Author Topic: Wingnut Wings Fokker E.II/E.III Early  (Read 29361 times)

Offline Cajun

  • Full Member
  • ***
  • Posts: 140
Re: Wingnut Wings Fokker E.II/E.III Early
« Reply #15 on: August 14, 2014, 11:43:48 AM »
Looks great!!!!

Offline BigBlue

  • Hero Member
  • *****
  • Posts: 640
Re: Wingnut Wings Fokker E.II/E.III Early
« Reply #16 on: August 20, 2014, 11:24:44 AM »
Thanks for the kind words, Cajun.

I have a small, but much overdue update.  I have been on vacation with my family for the majority of the last 2 weeks, so between travel and the absolutely stunning weather we have been enjoying, time at the bench has been minimal (for both this aircraft and the D.VII I am planning for the group build!)  That said, I did squeeze in a bit of modeling time, most of which has gone towards moving the cockpit to completion:


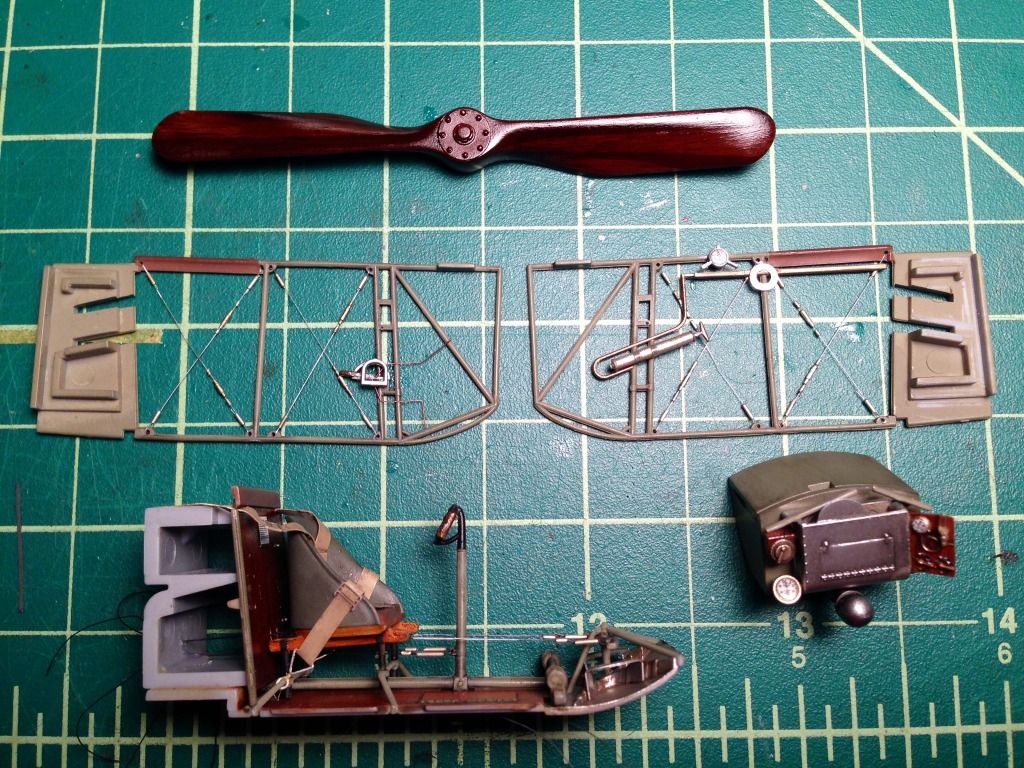
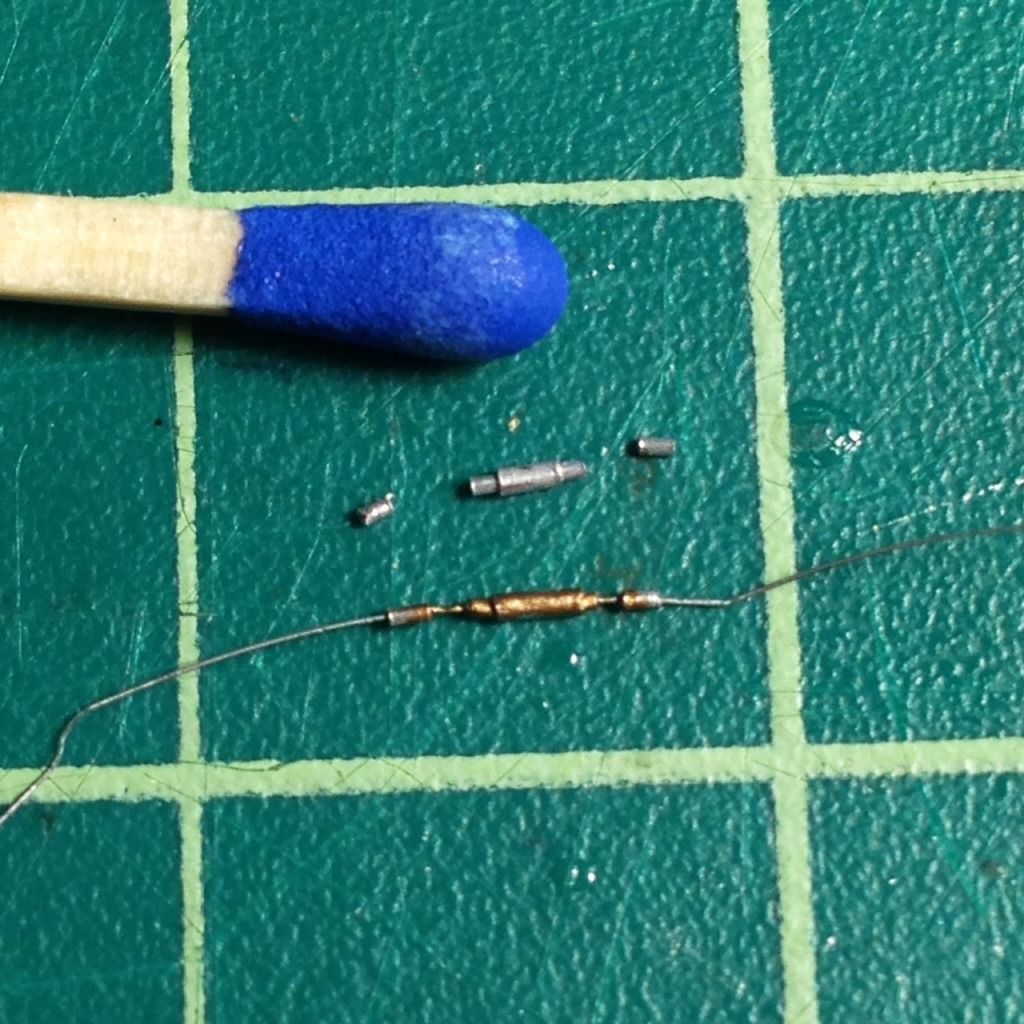
The side bracing is monofilament, and the turnbuckles are fashioned from slide fit aluminum tubing which I colored with a gold Sharpie.  I had originally strung a version with Gaspatch turnbuckles (1:32), but my results looked too cramped on those small spans, so I decided to try to simplify a bit.  I cut small pieces (not really small enough to be scale) to represent the eyelets at either end, and pair of slide fit tubes to represent the body:


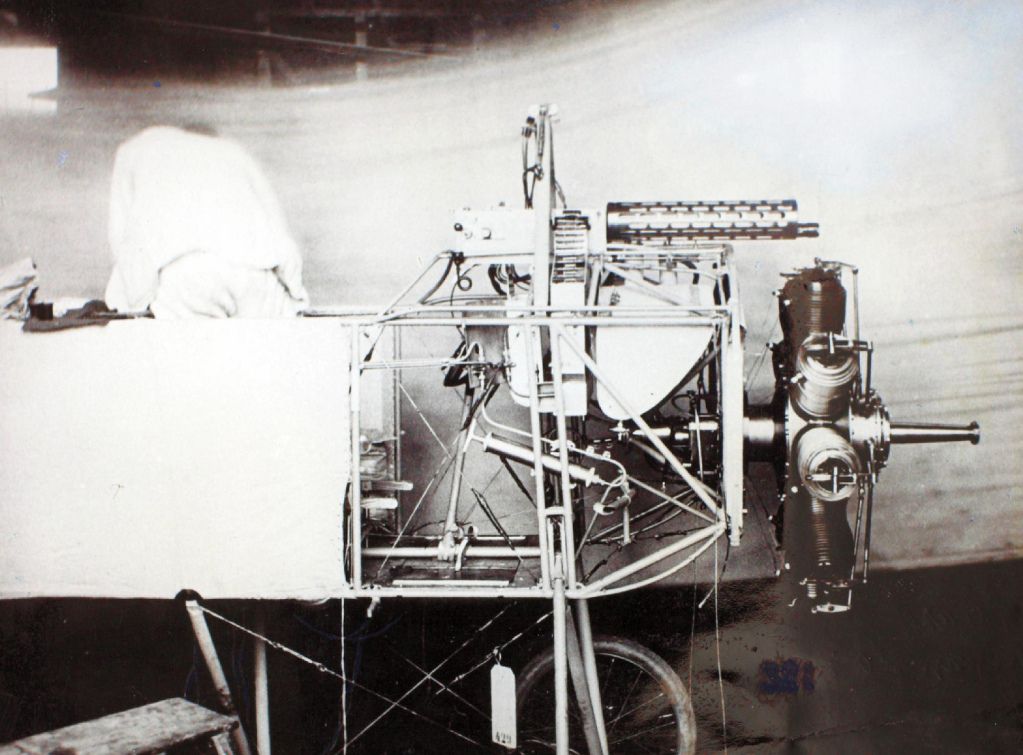
After I had worked all of this out and completed the rigging, I realized that the nagging feeling I had was caused by the fact that a majority of the reference photos I have seen seem to show some kind of protective covering over the turnbuckles, which would probably argue for a different representation.  For example (from the San Diego Air & Space Museum Archives):


Oh well, perhaps for my next Eindecker build.

The control line rigging is fine EZ Line Sharpied silver, with the exception of the wing warping lines running from the small pivoting arms beneath the pilot's chair, which are monofilament..  I have not fully envisioned how they are utilized in the final build, and I am leery of having them hanging off of my fuselage during the painting process.  I plan on using just enough of them to attach to turnbuckles which will then, in turn, connect to the actual wing rigging, but left them long to, hopefully, make it easier to accomplish this.  Any advice here from the Eindecker builders would be welcome.

Pressing the structure together for a few pictures looks like this:


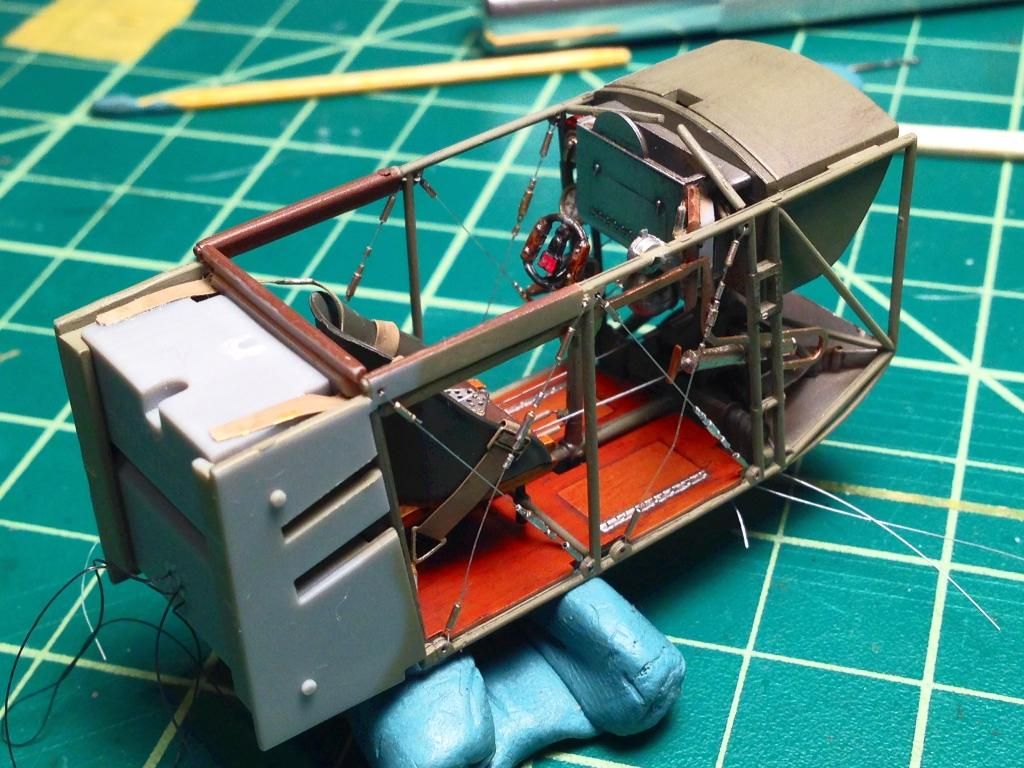
I can see that a bit of flex in the plastic framing means that I will have to tighten up one or two of the monofilament bracing lines.  I can also see that the wrestling process of getting the photo-etch belts has marred the paint on the back of the seat, despite my annealing and pre-forming the belts prior to painting anything.  I may be ready to spend the extra money on fabric belts.

I didn't execute the turned finish on the aluminum of the front flooring or the ammunition box.  I am using the reference photo on page 3 of the instruction book to justify my decision, but must say I like how it looks on those of your builds where you took the extra steps required.

I have drilled a pair of holes in the middle cross bars on the framing just ahead of the control panel which I will use for the cross bracing at the pilot's feet once the cockpit is assembled.  I have also drilled the connection point at the base of the control stick for the elevator lines.  I am planning on adding a bit of EZ Line to represent the cable the runs from the machine gun to the trigger on the stick, but will wait until after I have removed any masking post fuselage painting so as to avoid damage. 

Finally, as can be seen in the first picture, I gave the propellor a few coats of clear "varnish" once the oil paints had dried.  The first coat was a mix of clear yellow & red, and a second coat was a clear brown that I mixed from clear red, yellow and blue.  As a side note, I am thrilled that Bertl gave a more detailed explanation of his colored pencil technique, as I am still looking for a better way to represent the laminations.

I should have the cockpit finished this evening, and then will have to stop procrastinating on figuring out my technique for the turned aluminum so I can button up the fuselage.  If anyone notices any important rigging steps I shouldn't miss prior to that step, please let me know.  Any other suggestions, comments and critiques are welcome.

Thanks for stopping by, and thanks for making it through this post,

Chris

Offline RAGIII

  • Hero Member
  • *****
  • Posts: 19687
Re: Wingnut Wings Fokker E.II/E.III Early
« Reply #17 on: August 20, 2014, 09:39:32 PM »
Chris,
Your interior is really shaping up well! As for me I like the turnbuckle results  ;D Your colors and wood tones are spot on.
RAGIII
"A man has to know his limitations": Harry Callahan

"Don't slop it on" Lynda Geisler

Offline radio

  • Hero Member
  • *****
  • Posts: 3952
Re: Wingnut Wings Fokker E.II/E.III Early
« Reply #18 on: August 20, 2014, 10:02:31 PM »
A very nice cockpit.
Martin

Offline Umlaufmotor

  • Hero Member
  • *****
  • Posts: 1085
Re: Wingnut Wings Fokker E.II/E.III Early
« Reply #19 on: August 20, 2014, 10:26:37 PM »
Not bad, your Fokker Eindecker cockpit.
I like your work. 
But do not forget the electrical wire from the Blibschalter to the ignition distributor on the engine. ;)

Here is an original picture - note the orange arrows.


Here a picture of the model - you can see which wire I mean


And here are three images of a E.III for your documents. ;)


Servus
Bertl

Offline mgunns

  • Hero Member
  • *****
  • Posts: 2255
Re: Wingnut Wings Fokker E.II/E.III Early
« Reply #20 on: August 21, 2014, 12:39:00 AM »
Hello BigBlue:

Okay, at the end of the control column that fits under seat and back wall, there should be four lines, two coming off each tab.  Two attach to the control column ear that sticks through the fuselage and two go to the part A24 warping device on the undercarriage.


In this image you can see the two lines attached to part A24.


Bertl's work and build log is extremely helpful and I referred to it frequently in building mine.  Great photo's of the cockpit Bertl.

Hopefully this clarifies that aspect.  The lines hanging down didn't really interfere with painting that much.  Cockpit looks terrific.  Looking forward to seeing your Eindecker progress.

Best

Mark
« Last Edit: August 21, 2014, 12:43:11 AM by mgunns »
Mark

We few, we happy few.....

Offline bobs_buckles

  • Hero Member
  • *****
  • Posts: 3811
  • Freedom isn't free.
    • Bobs Buckles
Re: Wingnut Wings Fokker E.II/E.III Early
« Reply #21 on: August 21, 2014, 12:42:48 AM »
Beautiful work, Chris  :)
A pleasure to behold.

More!

Vb


https://www.bobsbuckles.co.uk/

Last Minute Man Of Faith

Offline BigBlue

  • Hero Member
  • *****
  • Posts: 640
Re: Wingnut Wings Fokker E.II/E.III Early
« Reply #22 on: August 21, 2014, 07:16:11 AM »
Rick, Martin, and von Bob, many thanks for your kind comments.  They mean a lot coming from you all.

Bertl and Mark, thanks to you both for the comments as well as for taking time to point me in the right direction.  I am very grateful.

So after the vacation-induced time off from modeling, I was eager to make some more progress last night... which basically meant gluing up the cockpit structure before bed.  Which I did before seeing the helpful suggestions above.

Bertl, it pains me deeply to tell the master craftsman that I will not likely be able to follow his suggestions after he has taken the time to show me the way, and even provided me with appropriate reference materials. :-[   I don't think I can add that ignition wire now that it is all buttoned up...  I hope this will not deter you (or anyone else) from attempting to keep me off the rocks in the future.

Mark, I saw your post in your build thread regarding that particular rigging, and saw the lines on the rigging instructions, but then in my haste to do something, disregarded them.  Hopefully I can salvage the situation as smoothly as you have.

As an aside, it isn't immediately clear to me what role those lines play.  The control horns under the pilot's seat would appear to move based on the rotation of the tubing that runs from the control stick as the pilot tilts the stick left or right (causing the aircraft to roll).  Furthermore, I assume that the end point of the control stick would tilt fore and aft as the pilot initiated elevator controls.  Wouldn't having two fixed length wires attached to the aft control horns impede that?  If anyone can take a moment to educate me, I would be appreciative.

Thanks again to all those that stopped by.

EDIT:


If I am looking at this photograph correctly (once again, photo credit to San Diego Air & Space archives), it looks to me like those two lines are not attached to the control horns, but rather seem to connect to the framing cross tube before continuing on aft.  Can someone shed light on: a) their purpose, and b) how they would look with fabric in place and b-2) how that would translate to the 1/32 version?

Thanks again,

Chris

EDIT 2:

Hmm... the return lines for the elevators perhaps?  The control lines attached higher up the stick pull one way, and the ones down here pull the other; one goes to the top of the elevators, the other to the bottom.  Assuming this is the case, why would they run outside the fuselage for this span?  Turnbuckle access?

Ok, I'll stop guessing (and editing) now!
« Last Edit: August 21, 2014, 08:07:13 AM by BigBlue »

Offline uncletony

  • Hero Member
  • *****
  • Posts: 4384
    • Aircraft In Pixels
Re: Wingnut Wings Fokker E.II/E.III Early
« Reply #23 on: August 21, 2014, 01:24:25 PM »
Chris, if I understand your question correctly, re: the lower lines from the control stick which are external running aft, and then re-enter the fuselage -- these are indeed the lower elevator cables. Why run them outside the fuselage? Parasite drag was not understood, frontal area was thought to be the most important aspect in aerodynamics, thus all sorts of excrescences puncturing the airframe envelope...


Offline BigBlue

  • Hero Member
  • *****
  • Posts: 640
Re: Wingnut Wings Fokker E.II/E.III Early
« Reply #24 on: August 22, 2014, 12:04:09 AM »
Thanks, Bo.

That was the question behind all that fumbling around, yes. 

Offline radio

  • Hero Member
  • *****
  • Posts: 3952
Re: Wingnut Wings Fokker E.II/E.III Early
« Reply #25 on: August 22, 2014, 12:18:21 AM »
You make a fine work. I will follow your build.
Martin

Offline mgunns

  • Hero Member
  • *****
  • Posts: 2255
Re: Wingnut Wings Fokker E.II/E.III Early
« Reply #26 on: August 22, 2014, 02:31:12 AM »
Hi Big Blue:

Regarding the external lines coming off the control column:  What Bo Said.   ;)

Best

Mark
Mark

We few, we happy few.....

Offline BigBlue

  • Hero Member
  • *****
  • Posts: 640
Re: Wingnut Wings Fokker E.II/E.III Early
« Reply #27 on: August 22, 2014, 06:44:48 AM »
Martin: Glad to have you on board.

Mark: Again, you have my gratitude.

I started the process for the turned metal work following Wingnut's suggested XF-16 / X-11 combination by spraying the Flat Aluminum base.  Chrome squiggles to follow soon.  I generally prefer Alclad for my aluminum / natural metal, and have seen some beautiful finishes with Mr. Metal Color, so there is some chance I may re-start in a different direction if this doesn't work for me.

Offline BigBlue

  • Hero Member
  • *****
  • Posts: 640
Re: Wingnut Wings Fokker E.II/E.III Early
« Reply #28 on: August 22, 2014, 12:26:32 PM »
I took a stab at the turned metal.  Not sure what I think, so I thought I'd put some pictures up for feedback:


They're not the highest quality shots, and I had a hard time getting the light to show the swirls, but hopefully you can see the effect.  As I said before, I followed WnW's recommended XF-16 X-11 combo.  My concern is that the swirls are too large and chunky versus the original.  As the paint thickened on me, the lines grew fatter.  I also found it hard to see what I was painting unless I kept the light at an off angle. 

I did some tests with combinations of Alclad paints, but haven't found one that I'm happy with, not that I've given up yet.  As much as I like the pictures I see using Mr. Metal Color, I am concerned that those paints are too delicate without a clear coat, which would kill the effect, no?

Any feedback would be welcome.

Thanks,

Chris

Offline uncletony

  • Hero Member
  • *****
  • Posts: 4384
    • Aircraft In Pixels
Re: Wingnut Wings Fokker E.II/E.III Early
« Reply #29 on: August 22, 2014, 12:42:08 PM »
Quote
I also found it hard to see what I was painting unless I kept the light at an off angle. 
The old car painter's trick  ;)

I think your results look pretty darn good -- I think to really sell this you need to think about negative space (sorry, ArtSpeak) -- you want the viewer to be unable to discern which is negative space (the background color) and which is positive (the "swirls"); to do so the swirls and the background need to be really tightly integrated... If that makes any sense

If you haven't done so already look at Dirk's E.II build, excellent photos of a really well executed technique on his cowls...