Author Topic: WnW Fokker D.VII F (501/18 "Red W")  (Read 20612 times)

Offline lcarroll

  • Administrator
  • Hero Member
  • ******
  • Posts: 8660
Re: WnW Fokker D.VII F (501/18 "Red W")
« Reply #90 on: March 20, 2015, 12:36:59 AM »
The perfect build still eludes me, but I can live with my efforts.

Chris,
    Your comment above makes me smile a lot, the epitome of "we are all too critical of our own efforts"! This is a beautifully done model and most enjoyable to follow along. The detail, paintwork, and weathering are superb, and if I could get this close to the elusive perfect model I'd be a very happy camper indeed. Lovely work, keep those updates coming!
Cheers,
Lance

Offline radio

  • Hero Member
  • *****
  • Posts: 3952
Re: WnW Fokker D.VII F (501/18 "Red W")
« Reply #91 on: March 20, 2015, 04:09:38 AM »
Looks like a very great build.
Martin

Offline BigBlue

  • Hero Member
  • *****
  • Posts: 640
Re: WnW Fokker D.VII F (501/18 "Red W")
« Reply #92 on: March 20, 2015, 08:19:42 AM »
Your comment above makes me smile a lot, the epitome of "we are all too critical of our own efforts"!

I think it can be hard to look at one's own work outside of the shadow of the ideal vision that was the original target.  When we see other people's work, it is without this context, so it can be judged on its own merits rather than on how it measure up to your original intent.  Either way, I am awfully appreciative of the comments you all have been kind enough to share.

There's a Japanese expression used by Zen artists that goes something like, "Seek Perfection, Accept Excellence".


Eastern wisdom for sure.  Doubly so given its conclusion.   :)

My exhaust "formula" leans heavily on lessons gleaned in these forums (including, but not limited to Bertl's great post in the Expert Building Tips section) using materials that I have on hand.  Hopefully I have similarly absorbed the amazing techniques presented here for finishing my propeller!

Thanks again to all,

Chris

WarrenD

  • Guest
Re: WnW Fokker D.VII F (501/18 "Red W")
« Reply #93 on: March 20, 2015, 09:26:21 AM »
Chris,
        This is just a really beautiful build sir. Just gorgeous, and thanks so much for sharing your exhaust formula.

Warren

Offline BigBlue

  • Hero Member
  • *****
  • Posts: 640
Re: WnW Fokker D.VII F (501/18 "Red W")
« Reply #94 on: March 22, 2015, 12:59:55 PM »
Thanks for your kind comments, Warren.

Tail feathered:


Not too much to tell aside from a scary moment when I knocked the model off my desk and onto the carpeted floor.  No major damage (that I've noticed yet) aside from a popped rudder stay line, and the engine getting knocked a bit askew.  I needed to re-glue the engine to its mounts (as well as wrestle with the radiator pipe that attaches to the front - only partially successfully), and re do the busted rigging.  All in all, pretty lucky.

The rigging is .127 mm mono colored with a silver Sharpie.  I attached the control lines inside the fuselage prior to closing it up so they were well secured.  Gaspatch 1/48 scale turnbuckles on the rudder stays and upper elevator horns.  For the latter, I wound up removing one of each of the turnbuckles' eyes and mounting the exposed posts into slits cut into the control horn.  The control line swaging is #29 Polyimide tubing.

Additionally, the bottom wing is attached and I will let the plane sit overnight while it cures.  Part of the reason I take so long to complete my builds is that I seem to stop myself before every major assembly point to think and re-think about what I am about to do before I commit to glue.  I spent a full day thinking about how to insert the turnbuckles into the control horns, and then wound up improvising.  Now I have paused before putting the upper wing on while giving myself a last call to adjust anything that would be difficult to access once that wing is in place.  Hopefully I will have a biplane tomorrow.

Thanks for looking in,

Chris

Offline BigBlue

  • Hero Member
  • *****
  • Posts: 640
Re: WnW Fokker D.VII F (501/18 "Red W")
« Reply #95 on: March 27, 2015, 11:42:28 PM »
Well, it didn't happen the next day as I had hoped, but the upper wing is on:


In fairness, it has been a biplane for a few days now, but I have not had time to sit down and put up this post.  Nor do I have anything but these iPhone photos to share (but will take better ones once I have finished the aircraft).  The upper wing went on without too much difficulty once I had double up on my efforts to clean out the mounting holes of decal material and paint.  I decided to attach the rear, single, cabane struts (B4 & B5) to the upper wing, thinking it would be easier to slide the bottom ends into their mounting holes on the fuselage than it would be to add two more connections to line-up up top.  I think this simplified things for me as it reduced the wrestling match to the two square holes in the center of the wing (3-pronged cabane struts) and a pair of holes for the N-shaped wing struts on either end.  Not too bad.  I used 2 part epoxy in the holes to give me a little working time.

I followed Justin's example in handling the twin control lines from the fuselage to the upper wing as explained here: http://forum.ww1aircraftmodels.com/index.php?topic=4423.msg80162#msg80162


The 'RB Method' worked like a charm; dead simple to achieve perfect results (you can make out the port side rigging in the 2nd picture above).  Highly recommended.

This build is nearly finished.  I still need to tackle the propeller, which I have clearly been dodging.  Other items on my list include: one or two clear coat touch ups dues to stray C/A, a couple of small weathering items now that everything is together, and attaching the rear lift handles, which I will do when everything else is done to minimize the number of times I break them off.

That's all for now.  Hopefully, I'll have a completed D.VII soon... but we know how that goes here.  Thanks for checking in,

Chris

Offline radio

  • Hero Member
  • *****
  • Posts: 3952
Re: WnW Fokker D.VII F (501/18 "Red W")
« Reply #96 on: March 28, 2015, 06:22:44 AM »
Abeautiful bird and fine weathering Chris.
Martin

Offline Ernie

  • Hero Member
  • *****
  • Posts: 3961
  • "Once more into the breach"
Re: WnW Fokker D.VII F (501/18 "Red W")
« Reply #97 on: March 28, 2015, 12:49:24 PM »
Speechless, Chris!  Absolutely gorgeous model.  The weathering is spot on.
Amazing work and I am already looking forward to your next bit of magic!

Cheers,
Ernie :)
The new old guy, take two...

WarrenD

  • Guest
Re: WnW Fokker D.VII F (501/18 "Red W")
« Reply #98 on: March 28, 2015, 01:21:01 PM »
Chris, this really is a beautiful build.

Warren

Offline KitRookie37

  • Sr. Member
  • ****
  • Posts: 489
Re: WnW Fokker D.VII F (501/18 "Red W")
« Reply #99 on: April 02, 2015, 02:50:35 PM »
Hello gentlemen,
I agree with mates. Beautiful work on this Fokker. Well done.  :)
Best regards.
Alain.
Use the force, Luke.

Offline stefanbuss

  • Hero Member
  • *****
  • Posts: 976
Re: WnW Fokker D.VII F (501/18 "Red W")
« Reply #100 on: April 02, 2015, 07:15:10 PM »
Absolutely convincing weathering on this Fokker. I enjoy following your updates immensely.

Stefan

Offline Des

  • Administrator
  • Hero Member
  • ******
  • Posts: 9325
    • ww1aircraftmodels.com
Re: WnW Fokker D.VII F (501/18 "Red W")
« Reply #101 on: April 02, 2015, 07:20:26 PM »
Absolutely brilliant build Chris, the finish you have achieved on this model is superb.

Des.
Late Founder of ww1aircraftmodels.com and forum.ww1aircraftmodels.com

Offline rhwinter

  • Hero Member
  • *****
  • Posts: 1145
Re: WnW Fokker D.VII F (501/18 "Red W")
« Reply #102 on: April 02, 2015, 08:24:06 PM »
Beautiful! I love it!

Offline RAGIII

  • Hero Member
  • *****
  • Posts: 19694
Re: WnW Fokker D.VII F (501/18 "Red W")
« Reply #103 on: April 03, 2015, 01:57:41 AM »
Beautifully done all around Chris! The weathering on the fuslege is outstanding!
RAGIII
"A man has to know his limitations": Harry Callahan

"Don't slop it on" Lynda Geisler

Offline BigBlue

  • Hero Member
  • *****
  • Posts: 640
Re: WnW Fokker D.VII F (501/18 "Red W")
« Reply #104 on: April 06, 2015, 12:59:15 PM »
First off, thank you very much Richard, Martin, Ernie, Warren, Alain, Stefan, Des, Richard, Michael, and Rick.  Your generous comments are sincerely appreciated, and I apologize for my delayed response.  The support from this community is incredible.

I am declaring this one done.  The last major step for my to undertake was the Heine propeller, and as I think I made clear, I have been dragging my feet on this for some time.  Having attempted various masking schemes I finally decided to attempt it free-hand with color pencils:


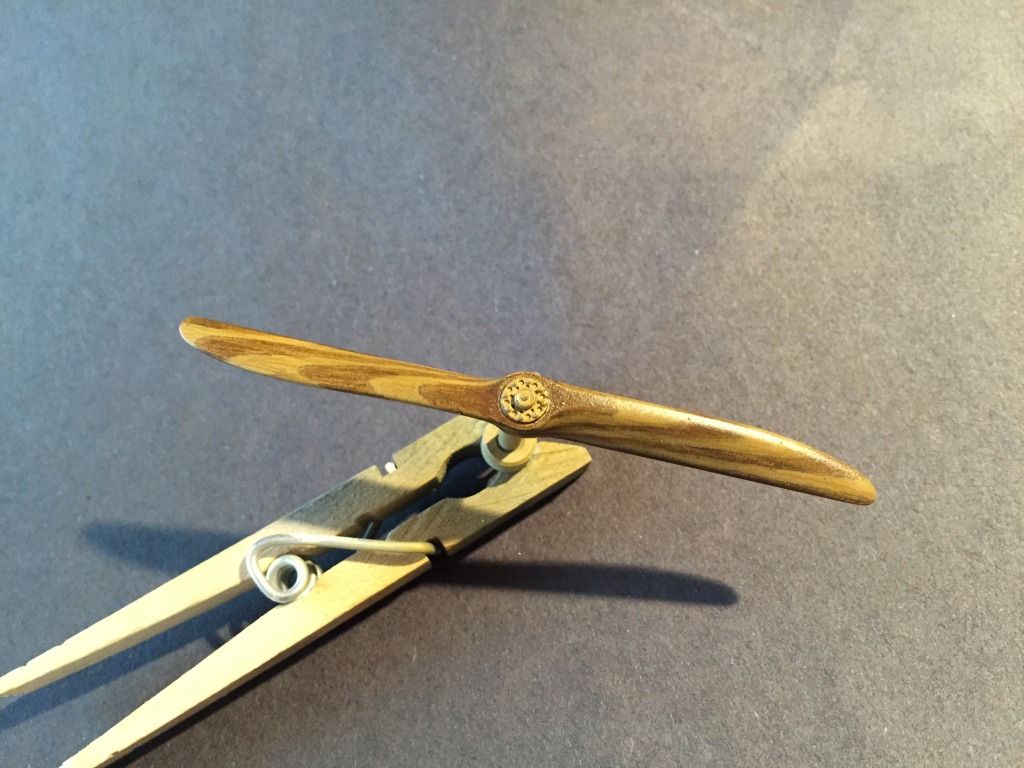
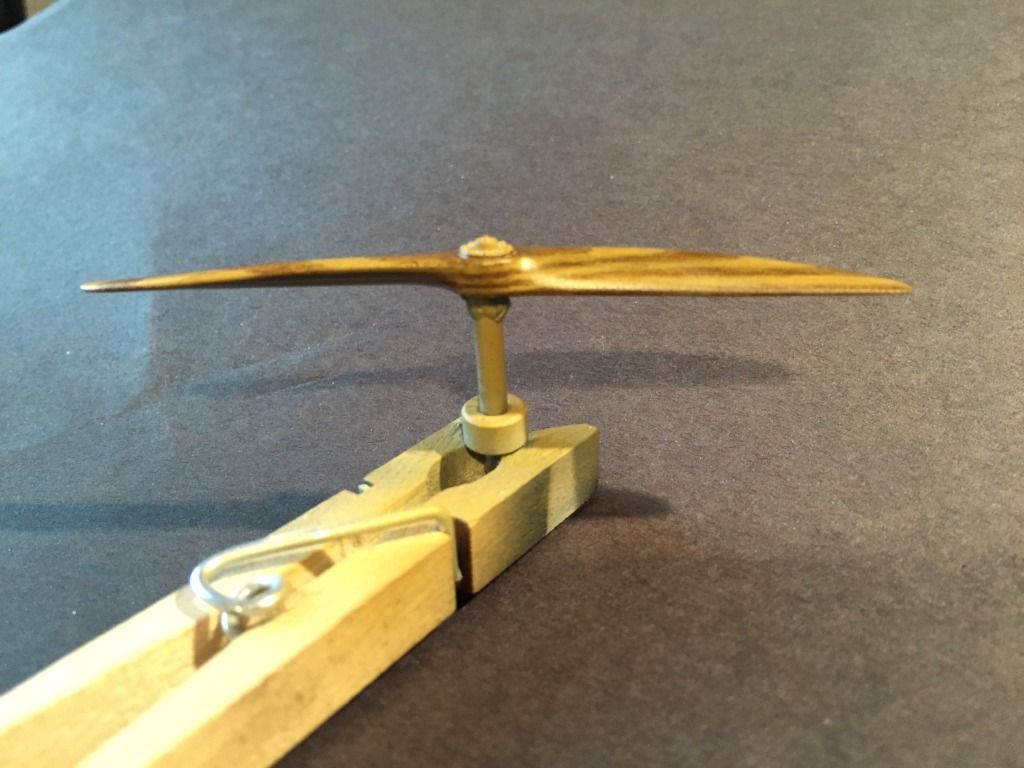
Better than I expected, given that I had no faith in my ability to mimic the lamination curves, but still rougher and less distinct than I would like.  The base coat is Tamiya Desert Yellow (XF-59), and I colored the darker wood with various shades of brown pencils from Prismacolor and Derwent (primarily Dark Brown 946 from Prismacolor).  In the interest of closure (the first post showing work in this thread was September 27th!) I decided that these results were close enough to what I want, but I am still trying to figure out a way to accurately map out the lamination curves for future builds...

I finished the propeller using Alclad Aqua Gloss, Alclad Aluminum for the hub, and Mr. Metal Color Stainless Steel for the nuts:


In addition to the prop, I added the lift handles to the rear of the fuselage, touched up a few spots here and there, and that was about it.  I have not yet taken any decent pictures of the final results, but will post some when I do.  I really enjoyed this build, and am happy with the final result.  I have always liked the lines of the D.VII, and enjoy seeing this one now that it is all together.  I am also very happy with the various after-market additions that I included: the Aviattic lozenge really looks beautiful, the Taurus BMW upgrades improve the kit engine significantly, the cowl nuts add a nice little bit of extra detail, and the Gaspatch LMGs are very convincing.

Thanks, once again, to everyone for following along with this glacial build, and especially to the many of you who were kind enough to leave comments.  I am very grateful that so many of you took the time to participate in this with me.

Chris