Author Topic: WnW Fokker D.VII F (501/18 "Red W")  (Read 14700 times)

Offline BigBlue

  • Hero Member
  • *****
  • Posts: 640
WnW Fokker D.VII F (501/18 "Red W")
« on: July 26, 2014, 04:25:00 AM »
Hello All,

As I mentioned in my post in the Group Build rules thread, I am a relative newbie to WWI aircraft modeling, so it I am both nervous and excited to join all you talented modelers with my attempt at "Red W".


I have a E.II/III on my table at the moment which I will need to work through prior to starting this build in earnest, so it will be a few weeks before I start posting any legitimate updates.  I am really looking forward to it.

I plan on using the fantastic looking Aviattic tailored-set decals for the lozenges, which brings me to my first request for guidance from those here who know more than I.  The box cover art shows the aircraft with lilac rib taping, but the kit's decals use lozenge tape. (They do include tapes for certain schemes, but they are yellow/linen rather than lilac.)  My question is which was more likely?

As I understand it, the tape color was correlated to the aircraft's manufacturer, and I have been assuming that the F aircraft were produced directly by Fokker.  Wouldn't this indicate lozenge tapes (in keeping with the kit's provided decals?)  The reference photos I have seen of this aircraft don't show the wing surfaces clearly enough to tell.  So with the caveat that we don't really know for sure, what would an educated guess point towards?

Thanks for any help (and to both Des for organizing, and the generosity of those providing the prizes!),

Chris

Offline kornbeef

  • Hero Member
  • *****
  • Posts: 961
  • U.K. Carpet monster genocide squad leader.
Re: WnW Fokker D.VII F (501/18 "Red W")
« Reply #1 on: July 26, 2014, 05:24:02 AM »
Nice choice. I think you surmise pretty well, I'm sure the rib tapes WNW dictate are the safest bet. the purple on the box top illustration sure look dapper tho  ;D there again that could just be my tired eyes playin trix

 
Never too old to learn sumfink noo

Offline Snowy

  • Full Member
  • ***
  • Posts: 125
Re: WnW Fokker D.VII F (501/18 "Red W")
« Reply #2 on: July 26, 2014, 04:47:27 PM »
I can apprectiate why you chose that one Chris. It was one I was considering so I will enjoy seeing your build. All the best for it. I'm a newbie to these also.

Offline FOKKERJ

  • Full Member
  • ***
  • Posts: 135
Re: WnW Fokker D.VII F (501/18 "Red W")
« Reply #3 on: July 26, 2014, 09:42:07 PM »
Welcome to the Fokker D.VII Group Build Chris.  8)

It's nice to see a Fokker D.VII F that isn't ALL White or Post War!  :)
These WNWs look like Great Kits and very straight forward

Cheers, Jay
Studies have shown that people who have more birthdays live longer. :)

Offline BigBlue

  • Hero Member
  • *****
  • Posts: 640
Re: WnW Fokker D.VII F (501/18 "Red W")
« Reply #4 on: July 27, 2014, 02:04:40 AM »
Thanks for the information and encouragement.  I hope I'll do her justice.

Offline RAGIII

  • Hero Member
  • *****
  • Posts: 18859
Re: WnW Fokker D.VII F (501/18 "Red W")
« Reply #5 on: July 27, 2014, 07:04:31 AM »
Chris,
Having seen what you did with the Snipe, I am REALLY looking forward to seeing your take on this one!
RAGIII
"A man has to know his limitations": Harry Callahan

"Don't slop it on" Lynda Geisler

Offline BigBlue

  • Hero Member
  • *****
  • Posts: 640
Re: WnW Fokker D.VII F (501/18 "Red W")
« Reply #6 on: September 28, 2014, 04:00:07 AM »
Time to blow some of the dust off of this thread.  While my Eindecker is on temporary hold, I have started on my DVII F build.  I thought I would start with the lozenge decals on the wings, a) because I have been eager to see those beautiful lozenge decals applied, b) because I didn't want Richard to think I had scammed a free set of decals to sell in some alley somewhere  ;)

I started with my typical black primer (Mr. Finishing Surfacer 1500) followed by Gunze Off White. 


I tried to leave the areas along the rib tapes a little darker, but was afraid to leave the effect too strong, thinking that I could always add shading after application, but would not be able to recover if they looked too dark.  As you can see in the following picture, I erred on the too subtle side, and the shading doesn't really come through at all.  No loss other than a bit of wasted airbrush time.


This is what everything looks like prior to any clear coats, weathering, etc.  I applied the decals directly over the Gunze paint since it has a semi-gloss coat, and I didn't want to introduce the dust that seems to accompany a gloss clear coat in my workshop.  Next time, I think I would try it with the clear coat for while the decals adhered without issue, there are a handful of small spots where the color is slightly lightened, which could be due to slight silvering.  Not a big deal all in all.

It took me a little bit to get the hang of the decals, but once I did, they were quite easy to work with.  I had one issue on the upper surface of the upper wing where I must have stretched the decal's width a bit as in order to line up the rib tapes, I had a bit of overlap with the rib ending the adjoining section, resulting in a dark line from the double decal.  I attempted to trim the piece with an Exacto knife while wet, and got a bit of a jagged edge which is visible on the wing.  From that point on, I made sure to slide the decals off of the backing paper north-south, rather than east-west and had no further issues.  I also found that I got better results leaving a bit of clear film along the abutting edges as it was easier to make sure that the newly applied decal didn't mess up the edge of the one already in place if they overlapped rather than butted against each other.


I definitely have some dodgy areas on the corners, particularly at the ends of the wings, but am satisfied with the overall appearance.  I think the finished product has the potential to look great (assuming I don't mess it up too badly!)  I'm very happy with the Aviattic  decals, and want to thank Richard once again for his generous offer.

Next up is the cockpit, which I hope to have underway this weekend.  I'll admit to being a bit apprehensive about the tolerances, and am thinking I will dry fit and spray some primer as has been recommended.

Chris

Offline coyotemagic

  • Hero Member
  • *****
  • Posts: 7710
  • "Here's to not buggering it up." -Winston Chuchill
    • My Models
Re: WnW Fokker D.VII F (501/18 "Red W")
« Reply #7 on: September 28, 2014, 04:06:19 AM »
Brilliant start, Chris.  The decals look awesome.  Can't wait to get mine.
Cheers,
Bud
"All men dream: but not equally. Those who dream in the dark recesses of the night awake in the day to find all was vanity. But the dreamers of day are dangerous men, for they may act their dreams with open eyes, and make it possible." -T. E. Lawrence

Offline BigBlue

  • Hero Member
  • *****
  • Posts: 640
Re: WnW Fokker D.VII F (501/18 "Red W")
« Reply #8 on: September 28, 2014, 04:48:56 AM »
Your joint will look fine, just put a little bit of umber weathering over the ragged bit ;)

Field repair!

Thanks Bud & Justin.  I know its not much of an update, but its a start!

Chris

Offline radio

  • Hero Member
  • *****
  • Posts: 3952
Re: WnW Fokker D.VII F (501/18 "Red W")
« Reply #9 on: September 28, 2014, 08:35:05 AM »
A very good beginning.
Martin

Offline RAGIII

  • Hero Member
  • *****
  • Posts: 18859
Re: WnW Fokker D.VII F (501/18 "Red W")
« Reply #10 on: September 28, 2014, 08:53:56 AM »
Nice start and I think you have done as well as most of us with the application of the Lozenge. I have experienced many of the same issues while learning the technique of using Aviattic Lozenge. Once learned though it is Easy!
RAGIII
"A man has to know his limitations": Harry Callahan

"Don't slop it on" Lynda Geisler

Offline lcarroll

  • Administrator
  • Hero Member
  • ******
  • Posts: 8558
Re: WnW Fokker D.VII F (501/18 "Red W")
« Reply #11 on: September 28, 2014, 09:38:21 AM »
Chris,
   As Rick says "Nice start" and I'll add excellent work on the Aviattic Product for a first try. I have found that you really have to check and double check to ensure there are no air pockets/bubbles under the decal once applied. Even the tiny ones if missed will result in a small silver patch. I've had reasonable success using a damp cloth and pressing as hard as is safe, and use Microsol on the corners, projections, and edges. I love the stuff but it does demand a little TLC.
Cheers,
Lance

Offline BigBlue

  • Hero Member
  • *****
  • Posts: 640
Re: WnW Fokker D.VII F (501/18 "Red W")
« Reply #12 on: November 12, 2014, 04:33:09 PM »
I see that this thread had nearly fallen to page 3 of the Group Build forum, so it must be time to show some work!  You wouldn't know it from the lack of updates (and the limited content of this one), but after a short post-Eindecker break, I have been making some progress on the D.VII F.

I started with the woodwork (not counting the prop), so that the oil paints I used for graining had time to dry.  Most of the parts are still on the sprues, so the pictures would be a bit boring to share at this point.  For the light colored wood, I used Tamiya Desert Yellow for my base, and Burnt Umber and Raw Sienna for the grain.  The darker wood pieces are mostly Raw Umber over Tamiya Flat Earth.  I will give them all a "varnish" coat of clear yellow & orange.

Since then, I have been focused on the BMW IIIa engine:


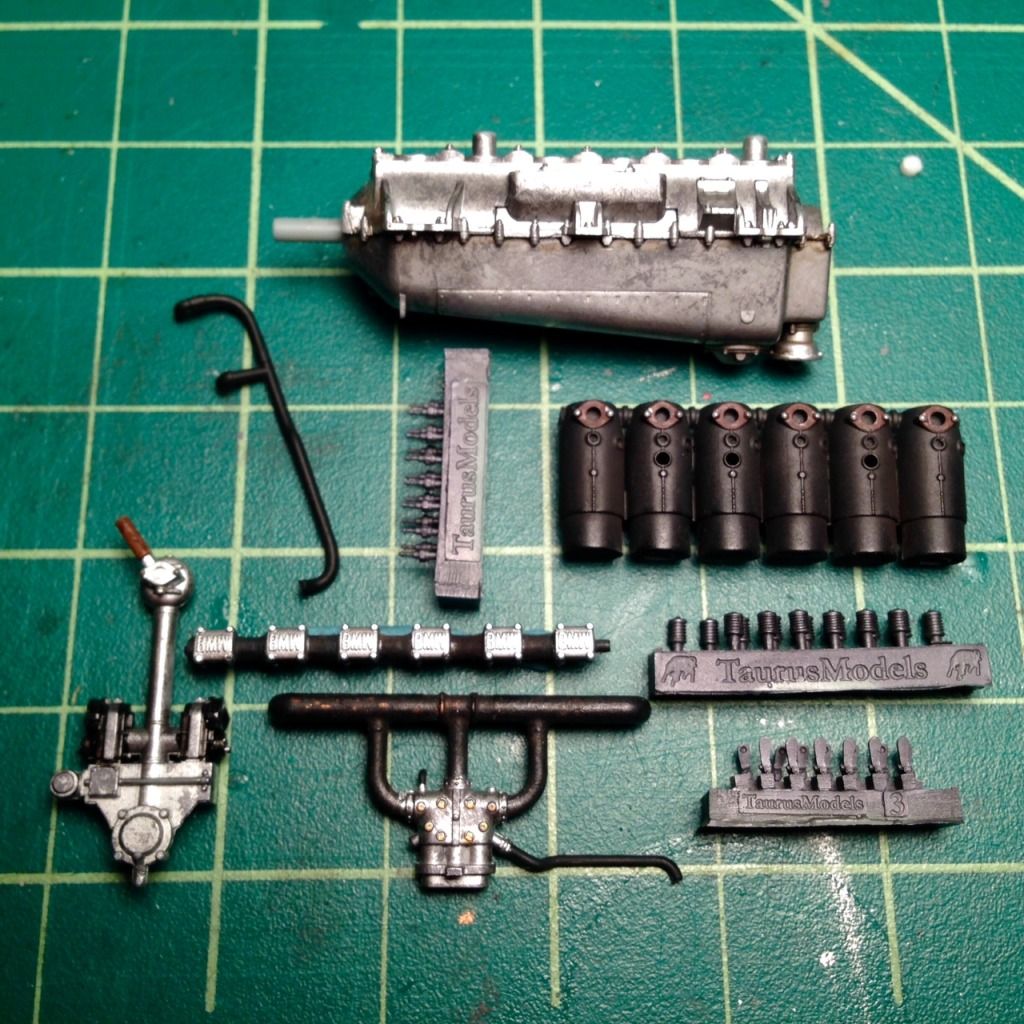
As you can see, I am using the Taurus valves & lifters, and so spent an evening removing the kit's molded arms from the rocker boxes.  The intake manifold is a mix of Tamiya Flat & Nato Black over Citadel Hashut Copper (it was handy) using a bit of salt for chipping as has been described by The Baron in many of his build threads.  Once dried, I treated the manifold pipe to a good scrubbing of MIG Pigments: Black Smoke and Russian Earth.  The aluminum on this piece (and the crank case) was done with Mr. Metal Color Aluminum and a bit of Iron to vary the finish.  I'm leaning towards a more uniform aluminum, and may re-spray the case.

The resin bits got a coat of that same Mr. Metal Color Iron, and the springs got highlights of AK's Dark Steel pigment, which gives them a nice metallic look that is not really visible in the poor quality phone picture.  The spark plugs are still unfinished.  The cylinders (with their coils removed) and water pipe were painted with a different batch of Tamiya Flat & Nato Black (mixed to taste).  The gaskets (?) are XF-9, Hull Red.  (My engine knowledge is clearly limited... I'd be interested in learning more if there is a resource someone would recommend on the workings of these beasts.)  Everything needs washes, weathering, some detail painting, etc.

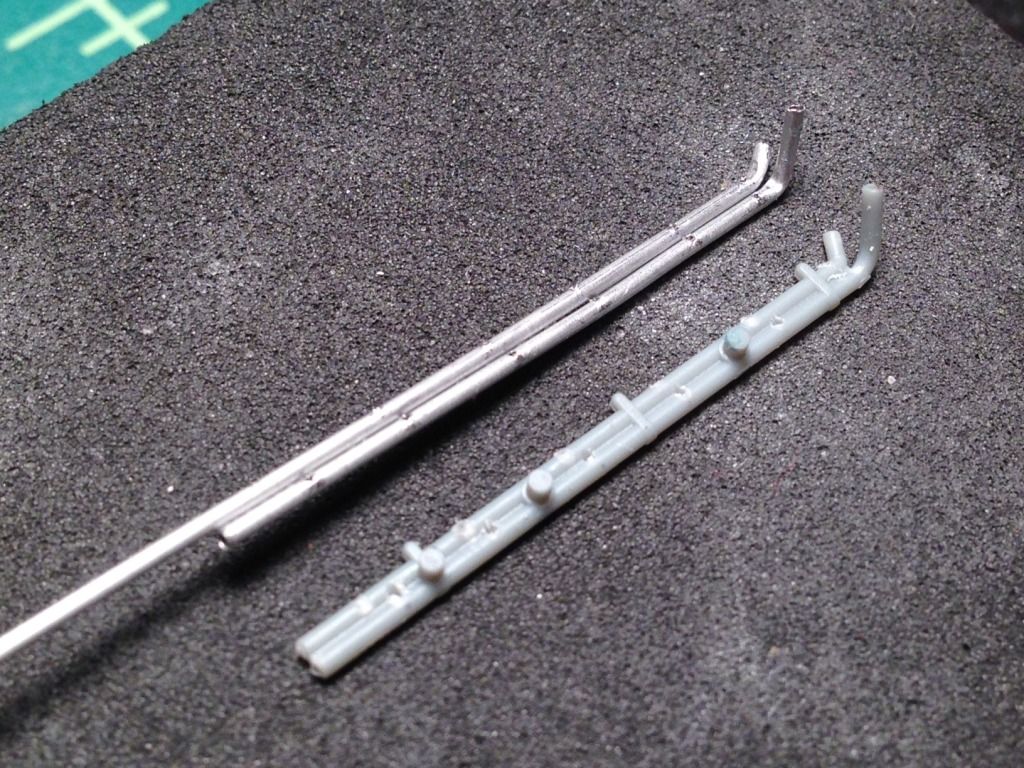
The piece with the magnetos appears to be missing the bottom most bit which seems to have been lost in transit.  (My kit also arrived with a broken "N" strut, which Wingnuts helpfully replaced for me... must have been a rough flight over.)  Looking at reference photos, I have attempted to recreate the structure using some styrene rod and various diameters of slide-fit aluminum tubing (on the right):


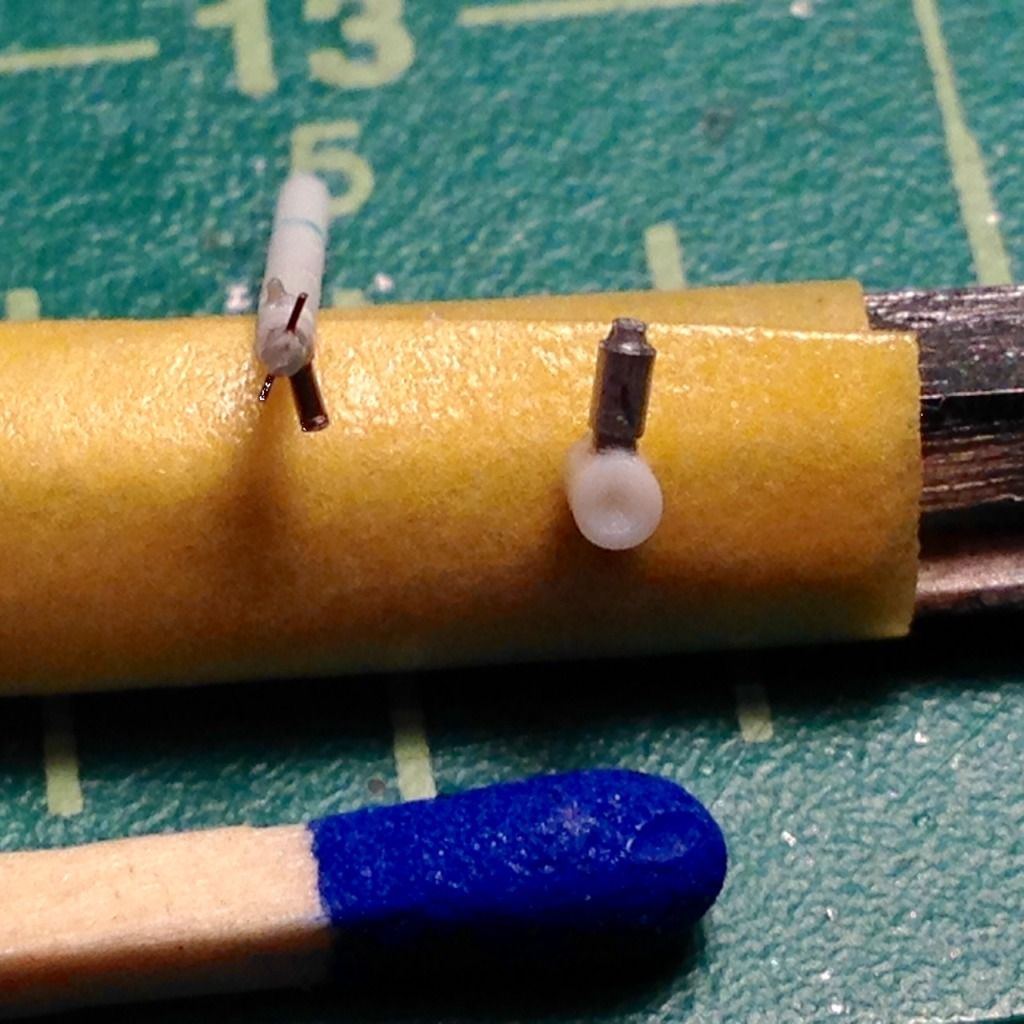
I have also taken a stab at a little drain that seems to go on the little U-shaped platform seen on the rear lower portion of the crank case above.  I am unsure if I will use it, as I think it is a bit over scale, and won't be seen anyway.  I also decided to replace the kit part for the tubes that hold the ignition leads using that same aluminum tubing:


I stuck a piece of 15 lb mono through the tubes, and bent them against a small nail I drove into a wooden base.  The mono prevented the tubes from totally collapsing, but remained relatively easy to pull back out once bent.  I drilled the holes by hand, using an old airbrush needle (aka a bodkin to a fly-tyer) to work a divot into the aluminum at the appropriate spots.  I was then able to carefully work a .35 mm bit through the surface.  The tubes have been glued using CA.  I still need to cut the 2nd tube to size and form the mounting brackets.  I have not decided what I am going to use for the ignition leads (this is my first non-rotary engine), but feel like I have more options now that there is an actual pipe opening (rather than drilled out plastic piece) to fit 6 lines into.  I also need to figure out how I want to connect the leads to those tiny (i.e. fragile) spark plugs; I am currently thinking about trying an unskilled version of Bo's crushed, cut and drilled tubing, but we will see.

The prop is waiting with a coat of Desert Yellow.  I don't feel like I have a reliable technique for painting / drawing the laminations, so it may be lonely for a bit. 

I think that's all I've got right now.  Hopefully more soon as this is now front and center in my mind and on my bench.

Thanks for checking in,

Chris


Offline BigBlue

  • Hero Member
  • *****
  • Posts: 640
Re: WnW Fokker D.VII F (501/18 "Red W")
« Reply #13 on: November 18, 2014, 03:22:21 PM »
I've made some more progress on the IIIa engine:


It doesn't look like much, but that is the result of a couple of evenings at the bench (I'm slow).  I replaced the kit's valves & lifters with the Taurus resin versions, and further installed a set of Taurus spark plugs.  I showed the pipes that hold the ignition leads under construction in my last post, and they have now been finished and installed.  Despite my priming the aluminum prior to painting, the Tamiya acrylic chips off if I look at it funny, so 'weathering' the pipes was straightforward.  The brackets are made from flattened .4 mm brass tubing, and I used some fine brass wire ('French Tinsel' from my fly tying kit) for the leads themselves. 


I decided on using my standard rigging method of a nickel tube slip-loop to attach the leads to the spark plugs, but initially experimented with making connectors from the same flattened brass tubing that I used for the brackets.  I didn't like they way they looked, so decided not to use them, but not before I spent a "relaxing" hour or two drilling all 12 of the little bastar... devils.  I put two in the picture so my time wasn't totally wasted.

I've drilled the magnetos to accept the leads which I need to install out of the back ends of the pipes.  I assume that process will take me a while, but other than that, finishing the engine shouldn't be too much of a challenge.  Then I'll start back on the cockpit.

That's all I've got, thanks for checking in,

Chris

Offline Ernie

  • Hero Member
  • *****
  • Posts: 3961
  • "Once more into the breach"
Re: WnW Fokker D.VII F (501/18 "Red W")
« Reply #14 on: November 18, 2014, 08:14:44 PM »
Thanks so much for the excellent update, Chris.  I really appreciate
your explanations to go with the pictures, really helpful stuff.
The engine is amazing and a credit to your talents, my friend.
Looking forward to the next chapter! :D

Cheers,
Ernie :)
The new old guy, take two...