Author Topic: Phönix D.I - Special Hobby1/48  (Read 10442 times)

Offline andonio64

  • Hero Member
  • *****
  • Posts: 1685
  • There's no hurry
Phönix D.I - Special Hobby1/48
« on: October 13, 2013, 07:14:47 PM »
Hallo friends,
here is my next job: the sturdy, manoeuvrable and reliable Phoenix D.I.
As Ian B  I am starting this job teaming up on another forum for a group build with Mark ("Guitarlute", still a newbie in this forum).

The box:


The sprues appear of a really good quality (crisp details and lack of retirements / injection points)
The pieces need a cleaning job from little flashes but not a great work.
I only have some doubts on the engine, but I haven't yet studied it.


The kit includes resin cast parts (radiator, exhaust tubes) and a small but well done photo eched fret.


The decals allow two different versions.
Although he one with skull and bones is more scenographic I will prefer the other one with a white U on red band on the fuselage. It is a plane of Flik14 based in Feltre (north east of Italy) during the Austrian occupation.
The pilot was Karl Urban who used this plane for his final victory; during a general engagement on 19 May 1918, he downed an Italian fighter, probably a Hanriot HD.1. (source Wikipedia).
Note that 19 May is my birthday!

 :o
« Last Edit: October 14, 2013, 03:40:47 PM by andonio64 »

Offline Dal Gavan

  • Sr. Member
  • ****
  • Posts: 469
Re: Phoenix D.I - Special Hobby1/48
« Reply #1 on: October 13, 2013, 10:29:02 PM »
The Phönix is so ugly it's attractive, mate, and has become one of my favourite WWI aircraft.  I look forward to your build, Andonio.

Dal.

Offline Nigel Jackson

  • Hero Member
  • *****
  • Posts: 2608
Re: Phoenix D.I - Special Hobby1/48
« Reply #2 on: October 13, 2013, 11:37:32 PM »
Good luck with the build Andonio, though I guess that with your skills it won't come down to a matter of luck.

Best wishes
Nigel

Offline RAGIII

  • Hero Member
  • *****
  • Posts: 18847
Re: Phoenix D.I - Special Hobby1/48
« Reply #3 on: October 13, 2013, 11:57:37 PM »
Antonio,
I am looking forward to seeing your treatment of this kit! I know it will be fantastic!
RAGIII
"A man has to know his limitations": Harry Callahan

"Don't slop it on" Lynda Geisler

Offline andonio64

  • Hero Member
  • *****
  • Posts: 1685
  • There's no hurry
Re: Phönix D.I - Special Hobby1/48
« Reply #4 on: October 14, 2013, 07:23:21 PM »
Dear friends,
yesterday I sprayed the sprues with gray primer, then I started studying the model.
My attention is now concentrated on 2 topics:

A)
Defining the base colours of the Plywood and of the CDL onto which overpaint the brown camouflage.
Any suggestion on which colour to use?

B)
Find pictures of the 200HP Hiero engine to know how to improve it and how to paint it.
So far I found these pictures
http://www.flickr.com/photos/25063579@N08/3384793588/sizes/o/in/photostream/
http://all-aero.com/index.php/contactus/64-engines-power/13009-hiero-b-hiero-c-hiero-d-hiero-e-hiero-6

all the pictures I have found show the starboard side, none of the port face...


Offline Ernie

  • Hero Member
  • *****
  • Posts: 3961
  • "Once more into the breach"
Re: Phönix D.I - Special Hobby1/48
« Reply #5 on: October 14, 2013, 08:22:32 PM »
Enjoy the new build, Antonio.  I enjoy your work and am looking forward to following
along with you. I think the red stripe version will look great, my friend!

Cheers,
Ernie :)
The new old guy, take two...

Offline coyotemagic

  • Hero Member
  • *****
  • Posts: 7710
  • "Here's to not buggering it up." -Winston Chuchill
    • My Models
Re: Phönix D.I - Special Hobby1/48
« Reply #6 on: October 15, 2013, 01:49:12 AM »
I'm really looking forward to watching this build, Antonio.  Here are the references I used in building mine:
http://www.wwi-models.org/app/sbj/srch/Macn.php?action=uArchList&subjId=397
http://www.greatwaraviation.com/forum/index.php?topic=2542.0
On the last one, scroll to the bottom.
Cheers,
Bud
"All men dream: but not equally. Those who dream in the dark recesses of the night awake in the day to find all was vanity. But the dreamers of day are dangerous men, for they may act their dreams with open eyes, and make it possible." -T. E. Lawrence

Offline andonio64

  • Hero Member
  • *****
  • Posts: 1685
  • There's no hurry
Re: Phönix D.I - Special Hobby1/48
« Reply #7 on: October 15, 2013, 01:55:35 AM »
Thanks Bud, I already knew the greatwaraviation.com thread.
The other link has fantastic pics and they are exactly what I needed!
 8)
Good!

Antonio

Offline andonio64

  • Hero Member
  • *****
  • Posts: 1685
  • There's no hurry
Re: Phönix D.I - Special Hobby1/48
« Reply #8 on: October 30, 2013, 04:47:57 PM »

This is the drawing of the Karl Urban Phönix D.I. I think I will make the brown camo overpaint less compact, the mottled colour should leave the base material more visibility.

I studied the colour schemas using for my test the back of a cookies tray sprayed with primer.


I decided to use

Number 22 (bottom left) / German CDL from Mr.Kit for fabric covered surfaces (wings, tail planes and rudder)
Does anybody have information about Austrian CDL tones?

Number 24 (bottom right) for the wooden surfaces: it's Tamiya Buff XF-57 as base drybrushed with a common acrylic sienna colour, finished with satin clear varnish.

Top half of No.24 you can see how I mottled the camo : umber brown acrylic tapped with a small sponge-brush (used for make up). I am satisfied and will go with it.
I will use it also on the fabric surfaces.
In the end it will be less sparse than this, mid way between this and the Urban schema on top of this post.

Ciao

Antonio

Offline andonio64

  • Hero Member
  • *****
  • Posts: 1685
  • There's no hurry
Re: Phönix D.I - Special Hobby1/48
« Reply #9 on: October 30, 2013, 04:59:51 PM »
Current state of the work:
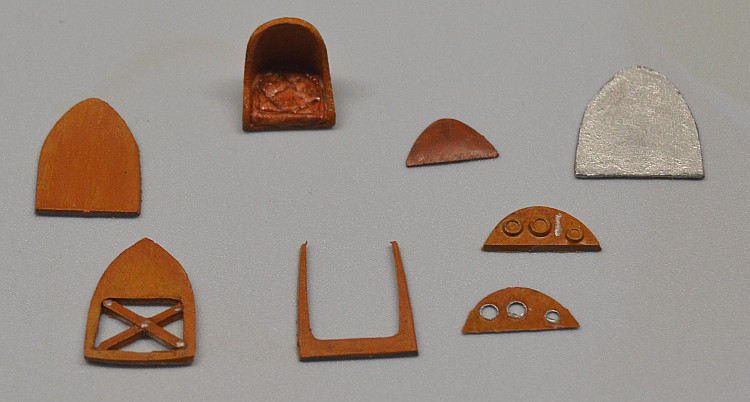

Cockpit pieces.
I wasn't able to retrieve any info about the cockpit outfit, so I followed other fellow modelers build...
On the left you can see 2 versions of the panel behind the pilot: one has X shaped struts on the opening (I have seen a panel like that in another build and I scratchbuilt it) and the other (provided by the Kit) is a solid one. I don't know which one I will use.

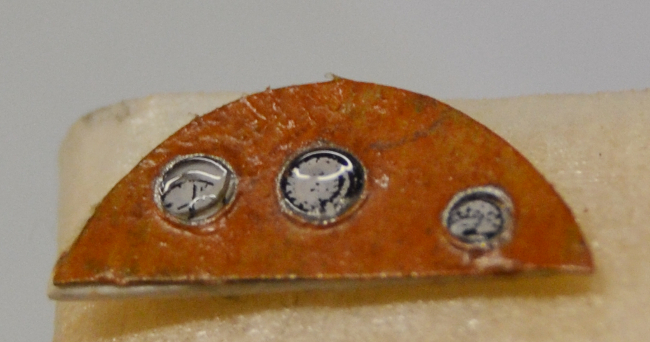
On the right you see two IPs the thin one is photoetched and the other is from the sprues. I decided to use the former. 

The aluminum panel was made by me to separate the engine compartment (the other side is painted as wood) from the cockpit.


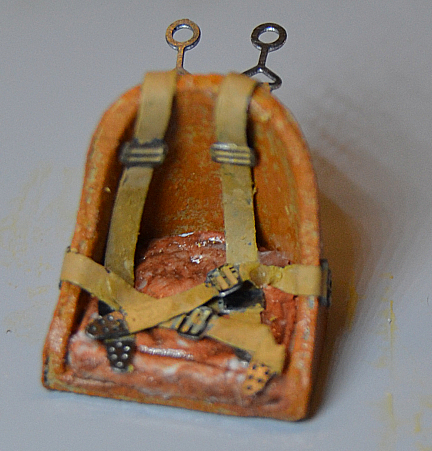
Seat with PE seatbelts (cushion made by me using FIMO paste)


Instrument Panel: I glued a white piece of plasticard on the back with some instrument decals, but they got ruined when sliding towards their location. I made many tries and in the end I didn't have any more left so I must be happy with them.
I dropped some "Synthaglass Liquid glass" by Dr. Toffano (Italian producer of great paints and varnishes) on the instruments.


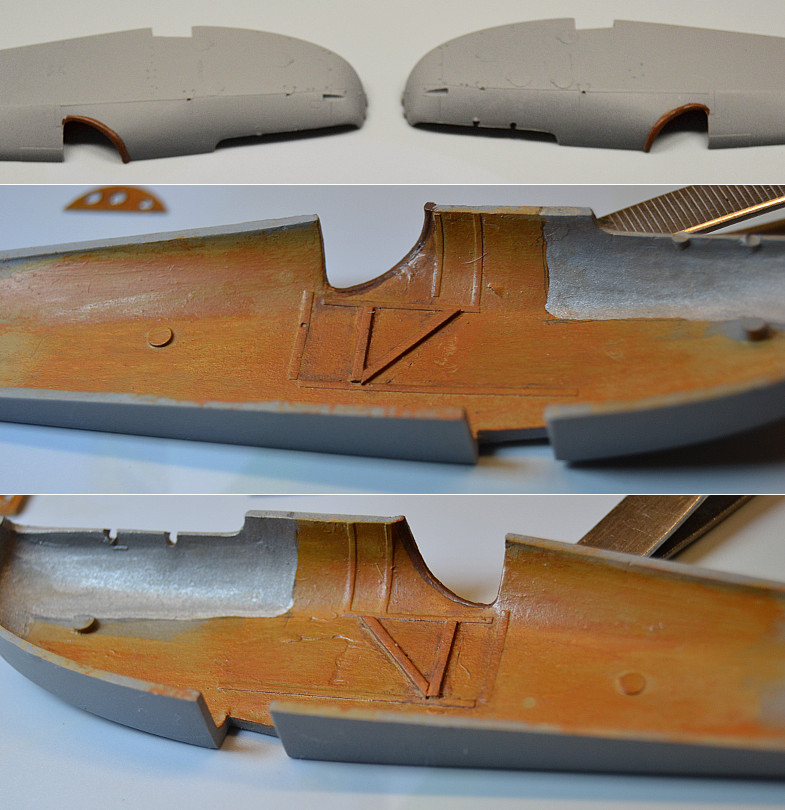
Here you can see the interiors of the cockpit, the V shaped struts are from my fantasy.
I tried to enhance the struts profile with a Van Dyke Brown colored pencil smudged with water.
I will add some more detail (gas pump, compass and throttle) before closing it.

The engine compartment has been painted using a 50/50 mix of Tamiya Flat Aluminum XF-16 and Tamiya dark sea gray XF-54 to give it a less shiny finish. I need to work more on this...


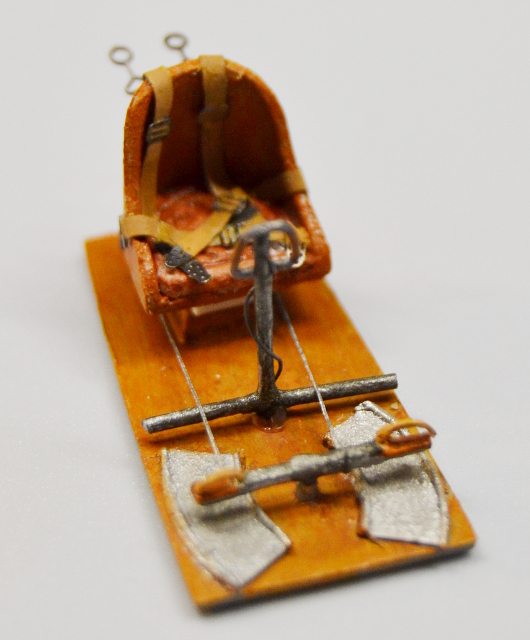
This is the full pilot pit. The control stick, the curved feet tracks (don't know their correct name) and the feet holder are made by me.
I added a piece of plasticard under the seat to raise it a bit, it looked too low!

Ciao

Antonio

Offline RAGIII

  • Hero Member
  • *****
  • Posts: 18847
Re: Phönix D.I - Special Hobby1/48
« Reply #10 on: October 30, 2013, 08:26:17 PM »
Antonio,
Nice start on this one! Your interior looks great!
RAGIII
"A man has to know his limitations": Harry Callahan

"Don't slop it on" Lynda Geisler

Offline Ernie

  • Hero Member
  • *****
  • Posts: 3961
  • "Once more into the breach"
Re: Phönix D.I - Special Hobby1/48
« Reply #11 on: October 30, 2013, 10:56:27 PM »
You are really doing well on the model, Antonio!  I like your paint palette...that's
a neat idea.  Your cockpit is looking very good.  The instrument panel is done well,
your instruments look good, especially with the "glass" effects.
  About the mottling, I'm wondering if you might give some thought to using the
style that Jacek used on his superb Albatros.
 
http://forum.ww1aircraftmodels.com/index.php?topic=2150.105

 I believe Bo raised the idea of using
an old toothbrush to "spray" the paint drops onto the fuselage. Look at the photos
and see what you think.  Just a thought.
  Anyway, my friend, carry on with your build...it will be another beauty!

Cheers,
Ernie :)
The new old guy, take two...

Offline andonio64

  • Hero Member
  • *****
  • Posts: 1685
  • There's no hurry
Re: Phönix D.I - Special Hobby1/48
« Reply #12 on: October 31, 2013, 12:01:40 AM »
Ernie, that idea is really fantastic and I think it suits many needs, (I was in particular thinking - among the other - to mud sprays beneath the plane belly).
But the result I am aiming at is the one which you can see on the box art and also on this build by my friend guitarlute

So the toothbrush "spray" technique would spray dots a bit too tiny.
But... that could be a basis preparation, before going with the spongebrush...

Thanks a lot Ernie, you suggested me an interesting technique and I will take this into account!

Offline GAJouette

  • Hero Member
  • *****
  • Posts: 3579
  • " Beware of the Spanish Inquisition"
Re: Phönix D.I - Special Hobby1/48
« Reply #13 on: October 31, 2013, 01:55:57 AM »
  Antonio,
You certainly have a knack for choosing interesting subject my old friend. Outstanding progress to date. I'm very impressed by your technique for testing the different wood finishes and camouflage. Well done! Keep up the outstanding works .
Highest Regards,
Gregory Jouette
" What Me Worry"

Offline andonio64

  • Hero Member
  • *****
  • Posts: 1685
  • There's no hurry
Re: Phönix D.I - Special Hobby1/48
« Reply #14 on: November 04, 2013, 05:20:26 AM »
Hallo,
the Phonix D.I build steps forward:

I decided to make a new IP, although I didn't achieve a much better result (left in the pic) I like it more than the PE one (right).


I made the engine, no detail added, it gets hidden into the plane nose... and added some details to the cockpit:
- fuel pump
- compass (below the pump)
- throttle
I also used some piece of sprue to hold the pit floor (orange pieces) and the engine (grey piece) in place when closing the fuselage.


Here are the exhaust tubes.


I glued the cockpit elements together:


And now I have closed the fuselage, needing some filing and filling.
Putty is now drying and in the meantime I studied the not-so-difficult rigging schema.

I just bought the Gaspatch anemometer and their buckles as well.
I am curious to receiving them.

This is all for now!

Ciao

Antonio