Author Topic: Eduard 1/48 Fokker EV  (Read 6123 times)

Offline Nigel Jackson

  • Hero Member
  • *****
  • Posts: 2608
Eduard 1/48 Fokker EV
« on: September 19, 2013, 06:23:01 AM »
Hello All

This posting marks the first in what I hope will be a fruitful series but they may come at almost geological intervals as I try to balance work, family, home and leisure. My goal is to complete an EV in the rabbit and snake markings that I've commented on elsewhere and in the streaked finish about  which I have received so much help. Do bear in mind, though that the finish will almost certainly be in the NJ house style to match the other 1/48 models in my collection. More sophisticated finishing will come, I hope when I venture into 1/32 scale next year.

I often find it helpful to try and sketch out with notes some key issues to get a very rough sense of what I am looking to achieve. So, my first posting here doesn't show any part of the model. Instead it is just a page of the notes and already you'll see there are issues, like which (if either)  is the correct interpretation of the fantastic info provided by Zabu and which is in the thread I do make models honestly! For the wing outline I just traced around the Eduard mouldings. The actual number of stripes (10) is more than I've come across before.


A second page of notes, contains the following observations.

Note and be careful: starboard cockpit framing already bent/distorted quite badly; same true to a lesser extent of an undercarriage leg.
Eduard internal lozenge decals for fuselage surely wrong - don't really represent something on the outside being looked at from the inside. replacements ordered.
Cockpit instrumentation on real thing very rudimentary.
Some largish areas of carrier film around parts of body of snake. Will need to remove?


So there we are. Please bare with me and my slow speed and if you spot any obvious howlers in my notes/interpretation do let me know.

Best wishes
Nigel 

mike in calif

  • Guest
Re: Eduard 1/48 Fokker EV
« Reply #1 on: September 19, 2013, 06:26:18 AM »
A good start... when do we glue up some bits?? ;)

Offline Zabu

  • Hero Member
  • *****
  • Posts: 681
Re: Eduard 1/48 Fokker EV
« Reply #2 on: September 22, 2013, 07:36:12 AM »
Hi Nigel. I'm glad i was helpfull.

What i'm telling you goes from what i read around in some forums, i'm no expert.

About undercarriage fairing.

Although many drawing and profiles are shown with the wing axle in lozenge, it's generally more accepted that they were solid... for money issues (not wasting money in lozenge in that part of the airplane) and for shock absorbers maintenance purposes fabric wouldn't be appropriated. With the constant leaking of oil, dirt, mud and so on the fabric would be permeable rooting the wood very quickly. Some experts say lozenge was hand painted when the aircraft was knew, but after some time it would be difficult to paint again cause of the falling castor oil.

In the comments that i kept in the image properties i have a quote again from DSA:

"The axle wing was shellacked, varnished to seal the plywood and painted dark olive green oil drippage."

I miss his Blue-Skies. :-[

Update: Now take a look in this pics... they were right about oil falling into to the axle wing or is that brand new lozenge?


And would a solid axle cover do this?


Hard to tell imo.

I hope i was any helpfull.

Cheers
« Last Edit: September 22, 2013, 12:19:58 PM by Zabu »

Offline ALBATROS1234

  • Hero Member
  • *****
  • Posts: 2657
Re: Eduard 1/48 Fokker EV
« Reply #3 on: September 22, 2013, 08:35:33 PM »
i read a while back about the top wing streaks i dont think they have 10 sections. dan san abott wrote there can be 3,4,5 or 7 sections. i dont know where he discovered this, and we cannot ask him since he passed away but he was a leading researcher on ww1 german colors ,patterns, and markings. did you see one with 10 sections or is this artistic licence? the landing gear wing was not covered with cloth it was wooden and painted the assumption held is that it was fokker green.

Offline Nigel Jackson

  • Hero Member
  • *****
  • Posts: 2608
Re: Eduard 1/48 Fokker EV
« Reply #4 on: September 23, 2013, 04:29:40 AM »
Zabu. Thanks again for coming to my rescue.

ALBATROS1234 I was just basing it on a quotation that Zabu had  provided elsewhere. To avoid confusion and overlapping threading, the quotation is now in the thread Fokker E.V/D.DVIII wing streaking. I extrapolated from that, but like you I was surprised.

Best wishes
Nigel

Offline Nigel Jackson

  • Hero Member
  • *****
  • Posts: 2608
Re: Eduard 1/48 Fokker EV
« Reply #5 on: October 01, 2014, 02:50:01 AM »
Hello All
First, my apologies for the enormous time lapse from the initial postings. Work, work, work! With Des’s permission this build log is actually a retrospective because the model is now completed and some photographs have been placed in the Specific Aircraft Build Links/ Show us your Fokker E.V thread on this forum. Thank you to those who've already visited and commented. Here’s just one of the images.

IMG_4780 by nigeljjackson, on Flickr

What I’ll do here is show some of the stages along the way.

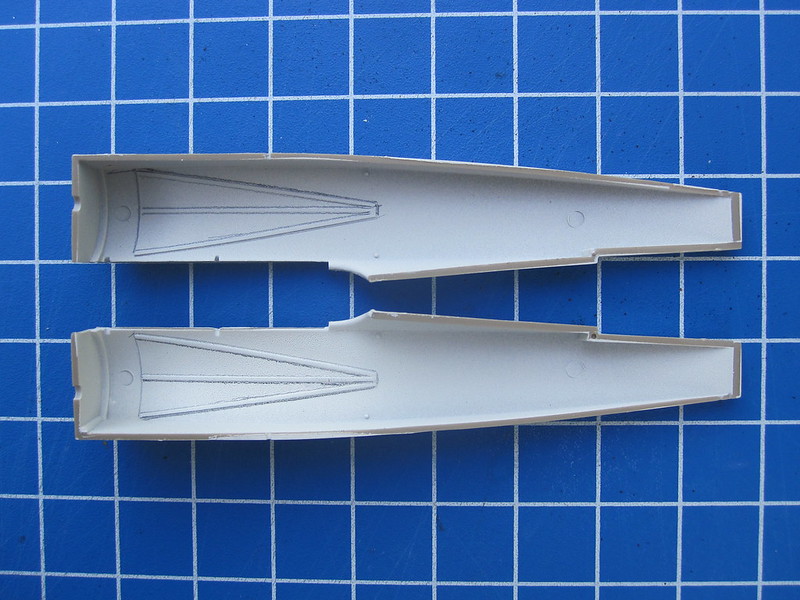
In this first stage, I sprayed the interior surfaces with a white undercoat bought from Games Workshop, and then used an HB pencil to shade around the moulded wooden parts.  I find this a bit easier than using washes etc. The potential disadvantages are clear: unless you use a very sharp pencil, you’ll get tramlines or scruffy edges; and the graphite is shiny (although this will go after the next stages).

IMG_3459 by nigeljjackson, on Flickr

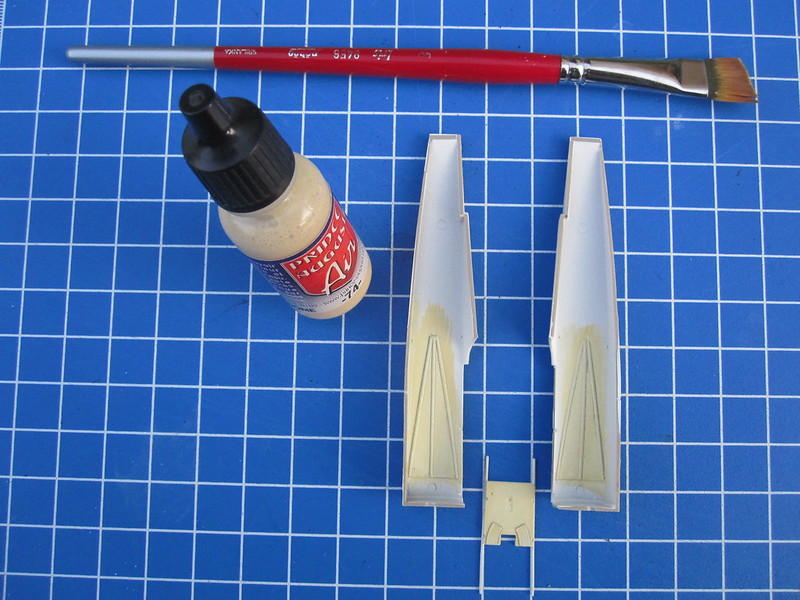
I’ve then brush painted a coat of Prince August Air colour number 74 – Beige Radome. As you can see I’ve used a very broad flat brush to do this.

IMG_3461 by nigeljjackson, on Flickr

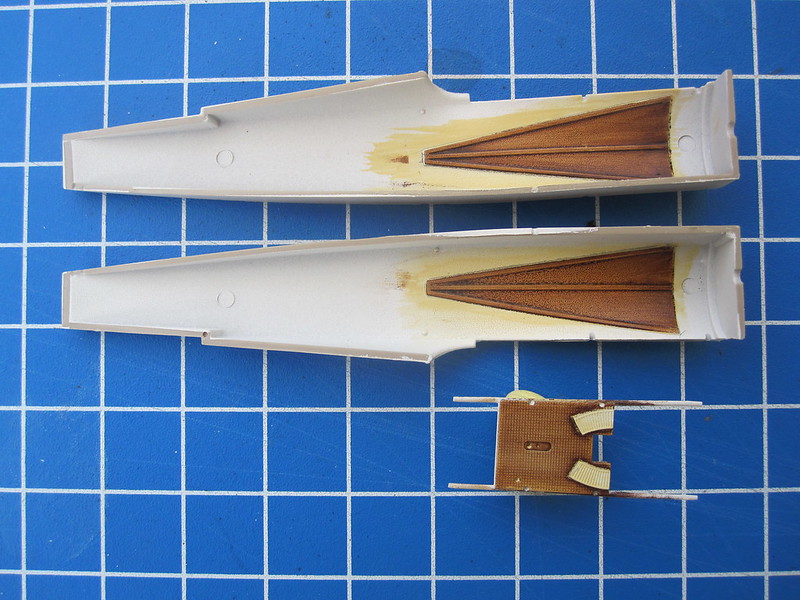
The next stage is one that I enjoyed.  From an ancient tube of Rowney Georgian 223 Burnt Umber Series 1, (It must be at least 35 years old!) I applied some oil colour without bothering too much about the thickness of the coat. I’ve found that it does not matter so much how it goes on as to how much and how it comes off. This meant using smaller stiff brush that I tend to use for dry brushing. Here I wanted to make broadly straight, parallel sweeps and had to wipe the excess from the brush on a regular basis.  This was facilitated by the slow drying time of the oils. I do sometimes use just a very small amount of white spirit to quicken things up but have learned to be sparing, otherwise you lose the very quality you are trying to capitalise on.

IMG_3462 by nigeljjackson, on Flickr

I had to hand some of the Old Propeller interior lozenge decal and applied that. Later using their decals for the fuselage exterior we developed a sort of love-hate relationship. It achieved a beautiful exterior finish, but I only had to look at it in a cross way for cracks and splits to appear. Well, maybe it was more to do with my clumsiness in handling ...

  IMG_4437 by nigeljjackson, on Flickr

Next time, I’ll deal with the other interior detail.

Best wishes
Nigel

PS as you'll notice, I abandoned any idea of the number of colour bands shown in the first posting.

Offline RAGIII

  • Hero Member
  • *****
  • Posts: 18859
Re: Eduard 1/48 Fokker EV
« Reply #6 on: October 01, 2014, 03:17:28 AM »
 I have already commented on how much I like your EV in the Specific Aircraft thread. I will add that this is an interesting and unique reverse build thread! I like the idea. Already know that it is a smashing success.
RAGIII
"A man has to know his limitations": Harry Callahan

"Don't slop it on" Lynda Geisler

Offline Nigel Jackson

  • Hero Member
  • *****
  • Posts: 2608
Re: Eduard 1/48 Fokker EV
« Reply #7 on: October 02, 2014, 09:16:12 PM »
Thanks as ever Rick. For the next posting I'll focus on the other internal details and get the fuselage sealed up.

Best wishes
Nigel

Offline Des

  • Administrator
  • Hero Member
  • ******
  • Posts: 9325
    • ww1aircraftmodels.com
Re: Eduard 1/48 Fokker EV
« Reply #8 on: October 02, 2014, 09:26:52 PM »
You did a superb job with the wood Nigel, it is a beautiful rich colour and looks very realistic, the inside lozenge is a great finishing touch.

Des.
Late Founder of ww1aircraftmodels.com and forum.ww1aircraftmodels.com

Offline radio

  • Hero Member
  • *****
  • Posts: 3952
Re: Eduard 1/48 Fokker EV
« Reply #9 on: October 02, 2014, 09:30:43 PM »
That is a very superb beginning.
Martin

Offline Nigel Jackson

  • Hero Member
  • *****
  • Posts: 2608
Re: Eduard 1/48 Fokker EV
« Reply #10 on: October 04, 2014, 03:59:52 AM »
Dear Martin and Des thank you.

I'll be flying to the UK and back home to France this weekend, but I'll try and get another posting added as soon as possible. There's also a sort of Camel build somewhere up my sleeve.

Best wishes
Nigel

Offline Epeeman

  • Hero Member
  • *****
  • Posts: 1419
Re: Eduard 1/48 Fokker EV
« Reply #11 on: October 04, 2014, 04:11:38 AM »
Great work so far, Nigel -

The wood and lozenge look very realistic.

Regards

Dave
As we say in fencing, what's the point?

Offline Alexis

  • Hero Member
  • *****
  • Posts: 7947
  • Love the self
Re: Eduard 1/48 Fokker EV
« Reply #12 on: October 04, 2014, 09:32:17 AM »
She looks awesome from my end Nigel ! ;D


Terri
Hurra ! , Ich Leben Noch
Body and life is a vessel we use to travel the planet . Femininity is the gift , The miracle comes from what we do with it .

Offline Nigel Jackson

  • Hero Member
  • *****
  • Posts: 2608
Re: Eduard 1/48 Fokker EV
« Reply #13 on: October 06, 2014, 04:51:04 AM »
Thank you Dave and Terri.

Now that we're back in France, I put up the next set of pictures. It gets us ever closer to the cock-up/catastrophe that occurred at one stage in the build before a stiff drink or two, well actually a cup of earl Grey tea, got me back on track. But more of that anon.

Best wishes
Nigel

Offline Nigel Jackson

  • Hero Member
  • *****
  • Posts: 2608
Re: Eduard 1/48 Fokker EV
« Reply #14 on: October 16, 2014, 12:10:20 AM »
Hello All
Bearing in mind that this is a retrospective look at the build with the final thing as shown below and elsewhere, here are some further steps.

IMG_4779 by nigeljjackson, on Flickr

Time for the cockpit interior, which was rather a Spartan affair and there is no comfy cushion for the pilot to sit on. By this stage in the war sitting on a parachute would have sufficed.  Behind the seat, but not clearly shown in these photos is some lozenge fabric. The aluminium painting ahead of the control column in these two pictures was tidied up in due course.  EZ Line has been used for internal bracing and cabling. I find it easier to use, though one of its known faults, variable thickness is evident here. 

IMG_4439 by nigeljjackson, on Flickr

All ready to seal up.

IMG_4442 by nigeljjackson, on Flickr

The photographic record gets a bit patchy here, and so we have quite a jump.

IMG_4447 by nigeljjackson, on Flickr

Here we have some of the sub assemblies on the way. The fuselage and tail assembly were sprayed gloss white by way of preparation for decals – although not all things were to quite work out that way. I’m not quite sure why the wing received a similar treatment and I’m pretty sure that I subsequently gave it a matt coat. But anyway, more of that anon.

Best wishes
Nigel