Author Topic: 1/32 albatros D:III roden  (Read 72674 times)

Offline Ernie

  • Hero Member
  • *****
  • Posts: 3961
  • "Once more into the breach"
Re: 1/32 albatros D:III roden
« Reply #150 on: June 29, 2013, 10:21:14 PM »
Paolo I will voice a comment on the rudder...now remember
I am a novice compared to yourself, but to my highly untrained
eye, the radius of the top-rear curve of the rudder still seems a
bit sharp.  It seems to me it should be a little gentler curve.
  Having said that, I think you are really making a splendid
model and I look forward to your next updates.  Keep up the
good work!

Cheers,
Ernie
The new old guy, take two...

Offline mc65

  • Full Member
  • ***
  • Posts: 216
Re: 1/32 albatros D:III roden
« Reply #151 on: June 30, 2013, 04:15:08 AM »
yep, ernie, thank you for appreciation and help... you're right to me!

I scaled down these two images, and it's evident the difference. also, it seems to me that the tail's forward part it's different, too!!
4989_2
5062_2


Offline Zabu

  • Hero Member
  • *****
  • Posts: 681
Re: 1/32 albatros D:III roden
« Reply #152 on: June 30, 2013, 07:13:39 AM »

I would soften the curve a little bit more, but hey...i'm a braille modeler and it's so hard to opine such a nice work and skilled modeler!

But well an honest opinion it's just that i guess.

Cheers


Offline RAGIII

  • Hero Member
  • *****
  • Posts: 19694
Re: 1/32 albatros D:III roden
« Reply #153 on: June 30, 2013, 09:07:59 PM »
Looks very close to me. A matter of just how picky you want to be.  8)
RAGIII
"A man has to know his limitations": Harry Callahan

"Don't slop it on" Lynda Geisler

Offline mc65

  • Full Member
  • ***
  • Posts: 216
Re: 1/32 albatros D:III roden
« Reply #154 on: June 30, 2013, 10:41:08 PM »
well...
seen the work (and the damage) I've done so far, the closest we get, the better!
here is the Mk III ..
5073

and some work before starting to paint the wings.
5074

structures are so thin that I fear will collapse under the weight of the model. at the suggestion of doug I inserted pins (brass, steel I have not found) of 0.4. trying to save the original plastic pins.
5084

and made ​​some passing holes in the wings.
5078

should hold.... I hope!
5079

now I should sand all the ribs, but I must also prepare for the luggage, tomorrow morning I leave for seven days out...
5076

soon, p. ;)

-Sören-

  • Guest
Re: 1/32 albatros D:III roden
« Reply #155 on: July 01, 2013, 05:39:52 AM »
Looks good Paolo. I think I would try decal strips as rip tapes. It was only a layer of fabric. And fabric is not very thick.

Offline mc65

  • Full Member
  • ***
  • Posts: 216
Re: 1/32 albatros D:III roden
« Reply #156 on: July 01, 2013, 09:03:30 AM »
hi soren, thank you!

decal stripes... sounds good... I want try to sand the mine almost to zero, then will see with a coat of primer. here a first approach on the lower wing. still plenty to do, sure.
5094

5095


and some retouching on hearts, yet to refine, too.
after darkening the top one, I enlarged the white surrounding, and lightened those on sides.
5096

5097

5098

5100

well, for the moment it's all, read you next week!
bye, p. ;)

Offline Ernie

  • Hero Member
  • *****
  • Posts: 3961
  • "Once more into the breach"
Re: 1/32 albatros D:III roden
« Reply #157 on: July 01, 2013, 09:26:57 PM »
Your fuselage looks great, Paolo!  Am anxious
to see how the wings turn out.  I think I would
go the decal route for the rib tapes as well, but I'm
curious to see how you make out.  With your talent
I don't see a bad outcome. 

Cheers,
Ernie
The new old guy, take two...

Offline kornbeef

  • Hero Member
  • *****
  • Posts: 961
  • U.K. Carpet monster genocide squad leader.
Re: 1/32 albatros D:III roden
« Reply #158 on: July 01, 2013, 09:48:44 PM »
Beautiful work.

A tip for the rib tapeing if you want to try.

Use the decal strips (I used WNW ribtapes but before you place them run a rivet punch wheel hard down the centres of each rib to force the plastic to bulge upward into tiny peaks (mini volcano's) then tape over without sanding the bumps down.

It can give a subtle impression of stitching/nailing and costs nothing but patience and a little blood if you run your fingertips over.

You can see the effect just to the right of the radiator on the upper wing of my DII (OAW) conversion I made out of the Roden/Encore kit to give you an idea of how it looks.

Keith
Never too old to learn sumfink noo

Offline Zabu

  • Hero Member
  • *****
  • Posts: 681
Re: 1/32 albatros D:III roden
« Reply #159 on: July 01, 2013, 11:42:28 PM »
Lovely!

I used decal strips in my Fokker D.VII, but it's a small scale to try this method.

Looking forward to see how your ribs will come out, but your a skilled modeler so i know that they are going to be first class!

Cheers

Offline pepperman42

  • Hero Member
  • *****
  • Posts: 4507
  • Sergeant, my brown pants.......
Re: 1/32 albatros D:III roden
« Reply #160 on: July 02, 2013, 03:39:10 AM »
The sanding process is going to be a challenge. Even pressure is the key I'd say or youre going to have wavy gravy tapes.

Steve

Offline RAGIII

  • Hero Member
  • *****
  • Posts: 19694
Re: 1/32 albatros D:III roden
« Reply #161 on: July 02, 2013, 08:10:38 AM »
I cant say enough about how good the fuselage looks! As for the tapes, it seems you are committed to the plastic so careful sanding will hopefully bring it all together!
RAGIII
"A man has to know his limitations": Harry Callahan

"Don't slop it on" Lynda Geisler

Offline mc65

  • Full Member
  • ***
  • Posts: 216
Re: 1/32 albatros D:III roden
« Reply #162 on: July 09, 2013, 08:17:39 AM »
Thank you all, I finally got back to the bench! :D
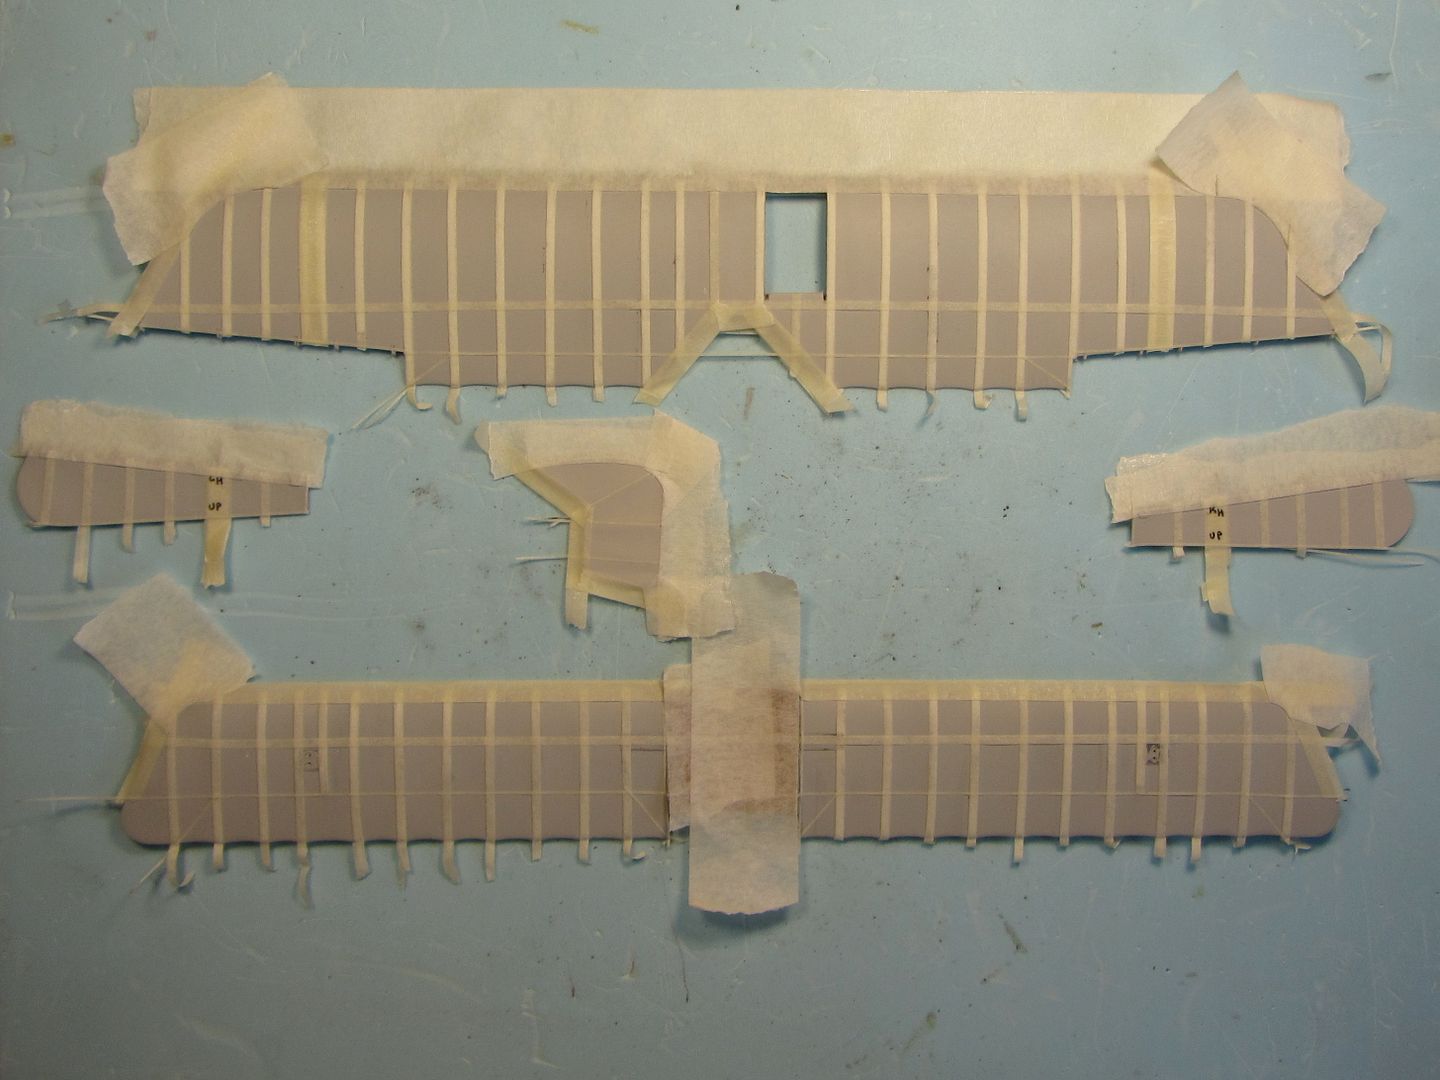
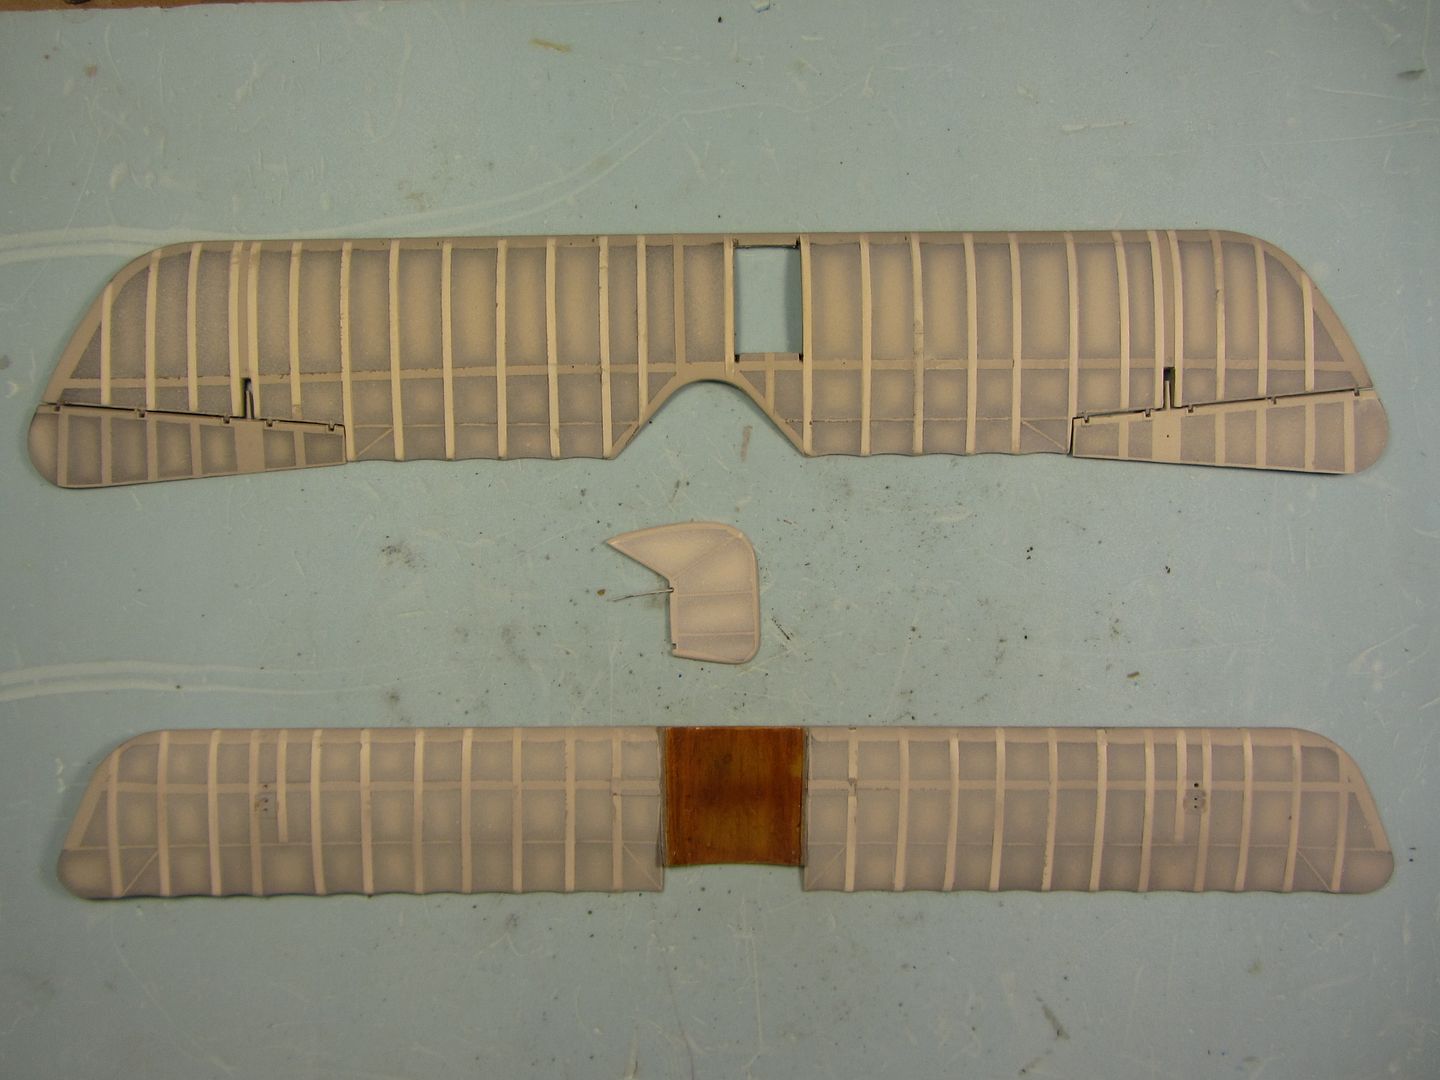
keith, great idea! but I had glued the ribs of plasticard. I give up stitching effect on this model, I think... ???

little upgrading:after sanding until I come tennis elbow, I realized that the best way to lower ribs was to use a round blade, and only after sanding.. :o
then, after a primer coat, I started to mask the wings. tons of tape!
5437

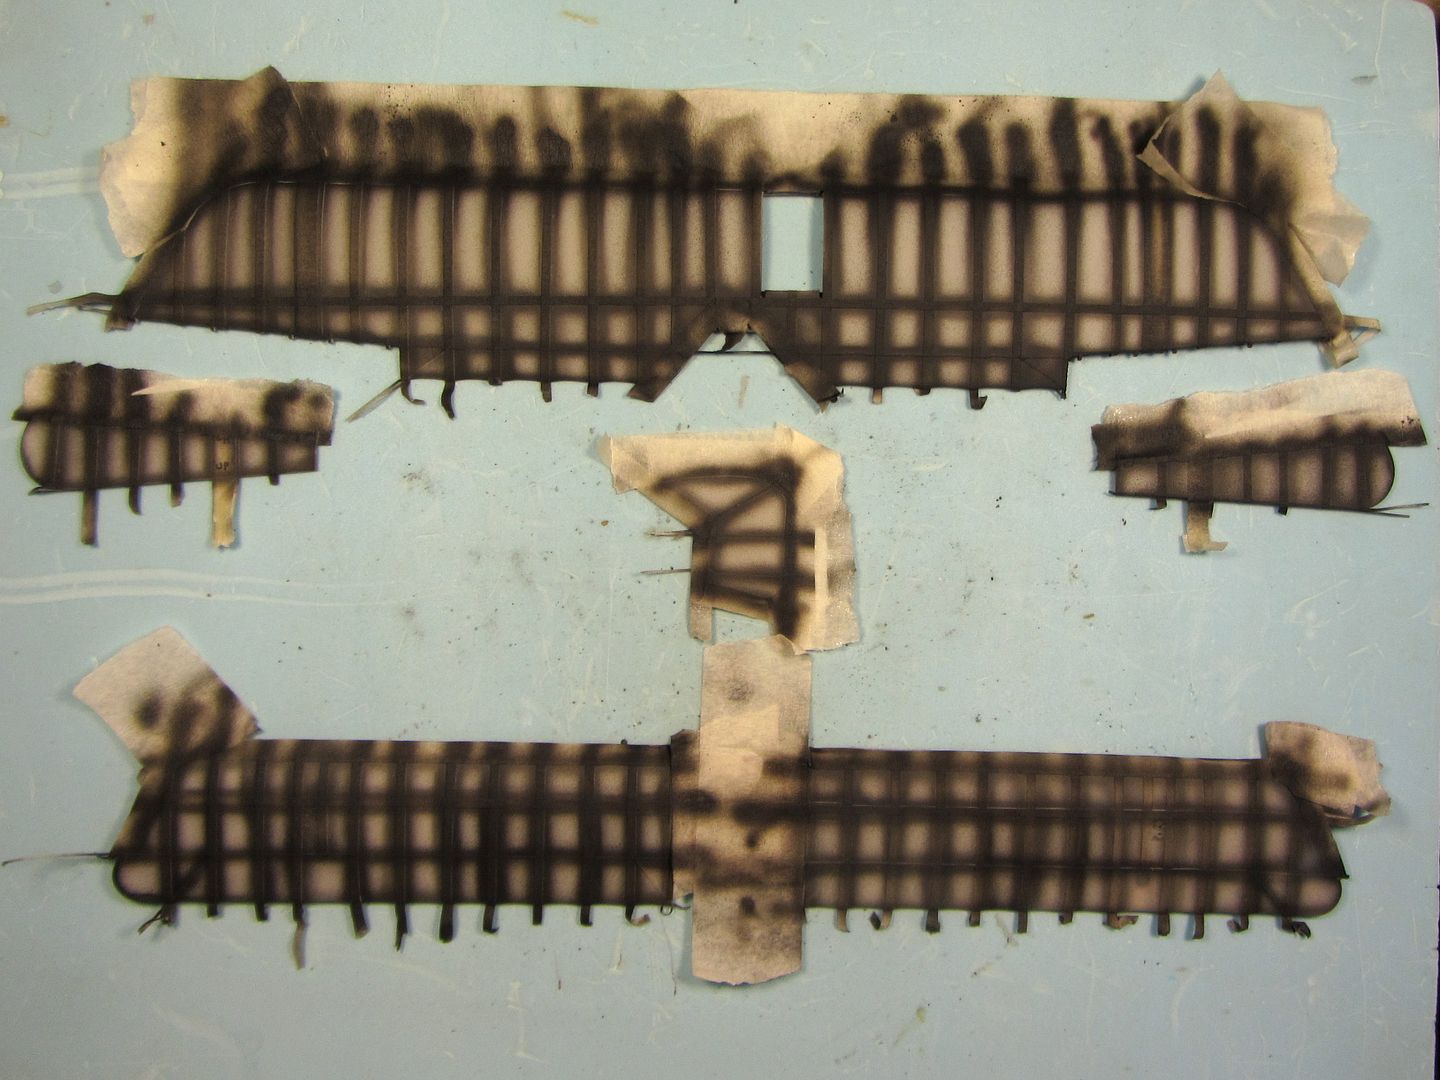
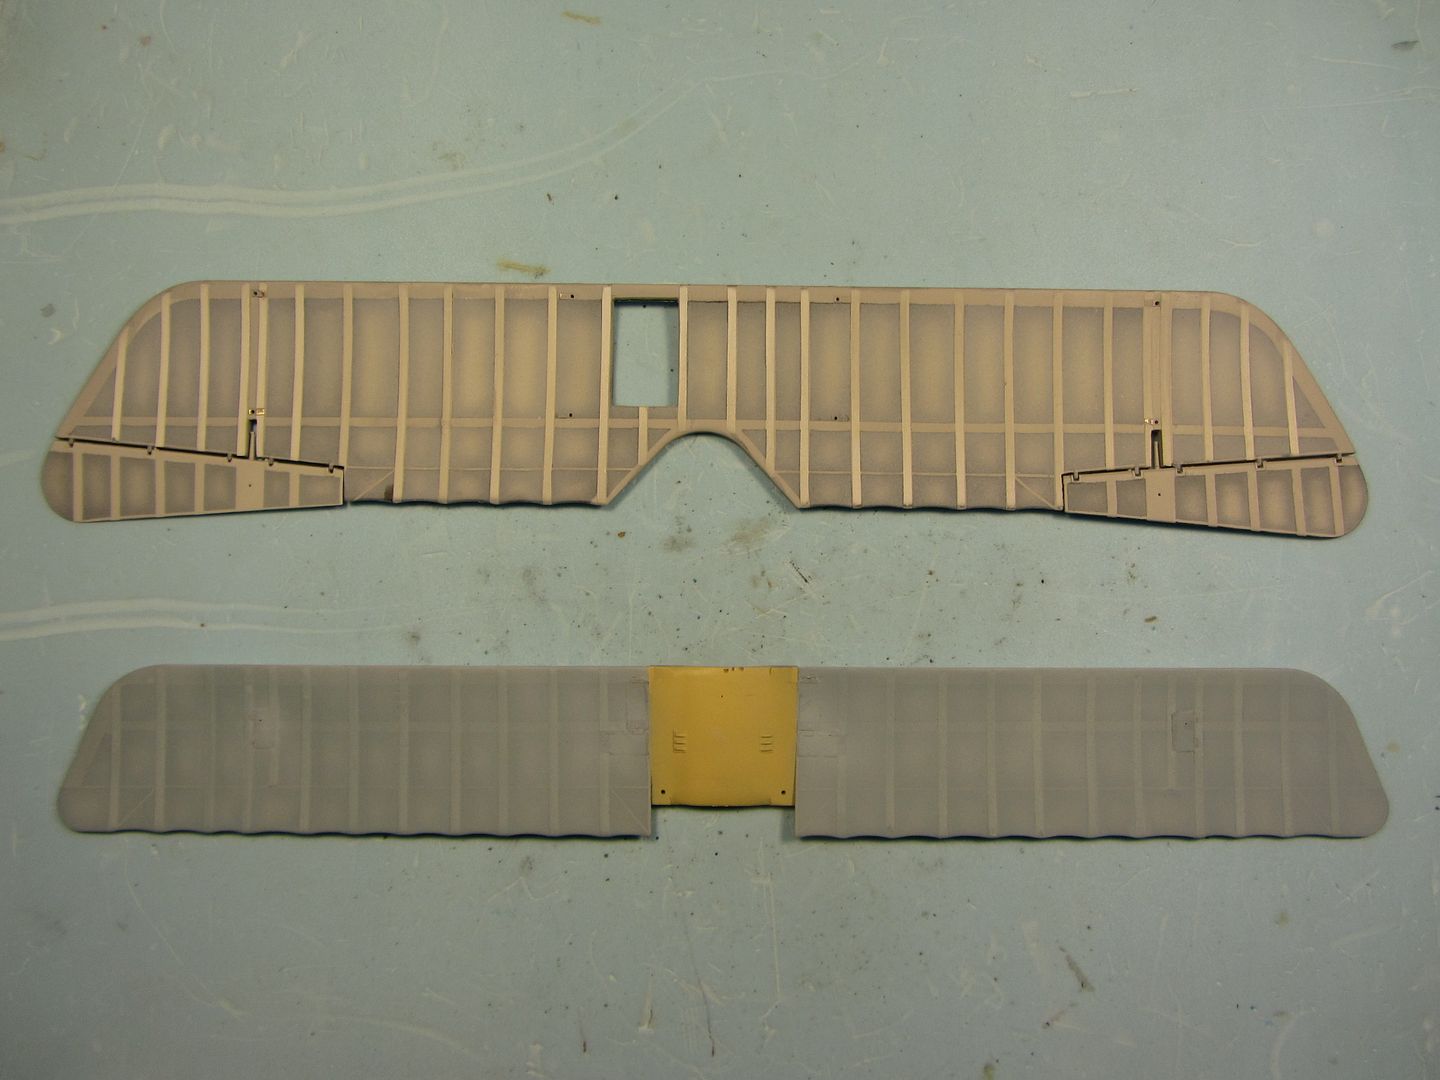
the idea was to achieve a triple sandwich of layers: base of the wing (shadowed) crossmembers (light) ribs (lighter). so, with light coats of dark grey... oooooooops, not so light! :o
5438

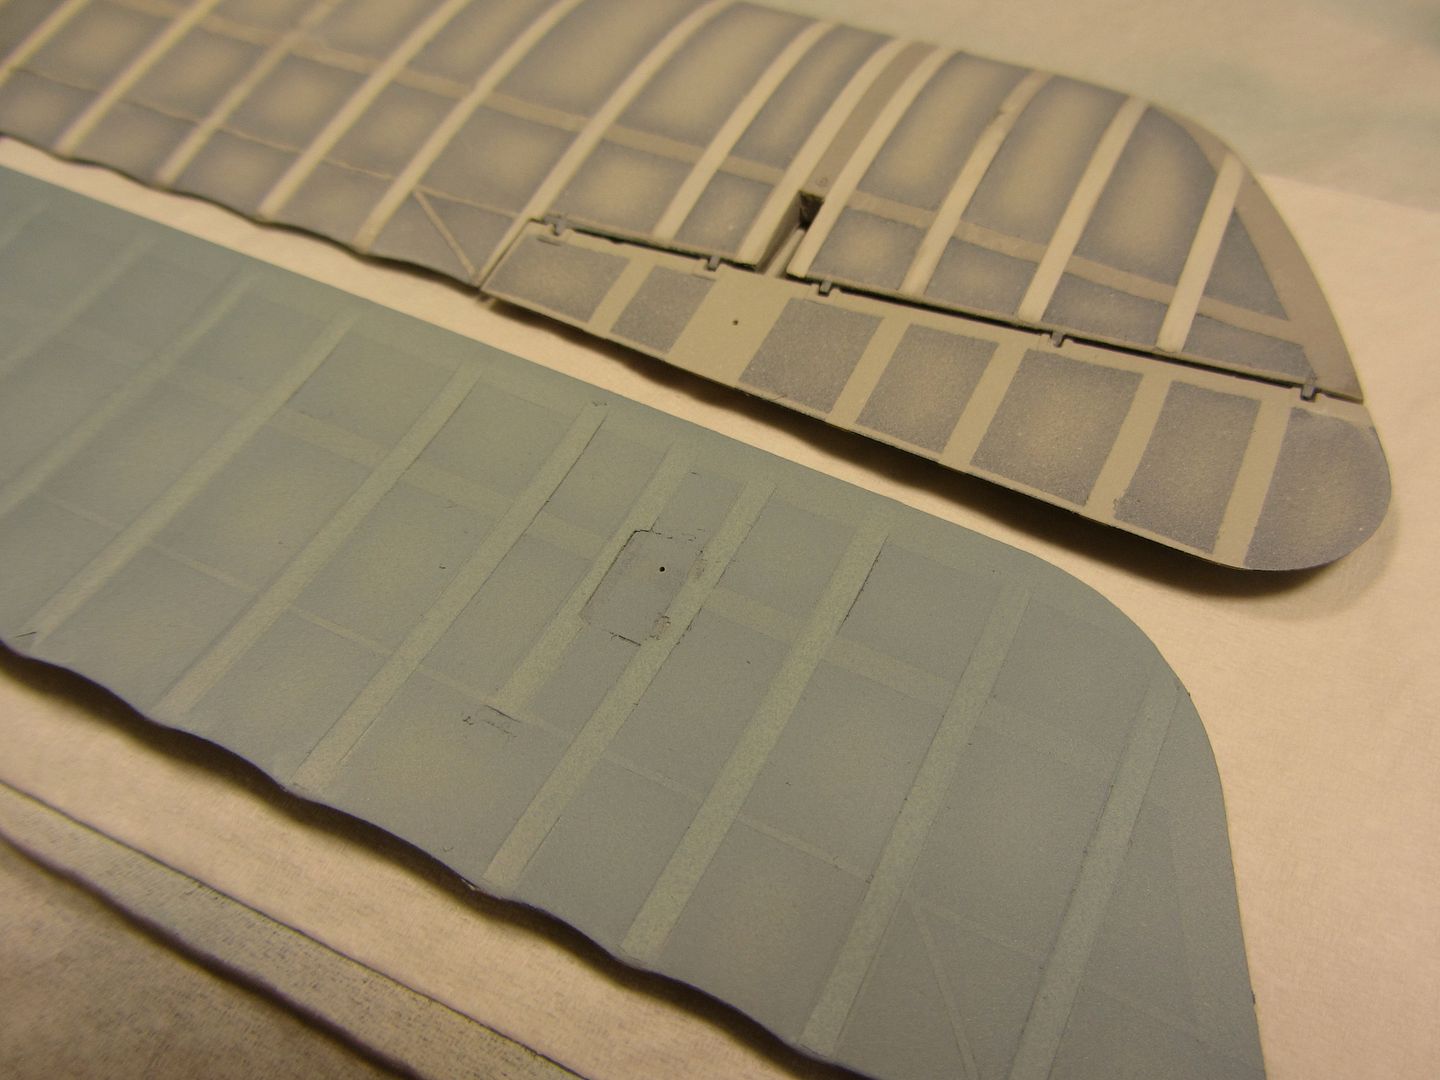
here softening the shadows with several layers of highly diluited white and a drop of radome tan.
5445

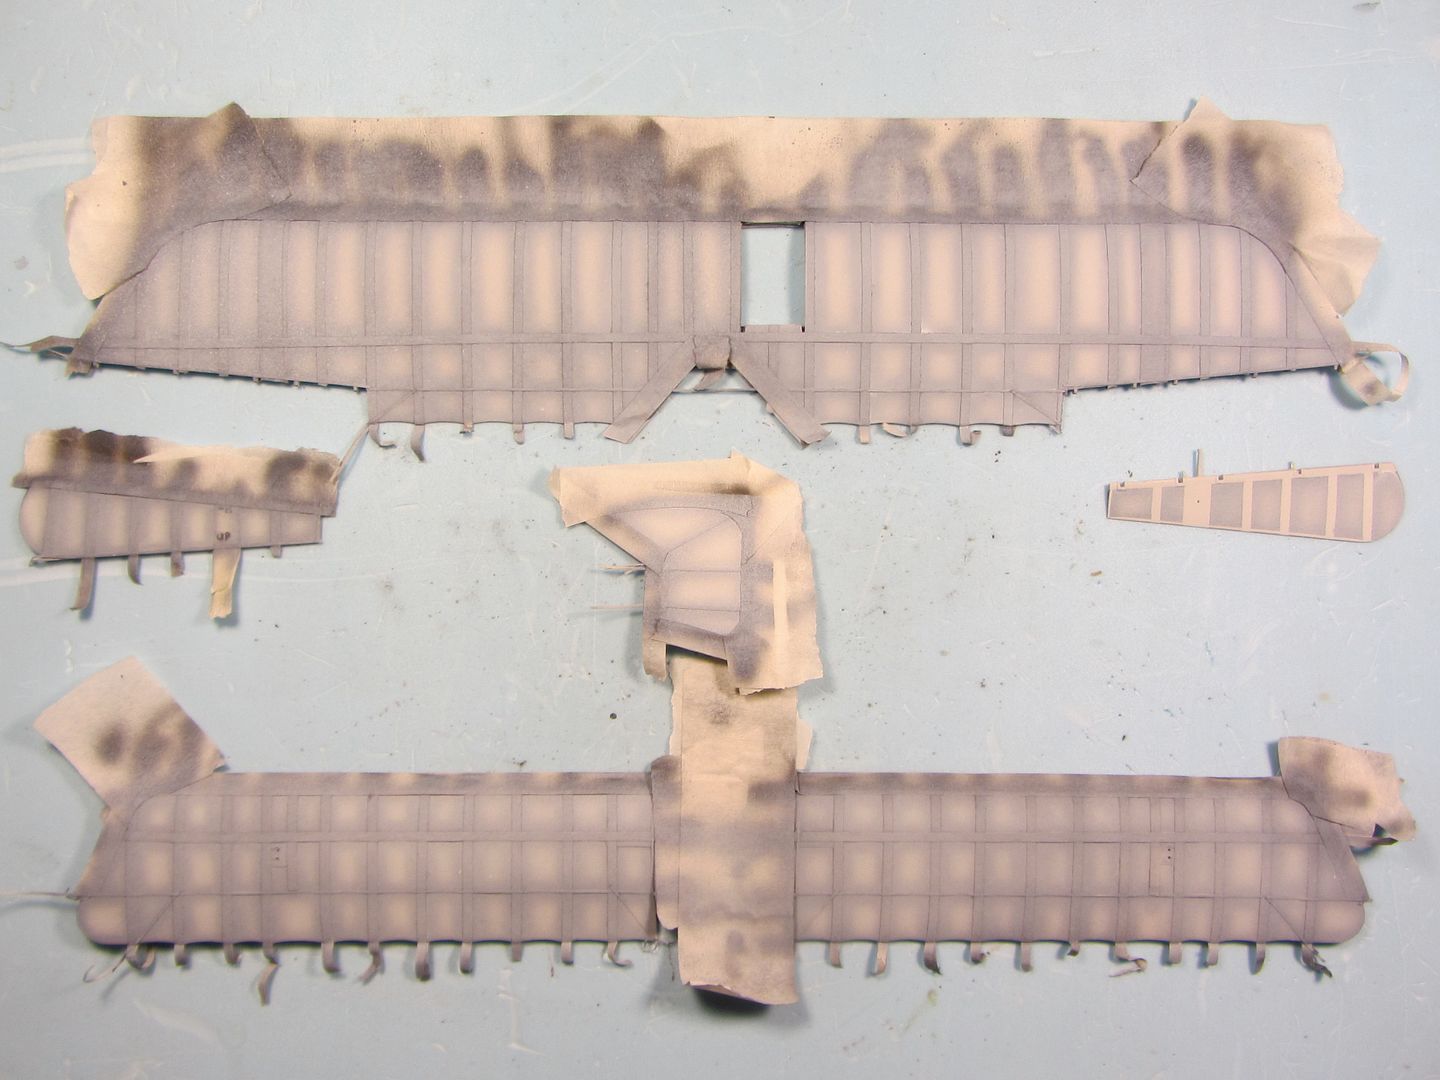
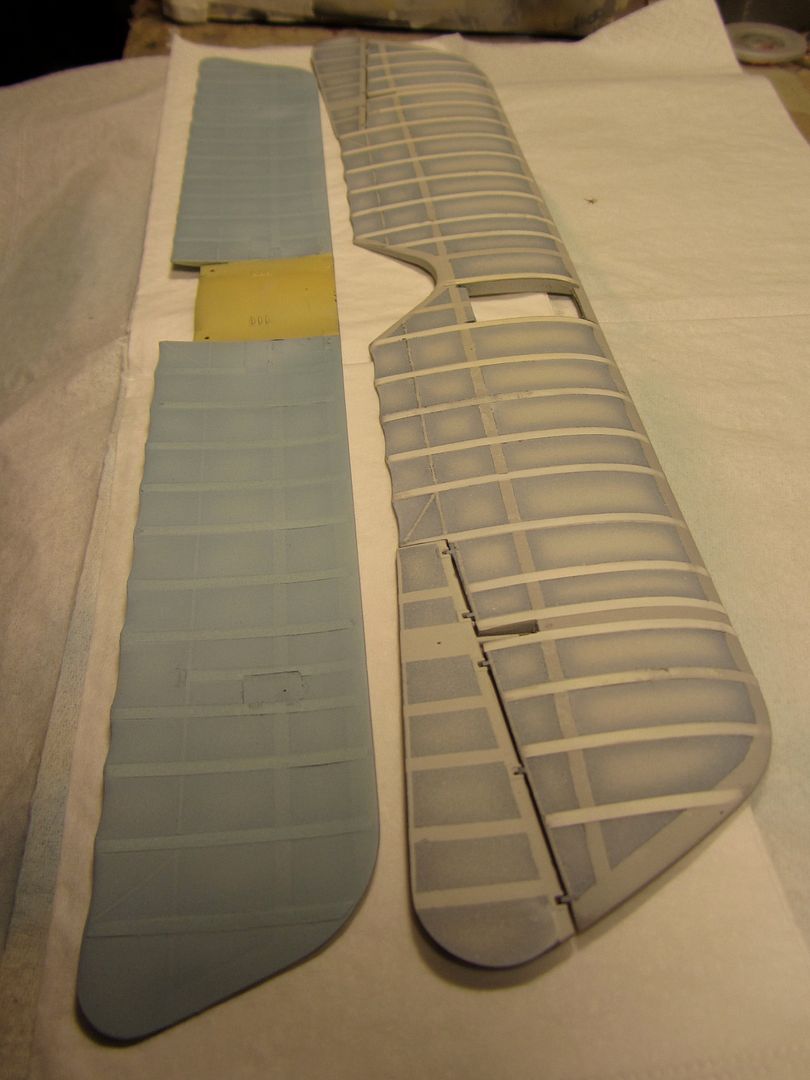
pulled away the tape, I started to differentiate the top wing from the lower and the ailerons.
5446

the idea is to achieve a low wing faded, and a top one almost new, with old ailerons.
5447

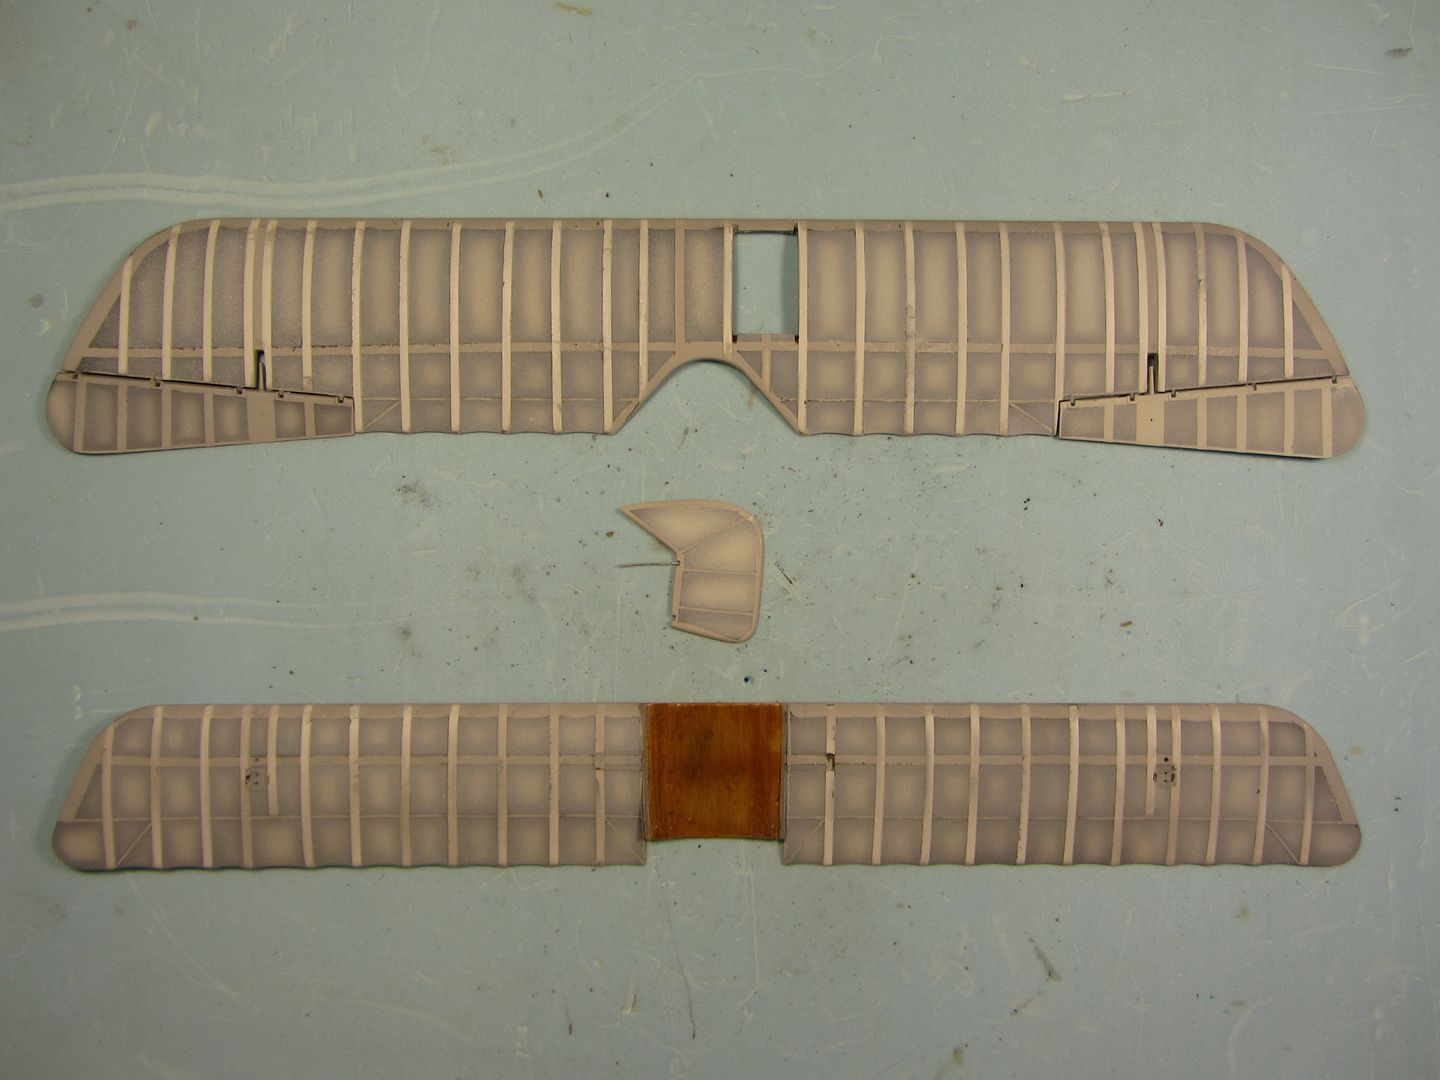
Unfortunately, between idea and action passes an abyss ... to figure out what I'm up really, I gave a coat of light blue and a subsequent spots of the same color lightened.
5448

while the base satisfies me, more or less, with the final color I'm not convinced ... ideas?
5452

actually, something is missing, but I do not know what! go to washing and oils could solve ... or not! :o
5453

Another question I have, is whether to use the decals for the two white bands on the upper wing, or paint them ... to the vote, to the vote! ;D

Offline Whiteknuckles

  • Hero Member
  • *****
  • Posts: 1335
Re: 1/32 albatros D:III roden
« Reply #163 on: July 09, 2013, 02:06:26 PM »
Paolo, this has been and continues to be a superbly instructive build.
The way you guys throw around suggestions and change things scares the #$&^ out of me!
Beautiful work and thankyou ;)

Andrew
Eternal Apprentice

Offline kornbeef

  • Hero Member
  • *****
  • Posts: 961
  • U.K. Carpet monster genocide squad leader.
Re: 1/32 albatros D:III roden
« Reply #164 on: July 09, 2013, 04:43:12 PM »
Hi Paulo.

All that sanding paid off, you must have superfit fingers now.  Roden's decals have never had a good reputation so  I'd be inclined to Use WNW national markings if if you have them floating anywhere. I think I'd paint the background field on the wings in that case.

Andrew yes that's why I love this site of Des's, It's the willingness to offer help, suggestions and support that makes it special.  ;D

Keith
Never too old to learn sumfink noo