Author Topic: 1:32nd scale Sopwith 1 1/2 'Strutter' (1.B2)  (Read 7472 times)

Offline Kamil Zoszak

  • Newbie
  • *
  • Posts: 31
Re: 1:32nd scale Sopwith 1 1/2 Strutter (1.A2)
« Reply #15 on: November 20, 2025, 07:46:39 AM »
WOW.... OUTSTANDING wood efects in british style

Offline PrzemoL

  • Hero Member
  • *****
  • Posts: 5668
  • There was Eru... and he made first the Ainur...
    • Przemysław Litewka
Re: 1:32nd scale Sopwith 1 1/2 Strutter (1.A2)
« Reply #16 on: November 20, 2025, 09:22:45 PM »
Lovely wood and canvas!
Ash nazg durbatuluk, ash nazg gimbatul,
Ash nazg thrakatuluk, agh burzum-ishi krimpatul.

Offline RAGIII

  • Hero Member
  • *****
  • Posts: 19957
Re: 1:32nd scale Sopwith 1 1/2 Strutter (1.A2)
« Reply #17 on: November 20, 2025, 11:37:35 PM »
Gorgeous interior work Mike. Lovely wood tones.
RAGIII
"A man has to know his limitations": Harry Callahan

"Don't slop it on" Lynda Geisler

Offline Mike Norris (UK)

  • Hero Member
  • *****
  • Posts: 2716
  • RAF Old and Bold
    • Mikes WW1 Aircraft Models
Re: 1:32nd scale Sopwith 1 1/2 Strutter (1.A2)
« Reply #18 on: November 21, 2025, 07:20:51 AM »
Hi all,
The Aviattic bleached linen effect decals (59 in total) were cut for the inside of the fuselage halves.
Although the weave effect can be seen, a white base coat would have been better than the dark yellow I used.
The main assemblies of the two cockpits have been fitted.

Now it's onto adding cockpit detail (not in the kit) and rigging,

Mike


Retired - 27 years RAF service then 20 years Military Aerospace Technical Author/editor.

Offline Tim Mixon

  • Hero Member
  • *****
  • Posts: 1165
  • Main focus is 1/72 WWI
Re: 1:32nd scale Sopwith 1 1/2 Strutter (1.A2)
« Reply #19 on: November 25, 2025, 12:52:25 PM »
Beautiful wood effects Mike. Looking forward to seeing more progress.

Offline Mike Norris (UK)

  • Hero Member
  • *****
  • Posts: 2716
  • RAF Old and Bold
    • Mikes WW1 Aircraft Models
Re: 1:32nd scale Sopwith 1 1/2 'Strutter' (1.B2)
« Reply #20 on: December 21, 2025, 07:24:45 AM »
Hi all,
It's been a few weeks since I last posted, mainly as I was abroad on vacation.
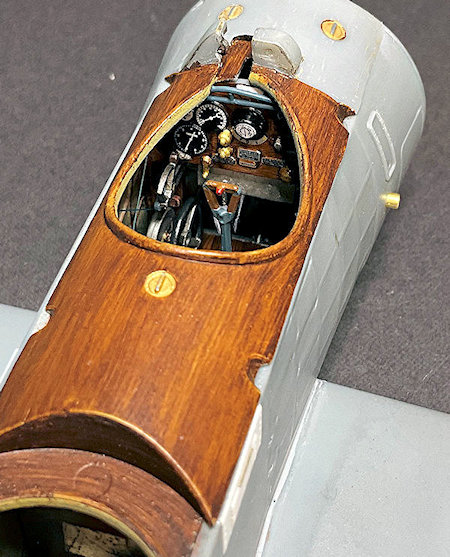
However, the fuselage internals are now complete.
Exact information is rare for the cockpit layout of the French 1.B2 version of this aircraft.
Therefore I've added what detail I could and with some artistic license.
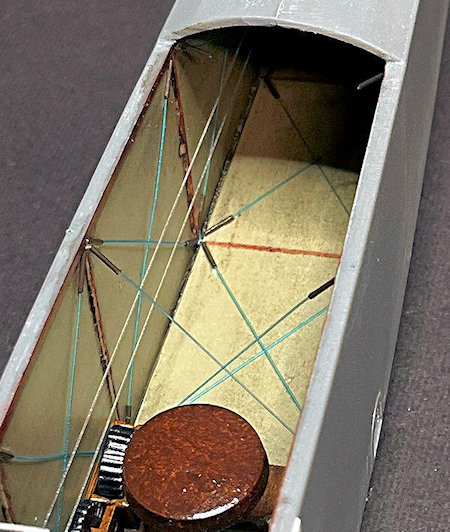
General:
Blue crossed bracing wires along the fuselage sides and rear floor section.
Added a false rear floor to hide the visible fuselage joint seam.
Given the access to the open cockpit, the control cables for the rudder, tail skid and elevator should be able to be added later - we'll see.

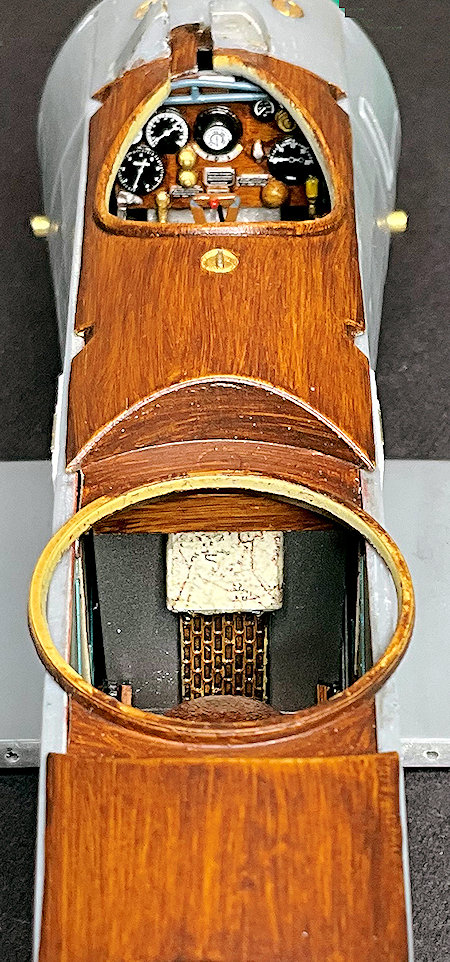
Rear cockpit
Crossed bracing wires at the rear of the cockpit.
Two bomb cannisters at the front of the cockpit.
Centre pedestal with a rolling map holder between the bomb cannisters.
Forward cross frame under the cockpit decking panel.
Tailplane incidence control cables from the pilot's cockpit.
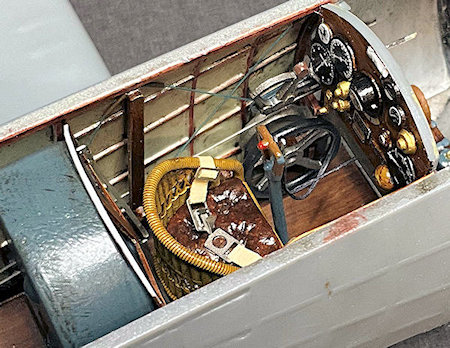
Pilot's cockpit
Tailplane incidence control cables.
Airbrake control cables.
Trigger cable for the Vickers machine gun.
Engine blip cable from the control column.
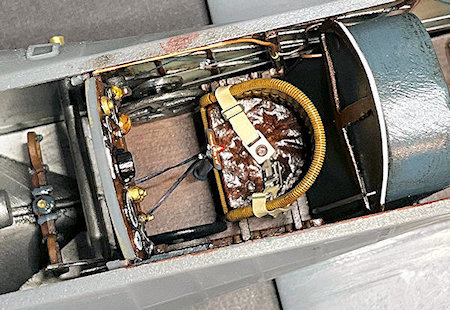
Ammunition container under the instrument panel.
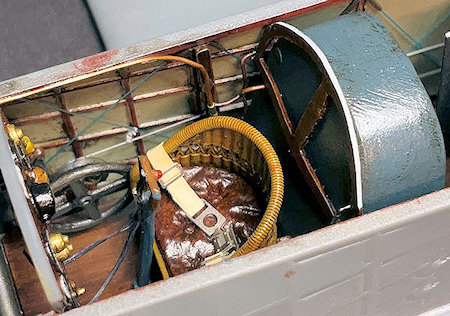
Wicker seat with cushion.
Engine throttle and mixture control rods.
Fuel supply pipes from the fuel tank.
Fuel content indicator pipe on the fuel tank.
Pipe to the oil Pulsometer.
Replacement carburettor air intake pipe (metal tube).
Retaining frame at the top, front of the fuel tank.
Rear support frame for the Vickers machine gun.

NOTE
The instrument panel is the British version and not the type fitted to the French 1.B2 aircraft.
The pilot's seat is of the British type and not the metal seat fitted to French aircraft.
Due to the access through the open cockpit area, the control cables for the rudder, tail skid and elevator should be able to be added later - we'll see.

Mike


« Last Edit: December 21, 2025, 07:31:53 AM by Mike Norris (UK) »


Retired - 27 years RAF service then 20 years Military Aerospace Technical Author/editor.

Offline RAGIII

  • Hero Member
  • *****
  • Posts: 19957
Re: 1:32nd scale Sopwith 1 1/2 'Strutter' (1.B2)
« Reply #21 on: December 21, 2025, 08:31:36 AM »
I think this is one of the Most Impressive Interiors I have seen you do....out of Many!
RAGIII
"A man has to know his limitations": Harry Callahan

"Don't slop it on" Lynda Geisler

Offline NigelR

  • Hero Member
  • *****
  • Posts: 2703
Re: 1:32nd scale Sopwith 1 1/2 'Strutter' (1.B2)
« Reply #22 on: December 21, 2025, 07:47:28 PM »
That interior does indeed look absolutely superb, lovely work Mike.

Offline Mike Norris (UK)

  • Hero Member
  • *****
  • Posts: 2716
  • RAF Old and Bold
    • Mikes WW1 Aircraft Models
Re: 1:32nd scale Sopwith 1 1/2 'Strutter' (1.B2)
« Reply #23 on: December 31, 2025, 09:26:34 AM »
Hi all,
A few updates on the 1.B.2 strutter.
I've added basic bomb release panels under the fuselage.
Initially I applied a light grey base colour on the model as I was applying the 'Aviattic' Weave Linen Effect'.
I though that would bring out the Aluminium effect for the linen covering.
However, it didn't so instead I applied 'Alclad' Duraluminium as the base coat.
Even so, the reflective nature of the paint lessens the linen decal effect somewhat. 
The French roundels and Escadrille markings were created in Paint Shop Pro software on my PC.
They were then printed using my Canon i-Sensys LBP631 Cw laser printer.
The chick/egg emblem and rudder decals were printed on clear back laser paper and the chick/egg decals were applied twice, as the decal paper is translucent.
The remaining decal were printed on white backed laser paper and carefully cut out for application.
The decals were sealed with a semi-matte clear coat, after which Flory Models dark dirt wash was applied.
The wash is basically to dirty up the aircraft (heavier than I normally apply).
The pilots Vickers and observers Lewis machine guns are also painted.

Next is to rig the control cables for the rudder, tail skid and elevator before the top decking panel if finally fitted,

Mike


Retired - 27 years RAF service then 20 years Military Aerospace Technical Author/editor.

Offline NigelR

  • Hero Member
  • *****
  • Posts: 2703
Re: 1:32nd scale Sopwith 1 1/2 'Strutter' (1.B2)
« Reply #24 on: December 31, 2025, 07:36:46 PM »
Nice to see some progress here, it's looking really good. Excellent additional details and the finish is really coming together. The decals look great, very impressive work. I'm thinking of getting a new printer that could print the odd decal, it seems like the Canon is a good choice. Do you treat the decals in any way after printing but before application?

Offline Mike Norris (UK)

  • Hero Member
  • *****
  • Posts: 2716
  • RAF Old and Bold
    • Mikes WW1 Aircraft Models
Re: 1:32nd scale Sopwith 1 1/2 'Strutter' (1.B2)
« Reply #25 on: December 31, 2025, 09:06:40 PM »
Nice to see some progress here, it's looking really good. Excellent additional details and the finish is really coming together. The decals look great, very impressive work. I'm thinking of getting a new printer that could print the odd decal, it seems like the Canon is a good choice. Do you treat the decals in any way after printing but before application?
Hi Nigel,
Printing decals on a laser printer is better than from and inkjet printer.
I have both.
Inkjet paper decals need to be sealed with a couple of coats of a clear acrylic varnish, such as Krylon in a spray can.
If not sealed the decal release water tends to bleed out the colours.
The pigment in a Laser printer is sealed in the decal paper by heat, so will not bleed in water.
The correct type of paper must be used for either Laser or Inkjet.
Also the settings in your PC and Laser printer need to be correct.
I use either Hayes of MDP paper in the Laser printer.
My Laser printer is the Canon i-SENSYS IBP631 Cw.
I use it just for decals when needed, as Laser toner cartridges are expensive,

Mike


Retired - 27 years RAF service then 20 years Military Aerospace Technical Author/editor.

Offline RAGIII

  • Hero Member
  • *****
  • Posts: 19957
Re: 1:32nd scale Sopwith 1 1/2 'Strutter' (1.B2)
« Reply #26 on: January 01, 2026, 01:46:33 AM »
Outstanding work Mike. The decals really look great! I love the Oil stains on the lower fuselage. Very well represented.
RAGIII
"A man has to know his limitations": Harry Callahan

"Don't slop it on" Lynda Geisler

Offline Tim Mixon

  • Hero Member
  • *****
  • Posts: 1165
  • Main focus is 1/72 WWI
Re: 1:32nd scale Sopwith 1 1/2 'Strutter' (1.B2)
« Reply #27 on: January 01, 2026, 10:24:29 AM »
Solid work Mike. I really appreciate the grimy look to the fabric.

Offline NigelR

  • Hero Member
  • *****
  • Posts: 2703
Re: 1:32nd scale Sopwith 1 1/2 'Strutter' (1.B2)
« Reply #28 on: January 01, 2026, 08:05:20 PM »
Hi Nigel,
Printing decals on a laser printer is better than from and inkjet printer.
I have both.
Inkjet paper decals need to be sealed with a couple of coats of a clear acrylic varnish, such as Krylon in a spray can.
If not sealed the decal release water tends to bleed out the colours.
The pigment in a Laser printer is sealed in the decal paper by heat, so will not bleed in water.
The correct type of paper must be used for either Laser or Inkjet.
Also the settings in your PC and Laser printer need to be correct.
I use either Hayes of MDP paper in the Laser printer.
My Laser printer is the Canon i-SENSYS IBP631 Cw.
I use it just for decals when needed, as Laser toner cartridges are expensive,
Thanks very much Mike, this is very helpful info.

Offline Mike Norris (UK)

  • Hero Member
  • *****
  • Posts: 2716
  • RAF Old and Bold
    • Mikes WW1 Aircraft Models
Re: 1:32nd scale Sopwith 1 1/2 'Strutter' (1.B2)
« Reply #29 on: January 03, 2026, 03:24:56 AM »
Hi all,
I've now added the control cables for the rudder and tail skid.
These were passed through the fuselage from outside and attached to the pilot's rudder bar.
The tailplane incidence control cables were fitted previously.
The cockpit decking panel was then fitted.

Next is the pre-rigging stage for all of the externally visible wires,

Mike


Retired - 27 years RAF service then 20 years Military Aerospace Technical Author/editor.