Author Topic: 1:32nd scale Caproni-Pensuti  (Read 1546 times)

Offline Mike Norris (UK)

  • Hero Member
  • *****
  • Posts: 2464
  • RAF Old and Bold
    • Mikes WW1 Aircraft Models
1:32nd scale Caproni-Pensuti
« on: February 13, 2025, 12:14:08 AM »
Hi all,
I'm about to start the Thulin K monoplane from Bjorn Carlson (Flying Bear).
However, as a 'fill in' build I though I'd build a rather quirky, although non-military, Italian tri-plane.
The only build I've seen of this model is by 'Flying Circus Models' on Youtube.

The kit is the 1:32nd scale Caproni-Pensuti from MicroMir models.


Emilio Pensuti was a test pilot for the Italian company ?Caproni? (Societ? Per Lo Sviluppo in Italia).
During 1918 he designed a small tri-plane aircraft, which he hoped could be flown by anyone and would become the ?bicycle of the air?.
The Caproni-Pensuti (AP-1) was a small single-engine sports tri-plane aircraft designed and built at Caproni in Italy just before the end of World War I.
The aircraft was a very compact, low-powered tri-plane.
The single-seat tri-plane had unswept rectangular wings, each with a full span of only 4 m (13 ft 1 in).
These were mounted without stagger, each wing braced to the one below by two pairs of vertical, parallel interplane struts, one pair out beyond mid-span and the other from the fuselage sides.
The central wing was attached to the upper fuselage and the other two held well clear of it by the struts.
There were ailerons on the upper and lower wings.
The Pensuti had a simple rectangular cross-section fuselage, with the open cockpit at the wing trailing edge.
A three cylinder, inverted Y configuration Anzani air-cooled engine of 26 kW (35 hp) in the nose drove a two-blade propeller.
The tri-plane had a fixed undercarriage of wide track, with a single wheel at each end of a single axle with its extremities attached to extensions of the outer interplane struts.
Its cruciform tail had horizontal surfaces mounted on the top of the fuselage; the vertical surface was trapezoidal and extended equally above and below the fuselage.
A small tail skid was carried on its lower tip.
Unfortunately, Emilio Pensuti was killed in an unrelated aircraft accident and the maiden flight was delayed.
It wasn?t until the 10th of February 1919 that its first flight took place at Vizzola, piloted by Lt. Lodovico Montegani.
The intention of the pilot was only to taxi the machine pending its engine tuning.
So, he started with a throttled engine. Halfway down the airfield, because of uneven ground, the machine bounced into the air.
Montegani felt from that jump that the tri-plane had good lift and was well balanced.
Then, he gave more throttle, pulled the control column, and found himself flying.
On later test flights, Montegani flew for 30 minutes and even longer.
The tiny tri-plane climbed up to 1000 meters, performed turn, spirals, dives and pull-outs.
From these tests the following data could be taken, maximum and minimum speed 90 and 35 km/h respectively.
Take-off and landing runs, 15 meters each, stop included. The engine an old, renewed and proven 35 hp Anzani.

As expected, this kit requires some corrections and replacement parts.
So far I've done the following changes:

Added plastic card strips along the fuselage seam to give a more positive location for assembly.
Added forward and rear bulkheads inside the fuselage.
Added some detail into the cockpit area.
Filled ailerons in the centre wing as the aircraft only had ailerons in the upper and lower wings.
Drilled through the blocked interplane stru locations in the centre wing (strus pass through the wing).
Drilled locating holes in the fuselage decking panel for the four upper cabane struts (none molded).
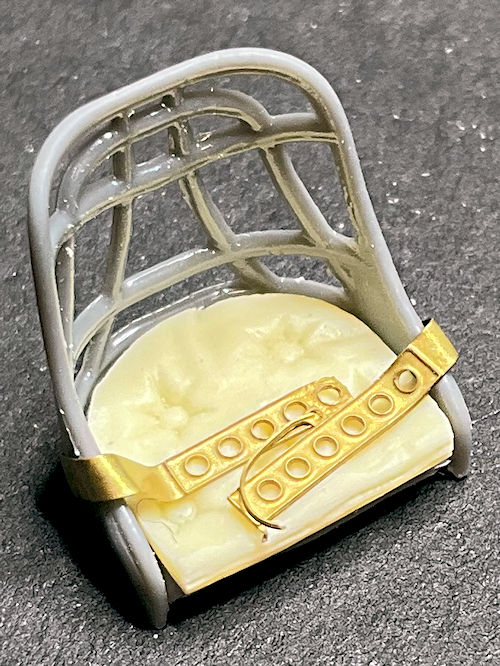
Added seat cushion and photo-etch lap belts for the pilots seat.
Replaced all four kit supplied interplane struts (too weak and rectangular cross section) with brass struts.
Replaced all eight kit supplied upper and lower cabane struts (too weak and rectangular cross section) with brass struts.
Drill locating holes for cabane struts into the underside of the fuselage and upper wing.
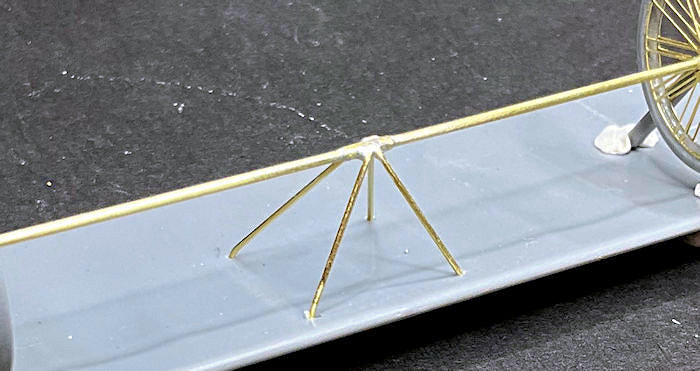
Replaced the weak, two part plastic landing gear axle with Brass rod and tubing.
Created Brass rod support frame for the landing gear axle (not supplied in the kit).
Chamfered the inner edges of both tyres to allow the photo-etch spoked rims to fit.

Mike


Retired - 27 years RAF service then 20 years Military Aerospace Technical Author/editor.

Offline andonio64

  • Hero Member
  • *****
  • Posts: 1775
  • There's no hurry
Re: 1:32nd scale Caproni-Pensuti
« Reply #1 on: February 13, 2025, 01:34:46 AM »
Interesting work Mike I was just looking in this very moment at the youtube tutorial by 'Flying Circus Models'... I think your WIP log will make me decide whether to buy the kit or not!


Offline NigelR

  • Hero Member
  • *****
  • Posts: 1790
Re: 1:32nd scale Caproni-Pensuti
« Reply #2 on: February 13, 2025, 04:15:22 AM »
A very interesting and fun project. Great brass work so far.....

Offline andonio64

  • Hero Member
  • *****
  • Posts: 1775
  • There's no hurry
Re: 1:32nd scale Caproni-Pensuti
« Reply #3 on: February 13, 2025, 06:45:53 AM »
Mike, from which fret did you take the seatbelts?

Offline Mike Norris (UK)

  • Hero Member
  • *****
  • Posts: 2464
  • RAF Old and Bold
    • Mikes WW1 Aircraft Models
Re: 1:32nd scale Caproni-Pensuti
« Reply #4 on: February 13, 2025, 08:40:42 AM »
Mike, from which fret did you take the seatbelts?

The lap belts were from my photo-etch 'spares' collection.
The kit does not provide any,

Mike


Retired - 27 years RAF service then 20 years Military Aerospace Technical Author/editor.

Offline Mike Norris (UK)

  • Hero Member
  • *****
  • Posts: 2464
  • RAF Old and Bold
    • Mikes WW1 Aircraft Models
Re: 1:32nd scale Caproni-Pensuti
« Reply #5 on: February 13, 2025, 09:33:27 AM »
Hi all,
The ailerons in the upper and lower wings have been cut out and pinned to allow them to be angled.
The elevator has been lightly scribed along its joint with the tailplane, to allow it to be angled,

Mike


Retired - 27 years RAF service then 20 years Military Aerospace Technical Author/editor.

Offline andonio64

  • Hero Member
  • *****
  • Posts: 1775
  • There's no hurry
Re: 1:32nd scale Caproni-Pensuti
« Reply #6 on: February 13, 2025, 05:56:40 PM »
Mike, from which fret did you take the seatbelts?

The lap belts were from my photo-etch 'spares' collection.
The kit does not provide any,

Mike

OK Thanks

Offline Mike Norris (UK)

  • Hero Member
  • *****
  • Posts: 2464
  • RAF Old and Bold
    • Mikes WW1 Aircraft Models
Re: 1:32nd scale Caproni-Pensuti
« Reply #7 on: February 14, 2025, 09:06:54 PM »
Hi all,
The 3D printed engine test fitted.
The ring to secure the front edges of the three cowl panels is supplied in the kit as photo-etch.
However, it is a little too large in diameter and overlaps the panels.
So I cut a correctly sized ring from 0.5 mm thick plastic card.
I've drilled 0.4 mm diameter recesses into the panels to represent fasteners, as they are not molded in the kit panels,

Mike


Retired - 27 years RAF service then 20 years Military Aerospace Technical Author/editor.

Offline PrzemoL

  • Hero Member
  • *****
  • Posts: 5287
  • There was Eru... and he made first the Ainur...
    • Przemysław Litewka
Re: 1:32nd scale Caproni-Pensuti
« Reply #8 on: February 14, 2025, 10:39:21 PM »
I will follow this with great interest. Fine start!
Ash nazg durbatuluk, ash nazg gimbatul,
Ash nazg thrakatuluk, agh burzum-ishi krimpatul.

Offline NigelR

  • Hero Member
  • *****
  • Posts: 1790
Re: 1:32nd scale Caproni-Pensuti
« Reply #9 on: February 15, 2025, 05:14:38 AM »
Lovely work Mike, looking great!

Offline Mike Norris (UK)

  • Hero Member
  • *****
  • Posts: 2464
  • RAF Old and Bold
    • Mikes WW1 Aircraft Models
Re: 1:32nd scale Caproni-Pensuti
« Reply #10 on: February 18, 2025, 06:15:56 AM »
Hi all
Apart from the rudder, all parts have now been painted.
I used Alclad and MRP lacquers and Tamiya acrylic paints.
I used Airscale instrument decals and photo-etch instrument bezels (kit supplied panel not used).
Wood and leather effects were painted with Windsor & Newton Alcylid oil paints (Raw Sienna and Burnt Umber).
All details are in my PDF build log, to be issued on completion of the model,

Mike


Retired - 27 years RAF service then 20 years Military Aerospace Technical Author/editor.

Offline NigelR

  • Hero Member
  • *****
  • Posts: 1790
Re: 1:32nd scale Caproni-Pensuti
« Reply #11 on: February 18, 2025, 07:24:41 PM »
That's looking lovely. The linen with the show through looks spot on.

Offline Mike Norris (UK)

  • Hero Member
  • *****
  • Posts: 2464
  • RAF Old and Bold
    • Mikes WW1 Aircraft Models
Re: 1:32nd scale Caproni-Pensuti
« Reply #12 on: February 20, 2025, 06:04:54 AM »
Hi all,
The pilots seat assembly, rudder bar and control column have been fitted into the cockpit.
Also the bracing wires and control cables.
Engine is fitted.
The fuselage, wings, ailerons, tailplane/elevator and rudder have had linen effect decal applied.
They were cut from the Aviattic clear doped linen (faded) decal (ATT32044).
They were then airbrushed with Tamiya Semi-Matte (X35) thinned with Mr. Color Rapid Thinners.

Mike


Retired - 27 years RAF service then 20 years Military Aerospace Technical Author/editor.

Offline NigelR

  • Hero Member
  • *****
  • Posts: 1790
Re: 1:32nd scale Caproni-Pensuti
« Reply #13 on: February 20, 2025, 07:23:39 PM »
Those sub-assemblies look amazing. Can't wait to see this come together.

Offline Mike Norris (UK)

  • Hero Member
  • *****
  • Posts: 2464
  • RAF Old and Bold
    • Mikes WW1 Aircraft Models
Re: 1:32nd scale Caproni-Pensuti
« Reply #14 on: February 22, 2025, 12:39:39 AM »
Hi all,
Just a quick update.
The photo-etch control horns/levers for the ailerons and elevator are a bit too flimsy to use.
Therefore' I've replaced them with horns from the PART 1:48th scale generic control horns (S48-087) set.
I've also made replacement elevator control levers and rudder control horns (not supplied in the kit) from 0.8 mm thick plastic card.
All of the many locating points for the rigging and control cables have been drilled into the model parts.

So, now it's onto the pre-rigging stage of the build,

Mike


Retired - 27 years RAF service then 20 years Military Aerospace Technical Author/editor.