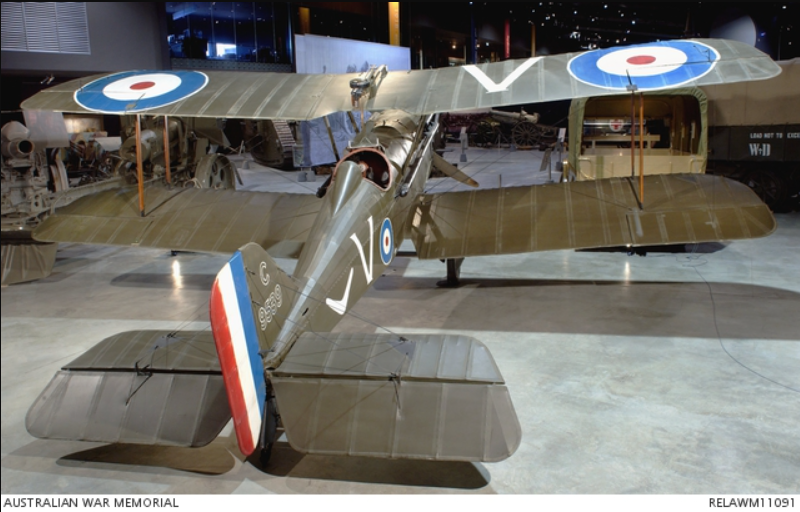
So I've been poking at this 1/48 WW1 subject for several months now. As a child, I had all the old Aurora, SMER, etc. kits spinning from my ceiling. These were some of my first models I built as a child and I've wanted to revisit those for years with my Adult Modeling Skills. Adult Modeling Skills should not be confused with the much more serious underlying condition of Advanced Modelers Syndrome (AMS).
Since I haven't done anything like a serious build on a biplane in 50 or so years, I thought it would be best to dip my toes in with something not-to-expensive that I would regret screwing up.
To that end, a small pile of cheap, old WW1 kits has been amassed, many the same ones that were hanging from my ceiling. I built the old Monogram DVII on a lark as Stachel's aircraft in the book. This is the build that's pushed me down this present rabbit hole.
.jpeg?width=1920&height=1080&fit=bounds)
This looked like the best candidate to figure out and learn painting ribs, rigging, weathering and such to look like the real thing. This kit started life in 1956 as an Aurora kit, subsequently reissued by Monogram in the 70's I think.
.jpeg?width=1920&height=1080&fit=bounds)
.jpeg?width=1920&height=1080&fit=bounds)
The decals look like toast, a shame as I like the blue they used. A friend is sending me some extra Roden decals but after reading about them, I'm not sure if he's really doing me a favor or not.
.jpeg?width=1920&height=1080&fit=bounds)
Armed with this Squadron Signal I jumped in and noticed the dihedral was a bit shallow. I made some cuts on the bottom at the wing joint and fixed it to match the drawings.
.jpeg?width=1920&height=1080&fit=bounds)
.jpeg?width=1920&height=1080&fit=bounds)
While all this cutting and bending was going on I couldn't put my finger on what was wrong with the bottom and then realized a large vent was missing so out came the grinder. About now I'm going from Adult Modeling Skills to Advanced Modelers Syndrome as I could have just painted the hole black.
.jpeg?width=1920&height=1080&fit=bounds)
.jpeg?width=1920&height=1080&fit=bounds)
The struts are the biggest eye sore, I found some replacement candidates in an old SMER DH.2. I will scratch the cabane struts. While there, I pinched some Lewis drums for the coming scratch cockpit. I filled the slots with kit parts and cut flush.
.jpeg?width=1920&height=1080&fit=bounds)
.jpeg?width=1920&height=1080&fit=bounds)
I busied up the top wing to look more like the real deal by sanding away the molded detail and replaced with my "go-to" furnace tape and wire to get some interest going on.
.jpeg?width=1920&height=1080&fit=bounds)
.jpeg?width=1920&height=1080&fit=bounds)
.jpeg?width=1920&height=1080&fit=bounds)
Monogram gave me a seat and joy stick. Out comes the sheet styrene.
.jpeg?width=1920&height=1080&fit=bounds)
Looking at the WnW's instruction pics online I cobbled together the seat, floor and instrument panel.
.jpeg?width=1920&height=1080&fit=bounds)
.jpeg?width=1920&height=1080&fit=bounds)
I'm still experimenting with the Vallejo paints and they still haven't disappointed.
I scratched numbers on the dials and coated with Future, belts from yogurt cup lid.
.jpeg?width=1920&height=1080&fit=bounds)
.jpeg?width=1920&height=1080&fit=bounds)
The Lewis drums I pinched from an old SMER DHII worked perfect.
I again used the WnW directions and painted the interior sides of the fuselage.
.jpeg?width=1920&height=1080&fit=bounds)
.jpeg?width=1920&height=1080&fit=bounds)
.jpeg?width=1920&height=1080&fit=bounds)
All closed up, I can do some more detailing around the engine covers and panels. Probably more furnace tape.
.jpeg?width=1920&height=1080&fit=bounds)
.jpeg?width=1920&height=1080&fit=bounds)
.jpeg?width=1920&height=1080&fit=bounds)
I am so, so GLAD I got those rudder pedals in there......

