Author Topic: 1:32nd scale Roland D.VIa  (Read 8237 times)

Offline Mike Norris

  • Hero Member
  • *****
  • Posts: 2214
  • RAF Old and Bold
    • Mikes WW1 Aircraft Models
Re: 1:32nd scale Roland D.VIa
« Reply #30 on: February 16, 2021, 10:07:19 PM »
Very nice!! Interesting that the joins are not butted; but, saw tooth. Did that increase the fuselage's rigidity?

I think so.
Roland used overlapping plywood planks, known as ’lapstrake’, which was similar to that used on clinker built boats.
This proved to be as strong, but lighter than existing constructions provided, which was an important factor for a fighter aircraft.

Mike


Retired - 27 years RAF service then 20 years Military Aerospace Technical Author/editor.

Offline Mike Norris

  • Hero Member
  • *****
  • Posts: 2214
  • RAF Old and Bold
    • Mikes WW1 Aircraft Models
Re: 1:32nd scale Roland D.VIa
« Reply #31 on: February 17, 2021, 08:31:21 AM »
Hi all,
The wood effect decals with 'scarf' joint plywood joints (from 'ProperPlane') are now done.
These are probably the most difficult decals I've applied, as Matt (FokkerFodder) is finding.
The 'scarf' joint strips and the fin, rudder and lower wing fairing were tricky, but the fuselage decals were something else.
They are four separate fuselage long single decals.
Not 'cookie' cut and with no marking or transparent areas for the fuselage raised details, such as access panels, pulleys and fittings.
Cutting these into sections was not really feasible as any slight overlap of the decal joins would show up as dark (double thickness of the decal.
Therefore when you lay down the decal, it rest on top of all the raised detail, like one pole holding up a tent.
This causes wrinkles and fold over of the decals.
I eventually worked around the problem but not without a few tears (patched) and wrinkles (fortunately on the underside), but these are certainly not for the less experienced modeler.

The decals are similar to those from 'Aviattic' in transparecy, but are not as strong.
They were laid onto a base coat of 'Tamiya' Dark Yellow (XF59) to darken the effect.

Next up is creating the masks for painting the large yellow arrow marking along the sides of the fuselage, which of course will cover a lot of the decals,

Mike


Retired - 27 years RAF service then 20 years Military Aerospace Technical Author/editor.

Offline RAGIII

  • Hero Member
  • *****
  • Posts: 18845
Re: 1:32nd scale Roland D.VIa
« Reply #32 on: February 17, 2021, 09:02:19 AM »
The wood grain decals have turned out well Mike. Seems a lot is involved in their use. I think personally I will stick with oils  ::) That being said they do look great once all is settled!
RAGIII
"A man has to know his limitations": Harry Callahan

"Don't slop it on" Lynda Geisler

Offline hrcoleman66

  • Sr. Member
  • ****
  • Posts: 275
Re: 1:32nd scale Roland D.VIa
« Reply #33 on: February 17, 2021, 10:14:32 AM »
That looks awesome Mike!

You gotta be happy with that.

Cheers,

Hugh

Offline fredjocko

  • Sr. Member
  • ****
  • Posts: 436
Re: 1:32nd scale Roland D.VIa
« Reply #34 on: February 17, 2021, 11:01:13 AM »
The wood grain definitely looks great and was worth the effort.

Offline kensar

  • Hero Member
  • *****
  • Posts: 2505
  • Reshaping the world - one piece at a time.
Re: 1:32nd scale Roland D.VIa
« Reply #35 on: February 17, 2021, 10:37:26 PM »
Looks very realistic, even in the closeups.

Offline Alexis

  • Hero Member
  • *****
  • Posts: 7947
  • Love the self
Re: 1:32nd scale Roland D.VIa
« Reply #36 on: February 17, 2021, 11:10:48 PM »
Looks good Mike , has an authentic feel to it  :)


Alexis
Hurra ! , Ich Leben Noch
Body and life is a vessel we use to travel the planet . Femininity is the gift , The miracle comes from what we do with it .

Offline Mike Norris

  • Hero Member
  • *****
  • Posts: 2214
  • RAF Old and Bold
    • Mikes WW1 Aircraft Models
Re: 1:32nd scale Roland D.VIa
« Reply #37 on: February 18, 2021, 12:09:14 AM »
There is some doubt now over the authenticity of this particular colour scheme.
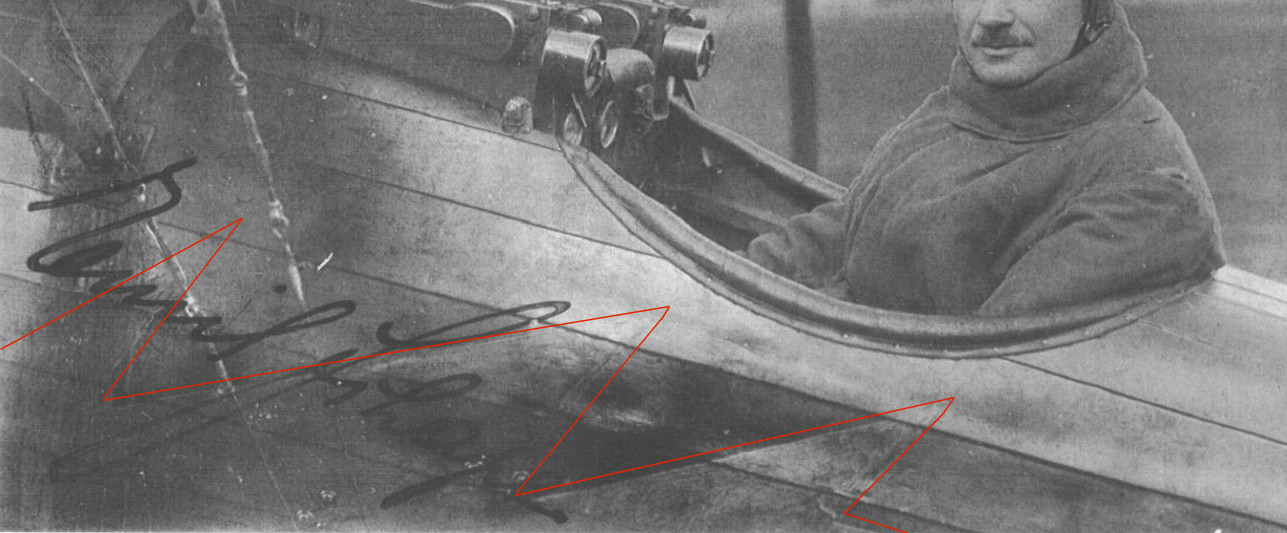
It seems that it was based on what is apparently the only known photograph of Emil Schäpe seated in a Roland fighter.
The Windsock Data file states that he is seated in a Roland D.VI but doesn't state whether it is a D.VIa or the later D.VIb version.
The photograph shows what appears to be the top of a multi-headed arrow marking on the side of the fuselage.
The late Dan-San Abott interpreted this as the yellow arrow and this seems to have been accepted by painters and illustrators, such as Bob Pearson's profile I'm basing this model on.

The doubts centre on three things - The aircraft in the photograph is a later Roland D.VIb (not a D.VIa), the arrow marking was a lightning bolt marking (not an arrow) and the fuselage was not varnished wood but in fact painted.
I've looked again at the photograph and to me at least, the fuselage marking looks more like an arrow head that lightning bolts.
Also I believe wood grain can be seen on the fuselage planking, although it is very faint. That said this was plywood strips, which wouldn't have much wood grain as such.
As to whether this is a D.VIa or a D.VIb is difficult to tell as the main differences were the D.VIb had a different engine and radiator cowl under the nose of the aircraft, neither of which can be seen on the photograph.
One possible clue for it being a D.VIb is that the two machine guns have extended cocking handles, which from other photographs the D.VIa didn't (standard cocking handles).
Maybe one day someone will come up with photographic or documentary evidence to settle these doubts,

When I build a model I like to try where possible to apply colour schemes that are not often modeled, which is why I chose this particular scheme.
I also didn't want to cover the wood effect decals with too much paintwork.
However, given the uncertainty of this colour scheme I've decided to switch the scheme to the Roland D.VIa, Serial No. 3615/18, which had no personal or Jasta fuselage markings.

Mike

« Last Edit: February 18, 2021, 05:06:36 AM by Mike 'Sandbagger' Norris »


Retired - 27 years RAF service then 20 years Military Aerospace Technical Author/editor.

Offline Mike Norris

  • Hero Member
  • *****
  • Posts: 2214
  • RAF Old and Bold
    • Mikes WW1 Aircraft Models
Re: 1:32nd scale Roland D.VIa
« Reply #38 on: February 19, 2021, 07:51:31 AM »
Hi all,
The basic fuselage is now finished.
As I said in the previous posts, the original colour scheme I was planning to do is in doubt, as to its authenticity.
In addition, any masking or masking tape laid onto these decals, no-matter how gently, started to lift the decals.
Having spent time and effort applying the wood effect decals, I didn't want to risk destroying them with masking.
There I chose an authentic scheme that has no personal or unit markings.

The metal fittings were brush painted with 'Tamiya' Grey Green (XF76).
Padding was 'Humbrol' Leather (62) with hightlights of 'Tamiya' Hull Red (XF9).
Other metal fittings were 'Mr. Colour' Stainless Steel (213) and 'Tamiya' Black (X18)
'Weathering applied with 'Flory Models' Dark Dirt clay wash.
Sealing coat is 'Alclad' Light Sheen (311).

Now onto preparing the wings, ailerons, tail plane, rudder and elevators for the lozenge decals,

Mike


« Last Edit: February 19, 2021, 10:08:51 AM by Mike 'Sandbagger' Norris »


Retired - 27 years RAF service then 20 years Military Aerospace Technical Author/editor.

Offline FokkerFodder

  • Sr. Member
  • ****
  • Posts: 326
Re: 1:32nd scale Roland D.VIa
« Reply #39 on: February 19, 2021, 07:55:34 AM »
Wow - Looking great Mike! I think picking a largely unmarked plane is a good idea - show off all that wood effect. I’m going to try and finish off my decals this weekend. Cheers Matt

Offline Mike Norris

  • Hero Member
  • *****
  • Posts: 2214
  • RAF Old and Bold
    • Mikes WW1 Aircraft Models
Re: 1:32nd scale Roland D.VIa
« Reply #40 on: February 19, 2021, 10:16:04 AM »
Hi Matt,
Good luck with that.
Apart from what we've both found thus far, I found that the decals lift easily.
Mine were treated with 'Microscale' MicroSet and also 'Tamiya' X20A thinners.
They were also then sealed with 'Alclad' Aqua Gloss 600.
Even so, when I just lightly touched the mask I was going to use onto the fuselage, then carefully took it off to reposition it, the decals started to lift with the mask in various areas.
That's one of the reasons I ended up choosing this scheme, that doesn't require masking the fuselage,

Mike


Retired - 27 years RAF service then 20 years Military Aerospace Technical Author/editor.

Offline hrcoleman66

  • Sr. Member
  • ****
  • Posts: 275
Re: 1:32nd scale Roland D.VIa
« Reply #41 on: February 19, 2021, 01:15:24 PM »
I think that the cleaner varnished wood Fuselage looks great! 

I wouldn't be too upset that the decals won't allow you to get more creative...  Just put it down as a note that if you want to mask and paint over a varnished finish in the future, don't use the decals...

CHeers,

Hugh

Offline Gisbod

  • Hero Member
  • *****
  • Posts: 2438
Re: 1:32nd scale Roland D.VIa
« Reply #42 on: February 19, 2021, 05:37:02 PM »
Ooh very nice Mike,

Yes, I’ve learnt never to mask over decals...

Guy
“Oh! I have slipped the surly bonds of Earth -
Put out my hand, and touched the face of God.”

P.O. John Gillespie Magee 1941

Offline Mike Norris

  • Hero Member
  • *****
  • Posts: 2214
  • RAF Old and Bold
    • Mikes WW1 Aircraft Models
Re: 1:32nd scale Roland D.VIa
« Reply #43 on: February 19, 2021, 08:42:10 PM »
Yeah it's strange these decals lift.
I've masked over other decals in the past using the same conforming solutions and sealer and had no problems.
It could be because the 'scarf' joints are decals on top of the fuselage wood decal, so double decal.
Hey-ho - moving on,

Mike


Retired - 27 years RAF service then 20 years Military Aerospace Technical Author/editor.

Offline FokkerFodder

  • Sr. Member
  • ****
  • Posts: 326
Re: 1:32nd scale Roland D.VIa
« Reply #44 on: February 19, 2021, 09:25:58 PM »
Hi Mike - mine have set like concrete - however I’m going to try a couple of the solutions you mention to see if they help lift them - I’m trying to remove some and it would be great to avoid respraying the white undercoat. Cheers Matt