Author Topic: 1:32nd scale - Ansaldo A.1 'Balilla'  (Read 25061 times)

Offline Monty

  • Hero Member
  • *****
  • Posts: 1699
Re: 1:32nd scale - Ansaldo A.1 'Balilla'
« Reply #120 on: January 30, 2021, 03:57:02 AM »
That is looking beautiful Mike. Very neat and precise. Your techniques and tips are really inspiring, looking forward to what you come up with! Regards, Marc.

Online Mike Norris (UK)

  • Hero Member
  • *****
  • Posts: 2718
  • RAF Old and Bold
    • Mikes WW1 Aircraft Models
Re: 1:32nd scale - Ansaldo A.1 'Balilla'
« Reply #121 on: January 30, 2021, 06:16:58 AM »
Hi all,
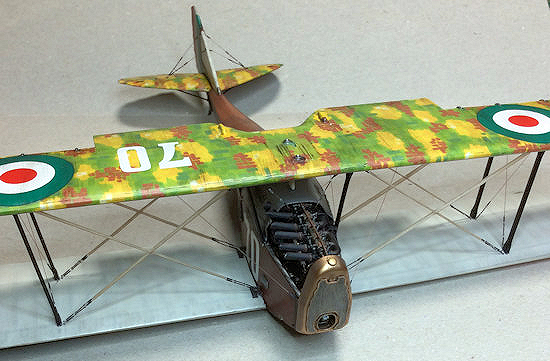
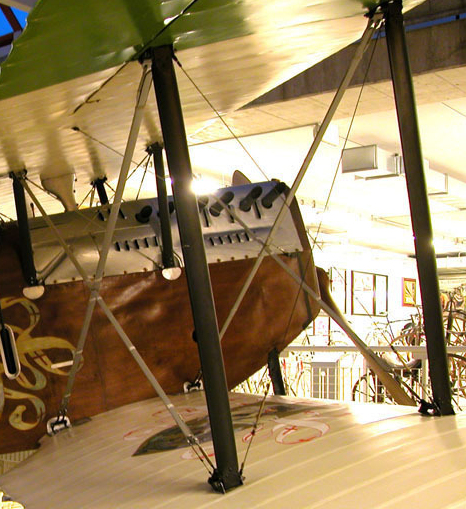
After experimenting with thin plastic card, decal, card, metal foil etc, I finally decided on this approach to represent the full length inserts between twin flying and landing wires.


Basically I used kitchen baking parchment paper.
The reasons being it's very thin and is easily positioned and secured to the rigging lines using PVA adhesive, which also gives you time to reposition if necessary.

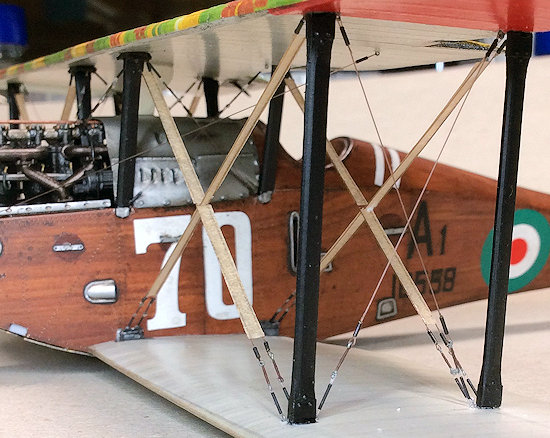
With the model fully rigged and the lines as taut:

Strips of baking parchment paper were cut to length and width (span) of the twin rigging wires.
PVA adhesive was brushed onto the rigging wires and one face of the strip.
The strip was laid onto the rigging wires and positioned to span and align with the wires.
More PVA adhesive was brushed over both sides of the applied strip and lines.

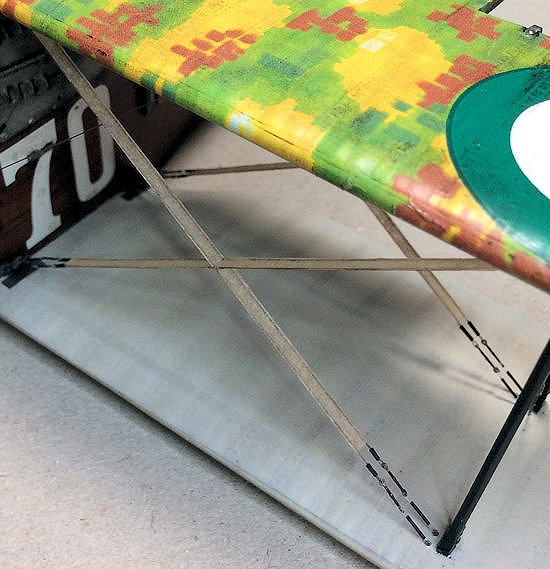
The thin paper self-grips onto the wires and adhesive.
The PVA adhesive not only secures the 'inserts' in position, but also seals the paper, ready for painting.
This method gives a smoother and flatter surface than other methods I tried.

The shots below show the strips that still need painting etc to finish them off

The next step will be to brush paint the rigging with the appropriate and thinned acrylic paint.
Lastly will be to apply thin white decal strips to represent the wrapping bands around the lines.

Having spent three day on this, I'm hoping the end result justifies the time spent - we'll see,

Mike


Retired - 27 years RAF service then 20 years Military Aerospace Technical Author/editor.

Offline maddog

  • Newbie
  • *
  • Posts: 14
Re: 1:32nd scale - Ansaldo A.1 'Balilla'
« Reply #122 on: January 30, 2021, 06:46:31 AM »
Elegant solution Mike, well done!

Offline rhallinger

  • Hero Member
  • *****
  • Posts: 1976
Re: 1:32nd scale - Ansaldo A.1 'Balilla'
« Reply #123 on: January 31, 2021, 01:27:34 AM »
That looks amazing to me, Mike!  Very well done.  A well-imagined solution that really looks the part.  Thanks for sharing this.  Oh, by the way, the Balillas looks fantastic! ;D

Best,

Bob

Offline RAGIII

  • Hero Member
  • *****
  • Posts: 19957
Re: 1:32nd scale - Ansaldo A.1 'Balilla'
« Reply #124 on: January 31, 2021, 01:34:54 AM »
Another Terrific solution to the inserts Mike! They look awesome.
RAGIII
"A man has to know his limitations": Harry Callahan

"Don't slop it on" Lynda Geisler

Online Mike Norris (UK)

  • Hero Member
  • *****
  • Posts: 2718
  • RAF Old and Bold
    • Mikes WW1 Aircraft Models
Re: 1:32nd scale - Ansaldo A.1 'Balilla'
« Reply #125 on: January 31, 2021, 07:44:25 AM »
Hi all,
The flying and landing wire inserts are finished - brush painted 'Tamiya' Sky Grey (XF19) and dusted with Earth pigments.
The ailerons are fitted and at the correct angles to match the control column position.
Aileron control rods fitted to the the operating levers in the upper wing, which again are at the correct angles to match the ailerons.
Windscreen fitted. I discarded the supplied acetate transparencies and used 'Microscale' Krystal Clear solution (basically refined PVA adhesive).
I also noticed many 'Balilla's' were fitted with a forward facing pipe in the fuel tank in the upper wing, so that's been fitted also.

So now it's onto the last two jobs - landing gear and propeller,

Mike


Retired - 27 years RAF service then 20 years Military Aerospace Technical Author/editor.

Offline RAGIII

  • Hero Member
  • *****
  • Posts: 19957
Re: 1:32nd scale - Ansaldo A.1 'Balilla'
« Reply #126 on: January 31, 2021, 08:49:04 AM »
 8)
RAGIII
"A man has to know his limitations": Harry Callahan

"Don't slop it on" Lynda Geisler

Offline Radarman

  • Hero Member
  • *****
  • Posts: 724
Re: 1:32nd scale - Ansaldo A.1 'Balilla'
« Reply #127 on: January 31, 2021, 09:23:23 AM »
Mike,
Every build you present demonstrates another trick from up your sleeve.
What’s next? We’ll have to see with your next unique build.  Just amazing work.

                                                                                      Kevin
We are all victims of history!

Offline Fvdm

  • Sr. Member
  • ****
  • Posts: 326
Re: 1:32nd scale - Ansaldo A.1 'Balilla'
« Reply #128 on: January 31, 2021, 06:36:04 PM »
Real nice 👌.

Online Mike Norris (UK)

  • Hero Member
  • *****
  • Posts: 2718
  • RAF Old and Bold
    • Mikes WW1 Aircraft Models
Re: 1:32nd scale - Ansaldo A.1 'Balilla'
« Reply #129 on: February 01, 2021, 01:49:09 AM »
Hi all,
Landing gear fitted.
Bracing wires are 0.12 mm diameter mono-filament with 1:48th scale 'GasPatch' turnbuckles.
Rigging tubes are 0.4 mm and 0.5 mm diameter blackened brass.
Weathering is 'Flory Models' pigment and 'Tamiya' Weathering Master Set A (Mud).

Now onto the propeller,

Mike


Retired - 27 years RAF service then 20 years Military Aerospace Technical Author/editor.

Offline PrzemoL

  • Hero Member
  • *****
  • Posts: 5669
  • There was Eru... and he made first the Ainur...
    • Przemysław Litewka
Re: 1:32nd scale - Ansaldo A.1 'Balilla'
« Reply #130 on: February 01, 2021, 02:00:25 AM »
Spectacularrrr.
Ash nazg durbatuluk, ash nazg gimbatul,
Ash nazg thrakatuluk, agh burzum-ishi krimpatul.

Online Mike Norris (UK)

  • Hero Member
  • *****
  • Posts: 2718
  • RAF Old and Bold
    • Mikes WW1 Aircraft Models
Re: 1:32nd scale - Ansaldo A.1 'Balilla'
« Reply #131 on: February 01, 2021, 06:55:21 AM »
Hi all,
The final part of the aircraft build is the propeller.
Airbrushed with a 70/30 mix of 'Tamiya' Flat Red (XF7) and Hull Red (XF9) to represent the dark finish needed.
A sealing coat of 'Alclad' Light Sheen (ALC-311) was airbrushed over the propeller.
Propeller bosses brush painted with 'Mr. Colour' Stainless Steel (213), then washed with 'AK Interactive' Kerosene (3029).
Finally the edges were lightly sponged with 'Tamiya' Weathering Master Set D (Oil Stain).

So, now onto the figures,

Mike


Retired - 27 years RAF service then 20 years Military Aerospace Technical Author/editor.

Offline RAGIII

  • Hero Member
  • *****
  • Posts: 19957
Re: 1:32nd scale - Ansaldo A.1 'Balilla'
« Reply #132 on: February 01, 2021, 07:42:26 AM »
The gear and prop are icing on the Cake Mike!
RAGIII
"A man has to know his limitations": Harry Callahan

"Don't slop it on" Lynda Geisler

Offline Ronkootje

  • Full Member
  • ***
  • Posts: 229
Re: 1:32nd scale - Ansaldo A.1 'Balilla'
« Reply #133 on: February 01, 2021, 08:06:31 AM »
Hi,

Sorry to hear that your PE broke! Indeed it is not necessary to heat the parts they can be just bent up in shape without this. I have test build one myself for the instructions of this kit and mine worked out fine.
Heating brass is when you roll a barrel of a Vickers for example makes rolling it easy but for straight bends always use the brass as is.

Regards Ron

Online Mike Norris (UK)

  • Hero Member
  • *****
  • Posts: 2718
  • RAF Old and Bold
    • Mikes WW1 Aircraft Models
Re: 1:32nd scale - Ansaldo A.1 'Balilla'
« Reply #134 on: February 01, 2021, 08:16:35 AM »
Hi Ron,
Yes - I've gotten into the habit over the years of annealing most photo-etch parts.
However, you're correct that not all need annealing.
My guess is that in this case it weakened the rigging brackets, which is why they were breaking.
Not to worry - lesson learned.

I have to say the resin moulding is probably the best I seen.
Especially the clever way you managed to mould into the fuselage the receptacles for the lower wing support rods.
That's a great idea and I think unique.

Mike


Retired - 27 years RAF service then 20 years Military Aerospace Technical Author/editor.