Author Topic: 1/48 Eduard Roland CII  (Read 2001 times)

Offline ebergerud

  • Newbie
  • *
  • Posts: 44
1/48 Eduard Roland CII
« on: June 19, 2020, 05:37:30 PM »
I'm starting a 1/48 Eduard Roland CII.

The kit itself is one of Eduard's early offerings - there's a lot of flash and the sprue gates are too thick. Mine is a "Weekend Edition" and the instructions are small and spare. I was able to download the Profipack instructions which are better and have several paint schemes. That helps but instructions are important to me and modern Tamiya these aren't. Pretty high part count - and the plane is large enough that I think 1/48 will work okay. (In retrospect, I'm really glad my last build of a Morane Saulnier N was 1/32 - that plane was tiny - and it really rewarded the larger scale.)
kit by Eric Bergerud, on Flickr

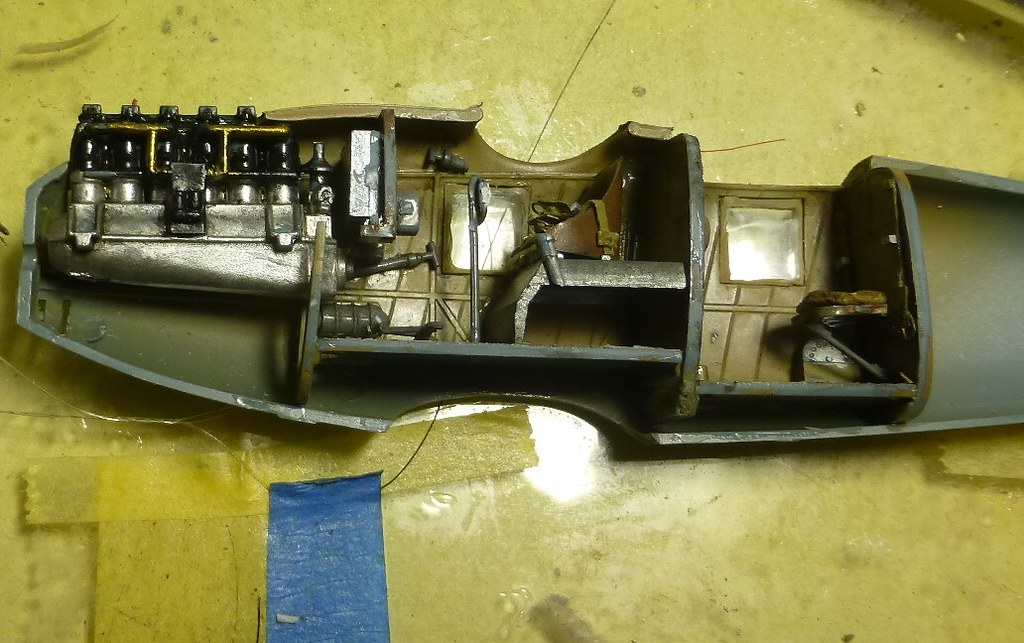
That said, the fit has been pretty good. The detail is certainly sufficient for my purposes. I will confess to heresy - I'm not keen on interiors because when the kit's done, there isn't much visible. That will certainly be the case here. But here's a pic that proves that I built one and even scratched some decent seat belts and made a cushion out of Apoxie Sculpt.
interiodet by Eric Bergerud, on Flickr
And there's an engine - but when the dust clears there won't be much of that visible either:
engine by Eric Bergerud, on Flickr

Above all the fuselage halves came together very well - that worried me. The piece over the observer station has some proper seams, but I think I'll be able to take care of these pretty well.
fuselage by Eric Bergerud, on Flickr
OK: that's where I'm at. Construction is actually pretty close to done. However, I think I'm going to prime the model as it sits here and prime the upper wings and landing gear seperately. The idea is that I want to combine rigging along with final assembly. I'm hoping for the best.

What I'm really thinking about is how to paint this kit. I have a few eccentricities that I will indulge myself. I will not paint an airplane purple. I will not put a face on an airplane. I will not put scales on an airplane. With that list, I've eliminated all of the paint schemes available from Eduard.

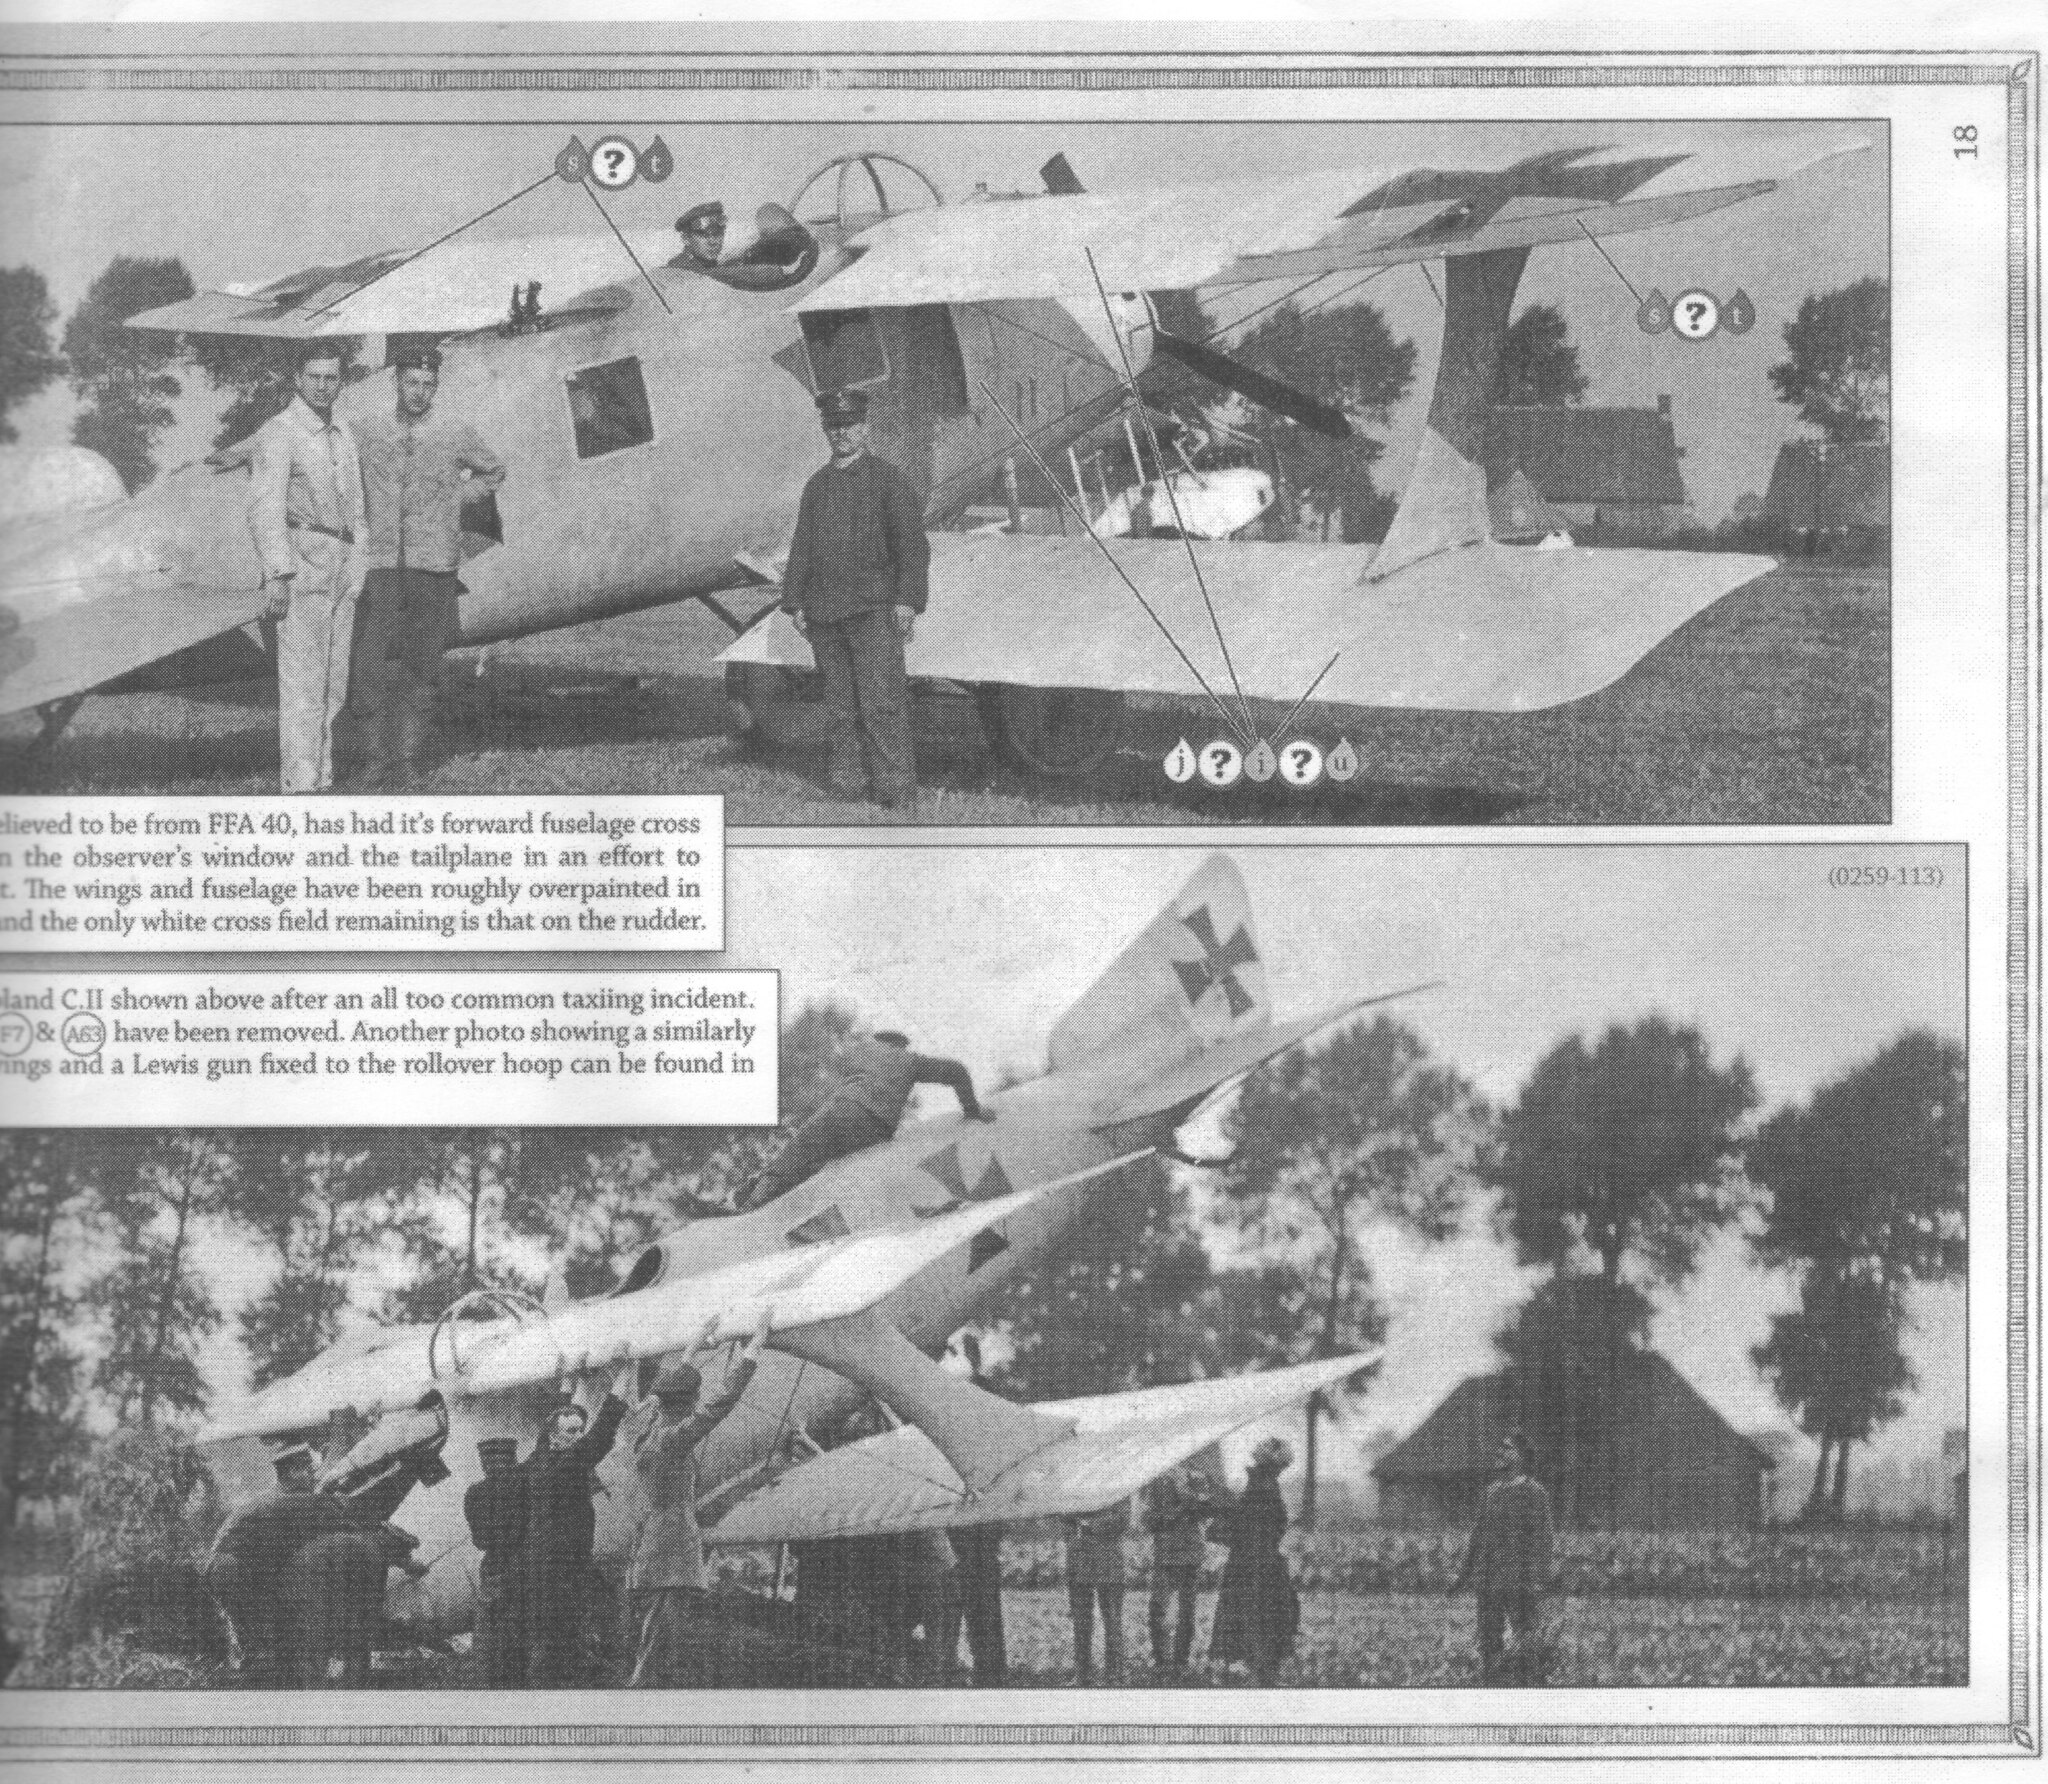
Which brings up WNW. Good grief gents - plague, riots, political craziness and WNW is shut down? What's next? Judgment day? I do hope Eduard gets their molds. Eduard has done a lot of reboxes and is doing pretty well with a fine stable of WWI bipes. So is the Ukrainian company IBG which has just put out a super neat 1/32 Gloster Gladiator - they're on a roll and would do the WNW line proud. I'm wondering how far WNW got with the 1/32 Lancaster - I could see that in Tamiya colors and selling very well indeed. (Tamiya's recent kits have been jaw-droppers. It's like every few years they have to remind the modeling world who is boss. They've done that again in the last five years.)  Fortunately, however, WNW also made a Roland CII and their instructions are still available. And it's there that I found several fine paint schemes - with no purple, faces or scales. But one really stands out. Here's a photo of an early Roland from the WNW instructions:
RolandColor by Eric Bergerud, on Flickr

WNW is free to admit that they're not really sure what colors are at work here. The bottom side of the wings will be a clear or matt doped linen faoring an off white hue. The original fuselage was either a cream yellow (we'll ignore that because it was on the Morane Saulnier) or a semi-gloss light blue which we'll go for. But, the rear half of the fuselage and good portions of the top side of the wings is a matt glaze that's either brown or olive green. I've got use in future for that brown glaze for a FD VII, so olive green it will be. (The green/blue scheme is one of the full camo schemes on WNW so I've got a good idea of what kind of hue I'll be looking for. Unfortunately, the WNW are PDF and can't be uploaded here.) I'm going to have to give this scheme a very careful think. You can see how mottled the fuselage is - that looks great to me. And WNW claims we've got an over paint here - that will add a factor. This is complex, so I suppose there's risk involved, but all I can do is wreck a model. And if it works out, I think it will be worth doing.
Which means it's time to get out the Duplicolor Hot Rod Black automotive primer to start the whole process which is crying for the irregular tones and will need black basing.
Eric

Bughunter

  • Guest
Re: 1/48 Eduard Roland CII
« Reply #1 on: June 19, 2020, 06:07:48 PM »
First one!
I will watch, have the Profipack in stash.
We had recently some nice builds of this bird here, in case you need some ideas.

Have fun,
Frank

Offline ebergerud

  • Newbie
  • *
  • Posts: 44
Re: 1/48 Eduard Roland CII
« Reply #2 on: June 19, 2020, 07:47:45 PM »
Bug
Maybe I haven't done my searching well, but it looks like one of our complete builds now exists without photos and another wasn't finished. Apologies if I'm wrong. The kit has been out for a long time - heaven knows its affordable - and it was a pretty important plane. As I understand it, it debuted just when the distinction between fighters and two seaters was growing more discrete with the introduction of the Nieuport 17, Albatross III and even Spad VII by the end of 1916. But at the beginning of the year, with Eindeckers and Bebes still present, a pretty fast plane with a forward firing gun like the Roland was a formidable plane - a Brisfit before its time. Amazing how fast military aviation changed - at least in the narrow sense - after 1915. Planes were growing so important and everyone knew it - so hundreds of machines were turning into thousands.

Bughunter

  • Guest
Re: 1/48 Eduard Roland CII
« Reply #3 on: June 19, 2020, 07:59:48 PM »
Robin has made a good job end of last year, and I can see the pictures of his build report:
https://forum.ww1aircraftmodels.com/index.php?topic=10672.0

Cheers,
Frank

Offline kensar

  • Hero Member
  • *****
  • Posts: 2505
  • Reshaping the world - one piece at a time.
Re: 1/48 Eduard Roland CII
« Reply #4 on: June 19, 2020, 09:45:05 PM »
"I will confess to heresy - I'm not keen on interiors because when the kit's done, there isn't much visible."

That just means you're more reasonable than most of us.
Good progress so far.  Most important is to enjoy the build.


Offline ebergerud

  • Newbie
  • *
  • Posts: 44
Re: 1/48 Eduard Roland CII
« Reply #5 on: June 20, 2020, 04:10:52 PM »
I'm not sure I've quite figured out searching this board. I did search Roland CII and found myself and some older posts. Search Roland C.IIa (with the period) and up comes Robins - which will be helpful for final assembly and rigging.
Eric

Offline GazzaS

  • Hero Member
  • *****
  • Posts: 1193
Re: 1/48 Eduard Roland CII
« Reply #6 on: June 21, 2020, 03:11:51 PM »
It's a good little kit, and you're smashing it!
There are only two states to be in:  Queensland and blotto.

Offline RAGIII

  • Hero Member
  • *****
  • Posts: 18871
Re: 1/48 Eduard Roland CII
« Reply #7 on: June 23, 2020, 12:24:51 AM »
Looking Fantastic! Just enough detail for the scale and what remains visible, IMHO.
RAGIII
"A man has to know his limitations": Harry Callahan

"Don't slop it on" Lynda Geisler

Offline ebergerud

  • Newbie
  • *
  • Posts: 44
Re: 1/48 Eduard Roland CII
« Reply #8 on: June 28, 2020, 06:37:29 PM »
Most of the painting is done on the Eduard Roland.
As is normal when I do aircraft I used a technique called "black basing." (Anyone interested in this technique should check out a brief introduction done by Doog on YouTube. Search "Black Basing." Doog has a long series of more detailed tutorials, but this 8 minute video gives you the idea.) Briefly, first you prime the model in black. I use a very good automotive lacquer from Duplicolor called "Hot Rod Black." I do this outside from the rattlecan because only water based solvents odorless oil spirits are okay inside. Anyway, this primer is "sandable" and "fillable" which means things like scratches and shadow seams will cease to exist. Lacquer also melds with the paint (although Duplicolor does zero damage to detail) which means there will be no peeling if you need to sand. It's great stuff and cheap because its not made for modelers. Like a dunce, I forgot to take a pic of the primed Roland - it was black.
Second you put on a "mottle coat" - this is a light and highly thinned version of what the base color is going to be and sprayed on in a maze of thin lines, squiggles etc - you paint "small" here, but if you get a spider web or two, it doesn't matter. What you want is a very irregular pattern. Because this is a bipe, I also put on 1/32" chart tape over the ribs because I want them to show up. Here's the kit after mottle:
mottle by Eric Bergerud, on Flickr

After the mottle is done, you begin to apply the base coat. The base should also be very highly thinned, because you want it to come down you don't want to cover the mottle completely - to do so would be like preshading a plane and then putting down an overly heavy base and eliminating the preshade. (Black basing is designed to replace preshade because you want a more irregular finish - however, if there are lines you want to emphasize, just don't mottle over them.) In this case I put down a light base and then remove the tape. Then I put on a few more coats. In general it's a good idea to stop before you think you should because the paint will darken as it dries. We're trying to get an uneven finish which will gives the model tonal variation. In essence you build a major portion of weathering into the paint job itself. If the finish looks clean and solid - it's not black based. The base colors on this plane come from the WNW instructions. We're looking for a bleached linen under the wings which is a kind of off-white. (FS37886) Rest of the plane, according to the WNW gurus is a light blue (FS25550). All of the paints used here my "go to" Golden High Flow acrylics which are simply great with an airbrush - they do have a satin finish, and the thinning medium is gloss so at this stage the model is very shinny. That will be fixed later. Do note that the base finish does remain somewhat irregular - that's the plan. Here's the linen and light blue base:
linendet by Eric Bergerud, on Flickr
linenbase by Eric Bergerud, on Flickr
lt-blu-base by Eric Bergerud, on Flickr
But we're not finished here. I picked a camo scheme from WNW that has an early Roland that has had it's fuselage half painted with a matt glaze.
RolandColor by Eric Bergerud, on Flickr
WNW says either olive green or brown. I want brown for another project. I also picked the green, because a variation of this olive on blue is at the heart of the complex streaky camo scheme often found on Fokker Triplanes. But that's not for now. This time I want a glaze - as suggested by WNW. A glaze is a little like a wash but you don't want it to collect anywhere like a panel line - you want it applied uniformly, but very light. This glaze is pretty heavy because you definitely want to change the color not just tint it like you would with a filter. However, we want the light blue to be slightly visible under the green. Note on the photo how irregular and mottled the fuselage is. I suspect the glaze was roughly applied and I was tempted to do it by hand. Instead I started with a color suggested by WNW - they give you a choice of Tamiya XF-65 or Humbrol 116. These are very different colors - XF65 is "Field Gray" (think German uniforms) - reminds me of khaki or even olive drab. According to my paint substitution chart it's an exact match for Vallejo US Dark Green - that's a paint I have. I mixed Golden HF "Yellow Oxide" with "Carbon Black" and just a drop of "Primary Green" and got an excellent match. (The Humbrol is almost a forest green.) Note - WNW calls either base color to be cut with "clear" 5-1, so the green is going to be translucent unless simply dumped on in ten coats or so. Also note that on the wing tips the green appears darker - I'm assuming that the photo talking not a radically different color. (We're doing some guesswork here - WNW admits that.) Here are pics of the glaze and one to give you an idea of where this three color scheme is headed.
glazedet by Eric Bergerud, on Flickr
glaze by Eric Bergerud, on Flickr
linen by Eric Bergerud, on Flickr
So there we are for now. Coming up is more weathering. I've clear coated it for decals. After that, we're going to add some oil filters and then some oil fading. What to do for scuffing, soiling and exhaust is undecided. And I suppose I'll have to finish construction and rig it. More later.
Eric

Offline lone modeller

  • Hero Member
  • *****
  • Posts: 5322
Re: 1/48 Eduard Roland CII
« Reply #9 on: June 29, 2020, 03:17:58 AM »
That paint effect using black as an undercoat is terrific.  The subtle contrast in the tones of the top coats is really very striking indeed - this is going to be an exceptional model when it is finished.

Stephen.

Offline RAGIII

  • Hero Member
  • *****
  • Posts: 18871
Re: 1/48 Eduard Roland CII
« Reply #10 on: June 29, 2020, 03:58:19 AM »
Outstanding paintwork! The black basing worked well!
RAGIII
"A man has to know his limitations": Harry Callahan

"Don't slop it on" Lynda Geisler

Bughunter

  • Guest
Re: 1/48 Eduard Roland CII
« Reply #11 on: June 29, 2020, 06:00:20 AM »
Great paint work, and this seems to be a very interesting marking!
Let's see, how this bird will look like at the end.

Cheers,
Frank

Offline Early Bird Fan

  • Sr. Member
  • ****
  • Posts: 261
Re: 1/48 Eduard Roland CII
« Reply #12 on: June 29, 2020, 09:48:30 AM »
great work on the paint, i've watched a few vids of people using the black basing technique on ww2 planes, the effect is striking and natural looking. This is going to be a lovely looking model once finished  8)

Offline GazzaS

  • Hero Member
  • *****
  • Posts: 1193
Re: 1/48 Eduard Roland CII
« Reply #13 on: June 29, 2020, 04:29:01 PM »
i agree...  two thumbs up on the black basing!
There are only two states to be in:  Queensland and blotto.

Offline kensar

  • Hero Member
  • *****
  • Posts: 2505
  • Reshaping the world - one piece at a time.
Re: 1/48 Eduard Roland CII
« Reply #14 on: June 29, 2020, 09:54:08 PM »
Very interesting results with the paint, Eric.