Author Topic: RAF FE8, Scaleplanes 1:72  (Read 44260 times)

Offline smperry

  • Hero Member
  • *****
  • Posts: 932
Re: RAF FE8, Scaleplanes 1:72
« Reply #30 on: March 20, 2020, 08:18:47 PM »
Thanks Ian
I'm going to try some.
sp
There is something fundamentally amiss with a society which forces it's modelers to work for a living.

Online IanB

  • Hero Member
  • *****
  • Posts: 2439
Re: RAF FE8, Scaleplanes 1:72
« Reply #31 on: March 21, 2020, 11:06:41 PM »
Well I think I've sorted the soldering problem. I turned it on again today and.....nothing. It's totally dead. Less than 2 weeks old and used twice. Bu**er. The warranty is only good in the US so I guess I'll have to fork out for another one. It certainly won't be this one  again!


So back to the old iron and I put together the rudder bar and control column, then gave it all a quick blast of paint, including some grey on the inside of the nacelle to give me an idea of where any further attention might be needed. It doesn't look too bad but I'll clean it up a little more anyway.


I also put together a PE seat and added some plastic strip to the bottom which will be shaped when it's dry to position it correctly.


Thanks for looking in!


Ian

Offline Alexis

  • Hero Member
  • *****
  • Posts: 7947
  • Love the self
Re: RAF FE8, Scaleplanes 1:72
« Reply #32 on: March 22, 2020, 11:23:12 AM »
Looking good Ian ! :) 8)


Terri
Hurra ! , Ich Leben Noch
Body and life is a vessel we use to travel the planet . Femininity is the gift , The miracle comes from what we do with it .

Offline RAGIII

  • Hero Member
  • *****
  • Posts: 18833
Re: RAF FE8, Scaleplanes 1:72
« Reply #33 on: March 23, 2020, 10:20:13 PM »
Excellent!
RAGIII
"A man has to know his limitations": Harry Callahan

"Don't slop it on" Lynda Geisler

Online IanB

  • Hero Member
  • *****
  • Posts: 2439
Re: RAF FE8, Scaleplanes 1:72
« Reply #34 on: March 25, 2020, 01:26:58 AM »
Thanks Terri and Rick! I must admit I'm enjoying this one, so far at least!

A little more progress today as I am now forced to stay at home for at least 2 weeks as I'm sure are most others. Unfortunately I'm not in a position to work from home so we have to use up our vacation time. Still, at least that means I'm being paid so it could be worse!


I spent this afternoon adding the rest of the interior framework using .020" x .030" strip and .015" dia rod. I had originally done the side frames with .010" x .020" strip but it looked out of scale so I pulled it all out and did it again. I think it was worth the effort!


and fortunately everything seems to fit!


so it all got another coat of grey.


The seat also got it's base coat of CDL so text job for tomorrow will be to add the CDL to the framework and panel behind the pilot ready for the wood painting. I'm not looking forward to painting those tiny frames but I did get myself some decent small detail brushes at Telford last year so it should be easier than previously!


Have a good night all! Stay safe and thanks for looking in.


Ian

Offline RAGIII

  • Hero Member
  • *****
  • Posts: 18833
Re: RAF FE8, Scaleplanes 1:72
« Reply #35 on: March 25, 2020, 04:20:56 AM »
Excellent progress. Your interior is going to look awesome!
RAGIII
"A man has to know his limitations": Harry Callahan

"Don't slop it on" Lynda Geisler

Offline Alexis

  • Hero Member
  • *****
  • Posts: 7947
  • Love the self
Re: RAF FE8, Scaleplanes 1:72
« Reply #36 on: March 25, 2020, 09:56:20 AM »
Ooooo , now I really looking forward on seeing some pint on her . She is looking might fine so far  :)


Terri
Hurra ! , Ich Leben Noch
Body and life is a vessel we use to travel the planet . Femininity is the gift , The miracle comes from what we do with it .

Online IanB

  • Hero Member
  • *****
  • Posts: 2439
Re: RAF FE8, Scaleplanes 1:72
« Reply #37 on: March 26, 2020, 12:54:31 AM »
Thanks guys, wait no longer for paint! At least in the interior....

I got a bit more done today on the interior. Paint all done now,


Step 1 for the woodwork was the CDL coat,

Step 2 was a "wash" of acrylic "leather"

Step 3 a coat of Tamiya clear orange.


Job done!

I know I too pics of each stage but my phone appears to have been hungry today so there's only one left


After that it was time to start putting it all together, including the PE seatbelts.


Sorry for the dearth of pics, I'll try to remember to feed the phone tomorrow morning! So tomorrow's tasks are to add the control cables in the cockpit, including something in the back to stick the exterior ones to when the time comes, add a couple of rudimentary instruments, then stick the halves together. 


Stay safe, and thanks for looking in!


Ian

Online IanB

  • Hero Member
  • *****
  • Posts: 2439
Re: RAF FE8, Scaleplanes 1:72
« Reply #38 on: March 27, 2020, 01:13:28 AM »
More progress!

In between making a beer run and grocery shopping (I had to forgo the water, tomorrow is good enough for that!) I managed to get quite a bit done today.


I had to replan my construction after realising that I had added the foot boards so could not now add the gun mounting across them. Instead I drilled a hole in the floor and trimmed the post for length. I had also forgotten to make the little wooden support for it so the "woodworking" kit came out again. After cutting and sanding it to an acceptable shape and size I painted it CDL. Once that was dry the "leather" wash went on


Followed not too long after by the clear orange


All was then attached to the tiny tub!


Thoughts then turned to how I was going to attach the control wires for rudder and elevator. I decided the best bet was to CA the lines to a small piece of plastic card so I could glue that inside then push the wires back into the tub once it was closed up to ensure they stayed safe. A piece of tape on the ends SHOULD ensure that I can pull them out again later.....

The lines were duly run across my silver marker, then CAd to little bits of strip, which were painted black, just in case! I made sure the lines were as close together as possible, then they were threaded through the holes and the little black piece was glued inside the rear of the tub. 


Another few minutes playing with offcut plastic card gave me the rear lower panel which was painted and attached.

I decided to forgo the internal control cables and the one or two instruments as it's already quite busy in there and I'm not sure I could fit them in! 


That left me with this


That'll do for me! So out with the glue!


She will sit overnight to ensure all is good and set, then out with the filler and sanding sticks!


Thanks for looking in folks, and stay safe!


Ian

Offline RAGIII

  • Hero Member
  • *****
  • Posts: 18833
Re: RAF FE8, Scaleplanes 1:72
« Reply #39 on: March 27, 2020, 07:40:55 AM »
Lovely work on the painting and construction of your interior!
RAGIII
"A man has to know his limitations": Harry Callahan

"Don't slop it on" Lynda Geisler

Online IanB

  • Hero Member
  • *****
  • Posts: 2439
Re: RAF FE8, Scaleplanes 1:72
« Reply #40 on: March 28, 2020, 02:19:29 AM »
Thanks Rick!

Evening all!

Time for today's close of play update.


My plans for today were thwarted upon inspection of the nacelle. It hadn't stuck well enough, despite the tabs. So the first job today was to adjust the tape and brush Gators grip into the joints, making sure it went all the way in between the floor and the shell. After that had dried I moved the tape and repeated the process in the areas that were now revealed. I'll leave it now until tomorrow just to be sure it's properly set.


That meant I had to find something else to do, so I started on the wings. There were 2 jobs that needed doing (apart from drilling all the holes!) and I was a little wary of the second one....

First though I marked out and removed the ailerons and tidied all those up. That also required filling the moulded aileron lines as they are too thick and in the wrong place anyway, the ailerons are smaller than the kit ones. They were removed by using a micro saw for the ends, then repeated scribing along a metal rule with a no11 blade until I could break them off. That ensured a nice straight, clean, edge

The second job?

Adding the dihedral. I was hoping that I'd be able to bend the wings and they'd hold the new shape, but was not sure about what would happen to the milliput I'd added earlier. I marked each one up and held them against a metal rule to give a good edge, then carefully applied a little pressure. It worked! The wings were all done in a short time, then each was compared both to the plans and more importantly, to each other. A slight difference from the plans won't be noticeable but if they are different from each other that will definitely show! 


That will do! There was one slight crack in the milliput but nothing serious and it will be easily dealt with. That leaves pinning the ailerons, and drilling the strut/rigging holes. That should be fun!


What other jobs could be done at this stage?
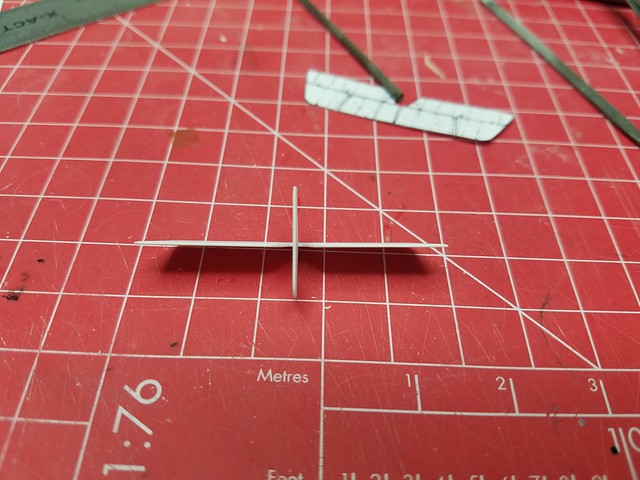
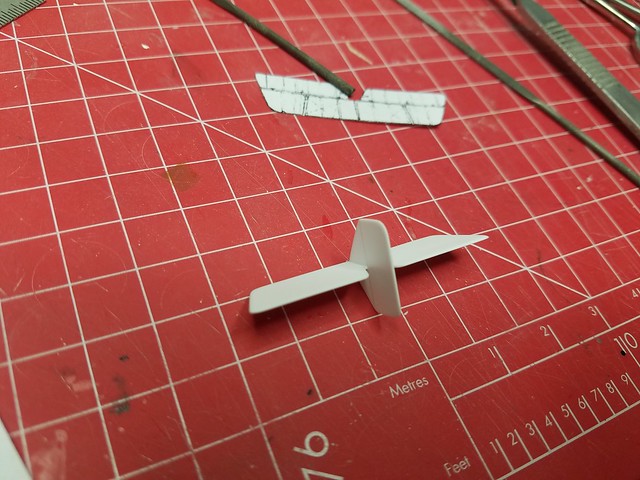


Tail feathers!


Cut from .020" sheet as usual, there was just one small difference to my normal procedure. To ensure that the tail is as strong as possible and straight, I left the rudder and both fins attached. I carefully measured and marked up the fins, scribed a line, then cut a slot with a small saw blade. I had to widen it very carefully with a no. 11 blade but it now slips over the stabilizer nicely.


I simply scribed the rudder joint on and will work with that.The elevators will be separated later. It looks good and I think it will add a bit of rigidity to the assembly.


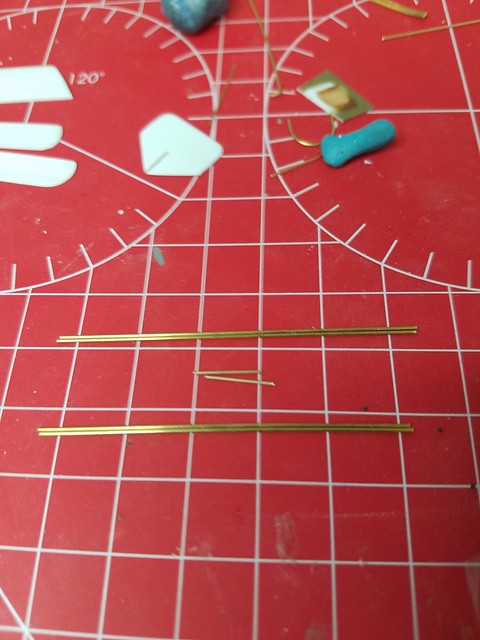
Last job for today was to cut the brass rod for the tail booms. First off I had to figure out the lengths. Normally I'd use the 1:48 plans and scale down but since these are all over the shop and the only ones I'd corrected were the 1:72 ones I had to measure even more carefully than usual! After measuring top and bottom at least 3 times I triangulated to get the true length.

For those not too sure, there are 3 simple steps. I first measured the length along the boom itself on the side view. That gave me the long side of a right angled triangle. Then on the plan view I drew a vertical line from the tail mounting towards the nose (This represents the measurement we just took from the side but is not the right length because of the slope, hence why I measured it along the boom from the side, not just the distance between the front and rear ends of the boom!). The distance between this line and the wing mounting gave me the short edge of the triangle. The diagonal is the boom length! Top one is 57mm and the bottom one 54.5mm.


I spent quite a while mulling over what size brass rod to use. I couldn't find any reference to what size they actually were so did it by eye, comparing to photos. I first went for .8mm and cut all 4 before deciding they looked too stubby, so I did it again with .6mm and I'm much happier with the look now. I think .8mm scales out to about 2.25" and .6mm to 1.75" (43mm) which is not out of the realms of possibility. The struts between top and bottom are .5mm.


So that's where we are tonight. Tomorrow will hopefully see the nacelle cleaned up and shaped correctly, and possibly even the soldering of the tail booms. We'll see how I feel when I get to it...


Stay safe, and thanks for looking in!


Ian

Offline smperry

  • Hero Member
  • *****
  • Posts: 932
Re: RAF FE8, Scaleplanes 1:72
« Reply #41 on: March 28, 2020, 02:53:49 AM »
Thank you Ian for the concise tutorial on getting the correct boom length. A mm off in 1:72 can be noticeable, not to mention the satisfaction of having gotten it exactly right. Looking forward to your further adventures in scratch building.
sp
There is something fundamentally amiss with a society which forces it's modelers to work for a living.

Online IanB

  • Hero Member
  • *****
  • Posts: 2439
Re: RAF FE8, Scaleplanes 1:72
« Reply #42 on: March 28, 2020, 03:00:51 AM »
Thanks SP!

I noticed in another post you said you're on Florida's nature coast. I lived in Crystal River for 7 years!

Ian

Offline smperry

  • Hero Member
  • *****
  • Posts: 932
Re: RAF FE8, Scaleplanes 1:72
« Reply #43 on: March 28, 2020, 04:55:41 AM »
Ian
They have had US 19 torn up from south of Homosassa Springs up to the airport for the last 2 1/2 years. At least when they are done the non-residents will zip through much faster. They are also extending the Suncoast Parkway up to Hwy 44 in Crystal River, the tree murdering Orcs :-) The only hobby shop in the area is Rob's in Ocala a good hour away, as is the nearest IPMS plastic modeling club. You probably picked a good time to depart.
sp
There is something fundamentally amiss with a society which forces it's modelers to work for a living.

Offline RAGIII

  • Hero Member
  • *****
  • Posts: 18833
Re: RAF FE8, Scaleplanes 1:72
« Reply #44 on: March 28, 2020, 05:50:17 AM »
excellent Math and Progress on your build Ian! The tail surfaces and wings look outstanding! I am also an Ex Patriot from Florida, although I lived on the East Coast Near Ft. Lauderdale  8)
RAGIII
"A man has to know his limitations": Harry Callahan

"Don't slop it on" Lynda Geisler