Author Topic: RAF FE8, Scaleplanes 1:72  (Read 44011 times)

Offline IanB

  • Hero Member
  • *****
  • Posts: 2435
RAF FE8, Scaleplanes 1:72
« on: March 01, 2020, 04:13:57 AM »
Sorry to have been away for so long, but what with relocation, and getting distracted by WWII aircraft and a car or two, my WWI models have unfortunately taken a back seat for a while.
However, despite my best efforts I have caved in to the Vac form and resin kit builders new group build and I will be starting the Scaleplanes RAF FE8 kit which was one of the first vacs I added to my stash. I have some after market goodies in the form of a SmallStuff Monosoupape engine and Aeroclub prop which although slightly too large is at least the correct pitch for a pusher and can be filed down, and a Miniworld Lewis gun. Wheels and national markings/serial have been sourced from the spares stash. The only issue is how I will do the number on the nacelle as I have no decals that will do the job. I'll sort that out when I come to it, and it will be less of a problem than figuring out how to do the tail framing!

Here's what I have to be going on with:


Did I mention how tiny it is?


I spent this afternoon scaling up the plans from the Datafile (why are the profiles and plan view different sizes? They are not to any particular scale either!) and sourcing the bits I needed. The last act of today was to outline the parts to be removed.


Oh well, here we go.....


Ian

Offline Thumbs up

  • Hero Member
  • *****
  • Posts: 568
Re: RAF FE8, Scaleplanes 1:72
« Reply #1 on: March 01, 2020, 04:32:15 AM »
Will be tagging along :)

Offline Borsos

  • Hero Member
  • *****
  • Posts: 3315
Re: RAF FE8, Scaleplanes 1:72
« Reply #2 on: March 01, 2020, 05:57:12 AM »
One of the most underrated and forgotten pusher planes of WWI. Great you are doing this one. I also have the WDF in my library and frequently wondered about these strange scale plans... Well, mistakes can happen everywhere I think.
Andreas
"Deux armées aux prises, c'est une grande armée qui se suicide."
Barbusse.
"Ein Berg in Deutschland kann doch einen Berg in Frankreich nicht beleidigen. Oder ein Fluß oder ein Wald oder ein Weizenfeld."
Remarque.

Offline Alexis

  • Hero Member
  • *****
  • Posts: 7947
  • Love the self
Re: RAF FE8, Scaleplanes 1:72
« Reply #3 on: March 01, 2020, 07:31:08 AM »
Now this is a type we don't see very often at all . Will be following along on this one . I built a 48 scale kit of the is using lone star models vac kit , it wasn't very good and I only ended in using the two fuselage halves - rest is scratchbuilt . Looking forward on your progress  :)


Terri
Hurra ! , Ich Leben Noch
Body and life is a vessel we use to travel the planet . Femininity is the gift , The miracle comes from what we do with it .

Offline IanB

  • Hero Member
  • *****
  • Posts: 2435
Re: RAF FE8, Scaleplanes 1:72
« Reply #4 on: March 01, 2020, 10:43:55 PM »
Hi "Thumbs", please do!

Andreas and Terri, welcome aboard, good to see you here!

Just in case we have any vacform "newbies" looking in, I'll document the whole process. So here we go!

First thing then, is removing the parts from the sheet. You will have noticed in my previous post I had outlined the parts with a black marker. Next step is to break them out, literally! I usually start by using scissors to cut the sheet into sections, each containing a part. Then using a knife blade, score around each part, but not too close. The plastic can then be bent and snapped off.


leaving you with this


I then score again, carefully right along the edge of the parts. This is why I said not to go too close last time. If you left enough, you can grab the excess with a pair of pliers and bend it away, again snapping it off cleanly. If you prefer you can omit the first snapping out part, but I prefer to work with gradually smaller pieces rather than trying to bite it all off at once, it gives me better control over what I'm doing.


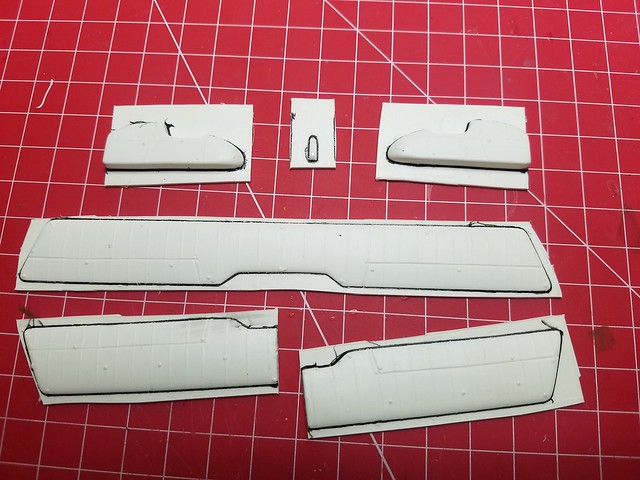
That left me with this


The wing undersides look like this


Don't worry, it's all going to be sanded off! That's why I drew the black lines earlier


So that I can see how far back I have to sand them! Not too important on the wings as I will just sand to the correct thickness which, on the trailing edges, will be much thinner than that line. But on other parts it's critical.


If the kit is made correctly!


Fortunately I checked the fuselage nacelle before I sanded it down...


It's actually the correct width without sanding, so that means it's going to be awkward and probably need filler!


After sanding the wings down, I checked them against the plans


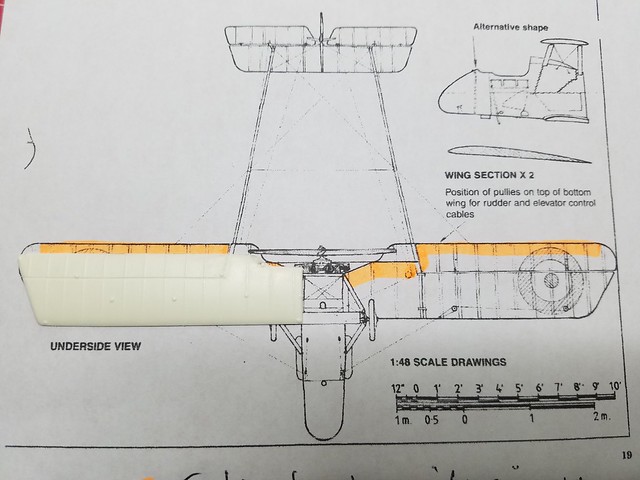
Not too good! The trailing edges need extending, as do the tips, and the centre cutout on the lower wings is the wrong shape, although it's too small so could be cut back.

It looks as though I'm going to have to make a set of wings too, so this kit will basically consist of the fuselage nacelle, suitably corrected, and a bunch of scratchbuilt and aftermarket parts!


Oh well, good job I didn't pay for it!


My printer died this morning too, so I need to buy another one! I guess I'll have to use the one at work for now!


Thanks for looking in!


Ian

Offline RAGIII

  • Hero Member
  • *****
  • Posts: 18793
Re: RAF FE8, Scaleplanes 1:72
« Reply #5 on: March 01, 2020, 11:10:01 PM »
wow Ian, it seems you are tackling a pretty poorly designed vac! So now on to scratch building  :-[
RAGIII

PS: Your work looked great prior to comparison of the parts to the drawings!
"A man has to know his limitations": Harry Callahan

"Don't slop it on" Lynda Geisler

Offline Mattrix25

  • Newbie
  • *
  • Posts: 15
Re: RAF FE8, Scaleplanes 1:72
« Reply #6 on: March 02, 2020, 03:07:19 AM »
Ian, STOP : the plans you are using are 1/48 scale !?

Regards,

Matt.

Offline IanB

  • Hero Member
  • *****
  • Posts: 2435
Re: RAF FE8, Scaleplanes 1:72
« Reply #7 on: March 02, 2020, 04:19:54 AM »
No worries Matt!
The originals are, but the other plans in the DF are different sizes for plan and elevation so it was easier to reduce the 1:48 plans than to enlarge the dubious scale ones twice for plan and elevation!

Ian

Offline IanB

  • Hero Member
  • *****
  • Posts: 2435
Re: RAF FE8, Scaleplanes 1:72
« Reply #8 on: March 02, 2020, 11:50:56 PM »
On with the latest installment of "Tales from the Table Top". Part 3: The Sorry Saga of a Scaleplanes Vac"


When we last saw the FE8 she was feeling very sorry for herself. Methinks it was an inferiority complex caused in part by having undersized parts. Understandable!

To remedy that, some minor surgery was required. The first step being to sand off the edges where extensions were needed to give a flat joint surface. The areas needing attention were the trailing edges and tips of all 3 wings. Once that was taken care of, strips of .020" x .060" were added to the trailing edges, and .030" x .100" to the tips.

That was done last night, and some Mr Dissolved putty added to the joints. This morning I started sanding them down. First I tackled the lower wings, the inner trailing edges were cut back to the correct positions and the new edges shaped.


One done


To make sure they match, I marked the second one using the first as a template.


That, and the upper wing, were then treated the same way.


Since the parts also have a concave underside, usually perfect for an early aircraft but unfortunately not this one, I did a skim of Milliput fine. It was rolled out into a thin sausage and stuck on, the flattened out using plenty of water, before finally using a scrap piece of thick plastic sheet, chamfered to an edge, as a scraper, again with water to smooth it out and level it off. It's a very messy process and difficult to see how well it worked. Hopefully it will be ok and i can always finish it off with PPP now that I have a solid base to accept the strut pins later.


The wings now look much better and the span is acceptable top and bottom.


On to the nacelle. Again the kit part is not good. The front end is too low, the cockpit opening is too low, and the cockpit sides are too vertical. Apart from that it's not too bad! 


Sort of like this


This is how the cockpit should be


and this is what we get


You'll see I've already added some Mr Dissolved Putty to help with the adjustment. That was before I though it through. The first issue was to correct the nose. After pondering a while I settled for cutting it and bending it up. I made a small cut either side, forward of the cockpit and inserted small spacers.


Here's the cut on one side


Bent upwards


Much better!


and with the spacers glued in, it was held in place with dolls house pegs. The gaps have been filled with more Mr Dissolved Putty and they have been set aside to set over night.


One final pair of shots to show the corrected wings over the plans.


Oh look, it's Happy Hour! Time for a beer.

Thanks for looking in everyone, have a great evening!


Ian

Offline lcarroll

  • Administrator
  • Hero Member
  • ******
  • Posts: 8546
Re: RAF FE8, Scaleplanes 1:72
« Reply #9 on: March 03, 2020, 12:08:57 AM »
Quote:  "Oh look, it's Happy Hour! Time for a beer."

Ian,
     A man after my own heart; after that sequence of modifications and repairs I hope you had two! Nice to see you back in action here, it's looking very nice!
Cheers,
Lance

Offline RAGIII

  • Hero Member
  • *****
  • Posts: 18793
Re: RAF FE8, Scaleplanes 1:72
« Reply #10 on: March 03, 2020, 02:53:41 AM »
Very innovative and successful mods Ian. The results look excellent!
RAGIII
"A man has to know his limitations": Harry Callahan

"Don't slop it on" Lynda Geisler

Offline Alexis

  • Hero Member
  • *****
  • Posts: 7947
  • Love the self
Re: RAF FE8, Scaleplanes 1:72
« Reply #11 on: March 03, 2020, 11:00:49 AM »
Ian , you are making really excellent progress on the corrections . Huge difference ! What are your plans for the cockpit ?


Terri
Hurra ! , Ich Leben Noch
Body and life is a vessel we use to travel the planet . Femininity is the gift , The miracle comes from what we do with it .

Offline IanB

  • Hero Member
  • *****
  • Posts: 2435
Re: RAF FE8, Scaleplanes 1:72
« Reply #12 on: March 03, 2020, 03:53:17 PM »
Thanks Lance, I had at least 2!
Thanks Rick, much appreciated.
Terri, my plan at the moment is to add stock strip to the sides to raise them and see how it looks. Milliput or Mr Dissolved Putty may come into use, added on the inside to enable me to sand the outside to the correct shape. I will also add a smidge of Milliput to the nose to reinstate the slightly bulbous shape of the upper nose surface.

That's the plan, we'll see how and if that needs to be amended!

Ian

Offline kensar

  • Hero Member
  • *****
  • Posts: 2503
  • Reshaping the world - one piece at a time.
Re: RAF FE8, Scaleplanes 1:72
« Reply #13 on: March 03, 2020, 10:31:18 PM »
By this point, I would have binned the 'kit' and scratchbuilt it.

Good work!

Offline IanB

  • Hero Member
  • *****
  • Posts: 2435
Re: RAF FE8, Scaleplanes 1:72
« Reply #14 on: March 03, 2020, 10:52:51 PM »
@kensar - It probably would have been easier, but not as much fun!

On to today's progress.

I'm very happy with the wings. This is the underside of the upper wing. I tried to get some oblique light on it to show the blemishes, but since there aren't any visible it was a bit of a waste of time!


Then it was on to the nacelle. The side pieces went on easily enough and I'm happy with those. 

A small fillet has also been added at the rear which will be filed down with a rat's tail file when dry to give the curve up to the rear sides. Because the sides are now higher, the rear of the cockpit doesn't need drastic alteration. However the hump behind the pilot's head was far too small so I rumaged in the spares box and found these


I think they came from the Sopwith Baby. Filed a bit narrower and reamed out with the rat's tail and it should work nicely!


It can be extended further aft once in place.

The last item on the cockpit nacelle was to add the final blanks to shape the front of the cockpit opening. Strips of .020" x .060" were added and again Mr Dissolved Putty was added to the seams. Once that's all properly dried I'll file and sand it all  to shape.


That should complete the adjustments needed, at least until after the halves have been jopined when I can finish off the final shaping. The underside at the rear will also need to be opened up and an angled piece inserted to give a slant to the underside, although the nacelle edges remain where they are. A strut will eventually be positioned between the lower rear edges of the nacelle too.

Last job today was the prop, which was actually done while waiting for other bits to dry so i could work on them again.

I started with an Aeroclub prop which was slightly too large so the tips were clipped to give the correct prop diameter of 34mm, then it was out with the needle files to reshape the blades, then thin them to a nice sharp edge.

Halfway


and finished


I'm happy with that, almost a shame to have to paint it!

That's it for today folks and progress with undoubtedly slow now as I'm back to work tomorrow.


Thanks for looking in!


Ian