Author Topic: Macchi M-5  (Read 36568 times)

Offline Mike Norris (UK)

  • Hero Member
  • *****
  • Posts: 2222
  • RAF Old and Bold
    • Mikes WW1 Aircraft Models
Re: Macchi M-5
« Reply #300 on: April 11, 2020, 05:29:49 PM »
Your engine is completely inline with the rest of your Superb build.
RAGIII

'engine is completely inline' -  ;D  I see what you did there   ;)

Mike


Retired - 27 years RAF service then 20 years Military Aerospace Technical Author/editor.

Offline huberlu

  • Full Member
  • ***
  • Posts: 206
Re: Macchi M-5
« Reply #301 on: April 11, 2020, 06:36:16 PM »
She's a true beauty !!!

Offline kensar

  • Hero Member
  • *****
  • Posts: 2507
  • Reshaping the world - one piece at a time.
Re: Macchi M-5
« Reply #302 on: April 11, 2020, 11:53:32 PM »
Fantastic looking engine.  Good upgrade to the spark plugs.
Continuing to follow along.

Offline RichieW

  • Hero Member
  • *****
  • Posts: 1966
Re: Macchi M-5
« Reply #303 on: April 12, 2020, 01:32:42 AM »
Great work Mike, love that engine. Your PDF build log on the Tripe is proving to be a great help to me btw.

Offline Mike Norris (UK)

  • Hero Member
  • *****
  • Posts: 2222
  • RAF Old and Bold
    • Mikes WW1 Aircraft Models
Re: Macchi M-5
« Reply #304 on: April 12, 2020, 03:00:13 AM »
Thanks Richie - glad it's of some use,

Mike


Retired - 27 years RAF service then 20 years Military Aerospace Technical Author/editor.

Offline Mike Norris (UK)

  • Hero Member
  • *****
  • Posts: 2222
  • RAF Old and Bold
    • Mikes WW1 Aircraft Models
Re: Macchi M-5
« Reply #305 on: April 12, 2020, 03:43:59 AM »
Hi all,
The kit illustration showing the rigging for the engine support 'Z' struts is wrong.
It shows correctly bracing rods fitted midway up the struts and routed across the fuselage between the front and rear struts of the two 'Z' struts.
What is not correct is that it shows a bracing rod fitted along the left and right sides of the 'Z' struts, spanning the front, centre and rear struts of each.
In reality all three bracing rods were fitted across the fuselage between the rear struts, centre struts and front struts.

I've pre-rigged both 'Z' struts, which will be finally rigged once fitted to the fuselage,

Mike

« Last Edit: April 13, 2020, 01:09:48 AM by Mike 'Sandbagger' Norris »


Retired - 27 years RAF service then 20 years Military Aerospace Technical Author/editor.

Offline RAGIII

  • Hero Member
  • *****
  • Posts: 19069
Re: Macchi M-5
« Reply #306 on: April 12, 2020, 10:26:05 PM »
You certainly have an Eye for the details Mike! I envy that ability  8) The strut rigging looks outstanding as always!
RAGIII
"A man has to know his limitations": Harry Callahan

"Don't slop it on" Lynda Geisler

Offline RichieW

  • Hero Member
  • *****
  • Posts: 1966
Re: Macchi M-5
« Reply #307 on: April 13, 2020, 01:03:52 AM »
Good knowledge Mike, mightily impressed by your fastidious attention to detail. Builds like this are a great form of online tutorial for me, enjoying following your work.  :)

Offline Mike Norris (UK)

  • Hero Member
  • *****
  • Posts: 2222
  • RAF Old and Bold
    • Mikes WW1 Aircraft Models
Re: Macchi M-5
« Reply #308 on: April 15, 2020, 04:01:19 AM »
Hi all,
The engines bottom support frame is complete.
The rigging is 0.12 mm diameter mono-filament, with 0.5 mm tube and 'Gaspatch' 1:48th scale Type C turnbuckles.
The three bracing cross bars are 0.4 mm diameter tube, with twelve end brackets from twelve plates (item 43) from (‘PART’ photo-etch for Fokker Dr.1 -S32-023).
The bars have an ‘RB Motion’ Aluminium Nuts Hex 0.79mm (1281-A) at each end.

The struts are reinforced with solid steel rods, so careful drilling through struts was required to avoid hitting them with the drill!!

On this particular aircraft, the wind driven pressure pump for the fuel system was mounted on the centre cross bar.
I discard the kit supplied photo-etch item and made a pump from sprue and a propeller from the 'spares' box.

Next up is to fit the engine then add the various controls and pipes to the engine, including those from the cockpit and fuselage fuel tank.

Mike


Retired - 27 years RAF service then 20 years Military Aerospace Technical Author/editor.

Offline kkarlsen

  • Sr. Member
  • ****
  • Posts: 398
  • 'Old modeller' - Trying to catch up!
Re: Macchi M-5
« Reply #309 on: April 16, 2020, 01:45:00 AM »
Wonderful!   ;)

Kent

Offline RichieW

  • Hero Member
  • *****
  • Posts: 1966
Re: Macchi M-5
« Reply #310 on: April 16, 2020, 01:53:20 AM »
Amazingly detailed work, brilliant!

Offline Alexis

  • Hero Member
  • *****
  • Posts: 7947
  • Love the self
Re: Macchi M-5
« Reply #311 on: April 16, 2020, 09:57:15 AM »
Can't wait to see the engine mounted into the supports , really excellent job on the details Mike  8)


Terri
Hurra ! , Ich Leben Noch
Body and life is a vessel we use to travel the planet . Femininity is the gift , The miracle comes from what we do with it .

Offline Mike Norris (UK)

  • Hero Member
  • *****
  • Posts: 2222
  • RAF Old and Bold
    • Mikes WW1 Aircraft Models
Re: Macchi M-5
« Reply #312 on: April 17, 2020, 12:28:22 AM »
Hi all,
Well just for a change ----

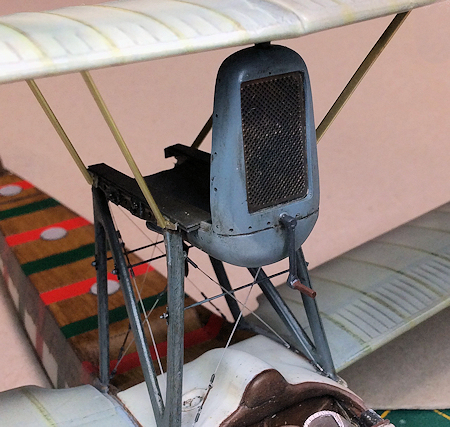
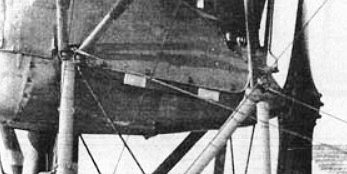
The lower engine support 'Z' struts support the radiator/engine cowl and the engine itself.
When I test fitted the lower 'Z' struts into the fuselage, I found they were leaning rearwards when in fact they should be perpendicular to the fuselage.
Therefore I 'tweaked' them to correct that.

A second pair of 'Z' struts are bolted to the front and rear struts and span up and forwards to attach to the underside of the upper wing, forming the central support structure.


I decided not to use the kit supplied upper ‘Z’ struts and replace them with struts created from micro-tube and rod, for the following reasons:
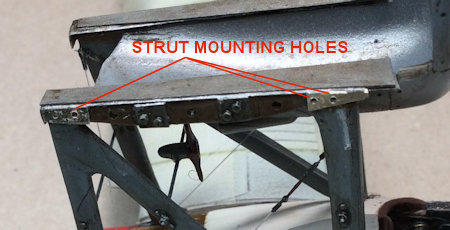
The photo-etch engine bearer plates and top of the lower engine ‘Z’ support struts have no locations for attaching the upper engine ’Z’ struts.
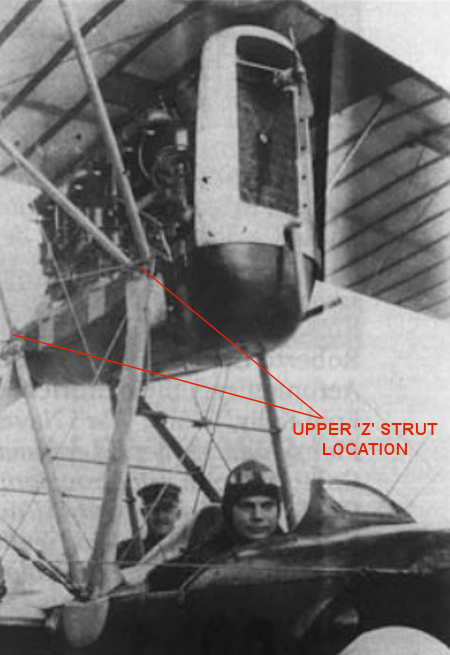
When test fitted into the location holes in the underside of the upper wing I found that the bottom of the struts on the two upper ‘Z’ struts were way too far rearwards and therefore not aligned with the tops of the lower ‘Z’ strut assembly, to which they should be attached (probably due to my correction of the lower 'Z' struts).
The actual upper ‘Z’ struts were made of three separate struts, not one combined assembly as provided with the kit parts.

To do this I drilled three 0.5 mm diameter holes through the lower 'Z' struts and the photo-etch engine bearer plates.
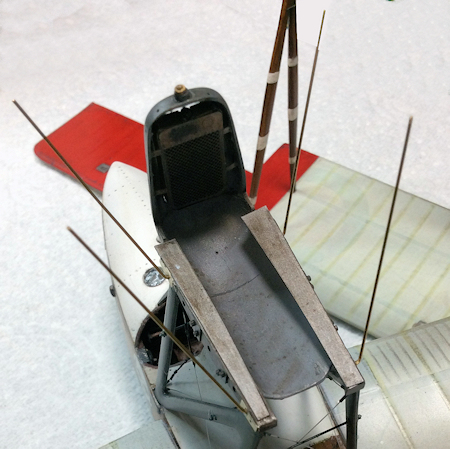
Then I created four support rods from 0.5 mm brass rod.
Finally I created four brass aerofoil sections that slid onto the support rods.
The upper wing now locates correctly onto the wing 'V' struts and the created brass struts.

Now I have to create the single struts that span between the top of the rear struts and the bottom of the front struts.

Remember - modelling is meant to be fun  ;)

Mike


Retired - 27 years RAF service then 20 years Military Aerospace Technical Author/editor.

Offline lcarroll

  • Administrator
  • Hero Member
  • ******
  • Posts: 8581
Re: Macchi M-5
« Reply #313 on: April 17, 2020, 05:07:59 AM »
Mike,
    Absolutely amazing work, this is the modeller's art in a whole new dimension! I am really enjoying (and learning from) this magical journey you are on!

Cheers,
Lance

Offline Mike Norris (UK)

  • Hero Member
  • *****
  • Posts: 2222
  • RAF Old and Bold
    • Mikes WW1 Aircraft Models
Re: Macchi M-5
« Reply #314 on: April 17, 2020, 05:53:44 AM »
Hi all,
Thanks for the encouraging comments - for this build I need them ;)
I made the cross struts in the same manner but the locating rods for these struts were soft soldered for strength.
A 0.5 mm diameter hole needs to be drilled into the underside of the upper to locate the top of the struts,

Mike


Retired - 27 years RAF service then 20 years Military Aerospace Technical Author/editor.