
Recent Posts

Pages: 1 ... 7 8 [9] 10
81
The World of Scale Models / Re: Monograms B- 26 Marauder 1/48
« Last post by Alexis on July 19, 2026, 09:12:48 AM »
Been some time since the last up-date on this project .

wells have been painted and weathered a bit with details pick out in silver paint , glued in place and work on the seems have started . Doing this part now before the wings are attached to the fuselage , nice to have a bit of room cleaning these seems up . There are some pretty big gaps to be filled . I filled this gap with plastic strips first sanding that down when dried . Now it is time for a bit of putty And areas which lost the rivet detail will be drilled out up and around the engine area so everything will blend in a better with the details throughout the kit . Props are painted and ready for decals . Engines got a coat of gloss black for the Alum , I used Vallejo metal coat . ( I'm out of Tamiya Alum form their enamel line of paints ) This has no grain like their lacquer and acrylic line .
82
Given the issues that you had to deal with, (successfully as it turns out), you have made a very good representation of an important type. Good to see this poor kit bashed into something much more accurate!

Stephen.
83
Under Construction / Re: 1:32nd scale OEFFAG Albatros D.III
« Last post by Mike Norris (UK) on July 19, 2026, 02:29:49 AM »
Hi all,
Just a couple of updates.
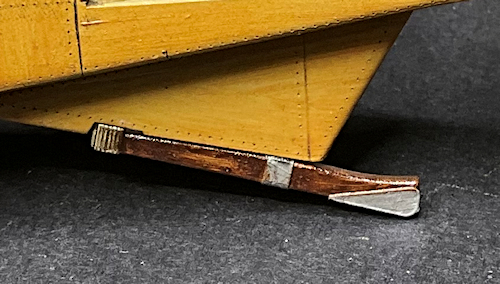
The tail skid is fitted.
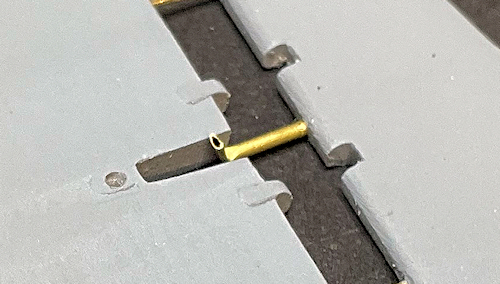
Also, 0.8 mm diameter Brass tube was bent to represent the aileron operating levers, which are not supplied in the kit.

Now its onto painting the flight surfaces,

Mike


84
Completed models / Re: 1/20 Balsa Albatros D.Va
« Last post by Will Levesley on July 19, 2026, 01:49:11 AM »
Looks amazing!  The lozenge on the wings looks fantastic.
85
a few more photos...
86
Started this one thinking it should be fairly quick and simple.  The first purpose designed fighter plane - a monoplane design with simple rigging.  Turns out the fuselage is an astounding 11.5mm too long, so it had to be shortened, the spinner was far too thin and pointy and had to be remodelled, the wheels are too small and had to be replaced, the tail skid is completely wrong and had to be replaced, the kit gun is awful and had to be replaced and there is no interior so that had to be scratch built as well.  All of the struts and undercarriage had to be thinned and shortened as well.  The wings also appear to sit about 1mm too low on the fuselage but I didn't correct that as I only realised that after I'd finished it!  There are other issues with shape around the cowling and cockpit areas too but I also left those as they where a bit beyond my skills.  The markings all came from the spares box.
Built as an RFC aircraft from 60 Sqn in 1916 flown by 2nd Lt Bayetto - and now bears a reasonable likeness to the real thing unlike what Revell provided.
87
Hi all - have had a couple of distractions over the last fortnight, but i've now worked through the hard stuff...

I decided I'd tackle the wings and engine nacelles as a single unit before attaching to the fuselage. The nacelles are a poor fit to the wing, so this way I was able to jostle the fit as best I could. There was still quite a bit of sanding and rescribing, especially on the joint between the upper wing piece and front of the engine nacelles. I also had to fill some spurious panel lines, and correct the misaligned panel lines around the exhaust areas between the separate nacelle parts. I also shimmed the upper wing part on one side with .005" card to assist with the fit at the wing root.


The fuselage went together well, though the gun covers are a poor fit. I had to be careful with adding the weight into the nose; there's plenty of space there but you have to be careful to allow enough room to joggle the gun cover in to place to achieve the best fit. Tidy up is still required in any case. I scribed the panel line down the centreline of the upper and lower fuselage, as well as add the hatches that Academy misses for the fuel fillers. This was the first time I had actually used SMS scribing tape. Where has this stuff been all my life! :)

The wing attachment to the fuselage, and the under-nose panel (which is a separate part) also had some gaps, but with some persuasion here and there while the glue was drying, I managed to achieve a nice enough fit, minimising clean up around all of the separate panels as well as the upper wing to fuselage joint. Happy days. 

I've now completed one of my favourite parts of a build - priming! Here the 'blank canvas' all comes together.  I've deliberately left the horizontal stabilisers off to aid with painting; they are a nice fit so won't be too much trouble to attach later.  There's still some areas here and there that need some additional tidy up, but nothing too significant.


Now, to choose a paint scheme...!

Cheers!

BC
88
Under Construction / Re: 1:32nd scale OEFFAG Albatros D.III
« Last post by NigelR on July 18, 2026, 05:57:40 PM »
Those exhausts look great. I wasn't going to bother replacing mine but after seeing these I absolutely have to!
89
Paper and Card models / Re: Der Kampfflieger Caproni Ca.3 1/72nd
« Last post by NigelR on July 18, 2026, 05:55:35 PM »
Nearly there and looking good! Off to a family wedding, so a nice weekend  :)
90
Paper and Card models / Re: Der Kampfflieger Caproni Ca.3 1/72nd
« Last post by NinetythirdLiberator on July 18, 2026, 02:45:18 PM »
Thanks, Nigel. 

And here's a shot of the main wheels and tires added.  Pretty close now!

I hope everyone is having a nice weekend...Dan
Pages: 1 ... 7 8 [9] 10