Author Topic: Mr Color - Thinner  (Read 6483 times)

Offline Ian from Doncaster

  • Hero Member
  • *****
  • Posts: 1164
Re: Mr Color - Thinner
« Reply #15 on: October 19, 2012, 03:19:06 AM »
The paints arrived today - I found an online distributor in the UK, ordered by 9pm UK time on Tuesday and the delivery was just before 1pm today.  Pretty good :)  Will be trying it out tonight.  There are some spare bombs in my WNW Fee that will soon be brass!

edit:

Here goes - top row L to R: Mr Metal Chrome Silver: Brass; Copper. 

Bottom row L to R: Humbrol Metalcote Polished Steel; Flat Aluminium; Gunmetal.


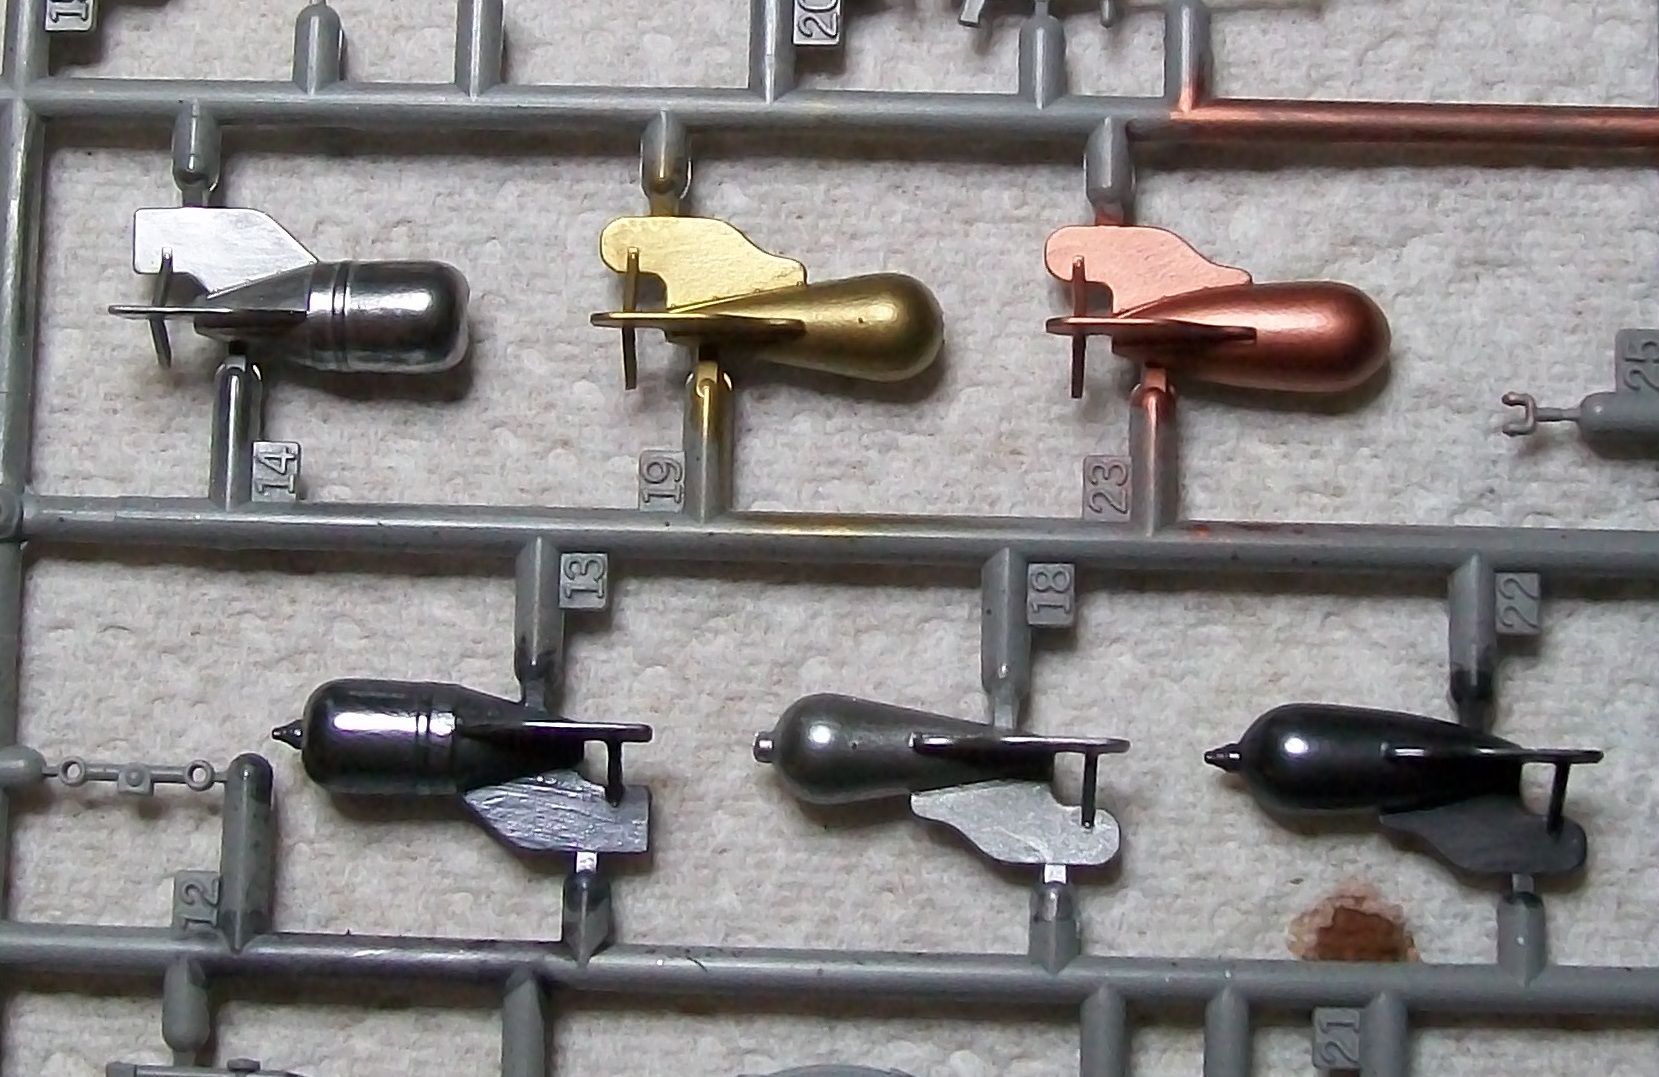
All of these are hand brushed, and buffed with the same brush once dry.  I used clean, new brushes for each of the Mr Metal colours.  I am quite impressed, the Mr Metal is no shinier than Metalcote, but Metalcote doesn't have brass nor copper - the Mr Metal is the best brass I have tried, and the copper is smoother than others.  I have not used any thinner - the Metalcote could do with thinning, especially the steel.  I am content with this trial, and will use the Mr Metal on my next build where required. 
« Last Edit: October 19, 2012, 06:20:37 AM by Ian from Doncaster »

Offline Whiteknuckles

  • Hero Member
  • *****
  • Posts: 1334
Re: Mr Color - Thinner
« Reply #16 on: October 19, 2012, 08:40:20 AM »
Thanks for showing the paints 'insitu' Ian, shows the results to good effect.
So what is your next build?

Andrew
Eternal Apprentice

Offline Ian from Doncaster

  • Hero Member
  • *****
  • Posts: 1164
Re: Mr Color - Thinner
« Reply #17 on: October 19, 2012, 07:57:22 PM »
I don't know yet, Andrew.  I have a choice from my stash, plenty to catch up with!  But having almost finished my WNW Fee I'm tempted to start the WNW Roland, as it should be relatively quick.  Then again, its only a few weeks until my birthday and I've dropped enough hints about the WNW E.II/III kit.

I think the Mr Metal paints will be used sparingly, but now that I have them, I can use them with confidence when required.  I also put a glass bead in each pot, to act as a agitator when shaking the pot.

edit - there appears to be some sort of advertising link appeared on the word "start" above.  I don't know how that happened but it wasn't me!
« Last Edit: October 20, 2012, 03:35:08 AM by Ian from Doncaster »

Offline gcn

  • Sr. Member
  • ****
  • Posts: 425
Re: Mr Color - Thinner
« Reply #18 on: October 20, 2012, 02:41:03 AM »
Shows what I know. I've some wiring in my Brisfit cockpit that needed painting copper so I dug out my Mr Color copper and brush painted it straight from the bottle and it went on really well so ill be doing that again. Not sure I'd want to do it over a larger area though.

Offline Ian from Doncaster

  • Hero Member
  • *****
  • Posts: 1164
Re: Mr Color - Thinner
« Reply #19 on: November 07, 2012, 11:48:53 PM »
So far I have found that for smaller components, and tubing, the Mr Metal goes on fine with a hand brush.  For larger, flatter areas, airbrushing will give better results unless you are very careful.  On larger areas I have found that unless the paint is rapidly brushed in, it can go sticky very quickly.  This can lead to a slightly pitted surface, so the metal looks cast rather than rolled or machined.

Offline pepperman42

  • Hero Member
  • *****
  • Posts: 4443
  • Sergeant, my brown pants.......
Re: Mr Color - Thinner
« Reply #20 on: November 08, 2012, 12:49:36 AM »
Thanks for the update. The brush painting aspect does give new possibilites to the cast/machined difference. Nice to know.

Steve