Author Topic: LVG C.VI, Pegasus 1/72  (Read 28235 times)

Offline Wolf

  • Full Member
  • ***
  • Posts: 188
  • The challenge is in the scale
Re: LVG C.VI, Pegasus 1/72
« Reply #15 on: November 11, 2016, 10:14:14 PM »
The engine is now ready.

I painted the block with Alclad dark Aluminium, the cylinders anthrazit and the rest in black. Then the engine was washed with Citadel sephia brown and partialy drybrushed with Revel Iron.

In the magnification everything looks a little bit crude, but this is 1/72. I added miniature pictures within the pictures which show the approximate size of the real thing if viewed on a 19" Display


A model thrives on its overall impression and not on that every little disagreement over the original is hyped up as a disaster

Online RAGIII

  • Hero Member
  • *****
  • Posts: 18839
Re: LVG C.VI, Pegasus 1/72
« Reply #16 on: November 12, 2016, 12:32:54 AM »
Looks terrific, especially in 1/72nd scale!
RAGIII
"A man has to know his limitations": Harry Callahan

"Don't slop it on" Lynda Geisler

Offline Alexis

  • Hero Member
  • *****
  • Posts: 7947
  • Love the self
Re: LVG C.VI, Pegasus 1/72
« Reply #17 on: November 12, 2016, 02:02:44 AM »
Very nice done , huge improvement over the kit part  :)


Terri
Hurra ! , Ich Leben Noch
Body and life is a vessel we use to travel the planet . Femininity is the gift , The miracle comes from what we do with it .

Offline steveb

  • Full Member
  • ***
  • Posts: 237
Re: LVG C.VI, Pegasus 1/72
« Reply #18 on: November 12, 2016, 04:23:31 AM »
Thanks for the paint references, it looks great!

Steve

Offline lcarroll

  • Administrator
  • Hero Member
  • ******
  • Posts: 8551
Re: LVG C.VI, Pegasus 1/72
« Reply #19 on: November 12, 2016, 04:29:54 AM »
VERY nice work in such a small scale Wolf. Your `photos within photos` are a nice touch, and really illustrate how small a subject you are working with.
Cheers,
Lance

Offline Borsos

  • Hero Member
  • *****
  • Posts: 3318
Re: LVG C.VI, Pegasus 1/72
« Reply #20 on: November 12, 2016, 06:22:12 AM »
I can't see anything crude, even under focus. It's a very clean and professional build, turns out really nice. I once owned the kit but never build it... I am curious to see what you're making out of it.
Best wishes
Borsos
"Deux armées aux prises, c'est une grande armée qui se suicide."
Barbusse.
"Ein Berg in Deutschland kann doch einen Berg in Frankreich nicht beleidigen. Oder ein Fluß oder ein Wald oder ein Weizenfeld."
Remarque.

Offline lone modeller

  • Hero Member
  • *****
  • Posts: 5317
Re: LVG C.VI, Pegasus 1/72
« Reply #21 on: November 12, 2016, 07:43:15 AM »
I can't see anything crude, even under focus. It's a very clean and professional build, turns out really nice.
I wholly agree with Borsos - there is absolutely nothing to be ahsamed of with this engine. Excellent build.

Stephen.

WarrenD

  • Guest
Re: LVG C.VI, Pegasus 1/72
« Reply #22 on: November 12, 2016, 10:20:25 AM »
What a great start Wolf, and as Juan said, a bold choice. I'm following this with much interest.

Warren

Offline Wolf

  • Full Member
  • ***
  • Posts: 188
  • The challenge is in the scale
Re: LVG C.VI, Pegasus 1/72
« Reply #23 on: November 14, 2016, 09:05:26 PM »
The pegasus kit has, considering its age, sufficient cockpit details.

But we are modellers and therefore do sometimes absurd things like scratching pieces that no one will realy be able to see ;)
I am no exception here. So I decided to replace the simple plastic socket with a scratch built fuel tank on which the pilot was in fact sitting.
To achieve this, I cut some pieces from an evergreen profile and glued them in a sandwich way togehter. After drying, this plastic chunk was sanded in form.
I also added some stretched sprue to simulate reinforcement and fuel inlets


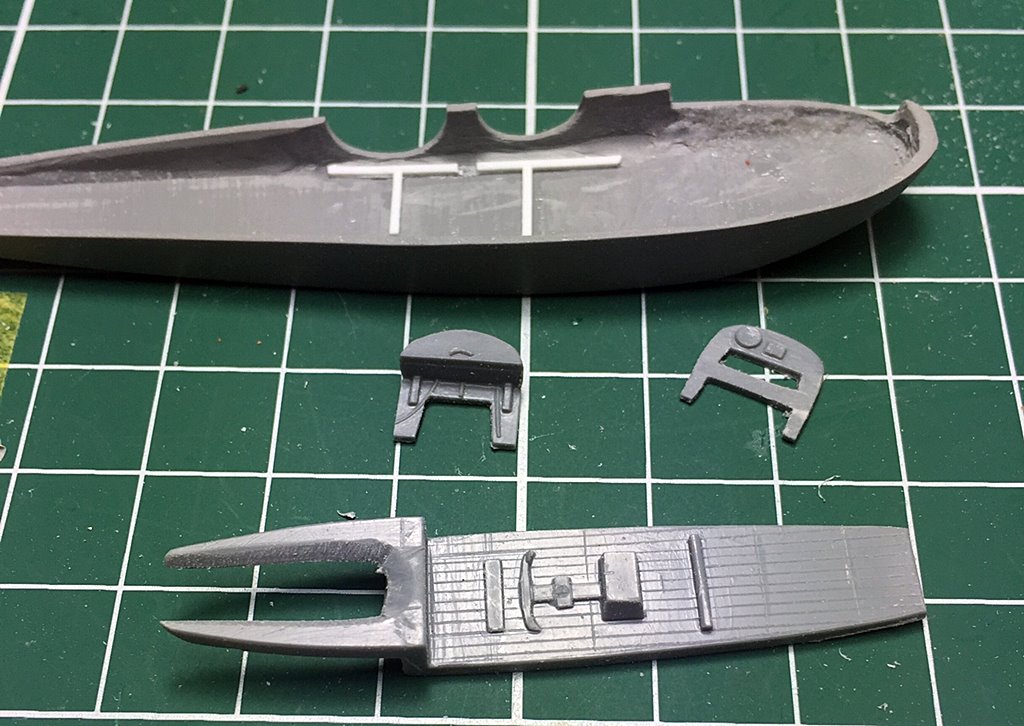
Additionally I used some everygreen profiles to give the fuselage walls some structure and also added a scratchbuilt bulkhead


« Last Edit: December 01, 2017, 12:15:59 AM by Wolf »
A model thrives on its overall impression and not on that every little disagreement over the original is hyped up as a disaster

Offline IanB

  • Hero Member
  • *****
  • Posts: 2439
Re: LVG C.VI, Pegasus 1/72
« Reply #24 on: November 14, 2016, 10:17:35 PM »
The fuel tank and seat look great. Sure no-one will see it, but it's still an improvement!

Ian

Offline ALBATROS1234

  • Hero Member
  • *****
  • Posts: 2657
Re: LVG C.VI, Pegasus 1/72
« Reply #25 on: November 15, 2016, 01:09:59 AM »
nice start there wolf, i remind you that you can also use the wnw website to access the instruction booklet therefore giving you a nice reference to build off of.

http://www.wingnutwings.com/ww/productdetail?productid=2&cat=4

Online RAGIII

  • Hero Member
  • *****
  • Posts: 18839
Re: LVG C.VI, Pegasus 1/72
« Reply #26 on: November 15, 2016, 08:53:39 AM »
Excellent work on the seat and tank!
RAGIII
"A man has to know his limitations": Harry Callahan

"Don't slop it on" Lynda Geisler

WarrenD

  • Guest
Re: LVG C.VI, Pegasus 1/72
« Reply #27 on: November 15, 2016, 09:03:36 AM »
Great work. I'm still flumoxed as to how y'all scratch-build bulkheads and other things such as that that fit so precisely.

Warren

Offline Wolf

  • Full Member
  • ***
  • Posts: 188
  • The challenge is in the scale
Re: LVG C.VI, Pegasus 1/72
« Reply #28 on: November 16, 2016, 12:51:28 AM »
Again, thank you all for the nice comments.

Quote
nice start there wolf, i remind you that you can also use the wnw website to access the instruction booklet therefore giving you a nice reference to build off of.
http://www.wingnutwings.com/ww/productdetail?productid=2&cat=4

Thanks for the hint. I even have the WNW Kit of the LVG. This is a good source but also I kind of burden as it shows me how simplistic the Pegasus kit is and urges me to detail it a little more.


No witchcraft. I just use a knife, mini files, sandpaper and patience. And believe me, after at least 100 attemps you will be ready to scratch your own.  ;)

Just joking. It is realy easy. Just cut a piece of plastic into a crude form and then with some sanding and repeated dryfitting bring it into shape.
It can also be usefull to transfer the approximate dimensons with the help of plasticine. Just press the plasticine into the fuselage were the bulkhead should sit, then remove it carefully, lay it on your plastic sheet and paint along the outer lines with waterproof pencil.
A model thrives on its overall impression and not on that every little disagreement over the original is hyped up as a disaster

WarrenD

  • Guest
Re: LVG C.VI, Pegasus 1/72
« Reply #29 on: November 16, 2016, 09:57:17 AM »
OK, thanks Wolf. Sounds like getting there, for your part, is just as frustrating as my journey to a good part.

Warren