Author Topic: DFW T.28 Floh (1/48 Eduard - 1995)  (Read 24594 times)

Offline GAJouette

  • Hero Member
  • *****
  • Posts: 3579
  • " Beware of the Spanish Inquisition"
Re: DFW T.28 Floh (1/48 Eduard - 1995)
« Reply #30 on: November 17, 2016, 05:27:49 AM »
 Antonio,
Outstanding progress my old friend. Looking forward to seeing you turn this sow's ear of a kit into a silk purse.
Highest Regards,
Gregory Jouette
" What Me Worry"

Offline Alexis

  • Hero Member
  • *****
  • Posts: 8352
  • Love the self
Re: DFW T.28 Floh (1/48 Eduard - 1995)
« Reply #31 on: November 17, 2016, 11:53:42 AM »
Your moving right along on this one , looking good so far  :)


Terri
Hurra ! , Ich Leben Noch
Body and life is a vessel we use to travel the planet . Femininity is the gift , The miracle comes from what we do with it .

Offline andonio64

  • Hero Member
  • *****
  • Posts: 1794
  • There's no hurry
Re: DFW T.28 Floh (1/48 Eduard - 1995)
« Reply #32 on: November 17, 2016, 06:13:57 PM »
Thank you lady and gentlemen!
I hope to move forward during the weekend, I am enjoying it!

Antonio

Offline andonio64

  • Hero Member
  • *****
  • Posts: 1794
  • There's no hurry
Re: DFW T.28 Floh (1/48 Eduard - 1995)
« Reply #33 on: November 21, 2016, 06:50:42 PM »
Hallo, during the weekend I was able to work a bit scratchbuilding the rudder:

I took the three view plan quoted above and traced the rudder with a pencil using copy paper onto the plasticard sheet (1.5 mm thickness).


Then I cut the piece from plasticard sheet


It seems fair enough...

(the transparence was done using GIMP overlaying the two images above)

Here the rudder is temporarily stuck with low tack plasticine


I made it thinner towards the top


Then I scribed small grooves over the framing traces and glued some plasticard rod (diam. 0.5 mm) with the geen cap glue


That's how the piece looked like after this operation


I sanded evrything off and milled the surface to give the impression of the linen. I used a spherical head, it's OK but after seeing this photo I went on milling a bit more to avoid this evident spherical hole (but I did not take any further photo, will do later)


Last operation was to insert into the rudder the control horns and the pin (made with copper wire 0.4 mm diam.) to be inserted in the fuselage


Thanks for the attention!

AnDonio

Offline Manni

  • Hero Member
  • *****
  • Posts: 1768
    • Der Militärmodellbauer
Re: DFW T.28 Floh (1/48 Eduard - 1995)
« Reply #34 on: November 21, 2016, 07:12:14 PM »
Very nice progress. Looking for more.
Manni
"Ich hab' da mal was vorbereitet.": Jean Pütz
"Warum noch mehr Bausätze?!?": meine Frau

Offline andonio64

  • Hero Member
  • *****
  • Posts: 1794
  • There's no hurry
Re: DFW T.28 Floh (1/48 Eduard - 1995)
« Reply #35 on: November 22, 2016, 05:01:50 AM »
Thanks Manni, I am doing my best!!!
;-)

Online RAGIII

  • Hero Member
  • *****
  • Posts: 19957
Re: DFW T.28 Floh (1/48 Eduard - 1995)
« Reply #36 on: November 22, 2016, 05:53:43 AM »
Nice work on the rudder Antonio!
RAGIII
"A man has to know his limitations": Harry Callahan

"Don't slop it on" Lynda Geisler

Offline Des

  • Administrator
  • Hero Member
  • ******
  • Posts: 9325
    • ww1aircraftmodels.com
Re: DFW T.28 Floh (1/48 Eduard - 1995)
« Reply #37 on: November 22, 2016, 06:38:23 AM »
Excellent work with the rudder.

Des.
Late Founder of ww1aircraftmodels.com and forum.ww1aircraftmodels.com

Offline xmald

  • Hero Member
  • *****
  • Posts: 1099
Re: DFW T.28 Floh (1/48 Eduard - 1995)
« Reply #38 on: November 22, 2016, 07:02:53 AM »
The Floh is still high on my Wanted lis. Maybe I`ll get lucky and manage to buy one  ;)
Very good looking progress Andonio!
Best regards
Filip

Offline andonio64

  • Hero Member
  • *****
  • Posts: 1794
  • There's no hurry
Re: DFW T.28 Floh (1/48 Eduard - 1995)
« Reply #39 on: November 22, 2016, 05:19:28 PM »
Thank you mates!

Offline andonio64

  • Hero Member
  • *****
  • Posts: 1794
  • There's no hurry
Re: DFW T.28 Floh (1/48 Eduard - 1995)
« Reply #40 on: December 19, 2016, 03:15:59 AM »
Hallo everybody,
some work done on the fuselage
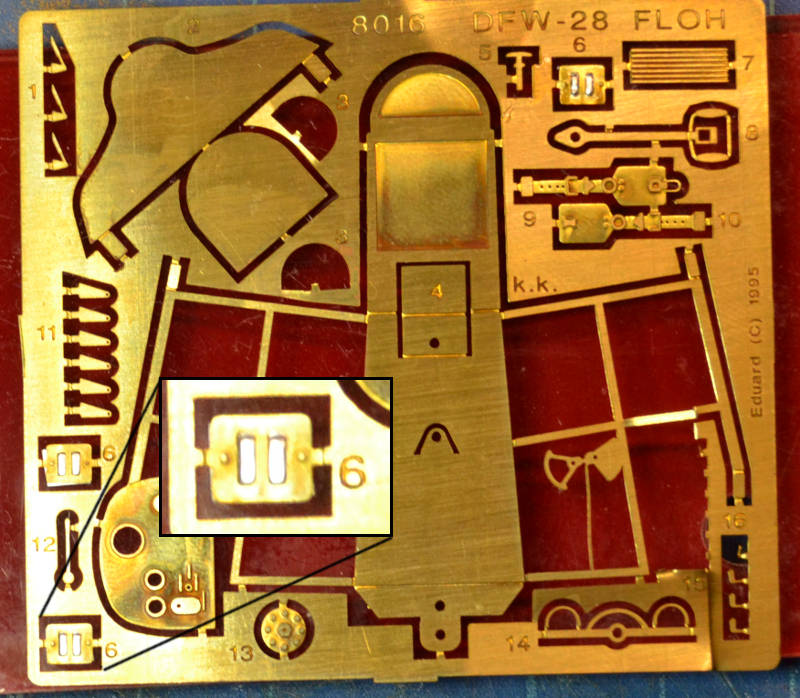
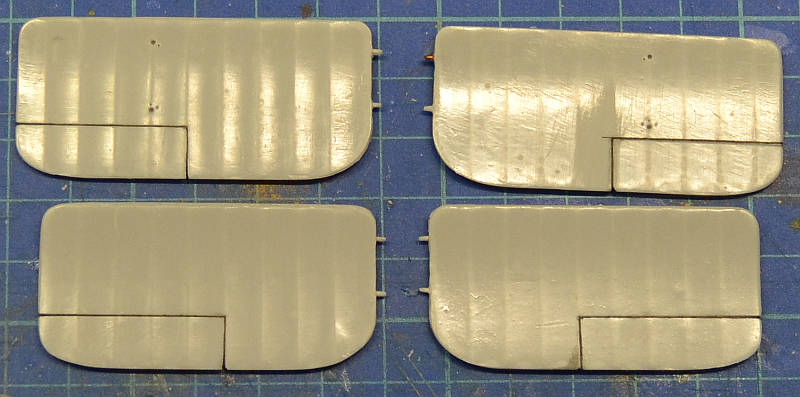
I wanted to reproduce the louvres on the two sides, which are represented by piece no.6 in the PE fret.
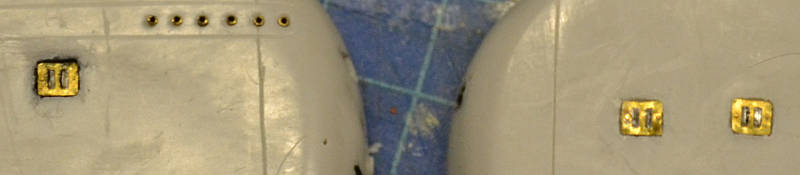
I glued squares of "lead" cut from wine capsules behind each piece no.6:


then I pushed the lead into the holes with a tootpick, and in the end I cut the back side of each louvre with a scalpel.

Here are the pieces glued in their position.


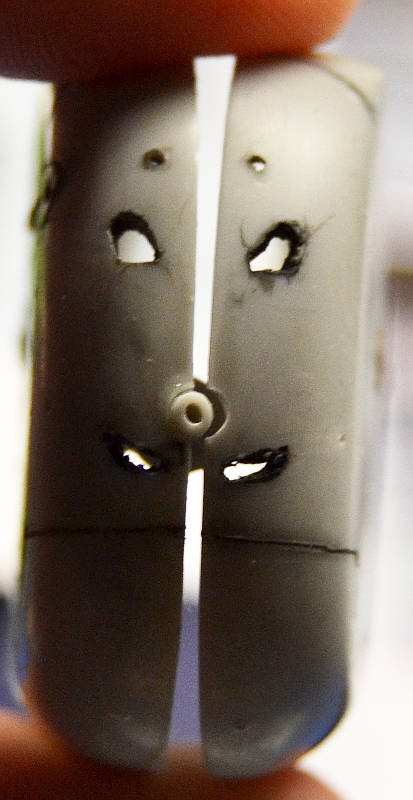
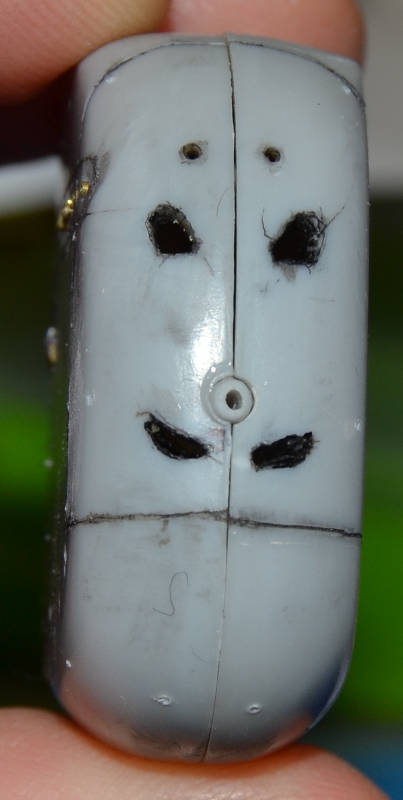
Here I tried to photograph (with horrible result) the louvres from the back to show the final effect.


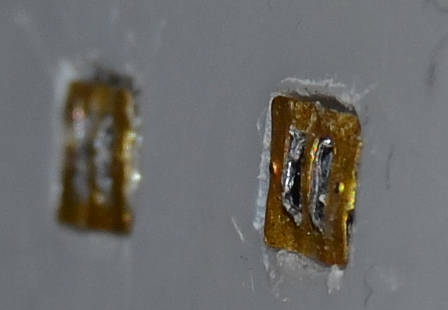
I hope the final result after painting will be better.


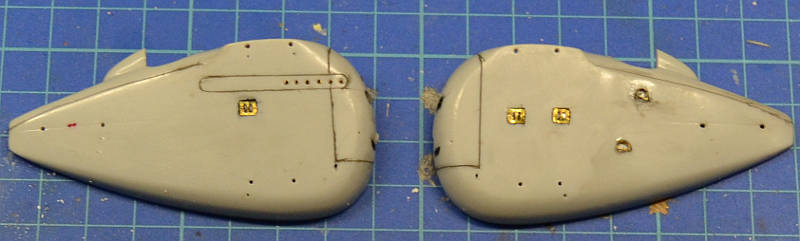
This is the current state of the two halves, I scribed the front panel (used to remove the engine for operations... really uncomfortable I guess)

Both on the fuselage and on the wings I experimented tamiya panel line accent black.
The result is good, I'll probably use it again after painting if necessary.


The openings on the plane "face" are supplied as decals, I don't like that solution so I carved them in the plastic and painted black inside.


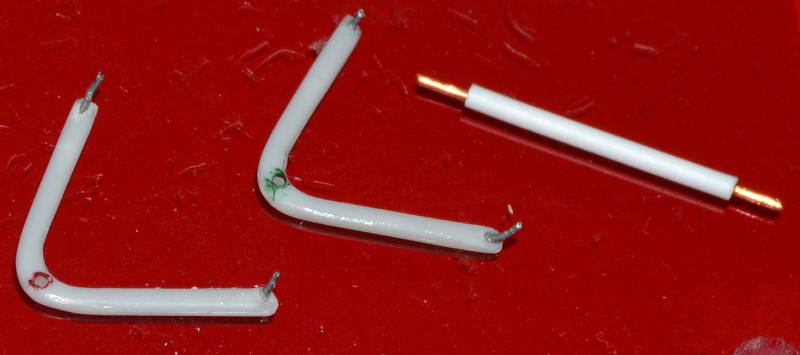
Last thing done: the undercarriage's struts were cleaned from flashes and pins installed.


Next step will be the cockpit

Ciao!

AnDonio

Offline andonio64

  • Hero Member
  • *****
  • Posts: 1794
  • There's no hurry
Re: DFW T.28 Floh (1/48 Eduard - 1995)
« Reply #41 on: December 28, 2016, 01:00:05 AM »
Hallo everybody,
with the help of some days off duty I have made some progresses on the work:


I decided not to use the photo etched "flat" struts and created an inner structure with 0.75 mm square plasticard rods.

In the meantime I sprayed all the pieces with white tamiya primer, here is shown the propeller with a fokker boss...


in this picture some photoetched pieces I worked on ready to be painted:
- seat + cushion
- cockpit foloor with some elements added
- control column totally scraatrch built with some zinc thread
- fuel pump made from plasticard and lead wire, with the handle coming from the PE fret
- seat belts from the PE fret wait to be painted
- dashboard was primerized and is waiting for some work


In these 2 pictures the cockpit floor, the longitudinal bar and the pin for the pedals were put by me. The step on one side is where the seat will be placed.

I'll start painting later this afternoon.

Ciao!

AnDonio

Offline ondra

  • Hero Member
  • *****
  • Posts: 954
Re: DFW T.28 Floh (1/48 Eduard - 1995)
« Reply #42 on: December 28, 2016, 01:29:11 AM »
Very nice job on the interior PE parts, looking forward to seeing them painted!

Looking at the holes in the plane nose, I would say that they would deserve a slight touch up with a round file. Their placement will be quite prominent on the finished model.

Cheers

Ondra
« Last Edit: December 28, 2016, 05:39:05 AM by ondra »

Offline andonio64

  • Hero Member
  • *****
  • Posts: 1794
  • There's no hurry
Re: DFW T.28 Floh (1/48 Eduard - 1995)
« Reply #43 on: December 28, 2016, 01:50:51 AM »
Thank you Ondra, I will see how to improve the front holes, actually the lower right one is out of alignment, now they appear as black blobs, I think theyll look betteronce the whole nose will be painted.

Antonio

Offline lone modeller

  • Hero Member
  • *****
  • Posts: 5718
Re: DFW T.28 Floh (1/48 Eduard - 1995)
« Reply #44 on: December 28, 2016, 05:23:15 AM »
Great update Andonio. Looking at the interior of the model I can see why this machine would not have been very popular with pilots. Your detailing is top notch.