Author Topic: Merit 1/24 SE5a : A beginners journey  (Read 15749 times)

Offline dinor

  • Jr. Member
  • **
  • Posts: 66
Merit 1/24 SE5a : A beginners journey
« on: May 08, 2016, 05:08:11 PM »
Hello All

After much encouragement I am starting my first ever build thread, on my second plastic plane in some 40 years. This is after the 1/24 Airfix Spitfire finished a couple of weeks ago and not counting a quick build 1/72 F16 undertaken as a glue 'bonding' excercise with my very young son a decade ago!

I hope that this thread will help me improve my skills and standards and I hope it will also be a help to others new to this hobby and help pass on any tips and tricks as I learn them. Small things that most of the experienced readers take for granted or can't even remember they have learnt but which could maybe assist others. Hence the title.

So , here we go then .... With the obligatory box art...


I have in mind a slightly different colour scheme, Leslie Holdens all red beastie whilst with No 2 Squadron Australian Flying Corps.


For reference I have also attached a photo of the MERIT Parts listing and the the first instruction steps


And..what the heck..one of the Spitfire  ;D


Dino


Offline KitRookie37

  • Sr. Member
  • ****
  • Posts: 489
Re: Merit 1/24 SE5a : A beginners journey
« Reply #1 on: May 08, 2016, 05:28:23 PM »
Hello ladies and gentlemen,
I'll follow your build. A beautiful Spit !! Will you build the typhoon ? A wonder !
So, little secretive, you tried to hide Millenium Falcon.... ;D
Best regards.
Alain.
Use the force, Luke.

Offline dinor

  • Jr. Member
  • **
  • Posts: 66
Re: Merit 1/24 SE5a : A beginners journey
« Reply #2 on: May 08, 2016, 05:50:06 PM »
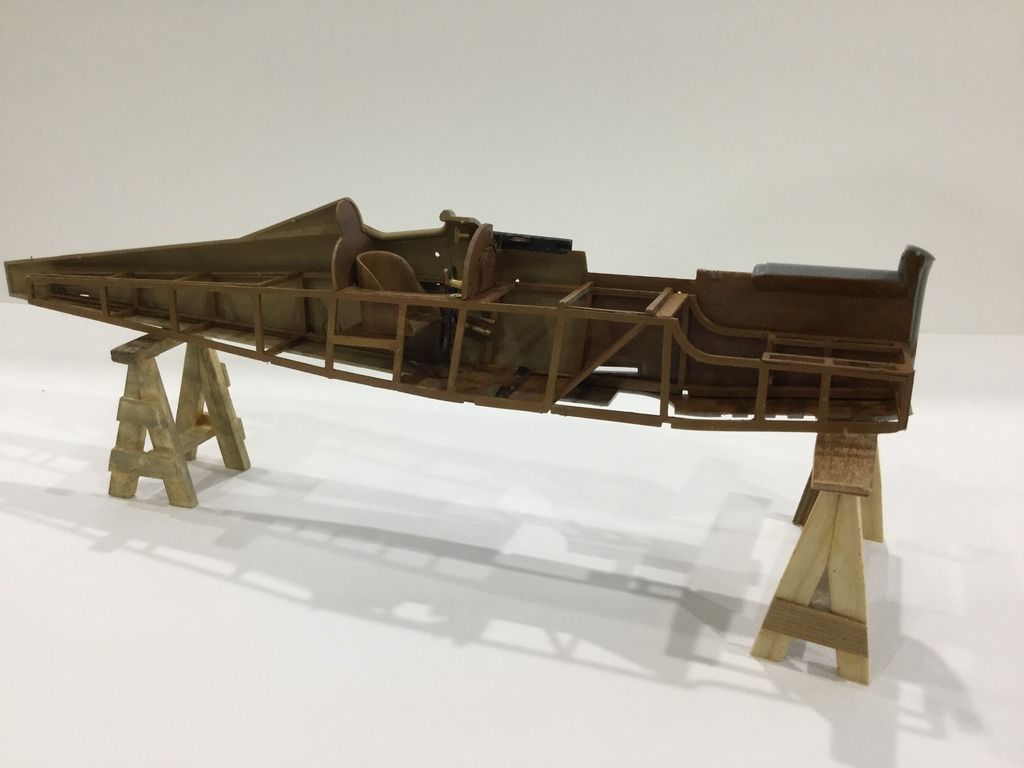
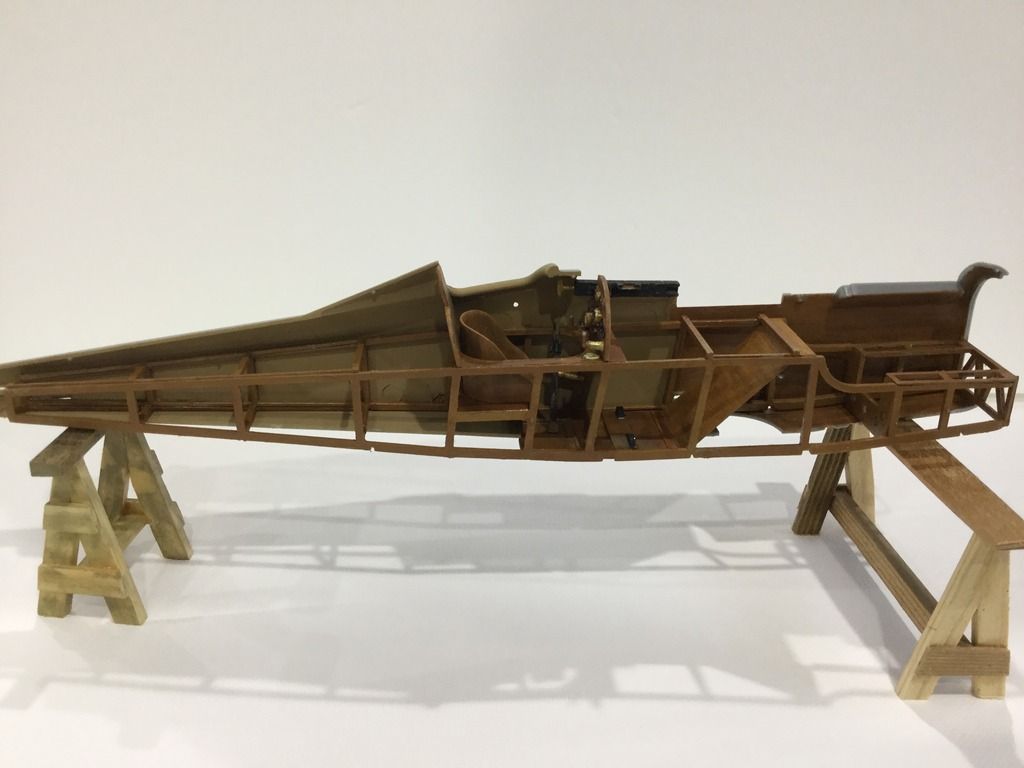
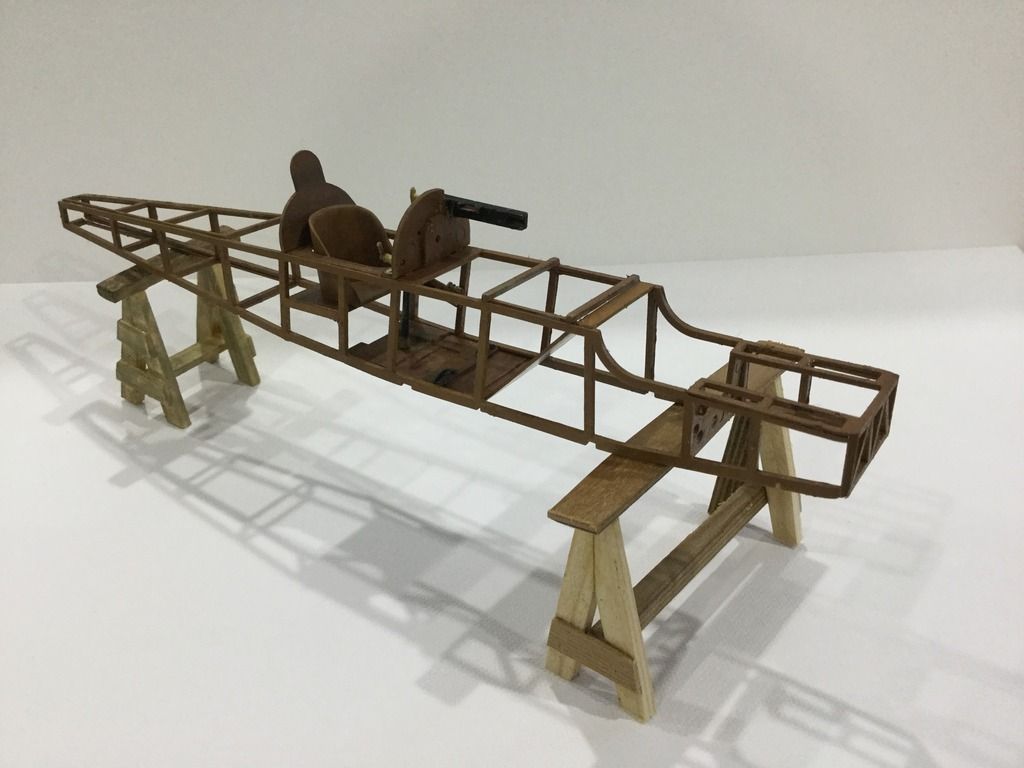
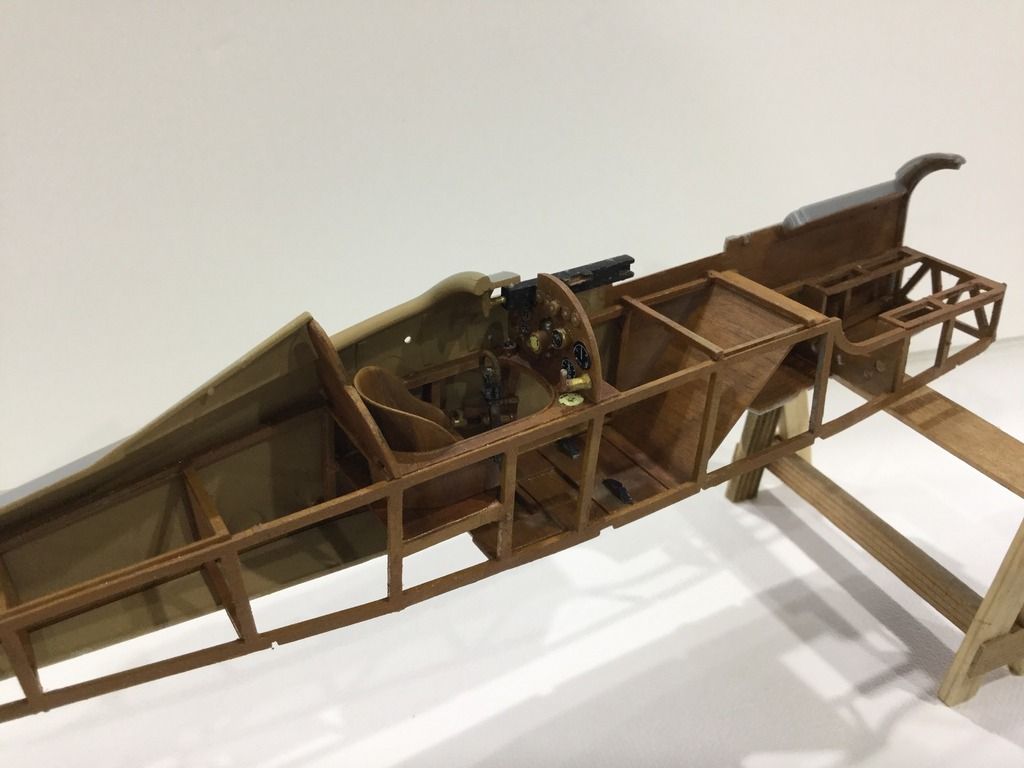
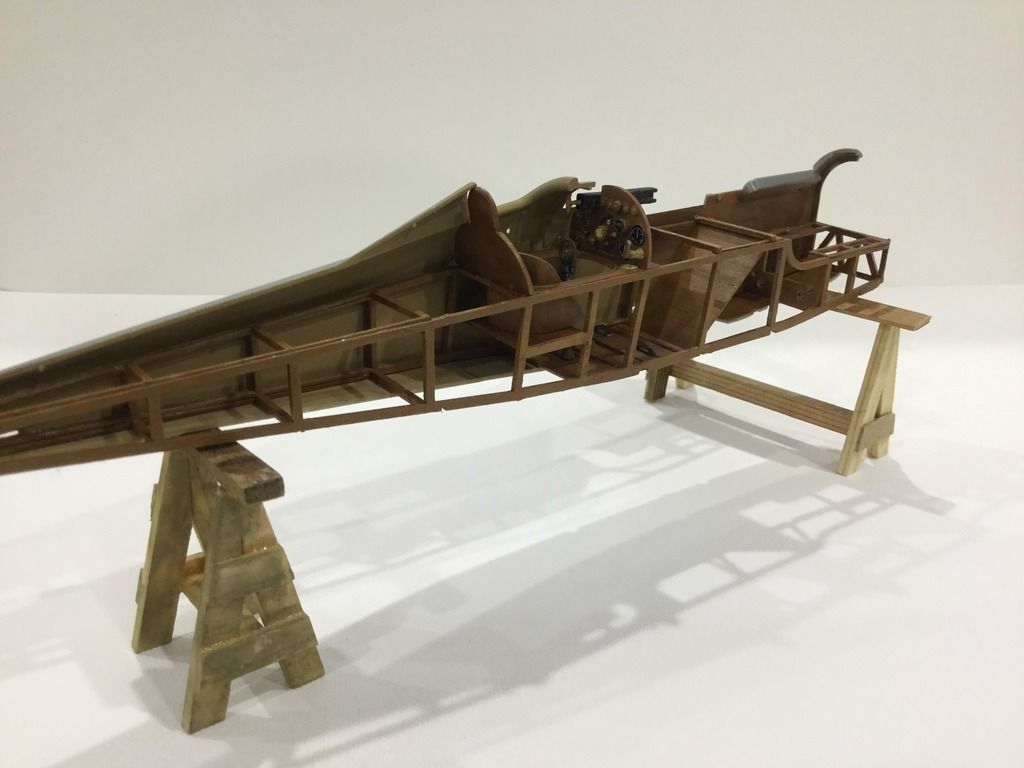
So, the state of play...Cockpit and basic fuselage frames complete...some firsts and learning ;

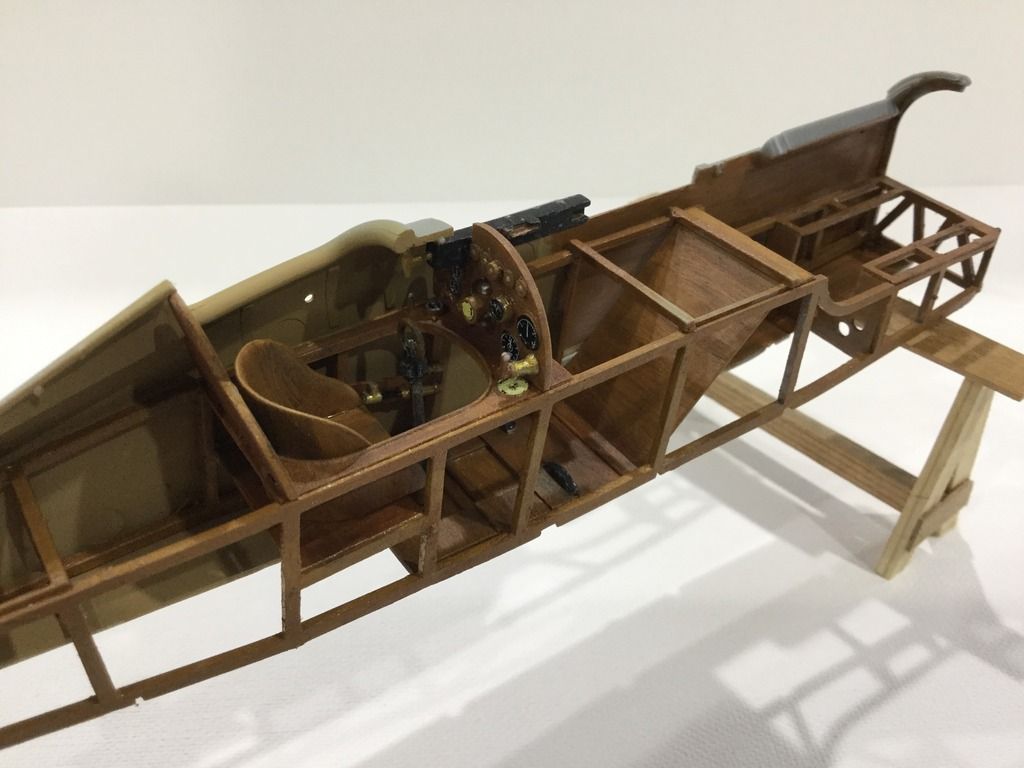
Micro Sol is indispensable in setting the small dials, also no matter what else I tried the only way with the instruments is to slowly cut around the diameter with a sharp knife.

Wood grain simulation is not too hard although a long way to go but with acceptable first results, need at least two days for the oils to dry at least here in Oz.

I use super glue in thin and medium in my RC planes, first time I have used super glue gel and for this type of modelling I like it, it seems to adhere even if the part has the oil paint on it...I have not yet tried normal Tamiya glue when the part is painted..maybe I should just standardise on the Gel and use 5 min epoxy as and when needed.

Photo etched rudder straps wee als a first, small steps with phtoetching but a start nevertheless !

Pre planning is critical as is trial fitting. When I fitted the assembly into one fuselage side and then joined the other I found the top curvature of the instrument dash was preventing the sides closing, the long pump also had to be slightly lowered and repositioned... I suspect this is a reflection of my building skills not the kit. The trial fitting also allowed me to establish the angle of the back rest behind the seat so it fits snugly into the fuselage side and is not proud, without a trial fit I would have probably glue this in at 90deg or close to.

I also found that for much of the longerons etc it was probably smarter to assemble , glue and paint rather than the reverse order, especially as most of it will not be visible.

Also re brush and paint management I have started using a large jar to hold the residue after cleaning brushes etc,I don't have a sink in the Man Cave and this has saved endless trips to the main house. I have also found that my airbrush management was vastly better at the end of the Spitfire build compared to the beginning. Cleans ups of the airbrush resulted in what looked like a chemical warzone around my bench during the first few attempts.

Next steps will be critical ..closing the fuselage sides, probably later this week after everything has had a proper chance to try.

Feedback , thoughts and advice always VERY welcome.

Also , any advice on how to source or arrange for 1/24 scale decals for the chosen colour scheme would be appreciated.

Happy Days for now

Dino


« Last Edit: May 08, 2016, 05:59:49 PM by dinor »

Offline dinor

  • Jr. Member
  • **
  • Posts: 66
Re: Merit 1/24 SE5a : A beginners journey
« Reply #3 on: May 08, 2016, 05:55:33 PM »
Hello Alain

Not secretive, I did not build the Millineum Falcon..not my thing...but my 16 year old son did !  :D

His skills are superb with not much modelling experience, the Falcon was the simple Revell snap together kit but his painting and weathering skills have transformed the look and feel of it....he is VERY artistic and creative.

He surprised me the other day, walked in with a very large box, the Revell giant Millienum Falcon kit... 904 parts.... He had sourced it himself second hand direct from Texas, with his own money from his part time work and jobs....he stated it will take him 2 years to build..at 16 ..not sure if I am proud or terrified.

Dino
« Last Edit: May 08, 2016, 06:16:30 PM by dinor »

Offline Des

  • Administrator
  • Hero Member
  • ******
  • Posts: 9325
    • ww1aircraftmodels.com
Re: Merit 1/24 SE5a : A beginners journey
« Reply #4 on: May 08, 2016, 06:28:52 PM »
You have made a great start with this kit Dino and what you have done so far looks very impressive, the wood tones are very realistic and the instrument panel is very well done. I've heard a lot about this kit and I'm looking forward to following along with your build, the red colour scheme should be very striking.

Des.

PS. beautiful Spitfire.
Late Founder of ww1aircraftmodels.com and forum.ww1aircraftmodels.com

Online Borsos

  • Hero Member
  • *****
  • Posts: 3583
Re: Merit 1/24 SE5a : A beginners journey
« Reply #5 on: May 08, 2016, 07:16:23 PM »
Hello,
wonderful first steps in modelling on your Se5a and a brilliant Spitfire. Very fine!
And congrats to your son, too, his skills are impressive as well! (I think pride would overwhelm the other feelings, isn't it?  ;). )

If the drying of the oils takes too long for you, there's "Uschi van der Rosten" on the market (just google it and you'll find his eshop). Alex offers a very good drying medium "Blitz dry" (yes, he makes ironic fun out of that "Blitzkrieg" terminology...), that shortens drying time for oils to just 3-5 hours.

Best wishes
Borsos
"Deux armées aux prises, c'est une grande armée qui se suicide."
Barbusse.
"Ein Berg in Deutschland kann doch einen Berg in Frankreich nicht beleidigen. Oder ein Fluß oder ein Wald oder ein Weizenfeld."
Remarque.

Offline kornbeef

  • Hero Member
  • *****
  • Posts: 961
  • U.K. Carpet monster genocide squad leader.
Re: Merit 1/24 SE5a : A beginners journey
« Reply #6 on: May 08, 2016, 07:51:52 PM »
Very nice so far and the spit is a delight, I'd kind of thought about getting this kit but it got slated but from what I see it looks very workable, I like the seperate framework idea a lot. I'll follow your blog with interest.

One thing I'd suggest is to download the WNW instructions from thir website, it will give you better insight to what is what.  The firewall between the cockpit & Engine shoul be in aluminium not wood. Their colour all out is more accurate than Merits it would appear.

Keith
Never too old to learn sumfink noo

Offline Monty

  • Hero Member
  • *****
  • Posts: 1682
Re: Merit 1/24 SE5a : A beginners journey
« Reply #7 on: May 08, 2016, 11:05:19 PM »
Lovely Start, there Dino! I'm looking forward to more... from what I can see it has great potential...

Regards,

Marc

Offline lcarroll

  • Administrator
  • Hero Member
  • ******
  • Posts: 8656
Re: Merit 1/24 SE5a : A beginners journey
« Reply #8 on: May 09, 2016, 02:14:01 AM »
Dino,
   Wonderful start and, if finished to the standard of that beautiful "Spit", it'll be a real winner! Your first attempt at woodgrain, the interior, and the detail are all excellent. You seem to be cruising very comfortably through this journey already, don't forget those crucial "dry fits" at every step; it's so much easier to deal with adjustments before the glue's on! As for glue I use CA Medium and Thin with accelerant on 90% or more of my joints always ensuring that paint on the joining surfaces is removed   
    Keep up the great work, nicely done so far.
Cheers,
Lance

Offline coyotemagic

  • Hero Member
  • *****
  • Posts: 7710
  • "Here's to not buggering it up." -Winston Chuchill
    • My Models
Re: Merit 1/24 SE5a : A beginners journey
« Reply #9 on: May 09, 2016, 02:57:00 AM »
Brilliant start, Dino!  This will quite a stunner when done.  Awesome Spitfire!
Cheers,
Bud
"All men dream: but not equally. Those who dream in the dark recesses of the night awake in the day to find all was vanity. But the dreamers of day are dangerous men, for they may act their dreams with open eyes, and make it possible." -T. E. Lawrence

Offline Ernie

  • Hero Member
  • *****
  • Posts: 3961
  • "Once more into the breach"
Re: Merit 1/24 SE5a : A beginners journey
« Reply #10 on: May 09, 2016, 03:43:59 AM »
Great start, Dino.  The SE5 will be a great model when done.  Your wood effects
are very good and I think Keith's advice about using WnW's instructions is sound.
Superb Spitfire, by the way, my friend!

Cheers,
Ernie :)
The new old guy, take two...

Offline RAGIII

  • Hero Member
  • *****
  • Posts: 19688
Re: Merit 1/24 SE5a : A beginners journey
« Reply #11 on: May 09, 2016, 05:27:28 AM »
I agree with the others completely. Very nice start! Your wood is looking great. Also like the others my compliments on the Spitfire!
RAGIII
"A man has to know his limitations": Harry Callahan

"Don't slop it on" Lynda Geisler

Offline BigBlue

  • Hero Member
  • *****
  • Posts: 640
Re: Merit 1/24 SE5a : A beginners journey
« Reply #12 on: May 09, 2016, 10:48:13 AM »
Welcome aboard, Dino; I'm glad you decided to share this with us.  The Spit tells me you you are going to do just fine!

Chris

Offline Gisbod

  • Hero Member
  • *****
  • Posts: 2438
Re: Merit 1/24 SE5a : A beginners journey
« Reply #13 on: May 09, 2016, 05:04:01 PM »
Great stuff Dino,

Looking good already and, like the others, am interested in seeing how the kit pans out..

Guy
“Oh! I have slipped the surly bonds of Earth -
Put out my hand, and touched the face of God.”

P.O. John Gillespie Magee 1941

Offline dinor

  • Jr. Member
  • **
  • Posts: 66
Re: Merit 1/24 SE5a : A beginners journey
« Reply #14 on: May 12, 2016, 01:58:29 PM »
Thanks for the words of encouragement everyone.

Not much done since the last post but I have cut out the triangular inspection panels on the top and bottom wing halves, the plastic was quite thick so I beveled  some out on the inner side of each wing which. This also gives a narrower profile to the edge of each opening if someone ever looks at it...but as my son says to me. 'But YOU will know' ... So in that spirit I have painted the firewall in Aluminium as suggested by Kornbeef, even though you will have to look hard to spot it  :)

I have also cut out the rectangular inspection hatch on the Fueselage. I have attached some photos including of the Fueselage and sprues to give an idea of the overall kit.

Next steps, probably on the weekend , is joining the Fueselage halves, eliminating seams, adding tail feathers....I am keen to get on with the build as one of the main learnings I wanted on this project was the Rigging..this should be interesting.

Some questions and advice though please..

1) I'd like to make some seat belts, no after market options that I can see re 1/24 does someone have a link or advice

2) Epeeman if you are reading this ... how did you treat the pulleys and control wire visible via the inspection hatches,I would appreciate your or anyone's advice on this.

3)Also does anyone have a contact for getting some decals done in my preferred scheme , I am thinking if I order them now they should be ready when the build is finished.

Many thanks Dino