Author Topic: Wingnut Wings Fokker E.II/E.III Early  (Read 29378 times)

Offline eindecker

  • Hero Member
  • *****
  • Posts: 532
  • The penultimate word in scale modeling since 1956
    • Models In Scale
Re: Wingnut Wings Fokker E.II/E.III Early
« Reply #135 on: October 23, 2014, 02:08:13 PM »
Lovely work. I'm following it closely. When I did my research for my IPMS USA Eindecker build review, I found from Josef Scott's "Compendia" that the Eindecker turnbuckles were color coded. Here is an excerpt from my review text:

"As you will see from some of the photos, the Eindeckers used a color-coded system for identifying which turnbuckles went where. The aircraft were regularly transported on wagons which were pulled by various vehicles. Their rigging was taken down and the wings secured alongside the fuselage for transport. When reassembling the wings and rigging, it was evidently important that turnbuckles meant for the starboard wing were not used on the port wing, and vice versa. Consequently, the turnbuckles were color-coded and instructions to this effect were stenciled on the wingtips for the mechanic’s edification – starboard red, port green, and the pylon turnbuckles were painted blue."

That was from part 2 — http://web.ipmsusa3.org/content/fokker-eindecker-iii-late-part-2

Hope this is useful. I'm looking forward to your continuing posts, and keep those photos coming.
Michael Scott
Author of "The Q Fragments" http://Http://theqfragments.com & Amazon for paperback and Kindle.

Offline BigBlue

  • Hero Member
  • *****
  • Posts: 640
Re: Wingnut Wings Fokker E.II/E.III Early
« Reply #136 on: October 23, 2014, 02:39:26 PM »
Thank you Eindecker.

I am very appreciative of any such historical information.  I had remembered reading your discussion of this in one of the other builds on the forums, and have already incorporated it into mine:


The green turnbuckles (two of which you can see under construction in the last picture my prior post) are attached to the opposite wing.

I had not read your review, but will eagerly do so... I love the oily fabric effect I am seeing in the slide show. 

Thanks again for your comments.

Chris

Offline RAGIII

  • Hero Member
  • *****
  • Posts: 19687
Re: Wingnut Wings Fokker E.II/E.III Early
« Reply #137 on: October 23, 2014, 11:33:15 PM »
Looking great Chris! All of the Eindecker builds are really informative about attaching the rigging. Your photos are a great tutorial!
RAGIII
"A man has to know his limitations": Harry Callahan

"Don't slop it on" Lynda Geisler

Offline radio

  • Hero Member
  • *****
  • Posts: 3952
Re: Wingnut Wings Fokker E.II/E.III Early
« Reply #138 on: October 24, 2014, 01:00:00 AM »
Your rigging looks very nice.
Martin

Offline rhallinger

  • Hero Member
  • *****
  • Posts: 1976
Re: Wingnut Wings Fokker E.II/E.III Early
« Reply #139 on: October 24, 2014, 03:27:11 AM »
Thanks for sharing this in such detail, Chris.  It will be most helpful for many of us who have yet to undertake a WNW Eindecker (it's currently fourth from the top of my build list  ;D). 

Regards,

Bob

Offline BigBlue

  • Hero Member
  • *****
  • Posts: 640
Re: Wingnut Wings Fokker E.II/E.III Early
« Reply #140 on: October 24, 2014, 08:11:45 AM »
Thanks again, Rick & Martin.  Glad this is helpful, Bob.

I have finished the underside rigging without any major issues (nothing worse than the occasional eyelet popping loose when I tensioned the line), and in many ways it has been easier to rig this than my snipe (unlike a biplane, this has very few crowded-space installs)  Tedious, yes; hard, no.  Figuring out how the road map was by far the trickiest part.

Here is a shot of the front rigging:


And the starboard wing attachments:


As I explained earlier, I looped the front rigging around the center post and knob.  The lines connected to the outer attachments looped between the crossbar and the front triangle center legs (i.e. between A25 and B3).  This was straightforward as there is nowhere for the loops to really go; I connected to the wing turnbuckle, ran the line around the center post, back through the sleeve, tightened the line and glued the sleeve, making sure the resulting loop was free to rotate.  Repeat.  Worth noting: these lines rub against the front of the landing gear legs.  While I'm sure this is not how the 1:1 version works, they are still straight to the naked eye, so I'm not too worried about it.

The lines connected to the inner turnbuckles required a bit more finesse since there is nothing really preventing the loops from falling off the front of the knob.  Those better skilled with a razor saw could probably cut a groove to hold them in place.  I chose, instead, to make the loop off of the knob (which made it pretty easy to thread the tubing), and tighten the line while holding the loop in place with my finger.  After tightening the line into the correct angle, I added a drop of CA on top of the knob for additional security.

None of the turnbuckle connections have been glued yet as I am waiting until I flip the aircraft over and rig the upper structure so I don't get slack due to the weight of the wings.  I plan on cleaning up and finishing off weathering the landing gear, then moving on to the top side.  It is enjoyable watching the aircraft come to life as the rigging fills in; it has been a fun couple of build sessions.

Thanks for checking in,

Chris

Offline Alexis

  • Hero Member
  • *****
  • Posts: 8019
  • Love the self
Re: Wingnut Wings Fokker E.II/E.III Early
« Reply #141 on: October 24, 2014, 09:19:30 AM »
Impressive paint work sir  8)


Terri
Hurra ! , Ich Leben Noch
Body and life is a vessel we use to travel the planet . Femininity is the gift , The miracle comes from what we do with it .

Offline eindecker

  • Hero Member
  • *****
  • Posts: 532
  • The penultimate word in scale modeling since 1956
    • Models In Scale
Re: Wingnut Wings Fokker E.II/E.III Early
« Reply #142 on: October 24, 2014, 10:02:09 AM »
"None of the turnbuckle connections have been glued yet as I am waiting until I flip the aircraft over and rig the upper structure so I don't get slack due to the weight of the wings.  I plan on cleaning up and finishing off weathering the landing gear, then moving on to the top side.  It is enjoyable watching the aircraft come to life as the rigging fills in; it has been a fun couple of build sessions."

Good decision. The wings on mine have developed a bit of a sag. Best to get all of the tension balanced before gluing the mono. I will insert a couple of thin shims between the wing roots and fuselage to straighten them, then re-tension the rigging.

Enjoying following your progress.
Michael Scott
Author of "The Q Fragments" http://Http://theqfragments.com & Amazon for paperback and Kindle.

Offline BigBlue

  • Hero Member
  • *****
  • Posts: 640
Re: Wingnut Wings Fokker E.II/E.III Early
« Reply #143 on: October 24, 2014, 02:48:51 PM »
Thank you very much, Terri, Michael and Justin.  Your comments are sincerely appreciated.

Justin, I am using 29 AWG which Amazon sells for $12.03 for 30".  I can fit a double length of 6x tippet (.127 mm) through it without too much difficulty, but I couldn't use it with .15mm mono, and I'm not sure I'd want to rig a whole aircraft using this size and EZ line.  The next size up, 28 gauge, has an inside diameter of .32 mm, but given that my heavier mono is .152 mm (5x tippet), I am afraid it may still be too tight to fit a double length.  Unfortunately, the 26 gauge only comes in packs of 50, which is more than a lifetime's worth, and costs $310.

Didn't get anything done tonight, but hopefully will be able to get some time in over the weekend.  Thanks again to everyone who has been kind enough to leave a comment.

Chris

Offline radio

  • Hero Member
  • *****
  • Posts: 3952
Re: Wingnut Wings Fokker E.II/E.III Early
« Reply #144 on: October 24, 2014, 10:26:56 PM »
Your build getting better and better.
Martin

Offline uncletony

  • Hero Member
  • *****
  • Posts: 4384
    • Aircraft In Pixels
Re: Wingnut Wings Fokker E.II/E.III Early
« Reply #145 on: October 25, 2014, 11:07:33 AM »
FWIW -- the stuff the tubing is made of is actually called polyimide not polyamide. I think I started this, not knowing the difference. I mention this because if you do a search on amazon supply, McMaster etc. for polyamide tubing, you are going to come up empty :)

Offline BigBlue

  • Hero Member
  • *****
  • Posts: 640
Re: Wingnut Wings Fokker E.II/E.III Early
« Reply #146 on: October 26, 2014, 03:11:34 AM »
Thanks, Bo.  I think the issue is that my spell checker flags "polyimide", but not "polyamide", rather than anything you did.

Chris

Offline BigBlue

  • Hero Member
  • *****
  • Posts: 640
Re: Wingnut Wings Fokker E.II/E.III Early
« Reply #147 on: October 26, 2014, 04:24:44 AM »
Small update:

Here are two last shots of the underside before I start on the top side rigging (and posing the aircraft for belly pictures becomes a challenge):


Clearly I have decided to go the oily route for my Eindecker.  Virtually every in-service photo I have seen is of an grubby, oil-stained, muddy mess, and I have seen the mess a rotary engine makes on reproduction and restored aircraft.  I figured this would be an opportunity to try my hand at some heavier weathering than I normally do.  I know it won't be to everyone's taste, but I am guardedly happy with my decision.  Hopefully it looks reasonable.  Here is what I did:

After rigging, I mixed a few drops of water with MIG Russian Earth pigment, and liberally applied the slurry to the wheels and lower portion of the undercarriage.  While wet, it looked like a muddy disaster, but when after it dried, it took on the more typically matte appearance that pigments deliver.  I cleaned it up with a dry brush (and a wet one in a few spots) until I felt things looked suitably dirty.  As happens with a wash, more dirt collected along the details, helping to separate them a bit from the sea of green.  I repeated the procedure with MIG Black Smoke pigment on the engine firewall.

Next, I filled a bottle cap with AK Interactive Engine Oil (enamel) highly thinned with hardware store mineral spirits, and dipped a ratty old brush into it.  With the aircraft sitting on its wheels, I cranked the pressure up on my airbrush (>40 psi), and firing short bursts, knocked the paint mixture off the brush in the direction of the airflow.  In a couple of places, I used the air pressure to blow back some of the paint on the aircraft's surface.  The aluminum below the engine and the landing gear too the worst of it.  There are a few areas that look a bit heavier than I want, so I may go back with a brush and some thinner and clean things up.

Preparing for the upper rigging, I re-worked the wing warping pylon a bit using the 1/32 Gaspatch turnbuckles, and added a pair of eyelets for the rigging wires that stabilize the mast (the reference photos Bertl provided a few pages back were very helpful here):


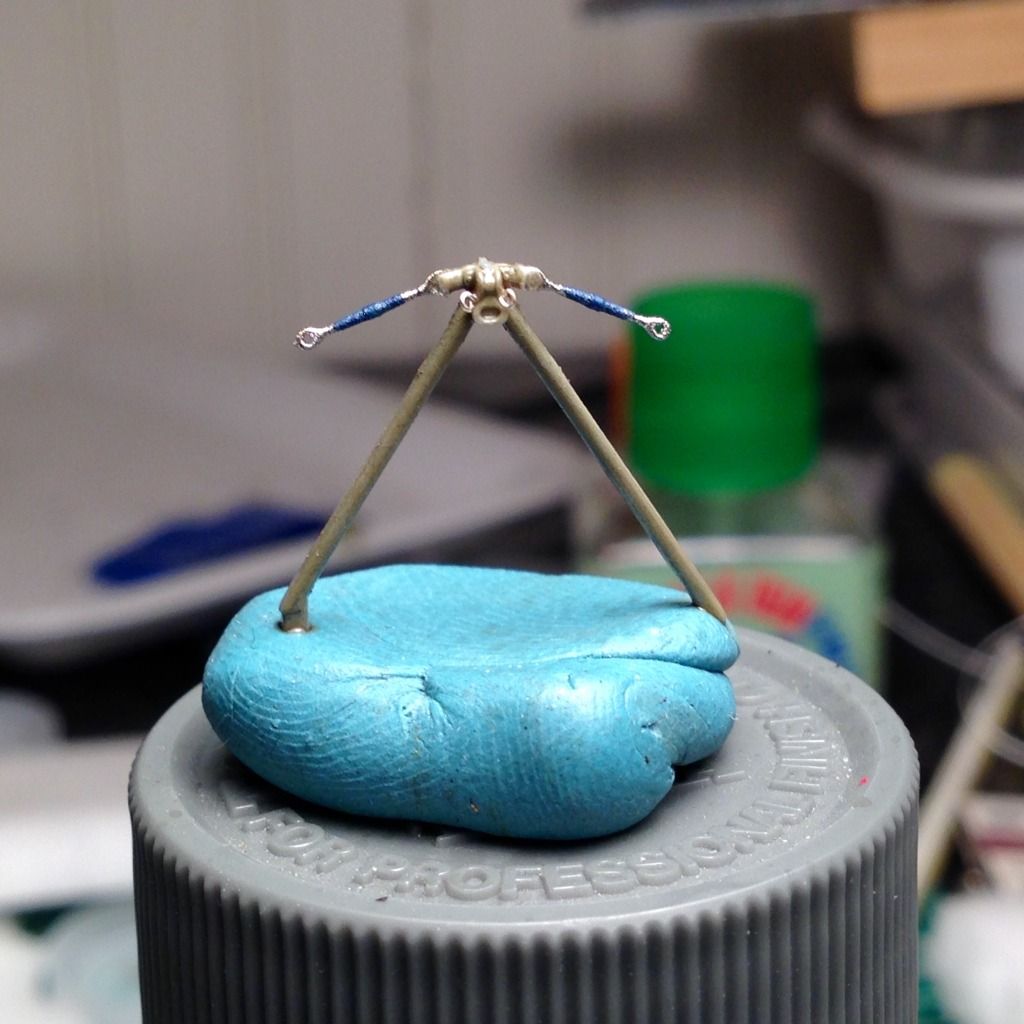
With a bit of trepidation, I cut off the molded turnbuckle arms, and slit the stub with a razor so that I could insert the turnbuckle eyelet (one side to completion at a time so I had a reference to use to check the angles).  I had to twist one of each turnbuckle's eyelets as they come turned 90° from the other end.  I used some thick CA to give me a bit of working time, and squeezed the plastic bits around the turnbuckle.  They arms seem pretty strong, but I admit I'm a bit nervous about putting too much pressure on them.  The eyelets are just twisted wire stuck into holes I drilled.

I should be able to get some, if not all of the upper rigging finished this weekend.  Getting close...!  (Thankfully, since the deadline for the group build looms.)

Thanks for checking in,

Chris
« Last Edit: November 06, 2014, 11:24:46 AM by BigBlue »

Offline radio

  • Hero Member
  • *****
  • Posts: 3952
Re: Wingnut Wings Fokker E.II/E.III Early
« Reply #148 on: October 26, 2014, 04:30:54 AM »
Wonderful work Chris.
Martin

Offline RAGIII

  • Hero Member
  • *****
  • Posts: 19687
Re: Wingnut Wings Fokker E.II/E.III Early
« Reply #149 on: October 29, 2014, 01:02:41 PM »
Beautiful rigging work! Extremely well done!
RAGIII
"A man has to know his limitations": Harry Callahan

"Don't slop it on" Lynda Geisler