Author Topic: WNW Fokker EIII Kurt Von Crailsheim  (Read 13332 times)

Offline Snowy

  • Full Member
  • ***
  • Posts: 125
Re: WNW Fokker EIII Kurt Von Crailsheim
« Reply #15 on: July 28, 2014, 01:43:44 PM »
Those swirls look terrific Mark, as does the engine and now the cockpit. I'm seeing this thread for the first time. It looks great.

Offline BigBlue

  • Hero Member
  • *****
  • Posts: 640
Re: WNW Fokker EIII Kurt Von Crailsheim
« Reply #16 on: July 29, 2014, 12:47:29 AM »
Mark,

I have just started working on this kit, so am very happy to have you out there lighting the path for me!  I have been trying to figure out how to read that rigging chart, and like James had reached the "what was I thinking?!" moment when I ran across your build log... perfect timing, and very helpful!

Loving what you have done so far.  I have been really torn about deciding if I want to add the Taurus engine, and your work has shown me that the kit parts can provide an excellent should I go that route.

Chris

Offline mgunns

  • Hero Member
  • *****
  • Posts: 2255
Re: WNW Fokker EIII Kurt Von Crailsheim
« Reply #17 on: July 29, 2014, 05:07:36 AM »
Glad to have you along Big Blue.  We will figure it out.
Mark

We few, we happy few.....

Offline RAGIII

  • Hero Member
  • *****
  • Posts: 19684
Re: WNW Fokker EIII Kurt Von Crailsheim
« Reply #18 on: July 29, 2014, 05:14:48 AM »
mark, Yours is the first  Fokker E series builds where the Modeler has actually attempted to show the necessary prep for the rigging process! I must say that I sold my first EIII because I wasn't sure how to connect all of the Dots! perhaps your build will help!
RAGIII
"A man has to know his limitations": Harry Callahan

"Don't slop it on" Lynda Geisler

Offline mgunns

  • Hero Member
  • *****
  • Posts: 2255
Re: WNW Fokker EIII Kurt Von Crailsheim
« Reply #19 on: July 29, 2014, 05:36:50 AM »
Hi Rick:

It is confusing, but I figured it out.  When I start the rigging, which will be soon I will include detailed photo's of where it all goes.  I got it all figured out.  Stay with me Rick.

Best

Mark
Mark

We few, we happy few.....

Offline Ernie

  • Hero Member
  • *****
  • Posts: 3961
  • "Once more into the breach"
Re: WNW Fokker EIII Kurt Von Crailsheim
« Reply #20 on: July 29, 2014, 06:01:24 AM »
Mark, you are doing an amazing job!  The swirls, your woodwork, the engine are all
to me, superb.  I am really taken with the seat cushion.  Could you please let me know
how you did it to show the wear as well as you did?  I look forward to the next updates on
this excellent build, my friend.

Cheers,
Ernie:)
The new old guy, take two...

Offline Ssasho0

  • Hero Member
  • *****
  • Posts: 581
    • Scale Models Club Bulgaria
Re: WNW Fokker EIII Kurt Von Crailsheim
« Reply #21 on: July 29, 2014, 06:25:08 AM »
Hi Mark,

I also like your work so far especially the different swirls and the seat cushion :) I follow all the 5 (I think) Fokker E type builds that are under construction at the moment, enjoying the good work you all do and shamelessly stealing ideas for my build :)
I am working on exactly the same element of the undercarriage rigging at the moment and studied the pictures very carefully, so I would like to share my opinion with you and the rest of the guys here, as you know the truth is born in the discussion!
My understanding for the rigging and the turnbuckles is that there were only one turnbuckle per cable. Its purpose is to tighten the line and generally it is located where the mechanic can easily access it unless there is some other equirement for its location. Regularly on every end of the cable there is a loop and something like stainless "belt"(don't know the english word for this part) that pins the loop. This is my understanding it is based on observations more than on anything else so it can be totally wrong, I'm not a tech guy or a tinker.
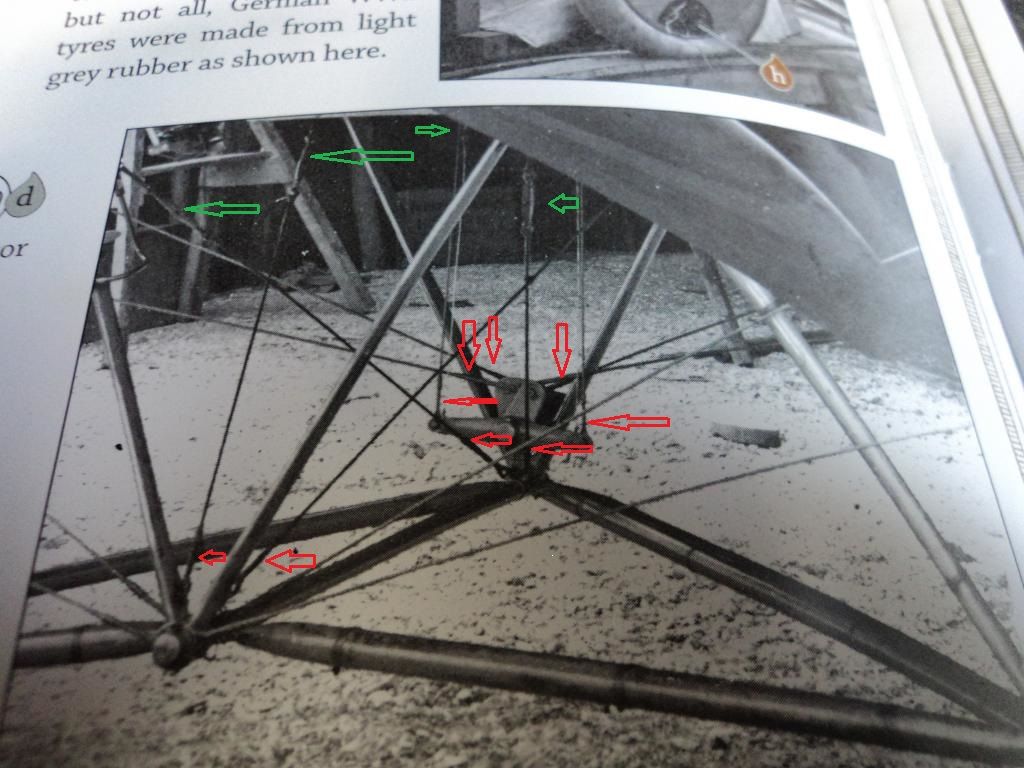
So the purpose of this long interlude is because I think there are no turnbuckles where you put them. Check your own pic, that I shamelessly downloaded and put some arrows on it. The red ones mean that there is no turnbuckle and the green ones show where the turnbuckles is located! Don't take my words for being true, just study the pictures and decide if tehre are, or there aren't turnbuckles and act accordingly ;)

Best regards,
Sasho

Think globally, act locally!

Offline bobs_buckles

  • Hero Member
  • *****
  • Posts: 3811
  • Freedom isn't free.
    • Bobs Buckles
Re: WNW Fokker EIII Kurt Von Crailsheim
« Reply #22 on: July 29, 2014, 07:27:46 AM »
Lovely work all round, Mark! You're moving along very nicely with this build  ;)
Keep going!

Cheers,
vB


https://www.bobsbuckles.co.uk/

Last Minute Man Of Faith

Offline mgunns

  • Hero Member
  • *****
  • Posts: 2255
Re: WNW Fokker EIII Kurt Von Crailsheim
« Reply #23 on: July 29, 2014, 12:13:26 PM »
The red ones mean that there is no turnbuckle and the green ones show where the turnbuckles is located! Don't take my words for being true, just study the pictures and decide if tehre are, or there aren't turnbuckles and act accordingly ;)

Best regards,
Sasho
Quote

Hello Sasho:

Thanks for your ideas.  It looks like you are correct.  I put the turnbuckles on that Part A45 as to my eyes they looked like turnbuckles.  It looks like it could be wires wrapped around a fitting.  (There is a name for it which escapes me now) and then wrapped around itself and secured.  I super glued the turnbuckles in that part so they are there for the duration for now.  However, as each build is a learning experience, I will certainly try the other method and refer back to your pictures with the arrows for reference on the next one.  If you look real close you can see that there are two wires coming off that tab as well for redundancy I would imagine.  I just may go for that look as well.  Lots of planning in the cockpit phase.
Thanks Sasho for the heads up.

Best

Mark
Mark

We few, we happy few.....

Offline mgunns

  • Hero Member
  • *****
  • Posts: 2255
Re: WNW Fokker EIII Kurt Von Crailsheim
« Reply #24 on: July 29, 2014, 12:14:45 PM »
Those swirls look terrific Mark, as does the engine and now the cockpit. I'm seeing this thread for the first time. It looks great.

Hello Snowy, glad to have you along for the build and your compliments, duly appreciated.

Best

Mark
Mark

We few, we happy few.....

Offline mgunns

  • Hero Member
  • *****
  • Posts: 2255
Re: WNW Fokker EIII Kurt Von Crailsheim
« Reply #25 on: July 29, 2014, 12:24:23 PM »
Could you please let me know
how you did it to show the wear as well as you did?  I look forward to the next updates on
this excellent build, my friend.

Cheers,
Ernie:)

Hi Ernie:

Pretty simple really.  I painted the seat Testors Leather, let it dry for a day or two, then with black oils used a small amount to highlight the buttons using the capillary method.  After a few tries it works pretty good.  If you get too much on it, you can sop it up with a Q-tip or a dry brush.  Once that has dried I go over it with Testors Model Master Desert sand on a very dry brush, just dry brushing it on for the desired affect.  I use the same method using silver to get that worn metal look too.  I use a #2 brush, put about a quarter to a half of the brush in the paint, then on a paper towel get as much off as I can and still have some on it; then I dry brush the lettering on the sprues until it barely highlights the letters and then move on to the seat or what ever object I am dry brushing.  It should be about as dry as possible.  If there is too much on the letters on the sprue, wipe some more off.  A little practice and you will have it down. 
Hopefully this helps.  It's getting later here in the great upper Midwest, but I will post some pictures of how to do it.
Thanks for stopping by, your interest and your compliments, much appreciated.

Best

Mark
Mark

We few, we happy few.....

Offline mgunns

  • Hero Member
  • *****
  • Posts: 2255
Re: WNW Fokker EIII Kurt Von Crailsheim
« Reply #26 on: July 29, 2014, 12:26:06 PM »
Hello Bob:

Thanks for coming along on this ride and your compliments, much appreciated, it is motivating and keeps my interest up there.

Best

Mark
Mark

We few, we happy few.....

Offline LindsayT

  • Hero Member
  • *****
  • Posts: 844
  • "Somehow it didn't seem like war at all..."
Re: WNW Fokker EIII Kurt Von Crailsheim
« Reply #27 on: July 29, 2014, 02:13:08 PM »
Keep it coming Mark. This is turning out to be an insightful thread.

Lindsay

Offline Vickers

  • Hero Member
  • *****
  • Posts: 600
Re: WNW Fokker EIII Kurt Von Crailsheim
« Reply #28 on: July 29, 2014, 03:22:24 PM »
Very nice choice of schemes and your metal, wood, and leather truly look the part, Mark.  This is a very promising build you've got going here and thanks for the detailed tips & observations! This is a kit I haven't attempted yet and when I do I know that I'll be grateful for the benefit of your experience with it.
Bruno: "How many rules are there?"

Willi: "I don't know... none of zem have ever been written down."

Offline mgunns

  • Hero Member
  • *****
  • Posts: 2255
Re: WNW Fokker EIII Kurt Von Crailsheim
« Reply #29 on: July 31, 2014, 12:42:55 PM »
Hello Vickers:

Thanks for following and your compliments.  I hope that what you find here is helpful and helps to clarify the instructions a bit.
Mark

We few, we happy few.....