Author Topic: Pegasus Bristol M1.C 1:72  (Read 10025 times)

Offline jknaus

  • Hero Member
  • *****
  • Posts: 1121
Re: Pegasus Bristol M1.C 1:72
« Reply #30 on: May 22, 2014, 08:51:09 AM »
Very very cool. But so tiny.  :)
James

Offline Ernie

  • Hero Member
  • *****
  • Posts: 3961
  • "Once more into the breach"
Re: Pegasus Bristol M1.C 1:72
« Reply #31 on: May 22, 2014, 06:17:35 PM »
Great work, Ian.  Your rib shading on the wings is perfect.  Very
well done!

Cheers,
Ernie :)
The new old guy, take two...

Offline radio

  • Hero Member
  • *****
  • Posts: 3952
Re: Pegasus Bristol M1.C 1:72
« Reply #32 on: May 22, 2014, 07:00:19 PM »
Lovely work Ian.
Martin

Offline mgunns

  • Hero Member
  • *****
  • Posts: 2255
Re: Pegasus Bristol M1.C 1:72
« Reply #33 on: May 23, 2014, 02:50:58 AM »
Hello Ian:

I can't see the finger print.  This is an interesting little model and you have done an outstanding job with it, fingerprint notwithstanding.

Best

Mark
Mark

We few, we happy few.....

Offline IanB

  • Hero Member
  • *****
  • Posts: 2496
Re: Pegasus Bristol M1.C 1:72
« Reply #34 on: May 23, 2014, 06:31:18 AM »
Thanks for the comments guys - the fingerprint isn't of the type we used to leave all over models, in glue, when we were kids, but I know it's there... I'll just have to position it so the lighting hides it!  ;)

 A little more front end detail made and added today....


Ian
« Last Edit: August 16, 2019, 05:31:43 PM by IanB »

Offline IanB

  • Hero Member
  • *****
  • Posts: 2496
Re: Pegasus Bristol M1.C 1:72
« Reply #35 on: May 25, 2014, 12:41:35 PM »
I wasn't happy with the windshield so I removed it and made another - slightly wider, and from thinner plastic packing. I've also fitted the undercarriage legs and made the tailskid.


Ian
« Last Edit: August 16, 2019, 05:33:04 PM by IanB »

Offline RAGIII

  • Hero Member
  • *****
  • Posts: 19694
Re: Pegasus Bristol M1.C 1:72
« Reply #36 on: May 25, 2014, 08:26:38 PM »
Looks great with the gear on! You are getting near to the end now! Looking forward to the rigging!
RAGIII
"A man has to know his limitations": Harry Callahan

"Don't slop it on" Lynda Geisler

Offline IanB

  • Hero Member
  • *****
  • Posts: 2496
Re: Pegasus Bristol M1.C 1:72
« Reply #37 on: May 29, 2014, 11:14:28 AM »
One more step closer to rigging...
 I've finished the landing gear by adding the two parallel rods which run either side of the axle to support the bungees, and the Rotherham pump. I'll add the prop for that right at the end. The king posts are on and just need to be painted and drilled, and the control horns, prop and spinner are on - I'm in the middle of filling the gaps between the prop and spinner with Mr Liquid Putty - that stuff is a life saver!


Ian
« Last Edit: August 16, 2019, 05:33:47 PM by IanB »

Offline vincentm

  • Sr. Member
  • ****
  • Posts: 411
Re: Pegasus Bristol M1.C 1:72
« Reply #38 on: May 30, 2014, 03:05:28 AM »
Beautiful upgrading and detailing. How did you do the rib shading? I read you have masked them, but which method did you use to shade the camo colors?

Offline IanB

  • Hero Member
  • *****
  • Posts: 2496
Re: Pegasus Bristol M1.C 1:72
« Reply #39 on: May 30, 2014, 09:52:17 AM »
Vincent: The rib shading was done with powdered pastels, brushed on dry over the masking with a small, flat ended paintbrush.

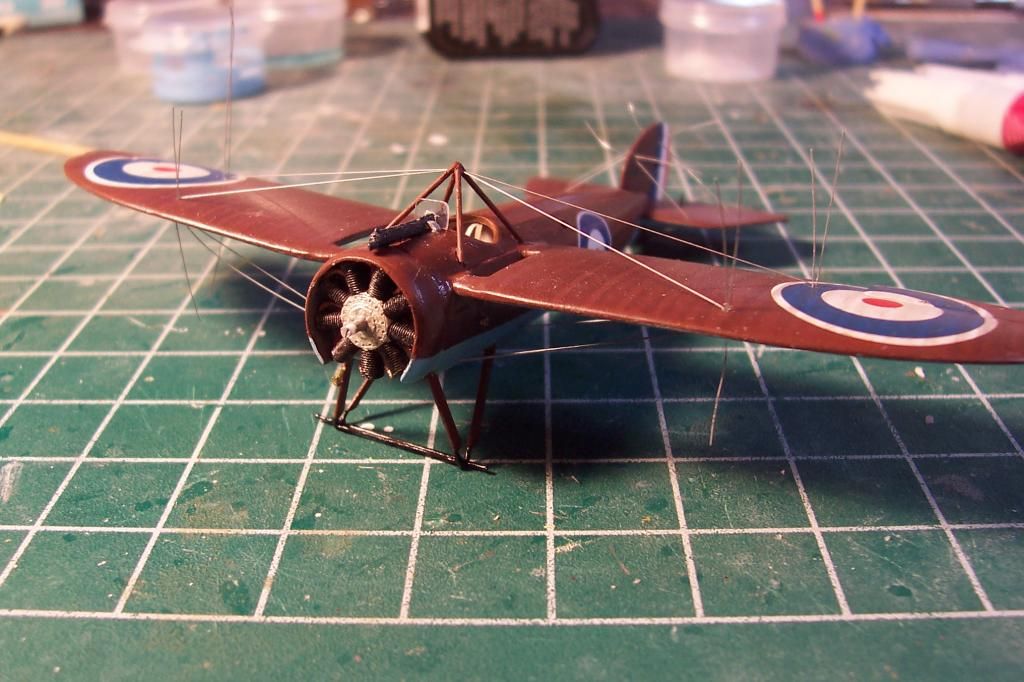
 I've adjusted the kingposts slightly as they were a little too tall, and made a good start on the rigging. All the structural rigging is done apart from a couple of wires still to be tightened on the right wing after one came loose, and the trimming and touch-up. The rest (undercarriage and control surfaces) will be done with stainless wire. Then I just need to refit the prop assembly and add the wheels, pitot tube and Rotherham pump prop and she's done!


Thanks to all for following and commenting on this build!

Ian
« Last Edit: May 30, 2014, 10:27:24 AM by IanB »

Offline frame

  • Jr. Member
  • **
  • Posts: 60
Re: Pegasus Bristol M1.C 1:72
« Reply #40 on: May 30, 2014, 05:35:27 PM »
Great work.
Very nice rigging.
Very interesting technique for rib shading.
I look forward to the next update.

Best Regards
Hristo

Offline Des

  • Administrator
  • Hero Member
  • ******
  • Posts: 9325
    • ww1aircraftmodels.com
Re: Pegasus Bristol M1.C 1:72
« Reply #41 on: May 30, 2014, 05:39:04 PM »
The Bristol is looking really good Ian and you have done a great job with the rigging.

Des.
Late Founder of ww1aircraftmodels.com and forum.ww1aircraftmodels.com

Offline vincentm

  • Sr. Member
  • ****
  • Posts: 411
Re: Pegasus Bristol M1.C 1:72
« Reply #42 on: May 30, 2014, 07:49:09 PM »
Quote
Very interesting technique for rib shading.
I agree. Thanks for the explanations Ian.

And well done for the rigging.

Offline IanB

  • Hero Member
  • *****
  • Posts: 2496
Re: Pegasus Bristol M1.C 1:72
« Reply #43 on: June 02, 2014, 06:47:30 AM »
Well gents, this one has finally been "put to bed" - done at last!

The final touches of Rotherham pump prop, control surface rigging, and pitot tube were added today.


I'll post the rest of the pics in the completed models section. Thanks to all who offered comments, assistance and advice!

Ian
« Last Edit: August 16, 2019, 05:35:16 PM by IanB »

Offline vincentm

  • Sr. Member
  • ****
  • Posts: 411
Re: Pegasus Bristol M1.C 1:72
« Reply #44 on: June 02, 2014, 08:14:29 AM »
Very nice bird. Looking forward to seeing more pics.