Author Topic: Roden Nieuport 24bis, 1/72  (Read 1229 times)

Offline ScottJ

  • Full Member
  • ***
  • Posts: 119
Roden Nieuport 24bis, 1/72
« on: October 31, 2025, 11:20:11 AM »
This might be a bit unorthodox but as I build so sporadically I thought it might be better to put together an under construction log when I?m just completing a project rather than while it?s ongoing to avoid large time gaps between posts.

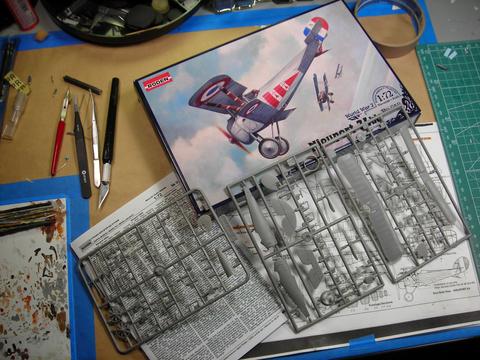
So after a many years layoff, due to many factors but mainly this house remodeling project I inflicted upon myself, here?s my first ?victim?.  Thought I?d resume with a fairly straight forward build, a Roden Nieuport 24bis.  In the past I?ve built static with no weathering, as if the aircraft just rolled out of the factory (except for inline engines seem to have a pre-rusted exhaust???).  I?m going to try cutting and offsetting the flying surfaces and add some weathering with this one.   Also my first time using a photo hosting site so hope that also works out. 


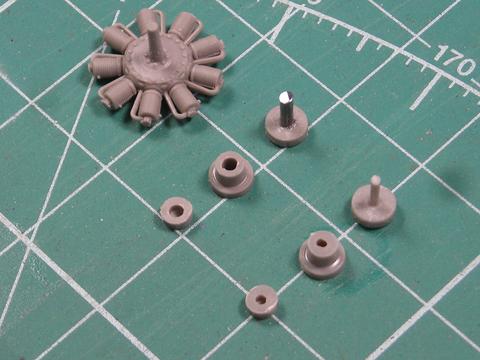
I thought the attachment for the engine looked a bit fragile so replaced it with a metal post? most likely overkill as the completed assembly is probably sturdy enough. 


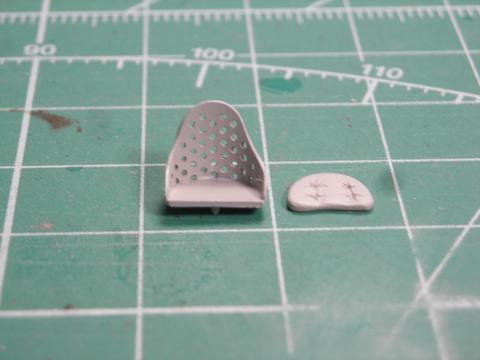
I?ve got several of the brass photo-etch sheets for seats but if I can I like to use them as templates.  I think they look better done in sheet styrene plus if I can keep making them, I?ve got an unlimited supply.


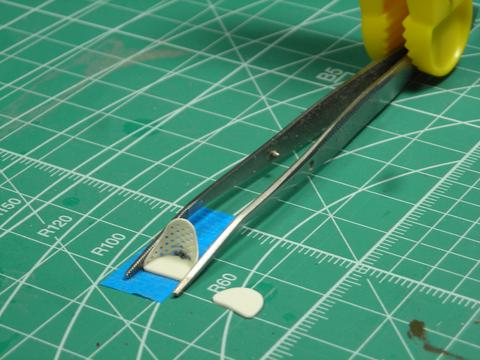
I mirrored the pin and slot underneath as on the kits seat for mounting.  Made a seat cushion so if a plastic pilot wants to climb in he?ll be comfy.   


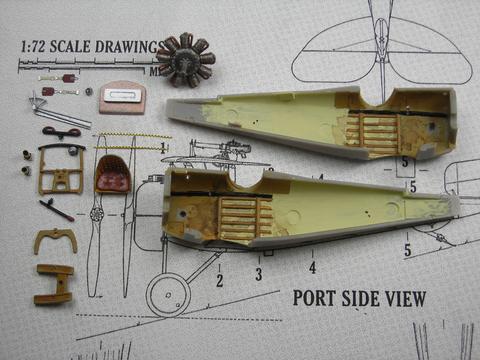
Interior and components? damn, that?s a dirty cockpit?, someone needs to take a bath! 


« Last Edit: November 03, 2025, 10:01:43 AM by ScottJ »
You can't grub with the sparrows when you've flown with the hawks... 
E.P. Janney?

Offline ScottJ

  • Full Member
  • ***
  • Posts: 119
Re: Roden Nieuport 24bis, 1/72
« Reply #1 on: October 31, 2025, 11:27:08 AM »
Fuselage is ready to come together.  Not extending the stringers to the rear is going to come back to haunt me (the upright with the cross member/instrument mounted breaks off when inserting the lower wing/seating assembly into the fuselage). 


Too bad they didn?t fly these things just in primer? I?d be about done.   


Upper wing painted and masked off, ready to try my hand at some weathering.   


Uh oh!!!, this isn?t the look I really wanted? I?ve really overdone the weathering here.  I didn?t realize how much product I?d put down until I pulled the tape off.  Much too much, especially in this scale.   


Underside, hopefully I?ve not made the engine too leaky.   
« Last Edit: November 03, 2025, 10:09:42 AM by ScottJ »
You can't grub with the sparrows when you've flown with the hawks... 
E.P. Janney?

Offline ScottJ

  • Full Member
  • ***
  • Posts: 119
Re: Roden Nieuport 24bis, 1/72
« Reply #2 on: October 31, 2025, 11:33:14 AM »
I decided I?m not going to strip the paint and redo it, this will just have to be a learning experience


So as far as the markings, I wanted to have this aircraft actually be in French service so had chosen the scheme as on the box.  This aircraft was with Esc. N.97, s/n and pilot unknown.  The pennant for the upper wing was printed out of register and when I tried to cut it down to remove the overprint, the overlying red just broke up and flaked off.  Didn?t even get a chance to put it in water to destroy it.  I considered painting a red pennant shape on the upper wing to place what was left of the decal on but thought if the decal broke up when placed in water I?d really be in trouble.  A trip to the decal file produced a sheet from Print Scale, Nieuport 17-24 with the selection for a 24bis being Sergent Arnold Courtney Campbell of N.124 Lafayette Escadrille.   


I wanted to see if I could find some pictures of this particular aircraft, make sure the decals were placed correctly and maybe determine if it had a windshield but could find no pictures.  For my reference I was using the Nieuport Fighters Datafile Special Volume 2 completely forgetting that I also had the Nieuport 24/27 At War Datafile.  When I looked in there, right on the backside of the cover is a Ronny Bar rendering of this plane with a photo right across from it.  Looks like the symbols behind the cockpit were in black and not on a blue field.  Well, it is what it is? as already mentioned this build is now more of a learning experience so if not upward, it?s onward.


One thing I?m happy with is the Gaspatch Vickers I got for it? Trying to build a model around it that will do it justice!   


Upper wing about ready to be placed.   
« Last Edit: November 03, 2025, 10:17:25 AM by ScottJ »
You can't grub with the sparrows when you've flown with the hawks... 
E.P. Janney?

Offline ScottJ

  • Full Member
  • ***
  • Posts: 119
Re: Roden Nieuport 24bis, 1/72
« Reply #3 on: October 31, 2025, 11:37:02 AM »


Some progress? I know it?s been a while since my last build but I seem to really be struggling with the rigging.  Nieuports are usually pretty straight forward but I?ve really had issues with this one, more so than usual.   


I think the next installment will be in the Completed  section.
Thanks for looking
Scott
« Last Edit: November 03, 2025, 10:22:04 AM by ScottJ »
You can't grub with the sparrows when you've flown with the hawks... 
E.P. Janney?

Offline RAGIII

  • Hero Member
  • *****
  • Posts: 19957
Re: Roden Nieuport 24bis, 1/72
« Reply #4 on: October 31, 2025, 11:58:47 AM »
Looks great! You are close with the Postimages stuff. I think someone posted a better way to use the share feature. If not PM me and I will walk you through the process.
RAGIII

"A man has to know his limitations": Harry Callahan

"Don't slop it on" Lynda Geisler

Offline ScottJ

  • Full Member
  • ***
  • Posts: 119
Re: Roden Nieuport 24bis, 1/72
« Reply #5 on: October 31, 2025, 12:11:52 PM »
Thanks so much Rick, I've been messing with uploading these photos but still haven't nailed it.  Hard to know what you are going to see until you post.  I'm still experimenting but will certainly take you up on your offer if I keep hitting dead ends.
Thanks again.
Scott...
You can't grub with the sparrows when you've flown with the hawks... 
E.P. Janney?

Offline NigelR

  • Hero Member
  • *****
  • Posts: 2706
Re: Roden Nieuport 24bis, 1/72
« Reply #6 on: October 31, 2025, 06:55:09 PM »
I think it's a nice idea to post the whole build thread together, it makes for an interesting read. But then if you are a slow builder like me, it would mean a loooong time between posts, and that could reduce traffic on the site, making it look less active than it is. Whatever you prefer is fine IMO.

I think you did a great job here for your return to the hobby. The build is really well done, very nice work on the interior and the end result looks great. The weathering is a bit overdone to my eyes (I am well known for liking a more subtle approach to weathering). But I hear you wrt to getting the balance right. I have also found that when I have sprayed weathering over a masked base coat it's really hard to see how it looks until you take the tape off. I'm sure as you build more you will get the balance to your liking. But it's a lovely build and I look forward to seeing more from you. 

Offline DaddyO

  • Hero Member
  • *****
  • Posts: 1559
Re: Roden Nieuport 24bis, 1/72
« Reply #7 on: October 31, 2025, 07:08:16 PM »
Sweet little Nieuport Scott  8)

I do like the way you've made the seat (which looks fabulous) so I'll nab that as a technique for my next one. For weathering on mine I use artists oil paints which I find much easier to control (and see the gradual build up), but then I'm a bit crap at using an airbrush . . . ::)
I think you were right to press on with getting it done even if you spot minor irritating faults as you are building; that way you get the 'full' learning experience and can use what you've learned on the next one.

Enjoyable thread to read through in its entirety
Paul
There cannot be a crisis today, my schedule is full

Offline Rip Van Winkle

  • Sr. Member
  • ****
  • Posts: 487
Re: Roden Nieuport 24bis, 1/72
« Reply #8 on: November 01, 2025, 10:06:28 AM »
Nicely done especially the cockpit.. The Roden Nieuports are pretty good models to build. I like your idea of posting the entire build at once. 

Offline ScottJ

  • Full Member
  • ***
  • Posts: 119
Re: Roden Nieuport 24bis, 1/72
« Reply #9 on: November 03, 2025, 10:44:04 AM »
Thank you all for the positive comments, as stated, the weathering didn't turn out as I'd imagined it.  I was using a weathering powder (Tamiya/soot) applied with a stiff bristle brush.  I really had a hard time determining if I was getting any product on at all... when it finally started to look like some was being applied I'd already overdone it being evident only when I took the tape off.  I did use artist oils to weather over the decals and may go that route for the whole model next time, completely bypassing the weathering powders.   
I need to get some better pictures and then it will turn up in the Completed section.  (And Thank You RAGIII for helping me out with posting the pictures, looking much better now!).

Scott...
You can't grub with the sparrows when you've flown with the hawks... 
E.P. Janney?

Offline NigelR

  • Hero Member
  • *****
  • Posts: 2706
Re: Roden Nieuport 24bis, 1/72
« Reply #10 on: November 03, 2025, 07:17:54 PM »
I would definitely avoid weathering powders for the overall finish, they are far too heavy and unpredictable IMO. Like Paul, I'm also a fan of using oils for subtle modulation and weathering. Also, PrzemoL on here is a master of subtle weathering using (IIRC) lightly tinted varnish oversprays - take a look at his silver finish on this thread: https://forum.ww1aircraftmodels.com/index.php?topic=15094.0

Offline RAGIII

  • Hero Member
  • *****
  • Posts: 19957
Re: Roden Nieuport 24bis, 1/72
« Reply #11 on: November 03, 2025, 11:41:19 PM »
Thank you all for the positive comments, as stated, the weathering didn't turn out as I'd imagined it.  I was using a weathering powder (Tamiya/soot) applied with a stiff bristle brush.  I really had a hard time determining if I was getting any product on at all... when it finally started to look like some was being applied I'd already overdone it being evident only when I took the tape off.  I did use artist oils to weather over the decals and may go that route for the whole model next time, completely bypassing the weathering powders.   
I need to get some better pictures and then it will turn up in the Completed section.  (And Thank You RAGIII for helping me out with posting the pictures, looking much better now!).

Scott...

Looking forward to those pictures. As for being overweathered, one look at My Nieuports will show you how restrained yours actually is  ???
RAGIII
"A man has to know his limitations": Harry Callahan

"Don't slop it on" Lynda Geisler