Author Topic: 1/72 SIA SP 2  (Read 8140 times)

Offline RichieW

  • Hero Member
  • *****
  • Posts: 1966
Re: 1/72 SIA SP 2
« Reply #30 on: April 24, 2021, 05:47:45 AM »
Scratch building is so addictive Stephen that I am contemplating selling my stash of Wingnut Wings kits. Hhhmmmmm.....decisions, decisions. In a way I miss building kits but at the moment I am learning so many new skills and so much about the history of aviation that I may only build WW2 kits from now on.

Richie

Offline Alexis

  • Hero Member
  • *****
  • Posts: 7947
  • Love the self
Re: 1/72 SIA SP 2
« Reply #31 on: April 24, 2021, 11:52:20 AM »
Yup , you have the bug big time ...GOOD !


Alexis
Hurra ! , Ich Leben Noch
Body and life is a vessel we use to travel the planet . Femininity is the gift , The miracle comes from what we do with it .

Offline kensar

  • Hero Member
  • *****
  • Posts: 2503
  • Reshaping the world - one piece at a time.
Re: 1/72 SIA SP 2
« Reply #32 on: April 25, 2021, 02:35:52 AM »
Your nacelle came together very well.  The lines on it are well blended.  It will look great with some paint on it.

After doing some scratchbuilding, kits just don't have the same appeal.  However, I will be keeping the ones I have!


Offline lone modeller

  • Hero Member
  • *****
  • Posts: 5300
Re: 1/72 SIA SP 2
« Reply #33 on: April 29, 2021, 04:47:29 AM »
Evening All,

Thank you Frank and Ken for your kind comments. Richie I know how you feel about scratch building: I disposed of my kit collection several years ago and have no regrets, but I am aware that scratch building is not for everyone. Looking at some of the models on this site and the superb details that modellers add, I sometimes wonder whether I would be better taking up origami or knitting, but the very generous comments made here help to keep me going.

I had to make a new top wing as the old one suffered badly from banana syndrome and I was quite unable to straighten it out: the one in the photo has been discarded and the new wing is still being painted. A coaming was added around the cockpit from 20 thou rod and I have carved a propellor from wood.

I have been coating plastic with acrylic paints over the past week - mainly mixed colours (Revell white and beige 314) for the CDL on the wings and flying surfaces and white and Mittlegrau (46) for the struts and nacelle. The wood sides of the nacelle are Revell brown (381). I applied many coats of the CDL and grey (probably 10 on the flying surfaces and nearly as many for the grey on the nacelle), to build up a solid layer of colour which has a smooth semi-matt finish. The national colours were Humbrol enamel red (60) which also needed several coats as the paint is rather thin, and Humbrol enamel Dragoon Green (MC 7) which I have had since the mid-1970's! The national colours may not be an exact match but given the variations in pigments and fading which took place, I am claiming that these are probably close enough to be acceptable. The tyres were Mittlegrau.

I have received the serial transfers from Arctic Decals and will apply them to the fuselage before I continue with construction.


When the new wing is finished (hopefully tomorrow), I can start on the final construction phase - wings, tail unit and undercarriage.

Thanks for looking.

Stephen.

Bughunter

  • Guest
Re: 1/72 SIA SP 2
« Reply #34 on: April 29, 2021, 06:57:13 AM »
In your Gods own scale the small parts are even smaller :o
We have somehow a parallel build now: subassemblies painted and mounting starts
The beast with the four wings is so small, that is may be also in your scale :-\

Cheers,
Frank

Offline RichieW

  • Hero Member
  • *****
  • Posts: 1966
Re: 1/72 SIA SP 2
« Reply #35 on: April 29, 2021, 07:46:13 AM »
Looking lovely with a bit of colour going on Stephen, nice and methodical as ever.

Yes, nothing at all against kits and the level of artistry and technical brilliance of so many of the modellers (yourself included) often leaves me in a state of shock of awe. I have frequented another forum for a few years and every now and then a stunning build is produced. Virtually everything that appears here is of the most incredible standard. Maybe, in a strange kind of way, that is the appeal of scratch building for me because I have absolutely no expectation of any great success. It might be fun to build a kit and do a scratch build of the same aircraft side by side. Hhmmmm...... ;)

Offline Alexis

  • Hero Member
  • *****
  • Posts: 7947
  • Love the self
Re: 1/72 SIA SP 2
« Reply #36 on: April 29, 2021, 09:39:49 AM »
Stephen , your up-dates always bring a smile and this one has me really grinning and I can't wait for the next one !

In the future if this helps you out . Remember on my Lloyd C.V build on how I made the gun ring ? This might work for you on warped wings . Boil a pot of water , dunk the part in the boiling water ( hold part with tongs ) for a few minutes . Pull out of water and place the wing on a flat surface and press the center on the warp down so wing is flat . Let set for a minute and pour cold water over top . This will re-set the memory to the plastic part .


Alexis
Hurra ! , Ich Leben Noch
Body and life is a vessel we use to travel the planet . Femininity is the gift , The miracle comes from what we do with it .

Offline DaveB

  • Hero Member
  • *****
  • Posts: 988
Re: 1/72 SIA SP 2
« Reply #37 on: April 30, 2021, 01:40:35 AM »
Good progress here, Stephen -

Great to the colours going onto the wings and your engine looks great now painted.

Looking forward to next update

Regards

Dave
As we say in fencing, what's the point!

Offline IanB

  • Hero Member
  • *****
  • Posts: 2435
Re: 1/72 SIA SP 2
« Reply #38 on: April 30, 2021, 03:26:28 AM »
Sorry to hear of the warping problems, but I think you have it all in hand as usual.
The wing colours look pretty good to me!

Ian

Offline RAGIII

  • Hero Member
  • *****
  • Posts: 18793
Re: 1/72 SIA SP 2
« Reply #39 on: May 01, 2021, 04:09:13 AM »
I am impressed as always with your work. The painted markings look excellent on all of the components! I am sure you will work out the warp issues.
RAGIII
"A man has to know his limitations": Harry Callahan

"Don't slop it on" Lynda Geisler

Offline Rookie

  • Hero Member
  • *****
  • Posts: 925
  • No guts, no glory...
Re: 1/72 SIA SP 2
« Reply #40 on: May 02, 2021, 05:40:19 PM »
I Love the beautiful curves of the fuselage Stephen!

Excellent work and great progress.

Willem

Offline Monty

  • Hero Member
  • *****
  • Posts: 1643
Re: 1/72 SIA SP 2
« Reply #41 on: May 02, 2021, 07:56:33 PM »
Great progress on this one, Stephen. And great problem solving. Regards, Marc.

Offline lone modeller

  • Hero Member
  • *****
  • Posts: 5300
Re: 1/72 SIA SP 2
« Reply #42 on: May 05, 2021, 06:33:04 AM »
Evening All,

Thank you Frank, Richie, Alexis, Dave, Ian, Rick Willem and Marc for your very kind comments which are very much appreciated.

Alexis I knew about the hot water method for restoring the wing but I think that the reason why it had warped was because I had sanded it too rigorously to get an aerofoil shape, so when I added the ribs that caused the distortion. I had not sanded the lower wing as roughly so it did not distort by very much and has been salvaged. Making a new wing seemed to be the quickest and easiest solution

Construction has restarted and I have now made the nacelle ready to be fixed to the lower wing. I have thought long and hard about the order of assembly of the major components and have decided to follow the sequence described here. More will follow later.

The first step was to put the radiators on to the sides of the nacelle. I had pre-drilled holes in the nacelle and radiators to take small pins to provide a strong joint, so a drop of cement and they were on. This was followed by the pipes to the top of the engine which were made from 20 thou rod which had been bent to shape and then painted:


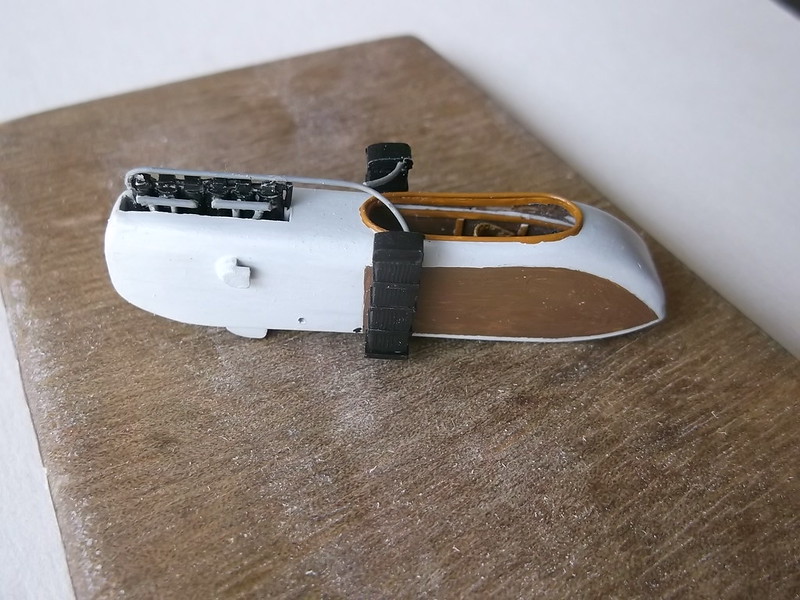
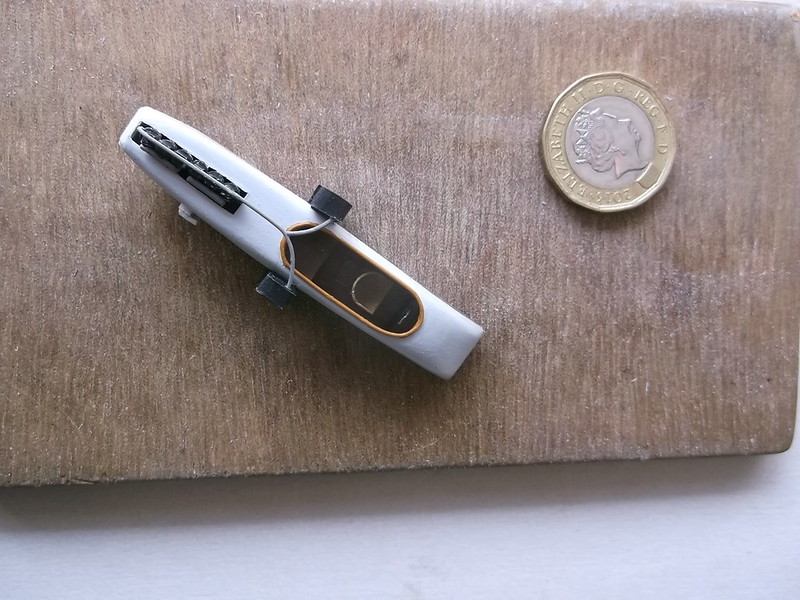
The cabane struts were cemented to the fuselage sides and allowed to set properly. The length of these is the same but the front end of the nacelle is supposed to be slightly lower when mounted to the wing - getting the lengths right was a bit of a fiddle. Having got the cabanes in place there were awkward cross struts to add between the lower parts of the cabanes - I used 10 x 20 thou strip for those. The return pipes from the bottom of the radiators to the engine had to be added to the bottom of the nacelle after the struts were in place as the pipes ran outside of the struts:


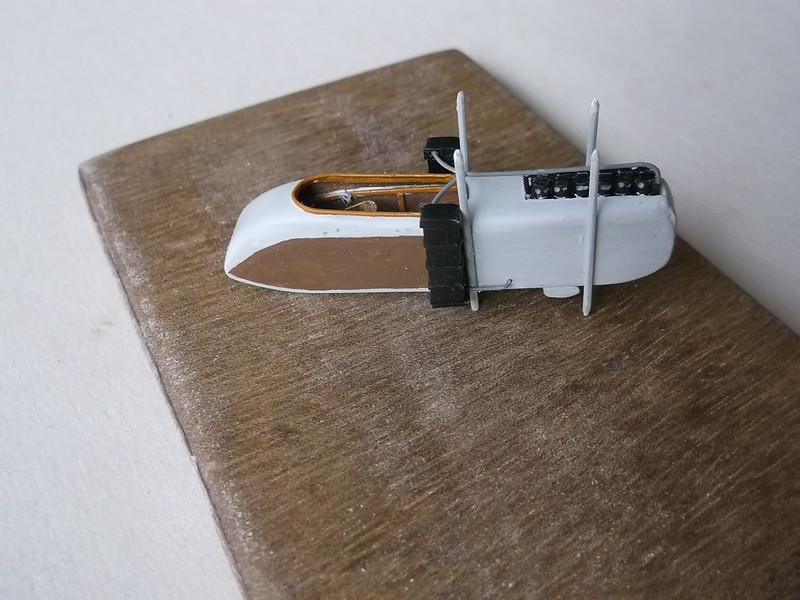
The serlal was now fixed in place - it was from Arctic Decals and made to order. It is slightly oversize (my fault, not Arctic Decals!), but I do not think anyone will notice if I do not mention it. I also added the exhaust pipes but some of these are too long and I will have to remove and trim them later before I fix the top wing i place.

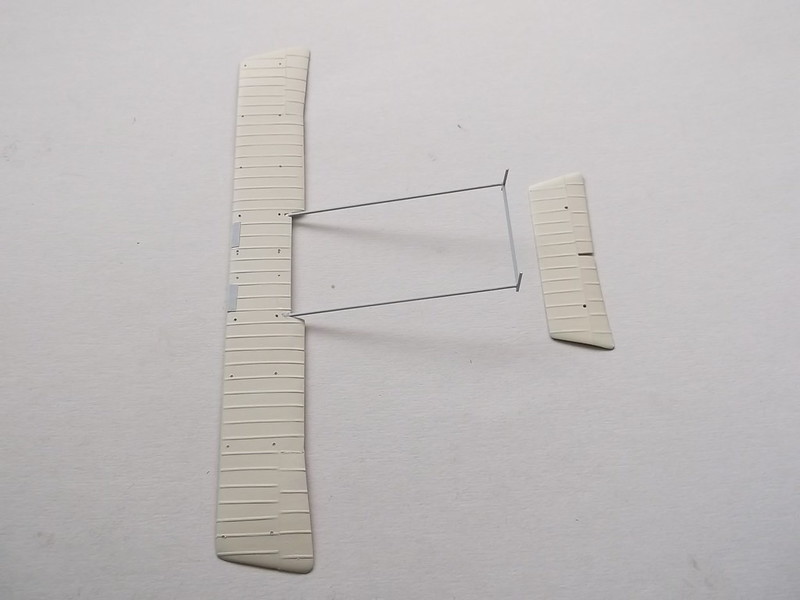
Now to mount the booms and tail. This is what I have been thinking about for some time. I have decided that the method I am about to describe is as good as any, but it varies somewhat form the method that I have used before. The rear of the booms were fixed to the rudder posts and the horizontal tail section sat on a cross member between the lower booms. The rudder posts passed through the horizontal tail surface, so I soldered two small rudder posts to the ends of the lower booms. I drilled two holes in the horizontal tail surface and squared these with the end of a small file and made sure that the posts would pass through properly.

The lower booms were epoxied to the slots in the rear of the lower wing and the correct angle achieved by using a standard boom jig - the height had been measured from the plans as described in previous build articles:


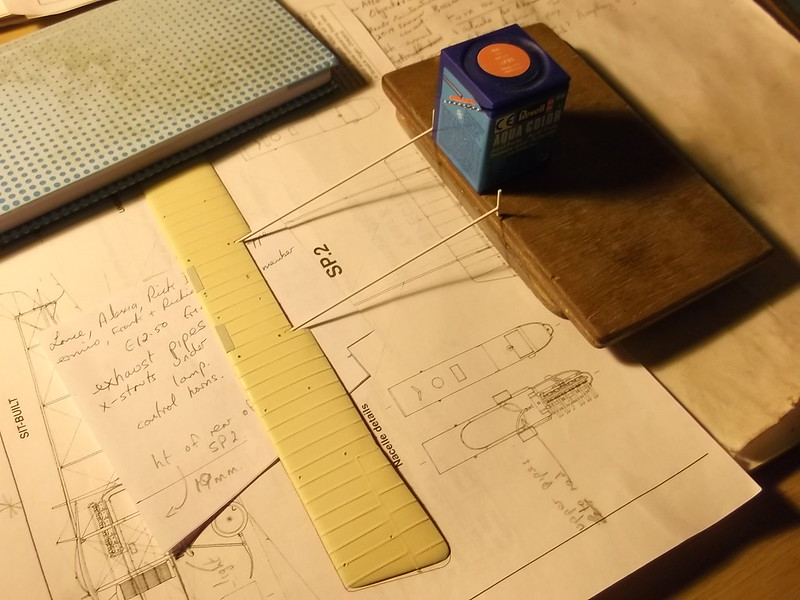
The above shows the booms set ready to be epoxied, the paint pot was to help keep the rudder posts upright while I fiddled and checked that everything was square and true. After the expoxy had been applied and cured I had this:


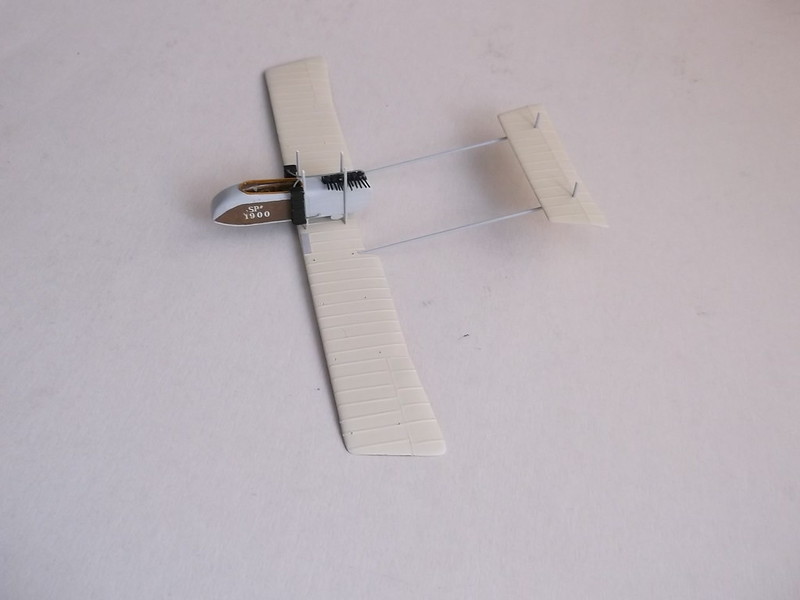
In the images there is a piece of paper with a line and arrow with 19mm written on it: the line represents the height of the booms at the tail end relative to the rear of the wing - the edge of the paper was used to measure the height of the wood blocks that make the jig. The wing and booms were laid over plans to get accurate alignments. Simple and effective - scratch building does not have to be complicated or difficult. A simple check of the newly installed booms with the horizontal tail surface showed that the rudder posts would pass through the holes in the tail, so the horizontal bar between the rear of the booms was inserted. This was a piece of 20 x 30 thou strip:


The nacelle sub-assembly was cemented to the lower wing and the boom bracing at the rear painted. Finally the horizontal tail surface was CA'd to the rudder posts and booms:


I have worked out how I intend to fix the upper booms to the top wing and then wing to the above asembly and will describe the process in the next update when I have completed that stage.

Thanks for looking.

Stephen.

Offline RichieW

  • Hero Member
  • *****
  • Posts: 1966
Re: 1/72 SIA SP 2
« Reply #43 on: May 05, 2021, 07:00:14 AM »
Superb update Stephen, the delicacy of this build is amazing. I love the great care but simplicity of your method for attaching the booms. I'm beginning to think a pusher has to be in my future. This is so inspiring!

Richie

Bughunter

  • Guest
Re: 1/72 SIA SP 2
« Reply #44 on: May 06, 2021, 04:59:50 AM »
Some small letters are bringing it to life :D
You are the master of effective simple tooling!

Cheers,
Frank