Author Topic: 1/72 SIA SP 2  (Read 8139 times)

Offline lone modeller

  • Hero Member
  • *****
  • Posts: 5300
1/72 SIA SP 2
« on: April 04, 2021, 08:45:30 AM »
Evening All,

I have had a loss of mojo recently, in addition to which I have not been able to decide what to make next until a couple of days ago. I am hoping that this new project will give me a bit more motivation to tackle something in plastic and offer a subject which has rarely been modeled and then usually as a vacuform. The subject of my choice is the Societa Italiana Aviazione (SIA) Savoja Pomilio (SP) 2, a pusher design derived from the Maurice Farman MF 11. It looked like this (scroll down the page to the second photograph):

http://www.ww1-planes.com/Italy/Savoia.php

or nearly like this:


because the cover illustrates an SP 3 which had a different shaped nacelle and reduced wingspan. This is also the subject of vacuform models. The SP 2 has been on my list of possible models for some time now, so I thought that perhaps it was time to give it a try, the more so as I only have one other Italian model in my collection: this one will help to keep it company.

I have not made much for the reasons given above, but making wings and tail surfaces means that with a little effort and in a relatively short time there is something to show. I cut and shaped the wing blanks from 30 thou plastic card which had been inserted into  in a length of drainpipe and hot water poured in. The tail surfaces were also cut and shaped from 30 thou card:


I marked off the ribs on the wings and horizontal tail surfaces and added 10x20 thou strip:


These are awaiting being sanded down. I also decided to make the two prominent radiators which will be attached to the sides of the fuselage nacelle. I glued together some scrap card and filed it to shape and after scoring the sides added pieces of 10x20 thou strip to represent the metal straps around the cooling pipes:


I will start to make a nacelle next to alleviate the tedium of sanding down the ribs on the flying surfaces and to give me something to show for my efforts.

Thanks for looking.

Stephen.

Offline lcarroll

  • Administrator
  • Hero Member
  • ******
  • Posts: 8547
Re: 1/72 SIA SP 2
« Reply #1 on: April 04, 2021, 11:41:25 AM »
Stephen,
      There's some pretty complex construction features apparent in that photo but nothing you haven't tackled successfully in the past. I'm looking forward as always to following your progress on this one, and expect it will be a real adventure!
Cheers,
Lance

Offline Alexis

  • Hero Member
  • *****
  • Posts: 7947
  • Love the self
Re: 1/72 SIA SP 2
« Reply #2 on: April 05, 2021, 01:35:26 AM »
Love your adventures so will tagging along on this as well ! And you are off to a great start already  :)


Alexis
Hurra ! , Ich Leben Noch
Body and life is a vessel we use to travel the planet . Femininity is the gift , The miracle comes from what we do with it .

Offline RAGIII

  • Hero Member
  • *****
  • Posts: 18793
Re: 1/72 SIA SP 2
« Reply #3 on: April 05, 2021, 01:40:54 AM »
Another impressive start to what I am sure will be an awesome build!
RAGIII
"A man has to know his limitations": Harry Callahan

"Don't slop it on" Lynda Geisler

Offline DaveB

  • Hero Member
  • *****
  • Posts: 988
Re: 1/72 SIA SP 2
« Reply #4 on: April 05, 2021, 02:30:40 AM »
Off to another great start there, Stephen -

Be an interesting one to see once finally completed

Regards

Dave
As we say in fencing, what's the point!

Offline Rookie

  • Hero Member
  • *****
  • Posts: 925
  • No guts, no glory...
Re: 1/72 SIA SP 2
« Reply #5 on: April 05, 2021, 03:54:10 PM »
Nice to see you back here with this beautiful project Stephen.

It's refreshing to see an Italian bird. I have the datafile too, and it looks pretty complicated to build. Nothing I would take on for a while.

The wings and tail surfaces already look great! Any idea what you are going to do with the Fiat engine? It will be clearly visible despite the 1/72 scale.

I'll be on row one following you building this!

Willem
« Last Edit: April 06, 2021, 05:16:46 AM by Rookie »

Offline gbrivio

  • Hero Member
  • *****
  • Posts: 1681
Re: 1/72 SIA SP 2
« Reply #6 on: April 05, 2021, 05:28:12 PM »
Interesting project, yor approach to wings creation is brilliant. Looking forward to next steps.
Ciao
Giuseppe

Offline ermeio

  • Hero Member
  • *****
  • Posts: 913
Re: 1/72 SIA SP 2
« Reply #7 on: April 06, 2021, 04:25:59 AM »
Awesome subject and great start!
It will be a showstopper
er me

Bughunter

  • Guest
Re: 1/72 SIA SP 2
« Reply #8 on: April 06, 2021, 06:44:25 AM »
That is a great start. Maybe there are some not so easy steps ahead of you, but it looks like you are going step by step. When the time comes, you will come up with the right solution.
I will follow with interest!

Cheers,
Frank

Offline RichieW

  • Hero Member
  • *****
  • Posts: 1966
Re: 1/72 SIA SP 2
« Reply #9 on: April 11, 2021, 07:33:32 AM »
Hi Stephen, this looks like another fascinating project. I shall watch and hopefully learn.

Richie

Offline lone modeller

  • Hero Member
  • *****
  • Posts: 5300
Re: 1/72 SIA SP 2
« Reply #10 on: April 15, 2021, 07:00:21 AM »
Evening All, 

Many thanks Lance, Alexis, Rick, Dave, Guiseppe, Ermio, Frank and Richie for your kind and encouraging comments. I have been in sore need of those recently as this update will show!

Well I nearly lost my mojo again. I finished sanding down the ribs on the horizontal surfaces and then turned to constructing the nacelle. My original intention was to push mould it in two halves, so I dutifully carved the male mould from basswood and after a couple of attempts I had two halves. Then I saw the problems which I had not given sufficient thought to, namely that I had a seam down the nose and the leading edge on the nose was rather blunt. I then did what I should have done at the start - look at a similar nacelle which I had made for a previous build. I refer to a Voisin III model which I made some years ago which has similarities in shape with this one:


The leading edge of the nacelle is sharp and the sides are flat so that the angles are quite sharp. The front of the nacelle is slightly curved and very prominent - any joint there is going to be a b.... to fill and hide. When I looked up how I had made the nacelle the answer was a blinding flash of the b.....obvious:


Make the sides and bottom from flat card and mould the top surface! This method means that the sharp edges of the lower part of the nacelle are easily reproduced, (no rounded corners resulting form the push mould which have to be sharpened), and the top surface has no seams! Easy when a little thought is given to the problem, or even simpler if I look up how I did something in the past....!

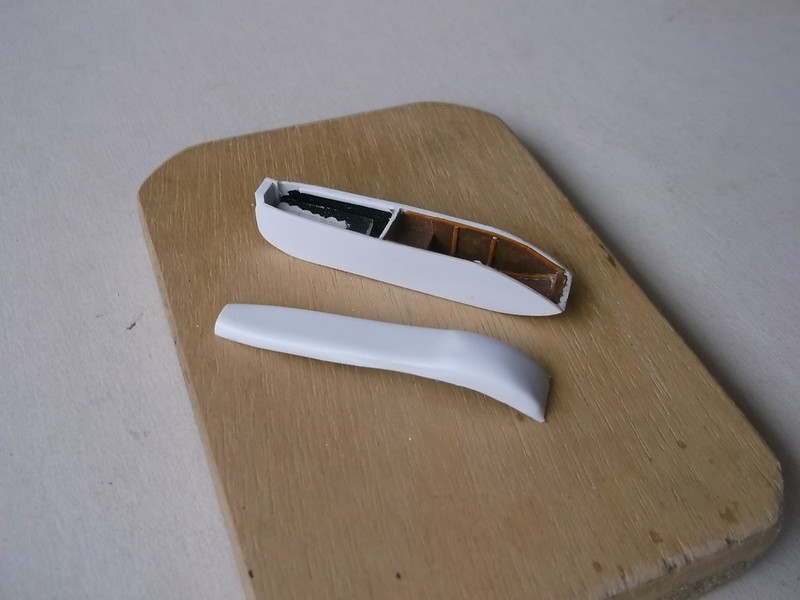
So back to square one and start again... by making the sides and bottom from 30 and 20 thou card respectively. This also made the cutting of the two rectangular and one round window in the bottom of the nacelle easy - no trying to match holes on each half of a nacelle moulding. I could curve the rear of the underside by repeatedly bending it with a pair of tweezers. I put some supports along the fuselage sides to hold the floor in the correct place, added some simple framing, painted the insides, made a blanking piece which represents the fuel tank behind the observer and a throttle quadrant, and it was ready to be assembled:


The seat in the image is a spare resin from Barracuda - I am not sure if it is accurate but as nobody is likely to see it I am not too concerned. Similarly I have left the interior details to a minimum - I will add an IP and control wheel but nothing else will be visible. The fuel tank blank helps to support the fuselage sides until I can fix the top in place. The rear of the fuselage was blanked off with 60 thou card to allow for the necessary filing and shaping. Filler will be needed here later too.

I moulded the top using the male fuselage mould and a new hole cut in plywood sheet. At this point I again ran into problems. Generally I can get a decent mould after two or three tries - not this time. Male moulds made from balsa wood seems to need a smaller gap than those made from basswood so I had to keep sanding down the male mould. Then I could not get the front of the nacelle to mould properly: I was close to putting this project on hold and starting something else. I decided that I would give it one more try and slightly change the angle when I pushed the male mould into the plastic sheet - and it worked immediately! I think that I am beginning to lose my touch with this moulding process as I have never had quite so many failures before.

Quite a lot of plastic had to be removed but that was straightforward so that I am at last at this stage:


The engine will consist of a row of rod pieces glued together with the top of the engine detail: I do not intend to make the lower parts as they will be completely concealed on the finished model. This was dropped into the fuselage so that I could measure the size of the hole which I need to cut into the moulding later.

I am hoping that I can now complete the nacelle and engine details and proceed with painting.

Thanks for looking.

Stephen.

Offline Edo

  • Hero Member
  • *****
  • Posts: 702
Re: 1/72 SIA SP 2
« Reply #11 on: April 15, 2021, 03:29:00 PM »
wow!
brilliant work!
very interesting to follow

ciao
edo

Offline RichieW

  • Hero Member
  • *****
  • Posts: 1966
Re: 1/72 SIA SP 2
« Reply #12 on: April 15, 2021, 05:01:07 PM »
A valuable lesson in perseverance for us all Stephen. Well done for not throwing in the towel. Looking forward to seeing the next step.

Richie

Offline Dave Brewer

  • Hero Member
  • *****
  • Posts: 513
Re: 1/72 SIA SP 2
« Reply #13 on: April 15, 2021, 06:02:03 PM »
A fascinating project Stephen, coming along very nicely.Beautiful Voisin by the way!
Cheers,
Dave.

Offline Gisbod

  • Hero Member
  • *****
  • Posts: 2438
Re: 1/72 SIA SP 2
« Reply #14 on: April 15, 2021, 07:31:06 PM »
That’s beyond amazing Stephen...

You do know you can buy ready made kits don’t you?  ;D

I’m in awe...

Guy
“Oh! I have slipped the surly bonds of Earth -
Put out my hand, and touched the face of God.”

P.O. John Gillespie Magee 1941