Author Topic: 1/72 Grahame-White Type X Charabanc  (Read 5017 times)

Offline Early Bird Fan

  • Sr. Member
  • ****
  • Posts: 261
Re: 1/72 Grahame-White Type X Charabanc
« Reply #30 on: March 02, 2021, 04:33:53 PM »
thanks for sharing your methods, they certainly seem to work for you and it's looking awesome (as your work always does).

Offline jeroen_R90S

  • Hero Member
  • *****
  • Posts: 1060
Re: 1/72 Grahame-White Type X Charabanc
« Reply #31 on: March 02, 2021, 06:28:24 PM »
Looking great!
I see I'm not the only one who uses those square Revell Aqua paint containers in such a way!
I even keep the empty ones and put varying degrees of "ballast" (nuts, stainless balls etc) in them to use them as you use the Humbrol tins. :)

Offline RAGIII

  • Hero Member
  • *****
  • Posts: 18793
Re: 1/72 Grahame-White Type X Charabanc
« Reply #32 on: March 02, 2021, 11:14:52 PM »
You have taken a giant step forward Stephen. The clever ways you devise to square things up is always entertaining...and gives one great ideas! The aircraft really looks outstanding as a biplane. The rigging is looking outstanding.
RAGIII
"A man has to know his limitations": Harry Callahan

"Don't slop it on" Lynda Geisler

Offline kensar

  • Hero Member
  • *****
  • Posts: 2503
  • Reshaping the world - one piece at a time.
Re: 1/72 Grahame-White Type X Charabanc
« Reply #33 on: March 03, 2021, 12:39:13 AM »
As the others have said, thanks for sharing your methods.  I always find it interesting how others put models together.
I also have my Mk I jigs - machining blocks.
This plane is interesting in that the radiator is suspended on wires.

Looking forward to seeing more progress. (Be sure to bolt that seat down well before giving rides!)

Offline lone modeller

  • Hero Member
  • *****
  • Posts: 5300
Re: 1/72 Grahame-White Type X Charabanc
« Reply #34 on: March 08, 2021, 10:20:27 PM »
Evening All,

Thanks Frank, Alexis, EBF, Jeroen, Rick and Ken for the kind comments - they are much appreciated.

Frank: I have shown my Mk 2 and 3 jigs in other build logs on this site, but at the moment I have not had the need to build a Mk 4 variant. I will let you know when I do!

Jeroen: I had not thought of adding weight to empty paint pots - that is a really good idea and as I have a couple of pots which are nearly empty, I will keep them ready for future use.

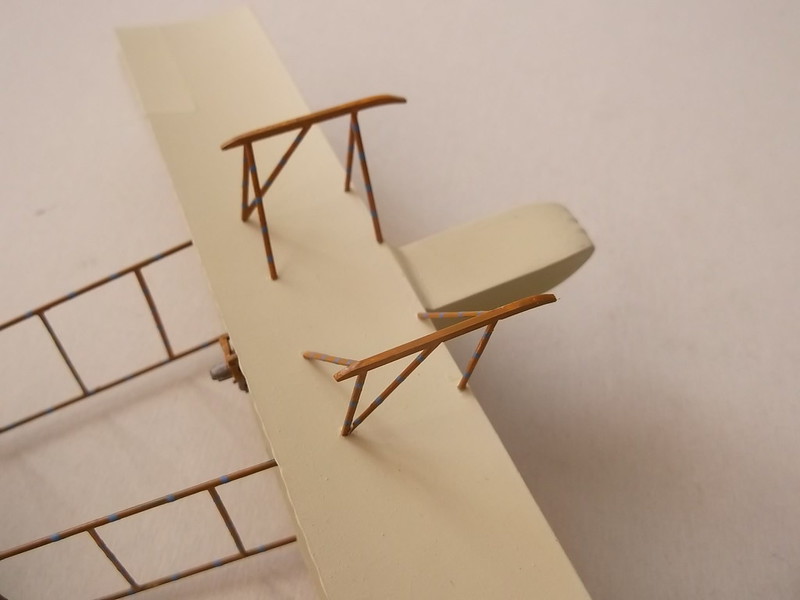
I have added the boom struts to the rear of the model - these were pre-painted and are held with CA:


Next up was the undercarriage. The layout of the main undercarriage was very similar to the Maurice Farman Longhorn, so I used a similar method of construction. The skids were pieces of 30 x 40 strip which were bent at the ends by holding the end in a pair of tweezers and twisting the plastic steadily until the desired shape was achieved. Holes were drilled to take the struts and the three uprights cemented into place. While the cement was still soft I placed the strut ends into the underside of the model and adjusted the struts to the correct angle. The bracing struts at the side were added quickly to keep the whole sub-assembly square and upright. When this had dried thoroughly I repeated the construction on the other side:


Axles were CA'd to the skids: these were cut from a paper clip:


The wheels, (not illustrated here), have tyres made from 60 thou rod which has been wound around a paintbrush handle and held in boiling water for about 10 seconds. The diameter of the brush handle is smaller than the finished tyre so that I can open the coil of plastic and hold it around a disc of card. I cement the ends of the rod making sure that not too much cement gets to the disc. When the joint has set I carefully release the tyre from the disc with a sharp scalpel blade The spoked wheels will be made from an Eduard PE set but I am having problems making these up at the moment - hence the lack of a picture.

The tail skids were a rather complex structure. There is a drawing in Flight magazine which shows them in detail, but I have had to simplify things a little in order to be able to make a viable structure which will be sufficiently robust. Basically it consists of the skid (filed and bent plastic strip), struts (rod), and side brackets (thin strip). The skid has been CA'd to the lower boom but in reality it should be free: practical considerations necessitated my field modification. I had drilled holes in the ends of the skids so that I could thread some wire through them - this makes the spring and wire attachment to the top of the tail unit. The remainder of the support was straightforward - put in the vertical strut between the skid and boom, side strut next and finally the two strips on each side of the skid. I had to work quickly to make sure all lined up properly before the cement set on the styrene. Finally the spring/wire was CA'd to the tail unit.


With the bulk of the construction now complete I am working out a rigging plan. There are rather a lot of wires left to add to this model, and I want to try to ensure that I do not knock any existing ones and have to replace them, so the order of addition matters a bit. They are also going to take a little time to fix into place.....

Thanks for looking.

Stephen.

Offline kensar

  • Hero Member
  • *****
  • Posts: 2503
  • Reshaping the world - one piece at a time.
Re: 1/72 Grahame-White Type X Charabanc
« Reply #35 on: March 08, 2021, 10:56:25 PM »
Stephen, this is a very complex craft you've taken on and your build log is very informative.  Thanks for sharing this with us.
Was there a 'suspension system' on wheel assembly?

Offline Alexis

  • Hero Member
  • *****
  • Posts: 7947
  • Love the self
Re: 1/72 Grahame-White Type X Charabanc
« Reply #36 on: March 08, 2021, 11:33:13 PM »
Really nice progress Stephen ! I'm already looking forward on the next up-date ...you rock Stephen  :)


Alexis
Hurra ! , Ich Leben Noch
Body and life is a vessel we use to travel the planet . Femininity is the gift , The miracle comes from what we do with it .

Offline RAGIII

  • Hero Member
  • *****
  • Posts: 18793
Re: 1/72 Grahame-White Type X Charabanc
« Reply #37 on: March 09, 2021, 07:18:50 AM »
Awesome update Stephen! Your work on the skids and tail skid is excellent. Really looking superb!
RAGIII
"A man has to know his limitations": Harry Callahan

"Don't slop it on" Lynda Geisler

Offline Early Bird Fan

  • Sr. Member
  • ****
  • Posts: 261
Re: 1/72 Grahame-White Type X Charabanc
« Reply #38 on: March 09, 2021, 05:49:31 PM »
awesome work as ever

Offline RLWP

  • Hero Member
  • *****
  • Posts: 1494
  • Bodger
Re: 1/72 Grahame-White Type X Charabanc
« Reply #39 on: March 09, 2021, 07:07:21 PM »
Stephen, this is a very complex craft you've taken on and your build log is very informative.  Thanks for sharing this with us.
Was there a 'suspension system' on wheel assembly?

I would expect to see the axle 'tied' to the skid with Bungee cord. Stephen?

Richard
Hendon for flying - the fastest way to the ground!

Offline lone modeller

  • Hero Member
  • *****
  • Posts: 5300
Re: 1/72 Grahame-White Type X Charabanc
« Reply #40 on: March 22, 2021, 07:25:39 AM »
Evening All,

Thanks Ken, Alexis, Rick, EBF and Richard for dropping by and leaving your constructive comments: they are much appreciated.

Ken and Richard - I did indeed tie the axles to the struts as explained below - I had not done so when I made the last post.

After a bit of a struggle, (time, not complexity of task), I have finally finished the charabanc. From a construction perspective this meant that I needed to add the bungee cords to the axles and skids - they were made from dark grey thread which I would around a couple of times and secured with CA. Then I could add the wheels which are wire wheels from Eduard with 40 thou rod for tyres. The propellor was carved from hardwood strip which I inherited from my father many years ago, the control horns, pulleys and a klaxon, (motor horn), which was mounted on the port side of the fuselage! Then it was time to complete the rigging, using rolled copper wire.

I will describe my method for rigging pushers in full here in case some of you think that it is more difficult than it is in reality. If a systematic method is used it is straightforward, if time consuming.

On this model I rigged the tail unit and the fore-aft gap between the cabane struts first, because later these are not very accessible. I also rigged the rear bays of the inner struts for the same reason. Then I rigged the fore-aft gap between the wing struts, followed by the rest of the rear of the wing bays. Next were the boom bracing, followed by the undercarriage and underside control wires including the aileron and elevator wires. I also rigged the upper wing overhang supports and the lower boom anti-drift wires. These latter make a cross between the rear of the booms and then run to the rear struts of the lower wings. Next were the rudder control wires from the horns to the pulleys on the wing struts, followed by the elevator wires to the rear struts. The remaining anti-drift wires for the upper part of the booms followed. With the rear of the model rigged I turned to the front. First were aileron wires on the upper wing, followed by the control wires for the rudder and elevators: these crossed from the rear struts to the front cabanes and then to the control horns and rudder bar at the front of the nacelle. Now I could complete the front strut bracing followed by the aileron control wires from the nacelle to the lower and upper wings were next and last were the front anti-drag wires. If that reads like a large number of wires then you will have read correctly! There are a lot of them, even for a pusher. I did not count them all but I think that it must be in the order of 150 - 170 in total (There were 190 on the Maurice Farman Longhorn which had slightly more than this one).

The windscreen was made from 10 thou acetate which I CA'd to the top of the nacelle. However it went a bit foggy when I bent it so I will have to replace it later - I left it in place to take the photos.


I will post more images in the finished models section later when i have completed some historical notes.

Thanks for looking.

Stephen.


Offline Early Bird Fan

  • Sr. Member
  • ****
  • Posts: 261
Re: 1/72 Grahame-White Type X Charabanc
« Reply #41 on: March 26, 2021, 03:26:45 AM »
i'm loving that LM, as usual a first class build from you

Online lcarroll

  • Administrator
  • Hero Member
  • ******
  • Posts: 8547
Re: 1/72 Grahame-White Type X Charabanc
« Reply #42 on: March 26, 2021, 10:10:26 AM »
Magnificent Stephen! I'll save my further comments for your Completed Models entry later, and I'm very much looking forward to seeing the photos!
Cheers,
Lance

Offline Rookie

  • Hero Member
  • *****
  • Posts: 925
  • No guts, no glory...
Re: 1/72 Grahame-White Type X Charabanc
« Reply #43 on: May 02, 2021, 05:49:06 PM »
Absolutely fabulous modelling Stephen!

Willem


Offline Monty

  • Hero Member
  • *****
  • Posts: 1643
Re: 1/72 Grahame-White Type X Charabanc
« Reply #44 on: May 02, 2021, 07:55:05 PM »
What an amazing and inspiring build! Stunning work, Stephen! And thank you for the detailed explanations, very useful. Regards, Marc.