« on: August 22, 2020, 09:17:07 PM »
Roden 1/48 Airco (De Havilland) DH9 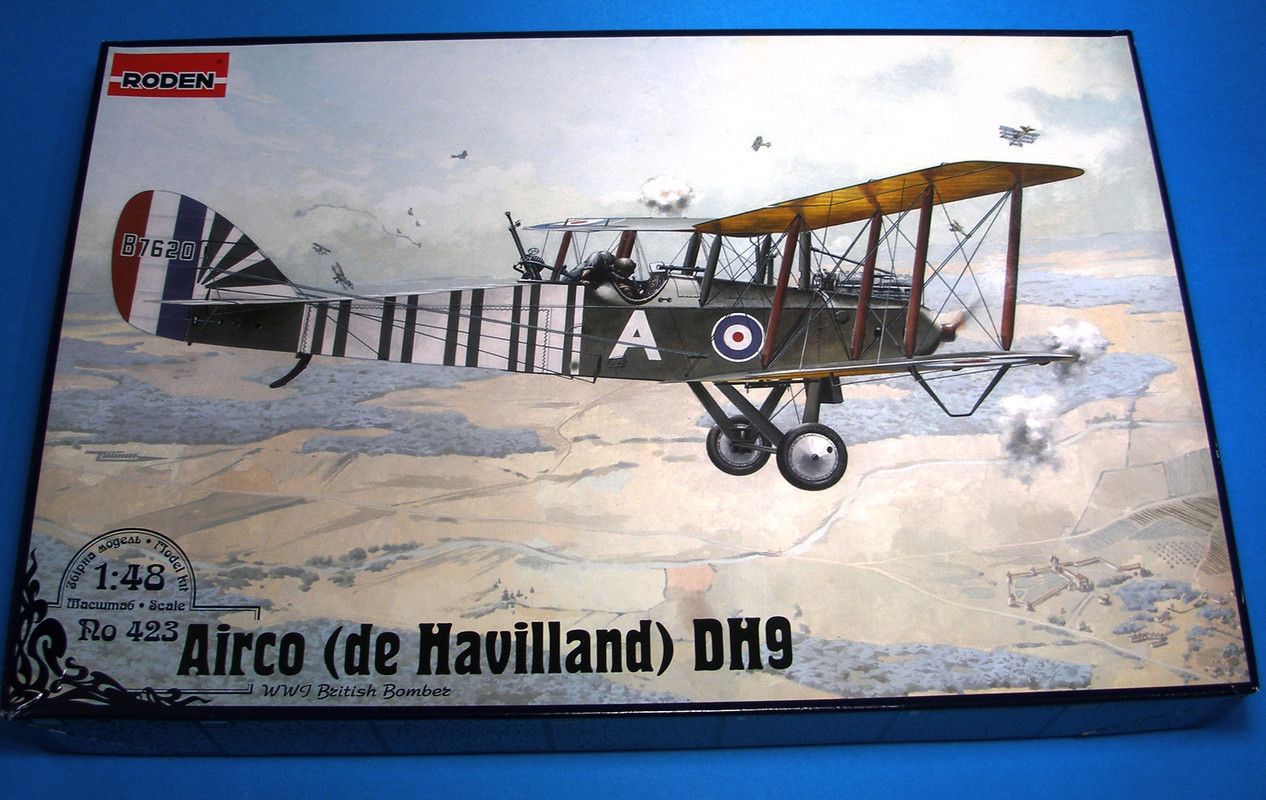 Reviewed by Brad CancianItem: Various – Ro423 (Standard Version), Ro435 (Commercial Version), Ro436 (Ambulance Version)
scale: 1/48
Price: Varies – 30 Euros, $US37 MSRP in USA, but often found on special. Available through hobby retailers worldwide.
Review kit kindly provided by Roden at http://www.roden.eu/HTML/framemodels.html The Airco DH9
The Airco DH9 was a development of the earlier Airco DH4, designed to address some deficiencies with the previous design. The DH4, though a successful bomber and reconnaissance aircraft for the RFC / RAF, suffered some shortcomings, most notably the crew location (the crew being far apart and unable to communicate easily), and lower power of its powerplant. The construction of the DH9s wings and tail plane was left largely unchanged from the DH4, but the aircraft received a redesigned fuselage. The pilot and the gunner were now positioned immediately next to each other and the nose of the airplane gained a streamlined form (which was rather “German-esque” in appearance). The airplane was initially fitted with the B.H.P. engine, which was predicted to offer a significant performance advantage over the DH4. In reality, the airplane’s performance was disappointing. The B.H.P. engine was not able to develop its projected power and was limited to 230 h.p., and the type's performance were in fact worse than its predecessor's. In an attempt to rescue the new development, a modified version of the B.H.P. engine was fitted to the airplane, the Siddeley Puma, however there was no noticeable improvement with this powerplant either. Despite its mediocre performance, the aircraft already had some 700 orders in place prior to completing flight testing. Rather than continue redesign, deliveries went ahead, and the type entered service at the end of 1917. It didn’t take long in service for it to be determined that tha DH9 (and its unreliable Siddeley Puma engine) was not well suited to combat conditions. German fighters were able to decimate DH9 formations with relative ease, and losses and unserviceability rates were particularly high. The situation appeared to be so dire, that the Chief of the Air Staff, Sir Hugh Trenchard, was driven to send an official query to the Air Ministry concerning the responsibility of government officials who had lumbered the air force with such an inadequate aircraft. Eventually the DH9 began to be removed from squadrons in France, being re-assigned to less hazardous duties. Production of the aircraft totalled, surprisingly, some 4000 aircraft, including 800 built post war.
After the war, the aircraft was used extensively in the civil sector, utilising ex-military surplus machines, often modified in weird and wonderful ways to carry cargo, mail and passengers. The combat career of the airplane was not finished with the signing of the Armistice Agreement, either. The aircraft saw post war service in the Air Forces of Australia, Belgium, Canada, the USA, Estonia, Chile, Latvia, Peru, Poland, Spain, South Africa, Switzerland, Ireland, Greece and Romania. Some airplanes reached Russia on the complement of the British Expeditionary Corps, where they were later passed on to the forces of the White Army. During the civil war a few machines were appropriated by the Red Army. Some machines were still in service in South Africa and Spain as late as 1938 as training machines. In Spain, a small number of them were flown during the initial stages of the civil war. The "Unluckiest Airplane of WWI" remained in operational use more than twenty years after the end of the Great War.The Bits and Bobs
Roden’s series of DH9 kits were released in around 2010, and presents the only real game in town for a 1/48 DH9. The kit comes in three boxings; a standard military aircraft boxing, a commercial aircraft boxing, and a RAF Ambulance boxing. The review sample is the standard military boxing in terms of the box, instructions, and decals, and the plastic is likewise for this version, but interestingly, I got the commercial version’s wings. Not to fear, as I have built the standard military version, and have previously owned the ambulance version, so the parts for these are well known to me and are thus also described herein.
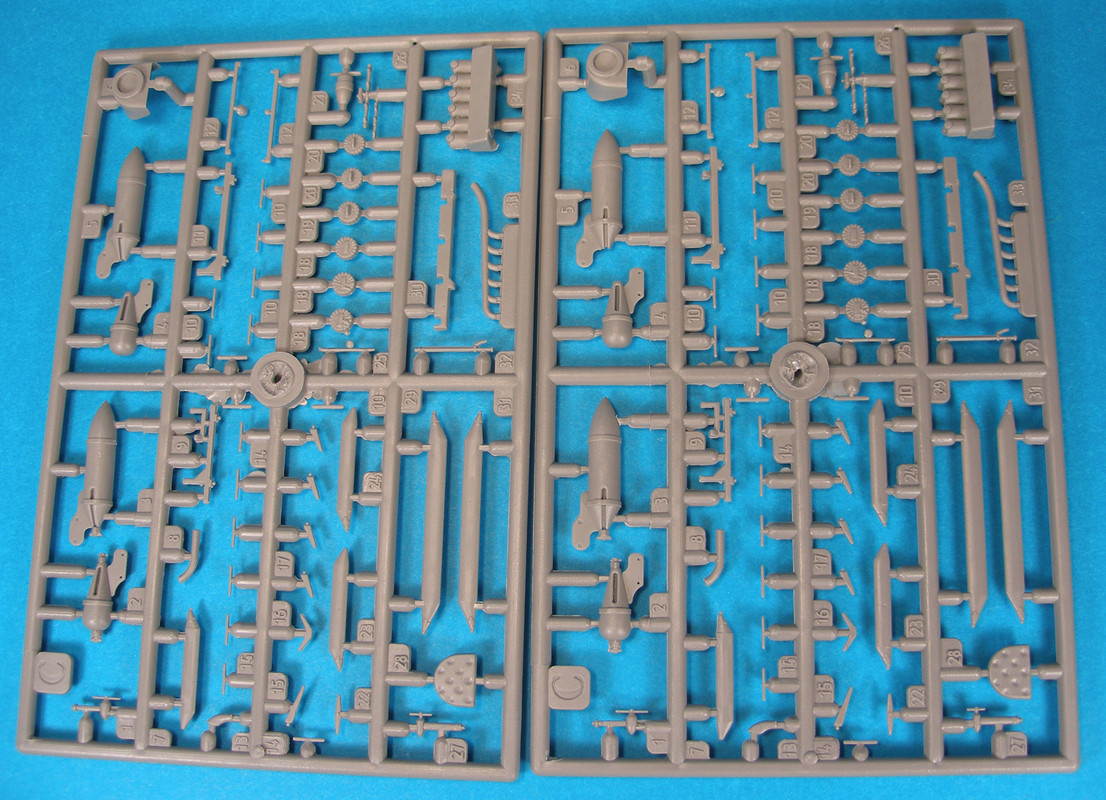
The plastic leverages heavily from the previously released DH4 kit, utilising many common sprues from the DH4, including flying surfaces, some of the fuselage sprues, and some of the common equipment sprues. The plastic is Roden’s usual soft grey fare, which is relatively easy to work with. It does also bend easily, so care is needed when aligning the long parts such as fuselage halves. The plastic also has a slight pebbly grain to it. There is a little flash to the parts, but nothing too severe, and this can be dealt with easily.
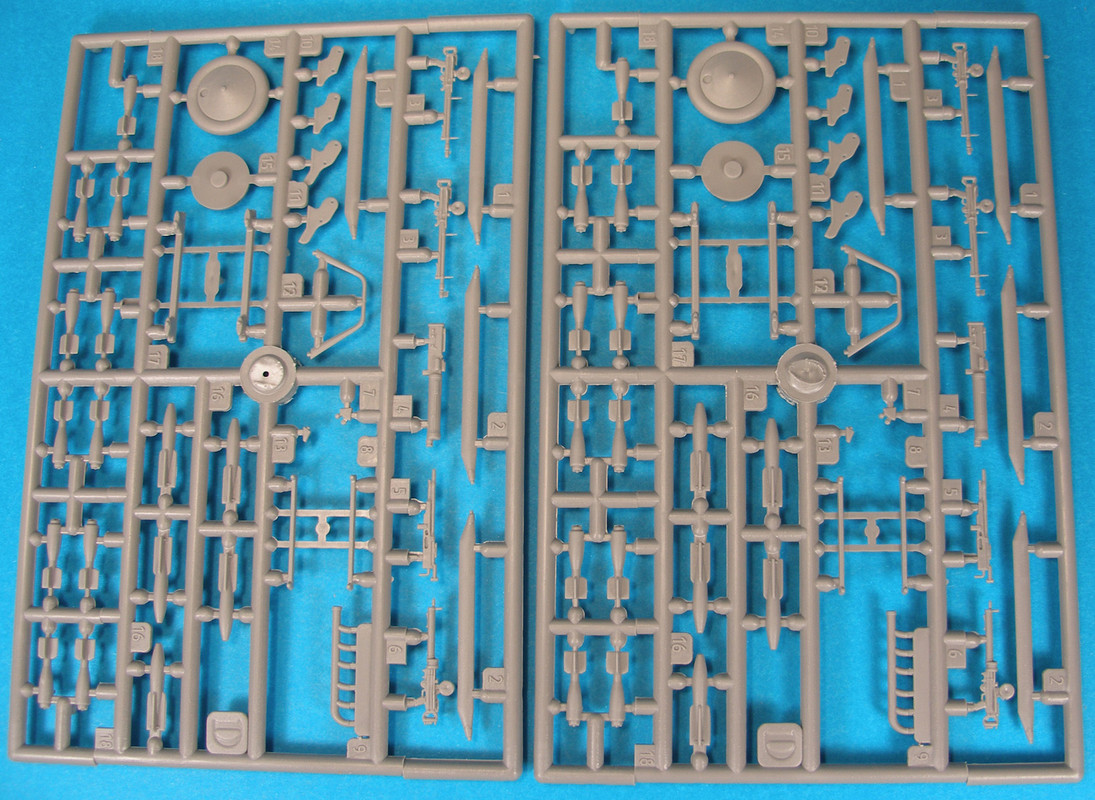
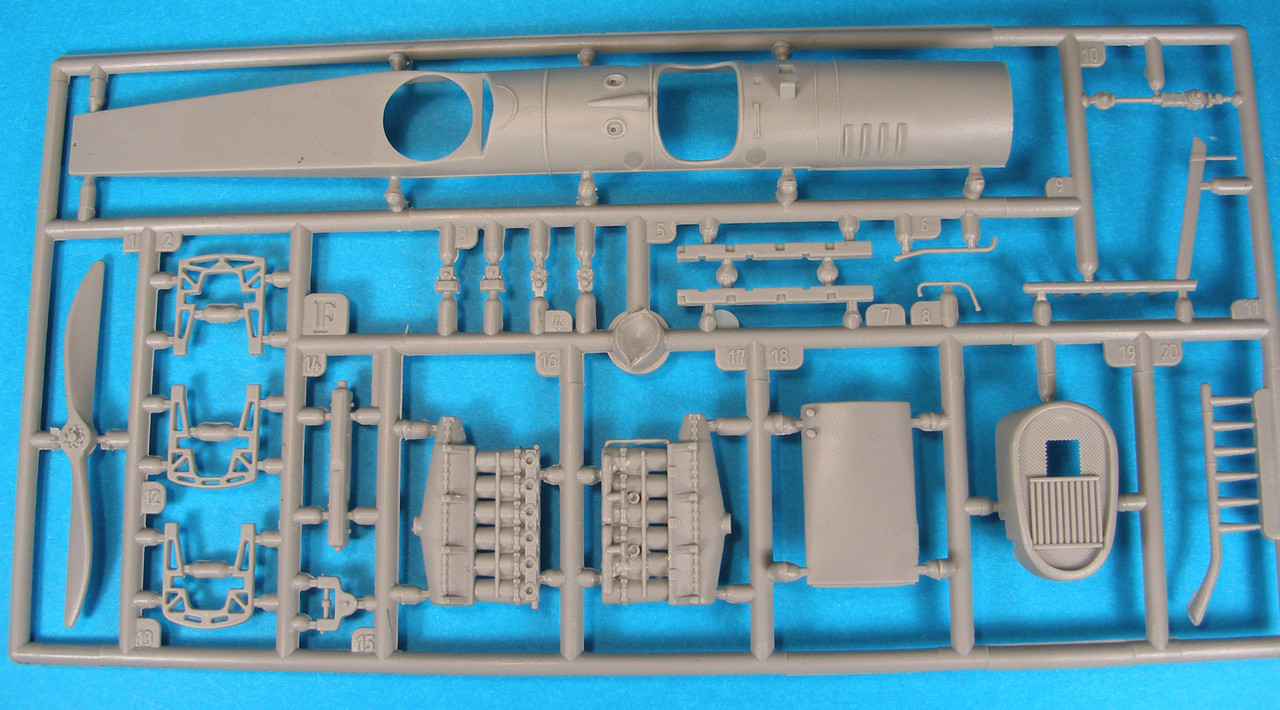
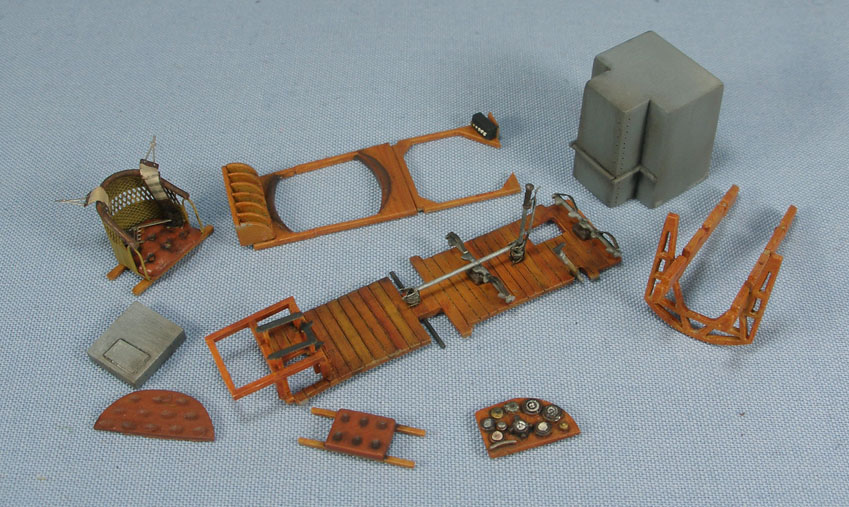
Sprue O contains the fuselage halves, tail feathers, instrument panel, some of the interior parts, the undercarriage axle, and gun Scarff ring. The fuselage is nicely moulded, with refined panel lines and petit fastener detail. The inside contains some nice interior frame detail, but there are some rather hefty mould release pin marks that will have to be dealt with, as the cockpit is a prominent point of attention with the completed model. The tail feathers are nicely done, with subtle representations of the ribs. No rib tapes are moulded on the flying surfaces, but these are easily replicated for those that wish to do so. The instrument panel is also very impressive, with nicely represented dial faces and switches. These would be nicely accompanied by some dial decals from the spares box, if you have them. The seat contains a separately moulded seat cushion, but the seat back is solid; i.e. there’s no attempt to represent the wicker seat of the actual aircraft. No seat belts are included, which is common for Roden kits of this era.
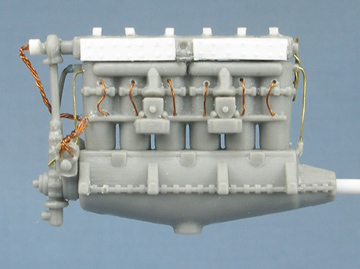
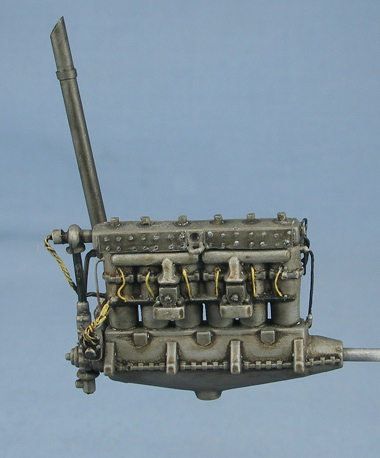
Sprue F contains the engine parts, the propeller, and a number of parts not used. These parts are for the DH4 kit. The engine is nicely done, but the detail on the separate cylinder head piece (F14) will need careful clean up to retain the detail. The propeller boss is particularly well done.
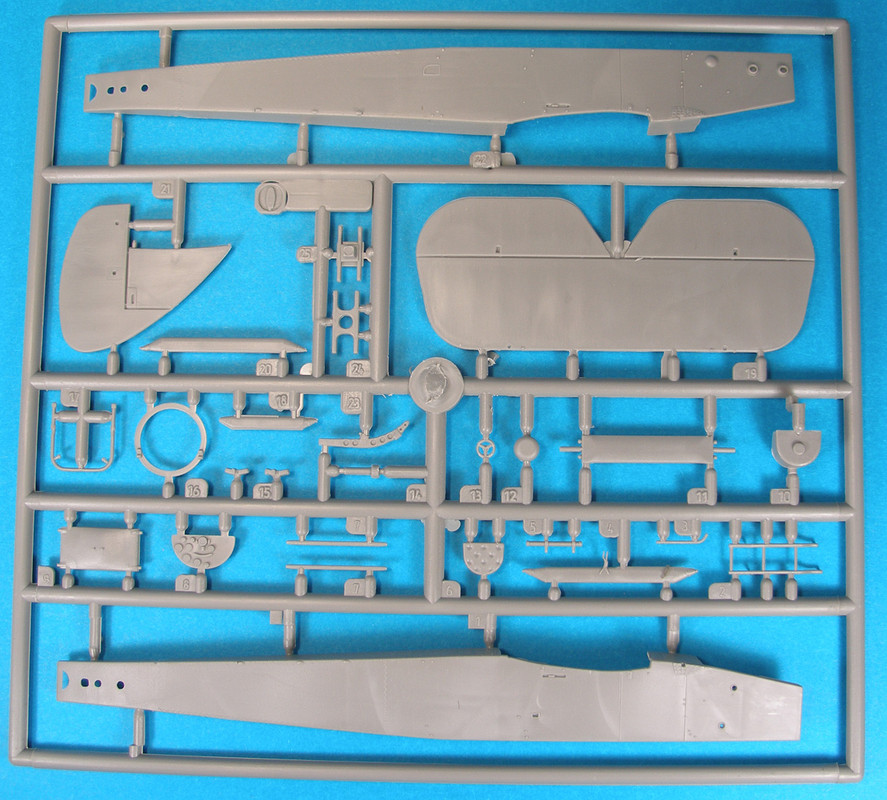
Sprue P contains the wings. Again, these have a lovely representation of the ribs. Care will be needed with the lower starboard wing; the large viewing cut outs are present, but the wing is weighty, and may be prone to breaking off the model during construction if you’re not careful (ask me how I know… more on that later). This sprue is common for the standard and ambulance versions of the kit. The commercial version contains parts for the swept back wing, correct for the commercial version with its more-aft centre of gravity.
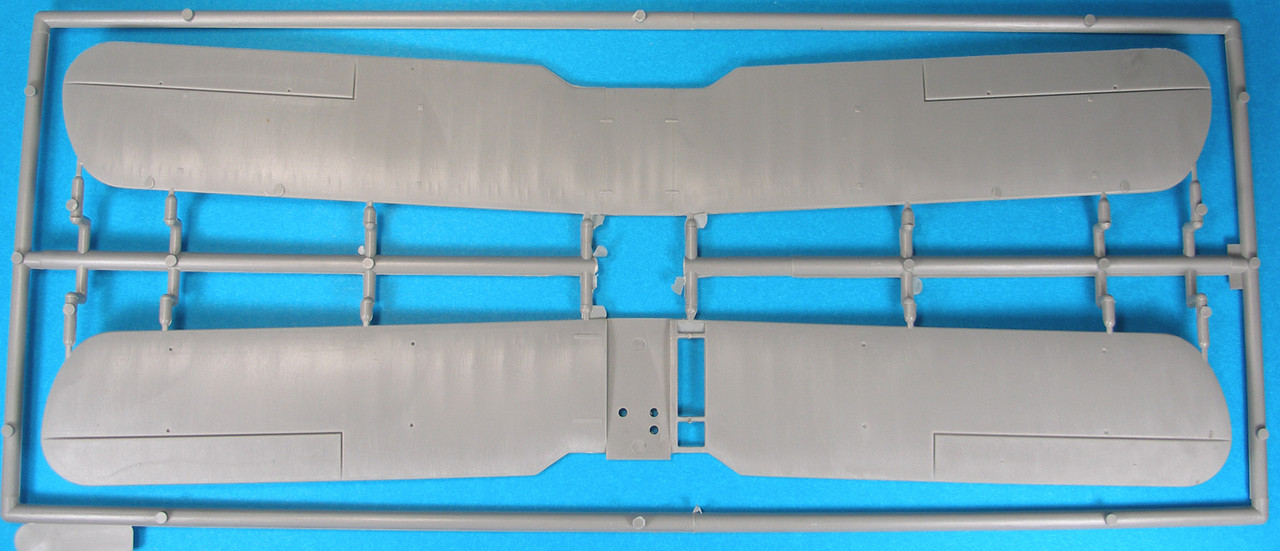
You get two each of sprue D, which contains wheels, bombs, struts, guns, and other various fittings. The guns are especially nice; not all of them will be used in the final build so you get a nice little supply of spares for the spares box. The wheels are nicely done, having the rear hub separate. This prevents sink-marks and makes some of the painting a little easier. Parts are quite finely done, so care will be needed in removing these from the sprue.
You also get two each of sprue C, which contains more struts, bombs, wheels lewis gun drums, and other bits and bobs. Again, the lewis gun drums are especially nice.
Sprue K contains the upper fuselage, interior framework, cockpit floor, nose cowl, radiator, undercarriage legs, and other details. The upper fuselage piece is very nicely done, with lots of restrained detail. The radiator is a highlight, with very finely represented mesh. This sprue also contains an extra forward fuselage part, used in the Ambulance version.
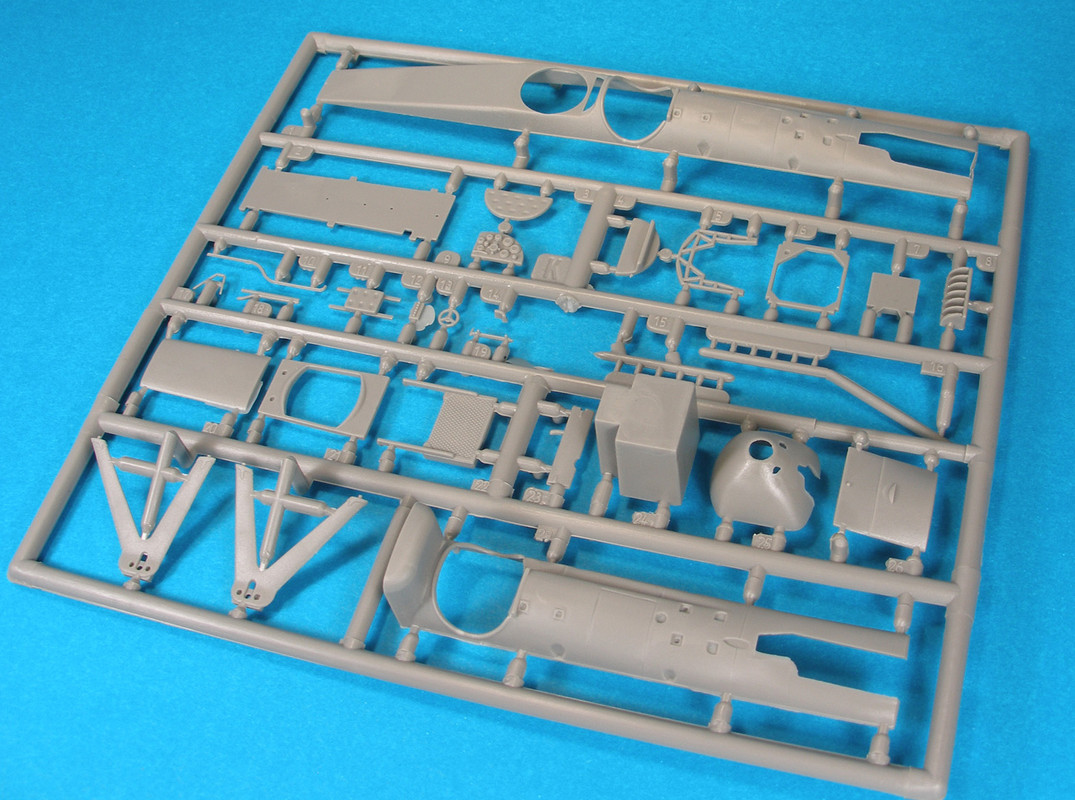
The Ambulance and Commercial versions also have a couple of additional sprues. One (not in my review sample) is a common sprue to the earlier DH4 kit, and contains four-bladed props, some interior details, and lots of un-used DH4 radiators and bother bits and pieces. You also get sprue V in both the commercial and ambulance versions – this sprue contains parts for the fuselage, namely the parts required for the passenger / stretcher compartments.
Instructions
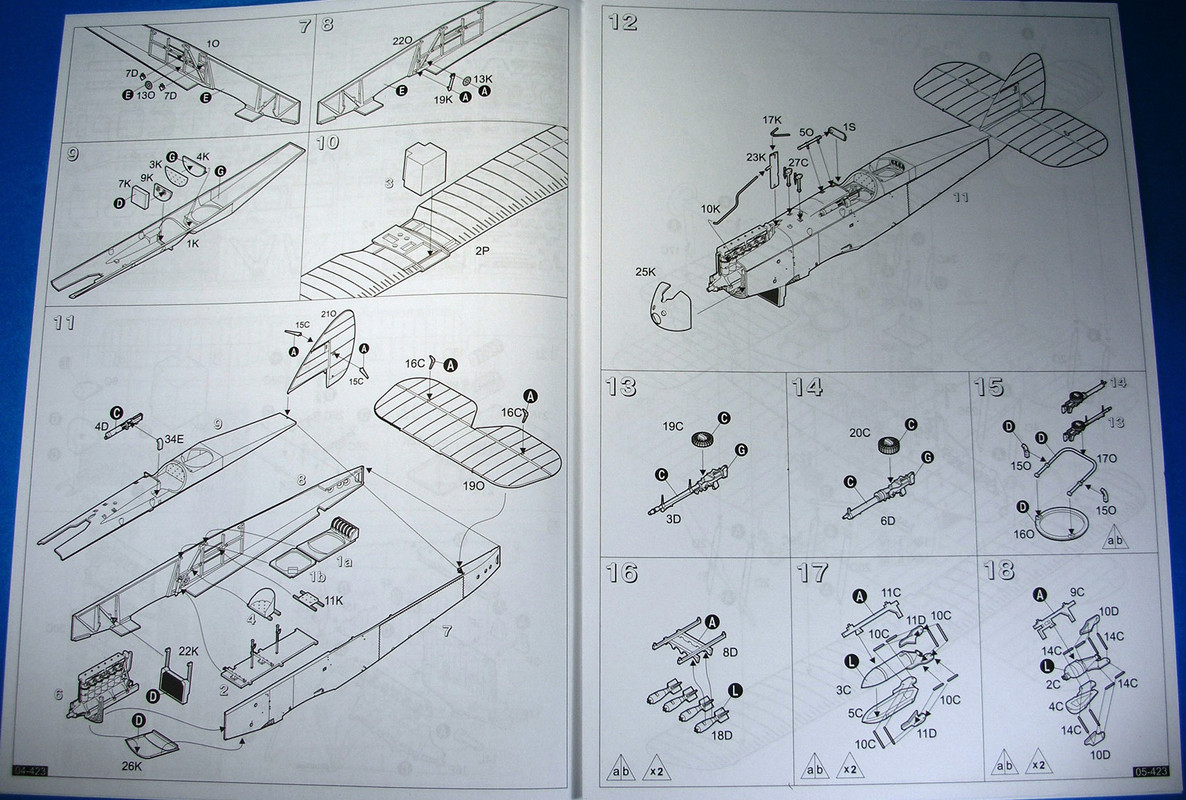
The instructions are Roden’s usual excellent fare. Instructions are provided in an A4 sized 12 page black and white booklet, with a history of the aircraft and technical specifications on the first page, an illustrated parts breakdown and construction notes on the second and third page, a rigging guide, and painting guide for four aircraft. Colour call outs are in Humbrol paint numbers. The rigging guide is a nice inclusion, but note it does not call out the double flying wires on the main planes. Construction is quite standard, beginning with the interior, then engine, major construction, armament, and rigging.
Colour schemes for four machines are provided in the ‘standard’ military boxing – three of these are green over clear doped linen, one carrying battleship grey nose panels. The fourth is a Russian machine, in overall light brown with linen undersides. The marking choices are quite diverse, which is nice.
Marking options in this boxing are:
• Airco (de Havilland) DH9, No.211 Sqn RAF. Pedre Synthe, France, flown by Capt. J A Gray. This aircraft was shot down and landed in Holland on June 27, 1918. Its crew was interned. Later it served with the Netherlands Army as deH443.
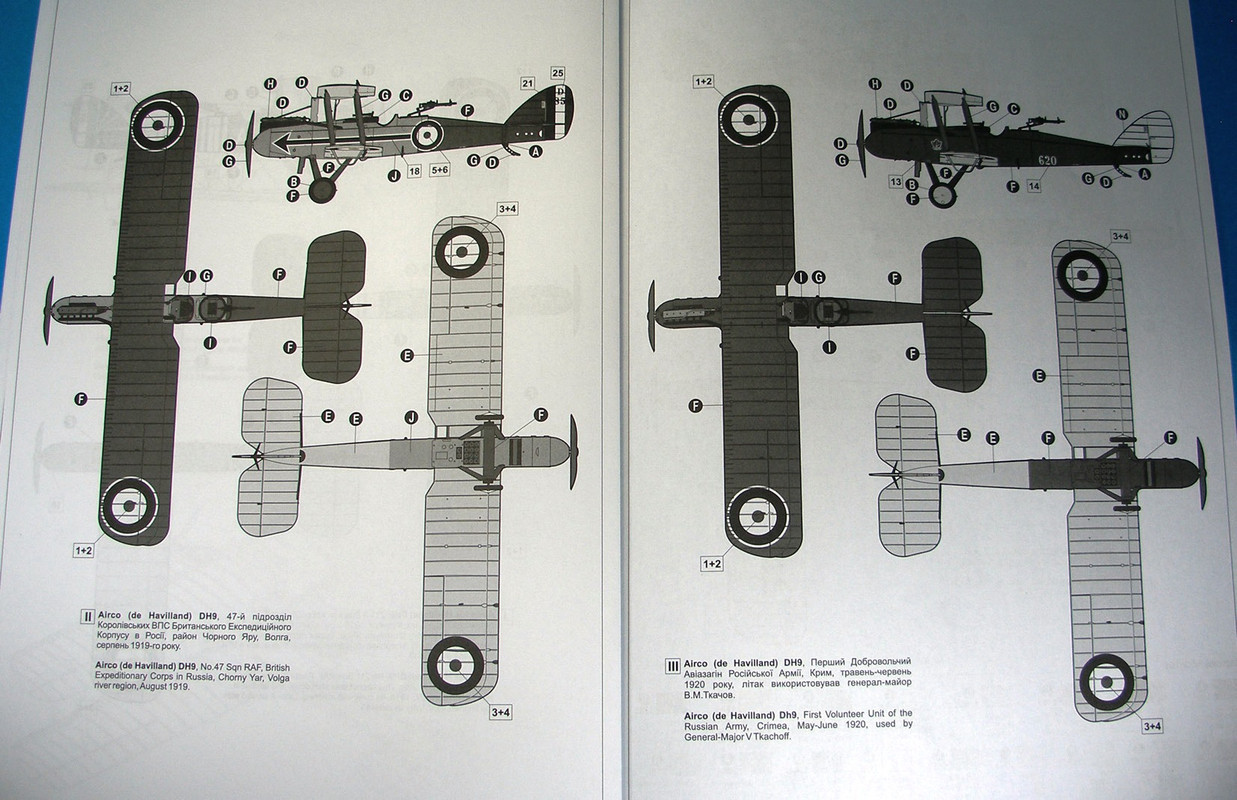
• Airco (de Havilland) DH9, No.47 Sqn RAF, British Expeditionary Corps in Russia, Chorny Yar, Volga river region, August 1919.
• Airco (de Havilland) Dh9, First Volunteer Unit of the Russian Army, Crimea, May-June 1920, used by General-Major V Tkachoff.
• Airco (de Havilland) DH9, "white 8". Red Army Fleet, Middle Asia, 1922-1923.
If you’re buying the Commercial version, you get one marking choice:
• de Havilland D.H.9C operated by de Havilland Hire Service, UK, 1922.
Likewise with the Ambulance version; you get one marking choice:
• De Havilland D.H.9 ambulance, D3117, “6” of “Z” Force Unit, British Somaliland, 1919-1920.
Decals
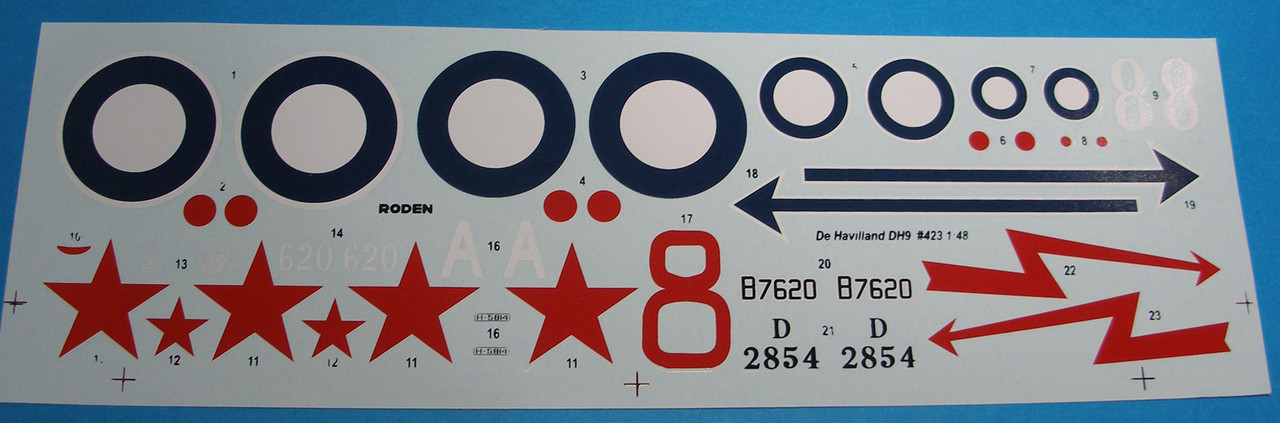
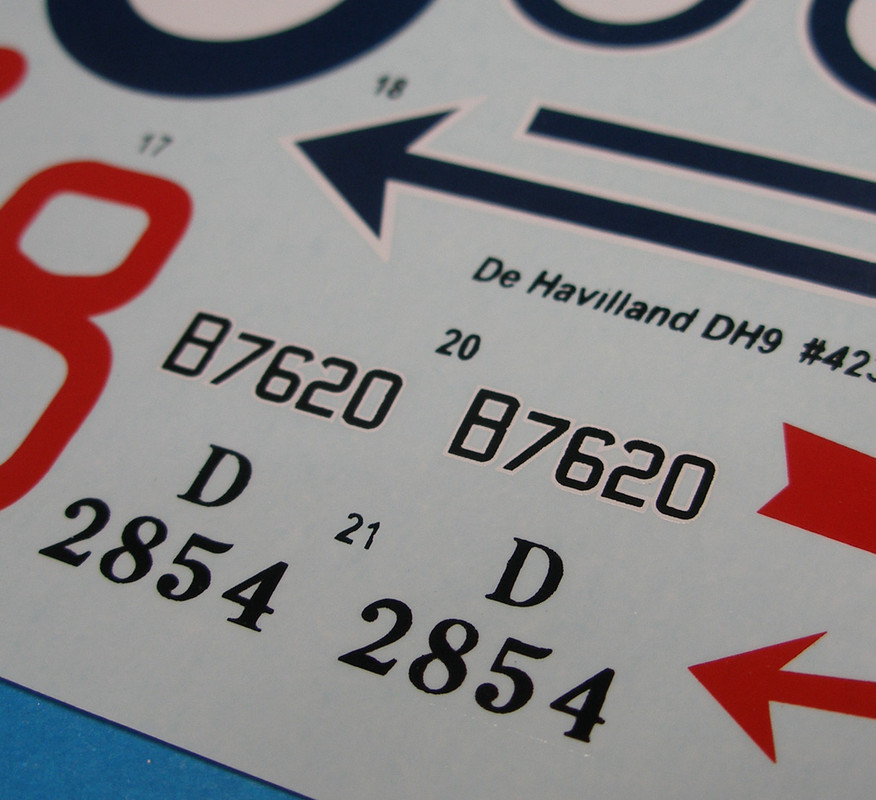
The decals are Roden’s standard fare here also. The decals are done in four colours (red, white, black, and blue). The blue is a little dark for my liking, but the other colours are nicely done, and are nicely opaque. The decals are also very well registered, with the white rings around the roundels and white outlines around the serials being nicely done and in register. The centre dots for the roundels are done separately also to avoid registration issues (thanks Roden!). The decals do look a little thick and glossy, and I am told that they can be a little stubborn under decal softener, but otherwise they look nice.
 Accuracy
I used the Windsock Datafile 72 as my primary reference. The overall dimensions of the fuselage, tail surfaces and panels accord to the datafile, which was clearly used as the primary reference. I couldn’t compare the wings (as I had the wings from the commercial kit), but from my recollections of comparing the standard wings to the datafile plans, these scaled quite well also. I maintain that Roden’s subtle representation of covered fabric still presents the most accurate in the game, even 10 years on. The cockpit and fittings are also quite comprehensive. The wings are also moulded in one piece, so this will prevent issues with alignment and obtaining the correct dihedral. Some of the smaller details (piping, etc), may need to be added here and there, but nothing too significant. Roden is to be commended for the completeness of the package.
Conclusions
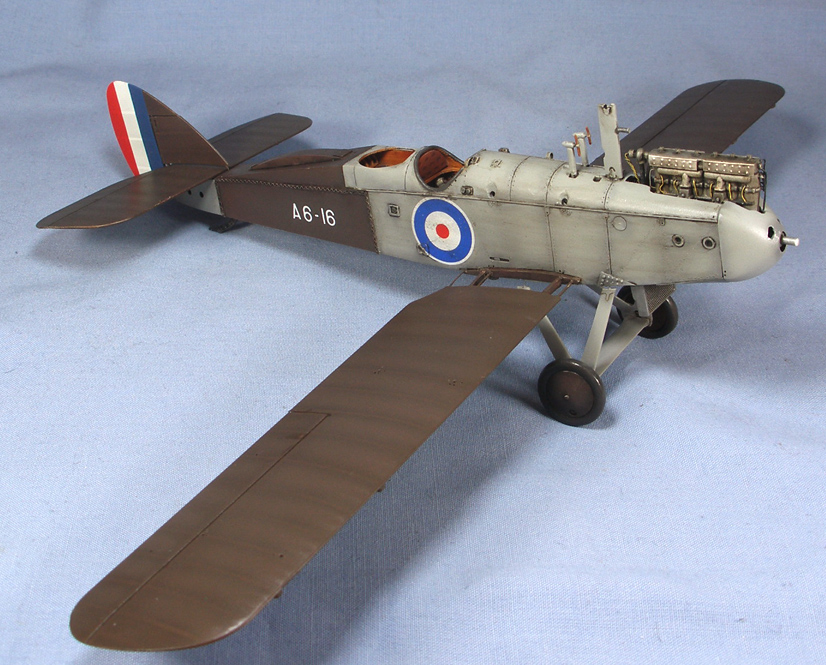
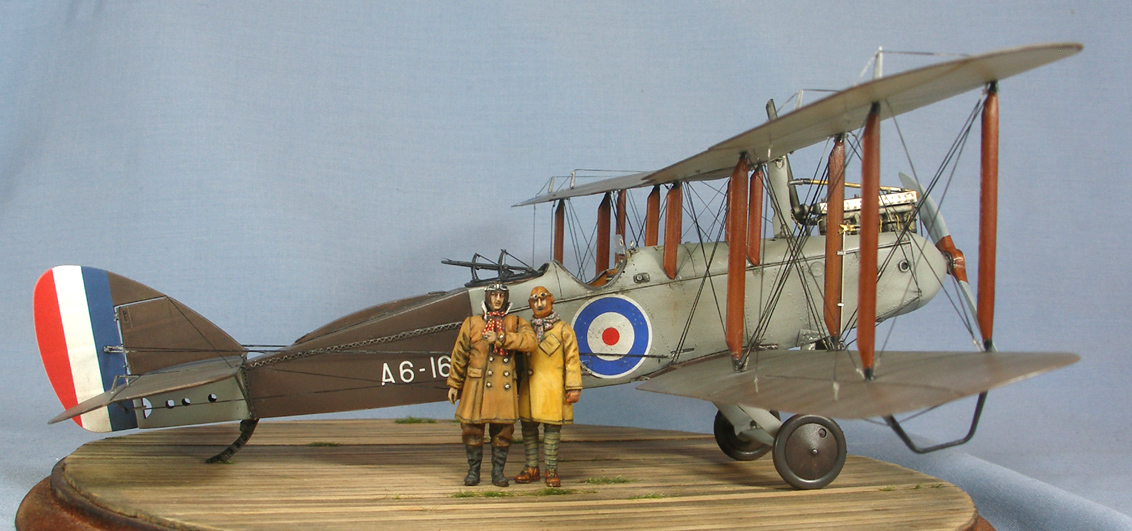
This is another wonderful package from Roden of an interesting subject. The DH9 doesn’t look like your ‘normal’ British two-seater, and actually has quite a charming and sleek look to it, which belies its somewhat unimpressive performance. The DH9 is a big aeroplane, however, even in 1/48 scale. Care will be needed to maintain alignment of the fuselage halves during construction. Care will also need to be taken when handling and rigging the model, given the weight of the wings and the fine structure around the lower starboard wing in particular. Overall, Roden is to be commended for releasing such a wonderful and interesting subject, with some interesting alternative boxings; this really is a comprehensive package and the only game in town for this aircraft.
Our thanks to Roden for the review sample
But wait…Now that the “in-box” review is done, how does she build? I picked up one of these kits when they first came out in 2010 and excitedly built her up, as I had always wanted to build an Australian RAAF post-war DH9. Here is a short re-cap of my journey building the Roden DH9. Engine
The kit engine is nice out of the box, but it benefits from some detail work. Modifications included wiring from fuse wire and new case heads pressed from thin foil, embossed with rivets to add the prominent rivet detail. The exhaust stack was modified to be the RAAF “chimney” style exhaust seen only on RAAF aircraft. This was made from the kit exhaust and brass tube.
 Interior
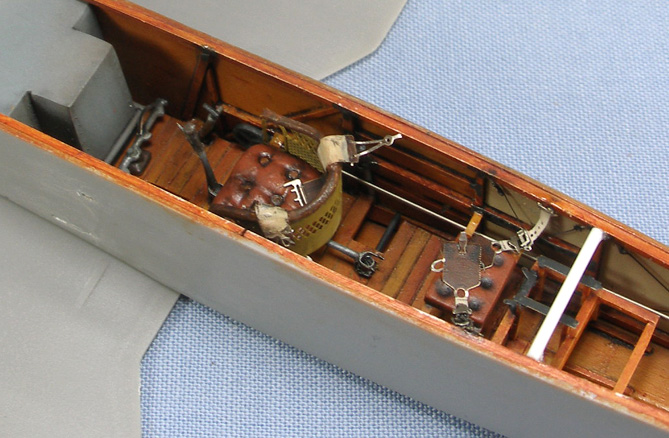
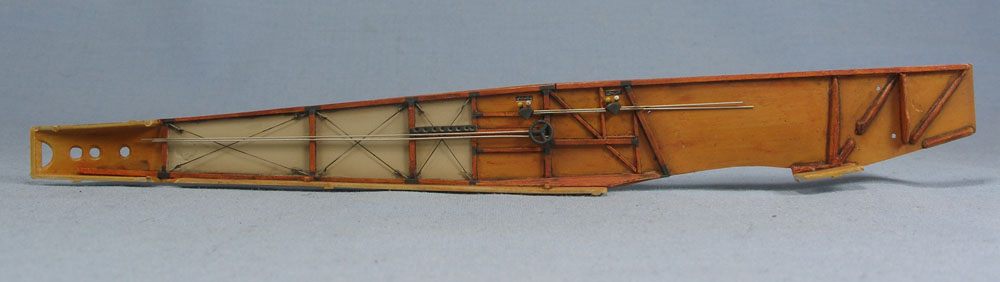
Though the kit interior isn’t too bad, the majority of the interior in my kit was scratch built, based off the kit instructions and interior from the Wingnuts Wings DH9A. I sanded off most of the interior detail to accommodate this. The kit floor was modified to have the requisite cut outs and scribed to represent a panelled floor. All side wall frame detail was scratch built from strip styrene. The pilot’s seat back is an Eduard etched piece. Control stick mounts were made from plastic and etch from the spares box. Tailplane incidence adjustment wires are from fuse wire, and rigging was done in elastic.

 The Fuselage
Some care was needed when joining the fuselage halves; the soft plastic bows significantly under pressure, and some shimming was needed to ensure alignment stayed straight and true. The butt-joint at the bottom of the fuselage benefits from adding some sheet plastic over the join on the inside of the fuselage, to avoid buckling and add strength. Plastic spacers were used to keep the upper fuselage sides correctly spaced for the upper decking panel. Some sanding is still required to get the fuselage halve joint smooth on the underside.
Additional details were added to the upper fuselage decking, including fastener detail, and details for the absent machine gun (RAAF machines rarely carried armament). The container mounted on the aft decking of RAAF DH9s was made from sheet plastic. Other exterior details included adding etched stitching, panel fastener detail, and other fittings. The bomb bay had small bomb clips added from etched spare parts. Tail plane was adjustable in its angle of incidence on the real aircraft, hence why It sits proud of the fuselage, and why the vertical stabiliser’s bottom surface is scalloped.
Wings
The lower wing fit nicely to the fuselage halves without too many dramas. As alluded to, I broke the lower wing during construction. The weight of the wing, soft plastic and thin connections here meant that the wing plastic fatigued and broke off during construction. Luckily, this occurred before painting, so I was able to repair the wing by carefully drilling wire reinforcements into the wing. Definitely one to watch out for. The struts were also a slight challenge; they are the correct length, but care is needed just because there is so darned many of them. I had some slight dramas with the outboard aft strut, again on the lower wing, but that was probably my fault in getting something out of alignment when I was repairing the broken wing. Careful test fitting will reward you with a simple attachment.
Rigging and Painting
Rigging was done using elastic and Bob’s Buckles turnbuckles. The painting was done with Gunze acrylics and oil paints for the wooden surfaces.
Conclusions… again.
This wasn’t a simple build; the only real complexities were associated with getting the fuselage together, and carefully dealing with the big heavy wings during handling and strut alignment. Overall, however, this is a very nice kit; it contains everything you need to build a nice representation. I recommend this for someone with a couple of WW1 kits under their belt, just purely because of those twin bay wings and extensive rigging, but I certainly recommend this one for those wanting something a little different in their cabinet. Cheers and happy modelling!


Logged
Owner and Administrator of ww1aircraftmodels.com and forum.ww1aircraftmodels.com

