Author Topic: Macchi M-5  (Read 35321 times)

Offline Monty

  • Hero Member
  • *****
  • Posts: 1643
Re: Macchi M-5
« Reply #15 on: November 12, 2019, 05:27:07 AM »
Wow! A challenging project, Mike! But what a beautiful subject! I'm sure you will do it great justice! Regards, Marc.

Offline Mike Norris

  • Hero Member
  • *****
  • Posts: 2211
  • RAF Old and Bold
    • Mikes WW1 Aircraft Models
Re: Macchi M-5
« Reply #16 on: November 12, 2019, 05:44:47 AM »
Hi all,
My research is throwing up more apparent anomalies - this time with the flight controls.
The kit instructions show both the rudder and elevator control 'cables' exiting from an open aperture in the fuselage support fairing for the tail plane and fin/rudder assembly.
These cables are attached to the rudder control horns at the base of the rudder itself and to control horns only under the elevator halves.
However it seems that:
The rudder cables exited the fuselage at the base of the support fairing and were routed back to the rudder control horns, which were in fact attached the rudder post and below the rudder assembly.
The elevator 'cables' it seems were more likely to be a push/pull rod which was connected to the elevator control horns only under the elevator halves. This method of control would only require control horns on one side of the elevator as it was a push or pull control.
Finally the model does not have aileron control cable exit openings in the rear decking behind the pilot, from where the cables were routed up and into the underside of the upper wing.
As an aside the model does not have the filler cap for the fuel tank, which should be located at the right side at the top of the rear decking panel (something 'Des' picked up on).

This is all detailed, with illustrations etc, in the PDF build log I'm compiling as I go along.

However before I sort that lot out I need to 'fettle' the tail unit as the there are a few issues to be corrected there as well,

Mike
« Last Edit: November 13, 2019, 04:09:40 AM by Mike 'Sandbagger' Norris »


Retired - 27 years RAF service then 20 years Military Aerospace Technical Author/editor.

Offline Mike Norris

  • Hero Member
  • *****
  • Posts: 2211
  • RAF Old and Bold
    • Mikes WW1 Aircraft Models
Re: Macchi M-5
« Reply #17 on: November 12, 2019, 11:48:52 AM »
Hi all,
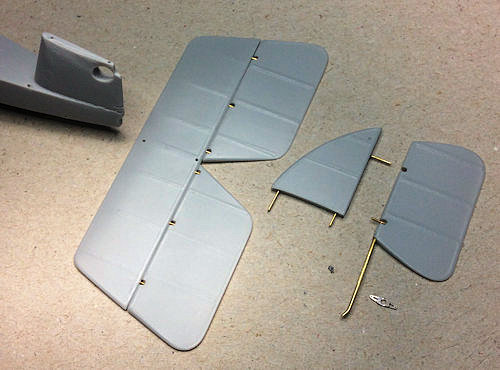
I've 'fettled' the basic tail unit.

Fuselage support fairing re-profiled and drilled.
Tail plane drilled.
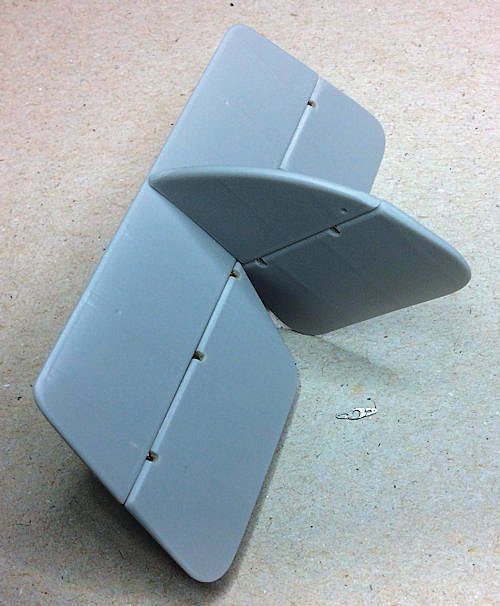
Fin re-profiled and pinned.
Rudder pinned.
Elevator halves pinned.
Rudder control line exit holes in fuselage drilled.
Support fairing aperture opened up for elevator controls.
Rear fuselage notched for rudder post.
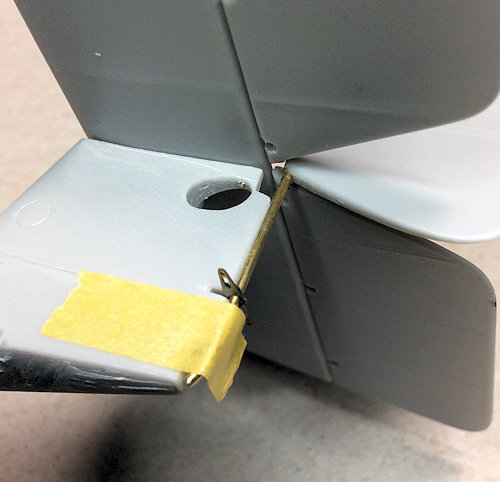
Rudder post added to rudder.
Photo-etch rudder control horn added.
Assembly all test fitted.

Just elevator control horns then its on to the cockpit end,

Mike


Retired - 27 years RAF service then 20 years Military Aerospace Technical Author/editor.

Offline RAGIII

  • Hero Member
  • *****
  • Posts: 18840
Re: Macchi M-5
« Reply #18 on: November 13, 2019, 06:56:29 AM »
Outstanding mods to the kit as always!
RAGIII
"A man has to know his limitations": Harry Callahan

"Don't slop it on" Lynda Geisler

Offline Alexis

  • Hero Member
  • *****
  • Posts: 7947
  • Love the self
Re: Macchi M-5
« Reply #19 on: November 13, 2019, 11:56:03 AM »
Moving along very well Mike  :)


Terri
Hurra ! , Ich Leben Noch
Body and life is a vessel we use to travel the planet . Femininity is the gift , The miracle comes from what we do with it .

Offline Mike Norris

  • Hero Member
  • *****
  • Posts: 2211
  • RAF Old and Bold
    • Mikes WW1 Aircraft Models
Re: Macchi M-5
« Reply #20 on: November 14, 2019, 05:40:54 AM »
Hi all,
A little more progress.
The ailerons have been rounded off at the leading edges and pinned to the upper wing for animation.
The fuselage support fairing for the tail plane/elevator/fin and rudder has been hollowed out to allow the elevator controls to be fitted from inside the fairing.
I've replaced the elevator control horns, which seemed over scale, with two from a 'Parts' 1:48th scale set.
The cockpit area and ports in the decking have been opened up,

Mike


Retired - 27 years RAF service then 20 years Military Aerospace Technical Author/editor.

Offline lone modeller

  • Hero Member
  • *****
  • Posts: 5317
Re: Macchi M-5
« Reply #21 on: November 14, 2019, 06:03:01 AM »
You are making very rapid progress with this Mike. The modifications which you are making look excellent - very fine detail indeed and you are clearly turning a sow's ear into something much more desirable.

Stephen.

Offline RAGIII

  • Hero Member
  • *****
  • Posts: 18840
Re: Macchi M-5
« Reply #22 on: November 14, 2019, 11:45:02 PM »
Continuing to be impressive.
RAGIII
"A man has to know his limitations": Harry Callahan

"Don't slop it on" Lynda Geisler

Offline Mike Norris

  • Hero Member
  • *****
  • Posts: 2211
  • RAF Old and Bold
    • Mikes WW1 Aircraft Models
Re: Macchi M-5
« Reply #23 on: November 18, 2019, 08:18:16 AM »
Hi all,,
Just a few updates for the Macchi.
Engine support bearers with added photo-etch bearer plates (kit part), cross bracing anchors (Gaspatch) and added nuts (RB Motion).
Also drilled out three lightening holes into the resin top struts and 'opened up' the fasteners around the engine cowls and the nail heads on the top of the forward fuselage.
The kit now supplies alternative wing floats but no support struts, so these were made from soft soldered 0.7 mm diameter brass tube.
I've also added all of the rigging points around the aircraft.

Now it's onto scribbing in the wood panel lines onto the fuselage,,

Mike


Retired - 27 years RAF service then 20 years Military Aerospace Technical Author/editor.

Offline RLWP

  • Hero Member
  • *****
  • Posts: 1494
  • Bodger
Re: Macchi M-5
« Reply #24 on: November 18, 2019, 08:44:16 AM »
How does the lightning know it is meant to go through the holes?

 ;D

Richard
Hendon for flying - the fastest way to the ground!

Offline Mike Norris

  • Hero Member
  • *****
  • Posts: 2211
  • RAF Old and Bold
    • Mikes WW1 Aircraft Models
Re: Macchi M-5
« Reply #25 on: November 18, 2019, 08:47:33 AM »
 ;D  ;D

Lightening holes are holes in structural components of machines and buildings used by a variety of engineering disciplines to make structures lighter.

Lightning is a naturally occurring electrostatic discharge during which two electrically charged regions in the atmosphere or ground temporarily equalize themselves, causing the instantaneous release of as much as one gigajoule of energy.

Mike
« Last Edit: November 18, 2019, 08:51:59 AM by Mike 'Sandbagger' Norris »


Retired - 27 years RAF service then 20 years Military Aerospace Technical Author/editor.

Offline RLWP

  • Hero Member
  • *****
  • Posts: 1494
  • Bodger
Re: Macchi M-5
« Reply #26 on: November 18, 2019, 09:11:03 AM »
I must learn to use much bigger smileys

Yes, Mike - I do know that. My warped sense of humour enjoys the idea of lightning forking it's way through the lightening holes

Richard
Hendon for flying - the fastest way to the ground!

Offline Mike Norris

  • Hero Member
  • *****
  • Posts: 2211
  • RAF Old and Bold
    • Mikes WW1 Aircraft Models
Re: Macchi M-5
« Reply #27 on: November 18, 2019, 04:53:42 PM »
 ;D ;D
I got the joke - I think we both have a warped sense of humour,
 ;)

Mike


Retired - 27 years RAF service then 20 years Military Aerospace Technical Author/editor.

Offline kensar

  • Hero Member
  • *****
  • Posts: 2505
  • Reshaping the world - one piece at a time.
Re: Macchi M-5
« Reply #28 on: November 18, 2019, 11:56:14 PM »
Why are you concerned with how heavy the model is?


Okay - that's another joke. ::)

Offline Mike Norris

  • Hero Member
  • *****
  • Posts: 2211
  • RAF Old and Bold
    • Mikes WW1 Aircraft Models
Re: Macchi M-5
« Reply #29 on: November 19, 2019, 01:11:30 AM »
Waaaahhhh  ;D


Retired - 27 years RAF service then 20 years Military Aerospace Technical Author/editor.