Author Topic: LVA Fokker D.III using 3D prints designed by Bo  (Read 8341 times)

Offline IvotB

  • Sr. Member
  • ****
  • Posts: 426
LVA Fokker D.III using 3D prints designed by Bo
« on: February 09, 2019, 07:12:03 AM »
Almost 3 years ago I ordered the 3D prints through Shapeways which were designed by Bo. Then I was ambitious to start the build, but there were other priorities. Now this group build offers an excellent incentive to start and finish this D.III this year. It feels for me that it belongs in this group build in honor of Des as I have seen him exploring different techniques in building ww1 airplanes. And moreover he encouraged me to push on with some building techniques that I tried to use.

So therefore based in the 3D prints and the Taurus models Oberursel engine and probably a lot more I am entering this group.

The starting picture already published in march 2016:


It will take at least 4 weeks to really get started as I first need to clear my workbench with a large number of brass H0 train models and a possible gauge 1 (1:32) dutch steam engine. Only three etches have been produced so far and another railway modeller is already quite advanced. I wonder how this model will look besides the D.III which have operated in the same era and area:


Brass models in gauge 1, gauge 0 and gauge H0.


regards,
Ivo

Offline Borsos

  • Hero Member
  • *****
  • Posts: 3315
Re: LVA Fokker D.III using 3D prints designed by Bo
« Reply #1 on: February 09, 2019, 07:23:54 AM »
Great railway models and the D. III needs to be followed closely! :)
Andreas
"Deux armées aux prises, c'est une grande armée qui se suicide."
Barbusse.
"Ein Berg in Deutschland kann doch einen Berg in Frankreich nicht beleidigen. Oder ein Fluß oder ein Wald oder ein Weizenfeld."
Remarque.

Offline gbrivio

  • Hero Member
  • *****
  • Posts: 1681
Re: LVA Fokker D.III using 3D prints designed by Bo
« Reply #2 on: February 09, 2019, 06:18:53 PM »
This is impressive, I'm really looking forward to this build. And congratulations on your locomotives, they are beautiful.
Ciao
Giuseppe

Offline Juan

  • Hero Member
  • *****
  • Posts: 2455
  • All gave some, some gave all.
Re: LVA Fokker D.III using 3D prints designed by Bo
« Reply #3 on: February 10, 2019, 12:11:15 AM »
Great choice Ivo, not seen often.  Looking forward to your project progressing.

Offline Monty

  • Hero Member
  • *****
  • Posts: 1643
Re: LVA Fokker D.III using 3D prints designed by Bo
« Reply #4 on: February 10, 2019, 12:43:27 AM »
What an interesting and challenging subject! You are quite right - Des would have been delighted to watch this build! I have a real soft spot for steam locos... lovely models of those too!
Regards,
Marc

Offline RAGIII

  • Hero Member
  • *****
  • Posts: 18793
Re: LVA Fokker D.III using 3D prints designed by Bo
« Reply #5 on: February 10, 2019, 08:01:54 AM »
Really great to see you are going to build Bos' Fokker from shapeways. Excellent choice!
RAGIII
"A man has to know his limitations": Harry Callahan

"Don't slop it on" Lynda Geisler

Offline GAJouette

  • Hero Member
  • *****
  • Posts: 3579
  • " Beware of the Spanish Inquisition"
Re: LVA Fokker D.III using 3D prints designed by Bo
« Reply #6 on: February 10, 2019, 08:19:39 AM »
 Ivo,
This promises to be one outstanding thread my old friend. Looking forward to seeing the first progress and the best of luck to you in the GB.
Highest Regards,
Gregory Jouette

PS: Absolutely beautiful locomotives!
" What Me Worry"

Offline Mike Norris

  • Hero Member
  • *****
  • Posts: 2200
  • RAF Old and Bold
    • Mikes WW1 Aircraft Models
Re: LVA Fokker D.III using 3D prints designed by Bo
« Reply #7 on: March 04, 2019, 08:09:20 PM »
Hi Ivo,
I'm looking forward to your build as I have the 3D printed Fokker D.VII to build as part of my entry.

Mike


Retired - 27 years RAF service then 20 years Military Aerospace Technical Author/editor.

Offline IvotB

  • Sr. Member
  • ****
  • Posts: 426
Re: LVA Fokker D.III using 3D prints designed by Bo
« Reply #8 on: March 05, 2019, 07:30:52 AM »
Hello Mike,

Yes, it is going to be quite a challenge to build this 3D prints model. Especially as I'm not really convinced with the strength of the prints. Bo has already built his fuselage with internal rigging, but that proved to be a mistake. It seemed that the combination of the 3D print with the rigging material reacted different on changing temperatures inside his house resulting in warping of the fuselage. I'm also a little bit scared to cover the wings with paper or silk. It is going to be an interesting experiment finding out what techniques will work and which will not.


regards,
Ivo

P.S., still haven't started yet. Too many children around who need help with their schoolexams and swimming and gymnastics tournaments. Oh yes; and then there is a job too :)

Offline Mike Norris

  • Hero Member
  • *****
  • Posts: 2200
  • RAF Old and Bold
    • Mikes WW1 Aircraft Models
Re: LVA Fokker D.III using 3D prints designed by Bo
« Reply #9 on: March 05, 2019, 06:51:43 PM »
Hi Ivo,
It is possible.
Here's a shot of the Fokker D.VII by Spanish modeller and Scale Model World Gold medal winner 2014 and 2015 'Chema Martinez'.
He built his with a 1/32 Wingnut Wings Fokker DVII front fuselage married to 'Aviattic' stripped fuselage, wing and tail elements.
If I can get anywhere near this I'll be happy,

Mike


Retired - 27 years RAF service then 20 years Military Aerospace Technical Author/editor.

Offline IvotB

  • Sr. Member
  • ****
  • Posts: 426
Re: LVA Fokker D.III using 3D prints designed by Bo
« Reply #10 on: May 25, 2019, 09:03:02 PM »
Mike, I'll see what I can do. I do plan however to cover the D.III.

When starting this build I announced that I had to clear my bench from other half products, before I could make a good start with this one. Well, over the last three weeks I managed to get some things done.

The end product should resemble this prototype in the end:


First I started to get the 3D prints straight. Putting it into hot water and letting it dry helps significantly, but 3 out of 4 wings are still not really straight. I hope to be able to settle this with the covering in the end. I also purchased an ultrasone cleaning device as cleaning the 3D prints by hand proved a little bit too difficult. Beside the fact that the 3D prints and then especially the wing ribs are very delicate and break easily, this is a great help for thorough cleaning the prints.

Then I sprayed most parts with grey primer and most wooden parts in a light brown color and the fuselage in a grey-green color.


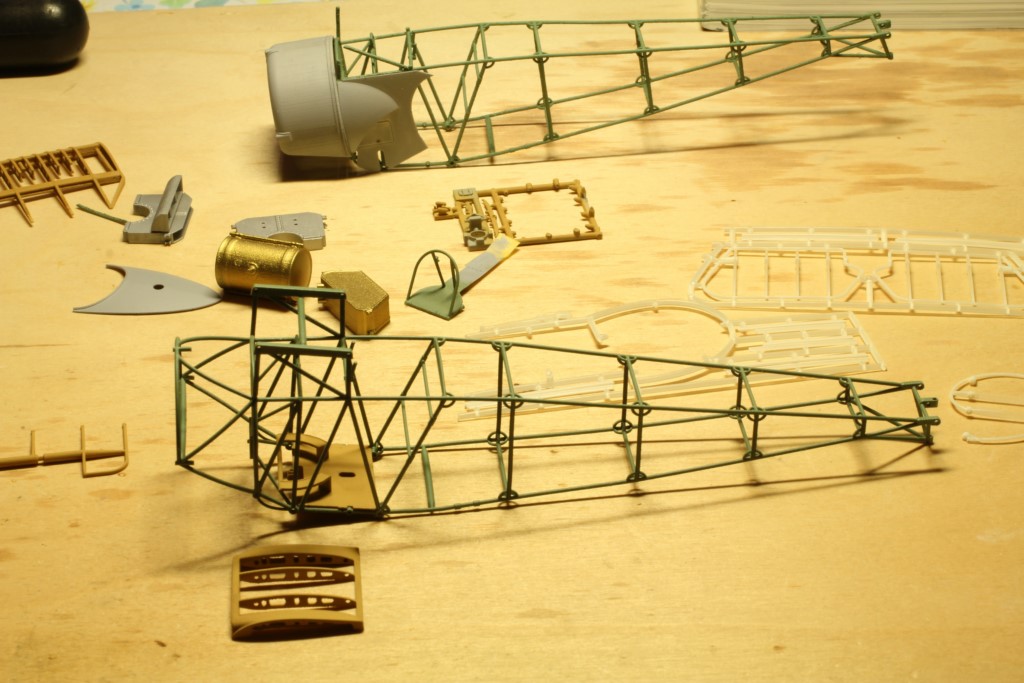
Because the first fuselage didn't arrive in one peace Shapeways provided me with another fuselage giving me a fuselage for testing some construction.

One of the first things to do is to attach the main fuel tank with wire into the fuselage. This is a kind of circus act, trying to balance the tank with 4 strings attaching them to 8 attachments in the fuselage. I took only 4 strings leading them through the holes in the bottom and the sides of the tank to the upper part. And then you have 8 loose ends. I attached one end of every string with a piece of tape to the fuselage and then carefully tightening the strings with the four loose ends. Then one after the other was secured with CA. Now the tank can still move up and down a little bit and later on during the construction I will secure the tank in its final position. It all seems easy when Bo showed his final result, but apart from the covering of the prints later on and the attachment of the control wires to the control surfaces and the controls in the cockpit, I expect that this has been one of the most difficult things.

Here you see the attachment with the tape:


I tried to give the tank a used look, but my weathering skills are not up to the usual standard shown here. But this tank will be only visible behind the pilot's seat.

Here the front tank, the seat, the back cover and the cockpit floor are test fitted to the fuselage:


More to follow.


regards,
Ivo

Offline RAGIII

  • Hero Member
  • *****
  • Posts: 18793
Re: LVA Fokker D.III using 3D prints designed by Bo
« Reply #11 on: May 25, 2019, 10:01:46 PM »
Ivo, What you have done to date is superb! I can't even imagine the challenge of attaching the tank with wires :o Looking forward to your next update.
RAGIII
"A man has to know his limitations": Harry Callahan

"Don't slop it on" Lynda Geisler

Bughunter

  • Guest
Re: LVA Fokker D.III using 3D prints designed by Bo
« Reply #12 on: May 25, 2019, 10:41:44 PM »
That is really a beautiful stripdown!
I can imagine, that this printed plastic is more brittle compared to my PE brass stripdowns even in a bigger scale.

Good luck with this parts and project!

Cheers,
Frank

Offline IvotB

  • Sr. Member
  • ****
  • Posts: 426
Re: LVA Fokker D.III using 3D prints designed by Bo
« Reply #13 on: May 26, 2019, 04:00:39 AM »
Thank for the encouragement.

I have already done some additional items. I'm running behind here because I'm using Flickr as my photo website and they have had (and still have) a lot of problems with their website and service.

I have tried to fit more parts to the fuselage. One of the issues that need attention is the fact that the 3D prints do not always have an even surface as they ar printed in layers. There are already other techniques available, but this is of the layer kind. I was very suprised though the really small details are being reproduced like for instance small holes in the main wing girders. Holes with a size around 0,3mm which I find pretty good.

But the surface effect can be seen here. It is already sprayed with primer and before I gave a treatment with a glass fiber pencil, but I will have another go at it:


In the front there small pins thatb are going to support the MG supports. Bo recommends to drill a hole of about 0,25mm in them and that proved to be possible.

I just put Gaspatch MG's on top to get an idea:


The ammunition bins have also been added in between the frame of the fuselage.


regards,
Ivo
« Last Edit: May 27, 2019, 12:54:59 AM by IvotB »

Offline RAGIII

  • Hero Member
  • *****
  • Posts: 18793
Re: LVA Fokker D.III using 3D prints designed by Bo
« Reply #14 on: May 26, 2019, 04:27:09 AM »
Really looks Terrific! The wing center in place, the Spandau test fit, and the ammo boxes are well done!
RAGIII
"A man has to know his limitations": Harry Callahan

"Don't slop it on" Lynda Geisler