Author Topic: WNW Fokker EIII Kurt Von Crailsheim  (Read 8673 times)

Offline mgunns

  • Hero Member
  • *****
  • Posts: 2255
WNW Fokker EIII Kurt Von Crailsheim
« on: July 28, 2014, 05:45:15 AM »
Greetings all:

This summer I have been putzing on the WNW Fokker E.II/E.III.  I was going to do one in Udets markings, and then Richtoffen and then Immelman's, but; they are all green, so I decided to do this one in the Fokker Beige in Von Crailsheim's markings.   Kurt got into flying after being wounded in the infantry, according the WNW instructions and interesting facts, he had one victory.  He had two crashes the final one would prove fatal as he succumbed to his injuries 5 days later.  It is suspected that this is the one he flew.  Either way, I like the scheme and the markings.

The box:


The model I will be doing


I really wanted to do an Eindecker as it is a significant aircraft in the history of the Great War and aviation.  I wanted to work on the 'swirls' effect.  I studied other builds here, Umlaufmotor is a great teacher, and decided, "what the heck" let's go!  So I followed the WNW tutorial for doing the swirls, but didn't have any luck with the silver paint, so I used plain old Testors what used to be sold as "PLA" enamel.  I started on the cheek panels.


Cowling:


And moving on to the side panels on the fuselage.  Alone they aren't impressive, but when on the model as a whole they look pretty good.


As has been mentioned before by those who have done this, critical to the success of 'swirling' is to keep the brush clean, once you get going you get a feel for the way paint flows and can pretty much figure out when it is time to clean the brush.  I just used random squiggles, "C"'s and mixed them altogether.  I am pretty happy with the overall effect.

After that, I moved on to the interior.  More excitement as it occurs, so stay tuned folks!

Best

Mark
« Last Edit: July 28, 2014, 07:02:05 AM by mgunns »
Mark

We few, we happy few.....

Offline mgunns

  • Hero Member
  • *****
  • Posts: 2255
Re: WNW Fokker EIII Kurt Von Crailsheim
« Reply #1 on: July 28, 2014, 06:21:22 AM »
On to the interior:

I followed the sequence per WNW instructions.  I didn't break any ground here, other than I can't figure out for the life of me how those pesky PE strips go on the cockpit floor.  It's a mystery to me, so I left them out.

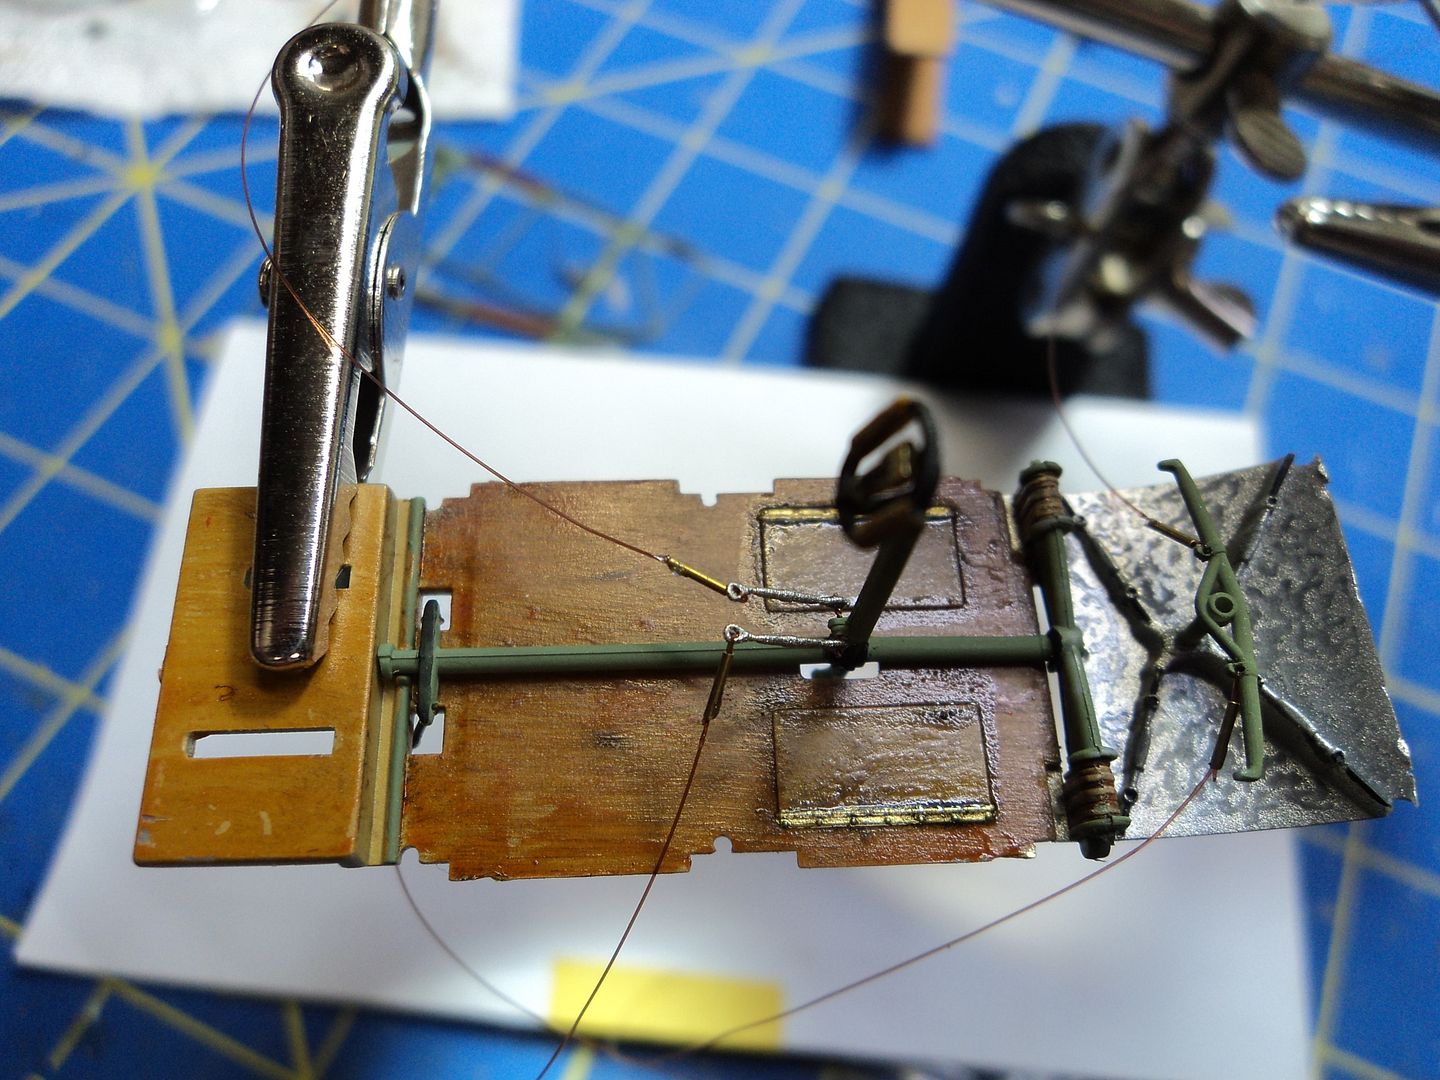
Working along with Bertl and others on the Forum, I painted the floor Tamiya XF 78 and painted the two little hatches a mixture of XF78 and some yellow.


I left the molded on rigging and turnbuckles in as it isn't all that noticeable in the finished model.  I then proceeded to apply the wood grain with oils.  I painted the hinges a brass, just because I liked the effect.


My cat shares the house with my wife and I so there is cat hair in some of the paintwork.

I did practice the swirls on the forward portion of the cockpit floor.


I used Gaspatch 1/48 type C turnbuckles for the rigging attachment points on the Control column and the rudder pedals.

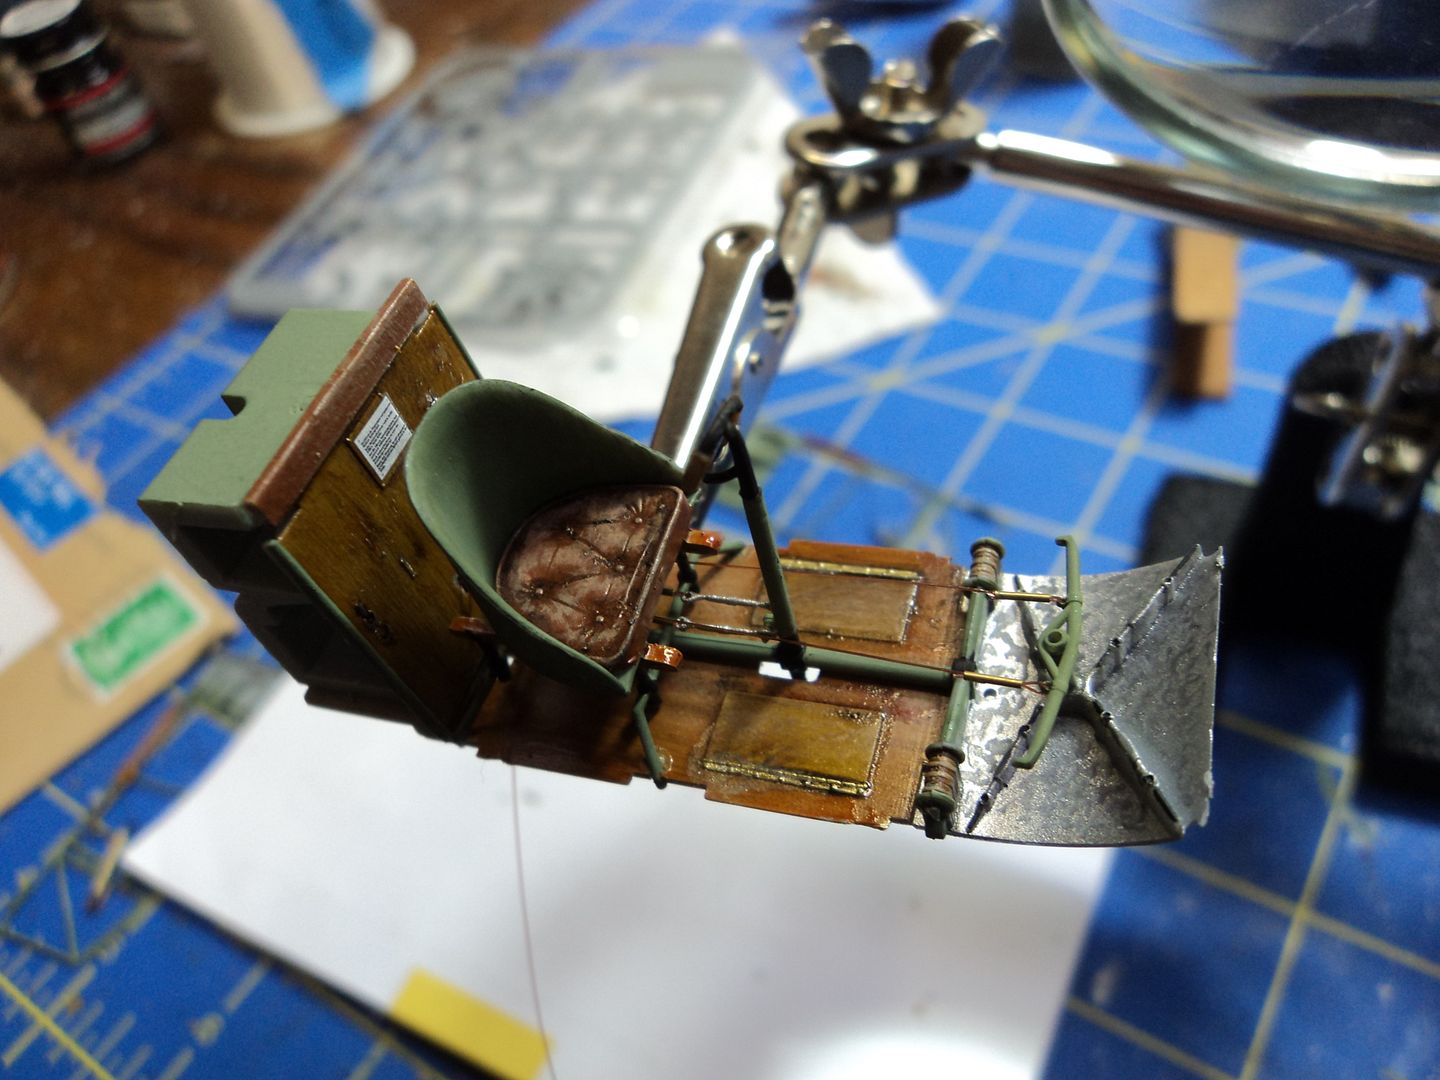
The almost finished interior.


I used the PE Seatbelts, but next time I am going to opt for the HGW ones.  PE is just too fiddly, although they look the part.


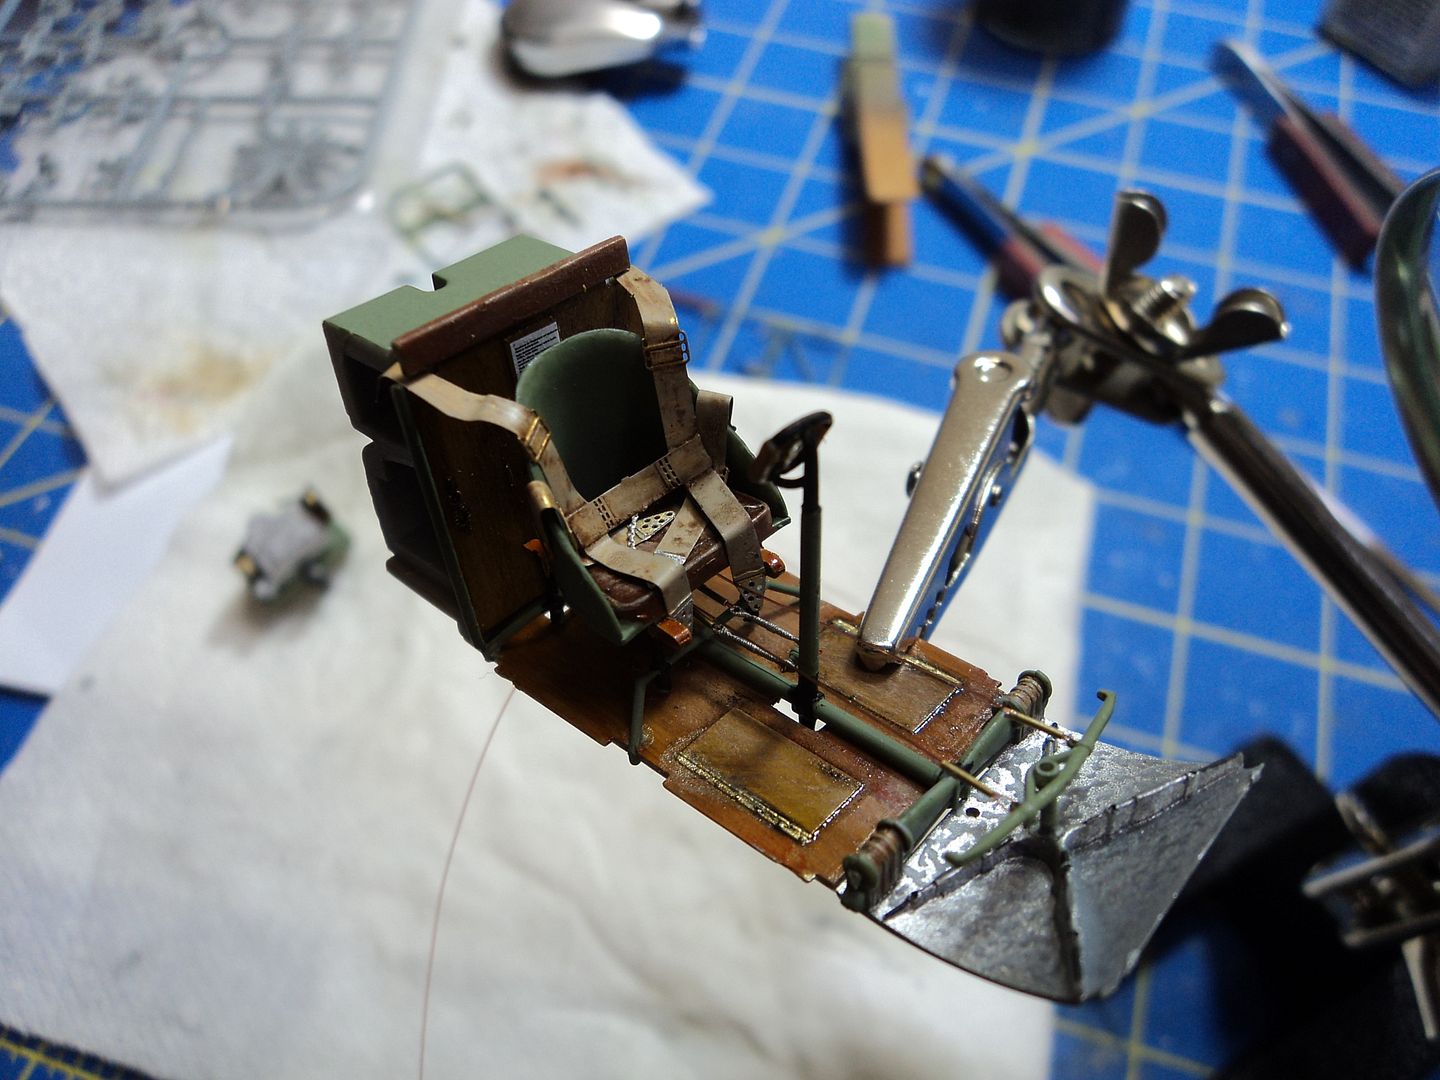
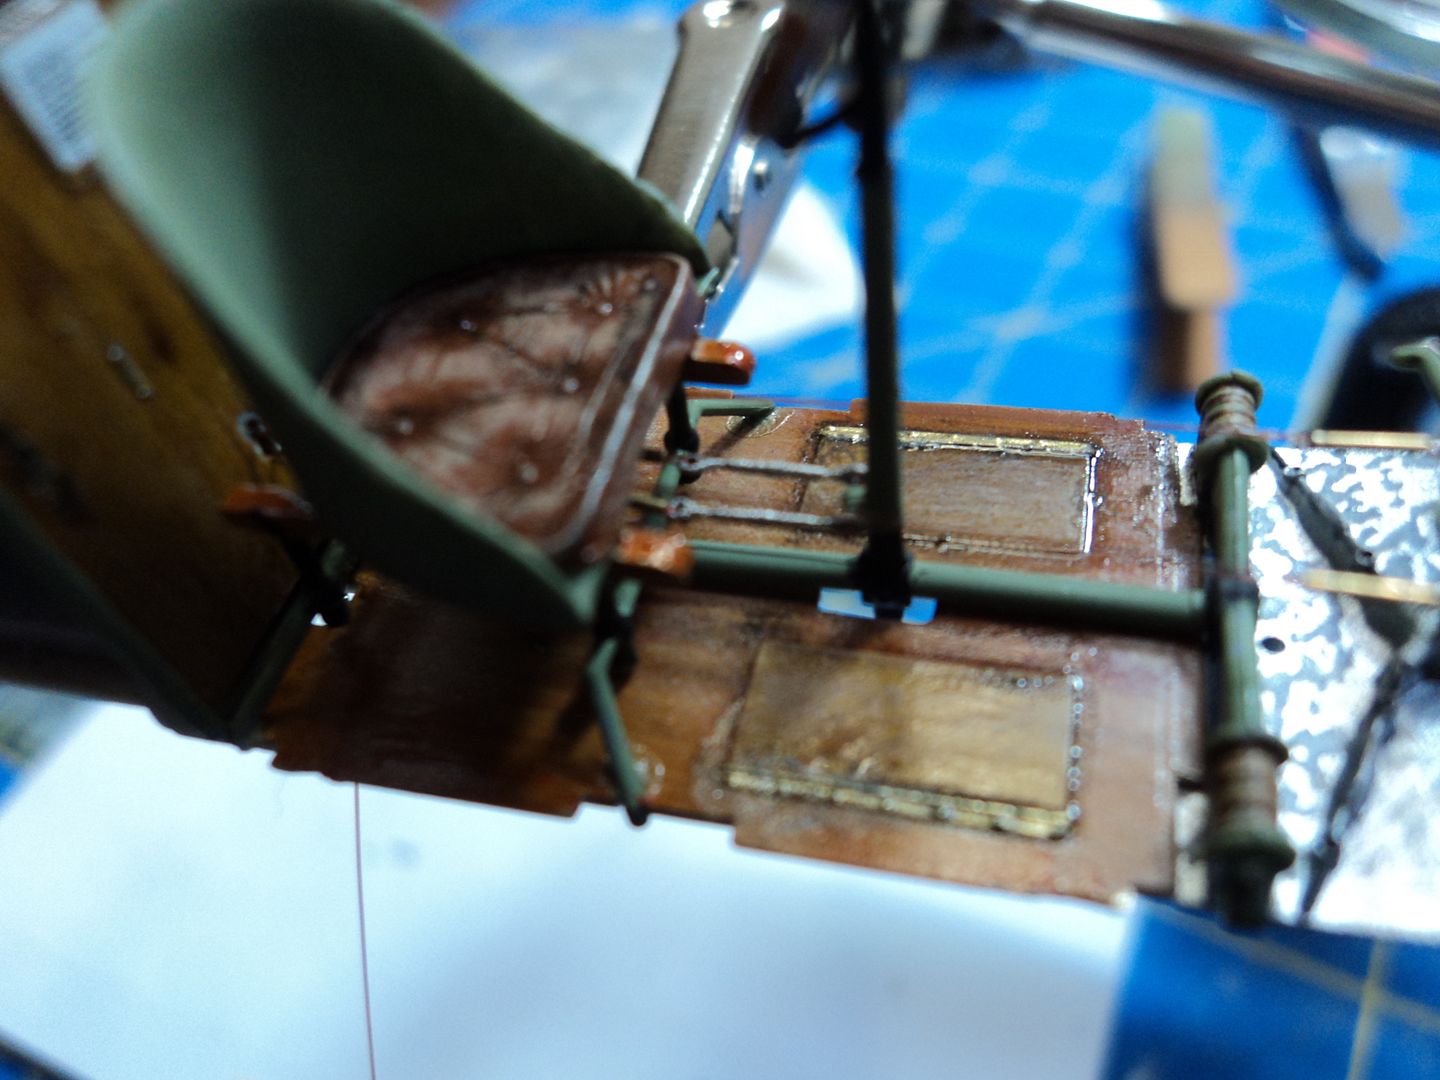
I was happy with the 'weathering of the seat cushion, but the PE belts pretty much cover that up.

I proceeded to continue to assemble the interior.  I used EZ line and Bob's Buckles.  Care should be taken to run the wire on the back side of the framework.  I naturally ran it over the front side and ran into a bit of a problem with the  PE part 6, but managed to recover with no noticeable fit problems.


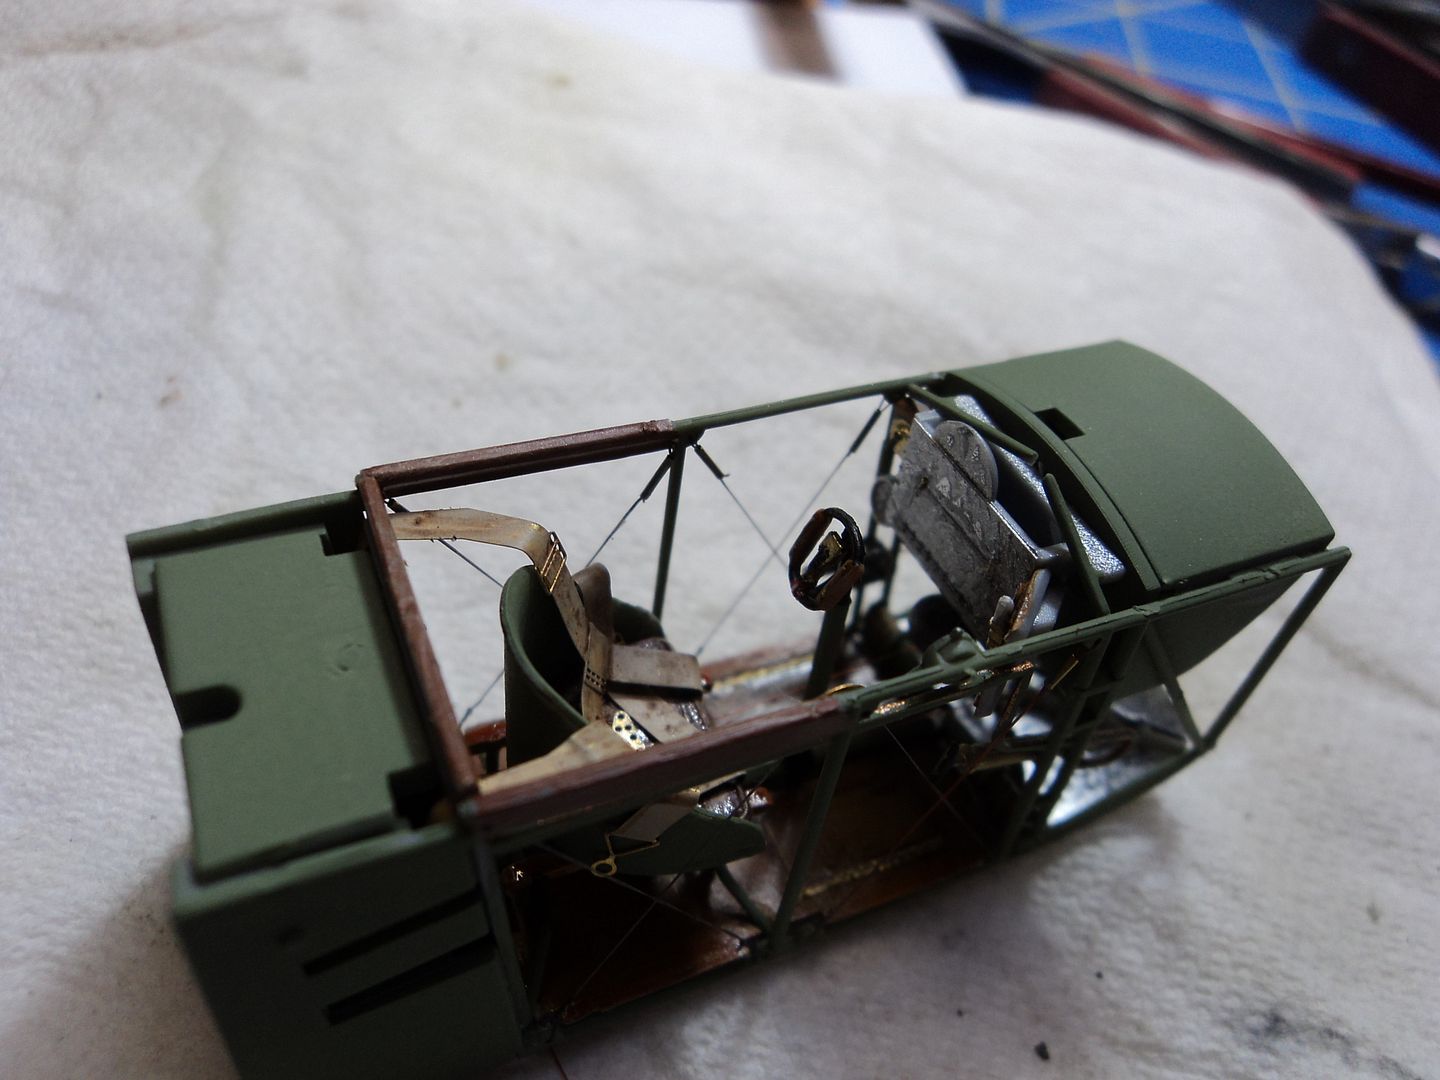
I painted the interior as called out by WNW and gave the natural metal the swirl treatment and I used the capillary oil method to highlight the access doors.  I was happy with the results.


I then proceeded to button up the fuselage.  I filled in the seams and painted the fuselage white.  For the frames I used a pencil and then painted the fuselage Tamiya FX 60 as called out by WNW in the instructions.  I am happy with the effect.

One of the things the modeler must be careful of is to drill holes in the bottom of the control column to attach the rigging.  Bertl has a great shot of what he did.  I drilled the hole prior to fixing the control column to the cockpit floor.  Once the fuselage was buttoned up, I took a piece of wire I cut off a Bob's buckles eyelet and fixed it.  I then attached one each Gaspatch 1/48 Type C turnbuckle.

I then attached the rigging that I ran from inside the cockpit to the turnbuckles.  In my haste I realized that I had attached the wrong ones.  These should have gone to part A45 in the undercarriage, not yet attached.  So, upon realizing my mistake, I improvised and attached a length of EZ line through the slots in the underside of the fuselage and will attach those to the part A45 at the appointed time.

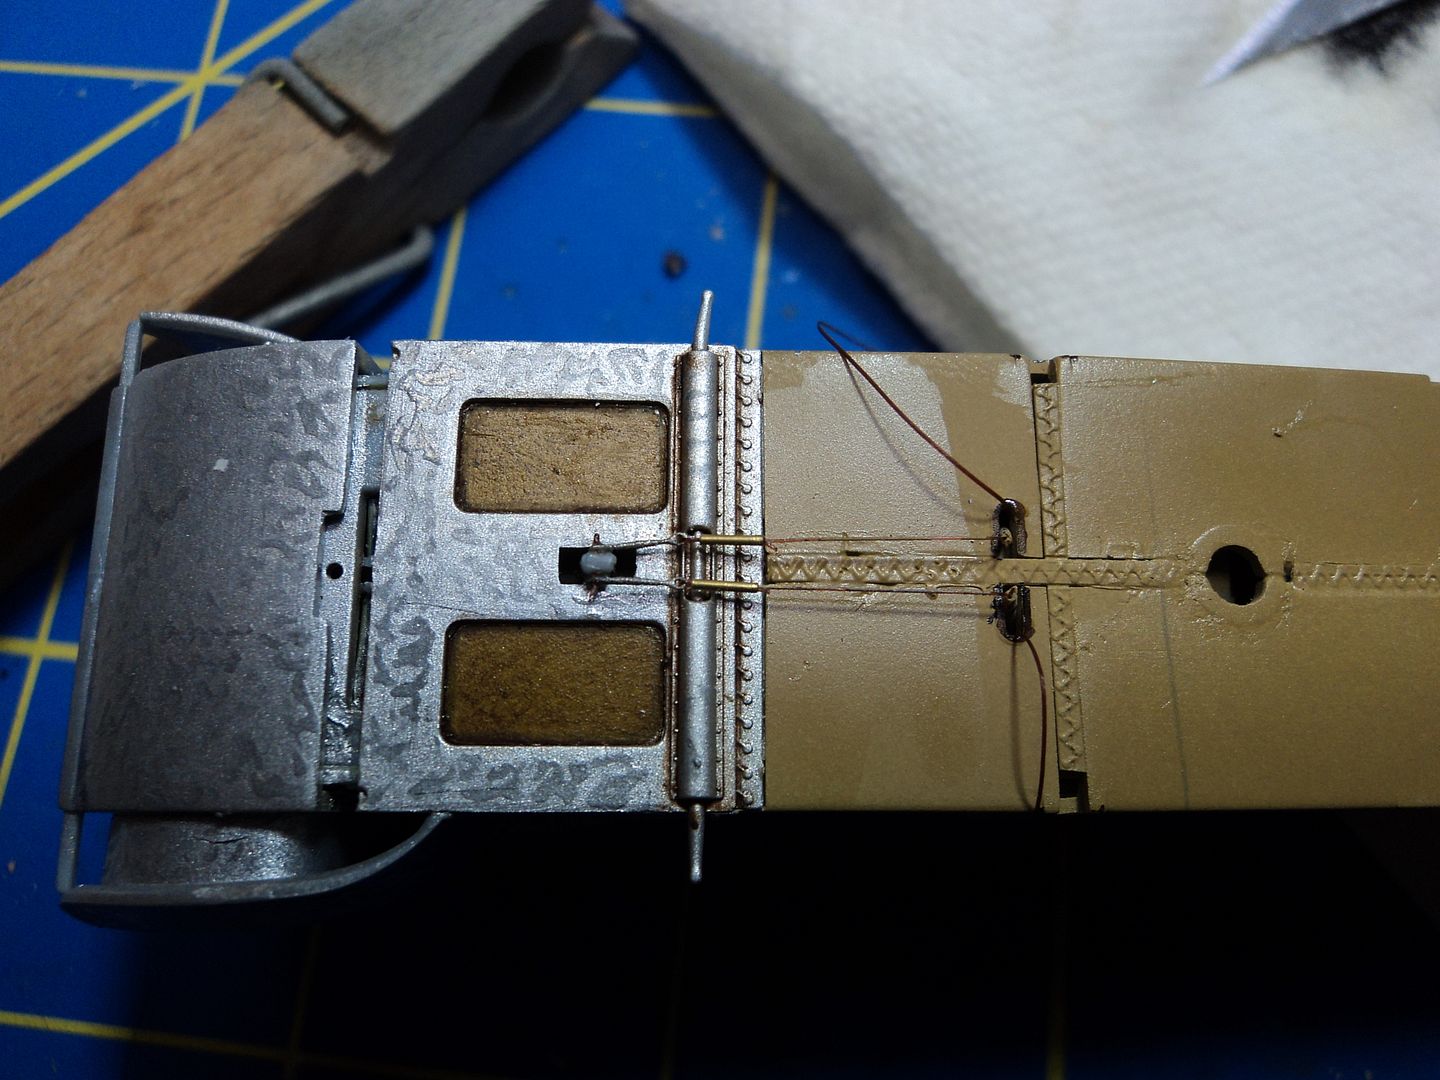
I hate it when I do that and get ahead of myself!  >:(
« Last Edit: July 28, 2014, 07:09:08 AM by mgunns »
Mark

We few, we happy few.....

Offline mgunns

  • Hero Member
  • *****
  • Posts: 2255
Re: WNW Fokker EIII Kurt Von Crailsheim
« Reply #2 on: July 28, 2014, 06:32:39 AM »
Moving on the motor.  I like the Taurus engine.  The folks who have managed to put it together have done outstanding work and it looks like the real thing.  Sadly, I don't have the patience to do that, so I used the kit engine.  A decent looking engine can be made from the kit one.

I painted it Tamiya Dull Aluminum.


I then proceeded to pick out the cylinders with a wash of oils using black for the cylinders and Van Dyke brown for the cylinder heads, just to set them apart a bit from the cylinders.  I then assembled the push rods, used EZ line for the plug wires, barely visible, weathered it a bit more, picked out some of the details as called out by WNW in the instructions with brass and I think it has the look.


The backside of the engine showing the plug wires.  I wasn't going to attach them as they aren't visible from the front, but they are visible from the back side, so I put them on.


Yes, folks, more exciting modeling coming your way as we have a barn burner of a card the E.III progress.

Best

Mark
« Last Edit: July 28, 2014, 07:12:11 AM by mgunns »
Mark

We few, we happy few.....

Online RAGIII

  • Hero Member
  • *****
  • Posts: 18956
Re: WNW Fokker EIII Kurt Von Crailsheim
« Reply #3 on: July 28, 2014, 07:10:54 AM »
Mark,
A very impressive array of photos! I like your swirls and the wood work is excellent! The overall cockpit interior is awesome! Love the Engine!!
RAGIII
"A man has to know his limitations": Harry Callahan

"Don't slop it on" Lynda Geisler

Offline mgunns

  • Hero Member
  • *****
  • Posts: 2255
Re: WNW Fokker EIII Kurt Von Crailsheim
« Reply #4 on: July 28, 2014, 07:14:47 AM »
Hello Rick:

Thanks for stopping by.  Swirlmania my friend, runnin amok here in the great upper Midwest.

So far it has been a fun build.  I am working on it slowly as I get a break from my two jobs and life.  Gotta keep one's chops up you know.  ;)

Best

Mark

Mark

We few, we happy few.....

Offline LindsayT

  • Hero Member
  • *****
  • Posts: 844
  • "Somehow it didn't seem like war at all..."
Re: WNW Fokker EIII Kurt Von Crailsheim
« Reply #5 on: July 28, 2014, 07:26:18 AM »
Great progress shots, buddy! I enjoyed the retrospective.

Lindsay

Offline Des

  • Administrator
  • Hero Member
  • ******
  • Posts: 9325
    • ww1aircraftmodels.com
Re: WNW Fokker EIII Kurt Von Crailsheim
« Reply #6 on: July 28, 2014, 08:13:10 AM »
Looking extremely good Mark, love the swirls and the cockpit interior, the seat cushion is excellent (before it was covered by the belts) and the rigging really looks the part, nice work on the engine also, well done so far.

Des.
Late Founder of ww1aircraftmodels.com and forum.ww1aircraftmodels.com

Offline Alexis

  • Hero Member
  • *****
  • Posts: 7947
  • Love the self
Re: WNW Fokker EIII Kurt Von Crailsheim
« Reply #7 on: July 28, 2014, 08:22:38 AM »
Fantastic so far Mark ! Your swirls turned out really well and I really like your really used seat cushion and can't forget to also mention on your wood effect , very impressive ! Looking forward on the next up-date .


Terri
Hurra ! , Ich Leben Noch
Body and life is a vessel we use to travel the planet . Femininity is the gift , The miracle comes from what we do with it .

Offline mgunns

  • Hero Member
  • *****
  • Posts: 2255
Re: WNW Fokker EIII Kurt Von Crailsheim
« Reply #8 on: July 28, 2014, 10:27:42 AM »
Greetings and thanks for following along:

@ Lindsay, I think it is "Old Man" who does a bit of a background on his build logs.  I really like that and took a tip from the "Old Man", thanks for following along and compliments.
@ Des, thanks for checking it out and your compliments.  So far this is a fun kit and goes together well.  Glad you like the "special touches".
@ Terri:  Glad you're aboard for this one and glad you like it.  Thanks for the compliments.

Best

Mark
Mark

We few, we happy few.....

Offline mgunns

  • Hero Member
  • *****
  • Posts: 2255
Re: WNW Fokker EIII Kurt Von Crailsheim
« Reply #9 on: July 28, 2014, 10:55:38 AM »
Okay folks, moving on to the undercarriage:  this is where the real fun begins as this is critical to the rigging of the airplane.  I studied the pictures on page 7 and tried to figure out how in the name of humanity it all went together.  I was lost.  So, I started to look at the details.  Part A45 is critical.  It is a small insignificant looking piece but is really critical and important that it be drilled and placed properly. 

Here is mine, painted, drilled and complete with the Gaspatch 1/48 turnbuckles.  I again used some scrap from Bob's buckles eyelets and attached the turnbuckles to those.

As you can see I also drilled holes in the tabs, two forward and two aft.  It fits in the rear undercarriage with the turnbuckle side forward.
Here is how it looks in the model:


Here is how it looks in the pictures:


After assembling the undercarriage, I carefully drilled a hole through the nub on part B3. for placement of the turnbuckles.

The model:

And again the pictures.

You can see that by breaking the picture down in details and comparing it with the kit parts it starts to make sense.
Here is a 3/4 shot and you can see where I placed Bob's Buckles eyelets behind the forward support assembly.  I used four.  You can also see where I placed the Gaspatch turnbuckles to receive the rigging from the fuselage undercarriage attachment points.  There are two little divits indicating where the eyelets should go there as well.

Hopefully this will help anyone building this model.
More excitement as we delve into the undercarriage placement and rigging.  Stay tuned, doncha dare miss it!

Best

Mark
Mark

We few, we happy few.....

Offline coyotemagic

  • Hero Member
  • *****
  • Posts: 7710
  • "Here's to not buggering it up." -Winston Chuchill
    • My Models
Re: WNW Fokker EIII Kurt Von Crailsheim
« Reply #10 on: July 28, 2014, 11:05:03 AM »
Fantastic work, Mark!  Your interior work is brilliant and that engine is perfect.  I thought it was a Taurus engine.  Love you treatment of the metal panels.  This is really moving along.  I can't wait for the next update.
Cheers,
Bud
"All men dream: but not equally. Those who dream in the dark recesses of the night awake in the day to find all was vanity. But the dreamers of day are dangerous men, for they may act their dreams with open eyes, and make it possible." -T. E. Lawrence

Offline Des

  • Administrator
  • Hero Member
  • ******
  • Posts: 9325
    • ww1aircraftmodels.com
Re: WNW Fokker EIII Kurt Von Crailsheim
« Reply #11 on: July 28, 2014, 11:22:30 AM »
Can't see what your problem is with the undercarriage rigging Mark, those pictures are as clear as mud  ??? ??? ;) I'm sure that you will work it out, once you eliminate the unwanted lines and only concentrate on the ones you are working on it all becomes very clear and quite easy, keep up the excellent work Mark.

Des.
Late Founder of ww1aircraftmodels.com and forum.ww1aircraftmodels.com

Offline lcarroll

  • Administrator
  • Hero Member
  • ******
  • Posts: 8567
Re: WNW Fokker EIII Kurt Von Crailsheim
« Reply #12 on: July 28, 2014, 12:26:16 PM »
Wow Mark, great update and lots of incredible detail going on there! The metal work is really nice, not to mention the interior and wood portions. I'll be following this with interest............ 8)
Cheers,
Lance

Offline mgunns

  • Hero Member
  • *****
  • Posts: 2255
Re: WNW Fokker EIII Kurt Von Crailsheim
« Reply #13 on: July 28, 2014, 01:06:12 PM »
Hello guys:

Bud, Des and Lance:  Now, when I figure out what all the lines do, it will come together.  Of a great help is the Eduard instructions.  I downloaded them when I got the EII/III last year.  They aren't crystal clear, but helpful.  I know the controls were all wing warping and that is what part A25 is all about, the wing warping.  I think the forward lines are for support, the back ones are for wing warping, and then there are those pesky undercarriage support lines!  Amazing and it all worked!  Thanks Bud, Lance and Des for the kind words: much appreciated.
Thanks for following along, more news as it happens.

Best

Mark
Mark

We few, we happy few.....

Offline jknaus

  • Hero Member
  • *****
  • Posts: 1121
Re: WNW Fokker EIII Kurt Von Crailsheim
« Reply #14 on: July 28, 2014, 01:26:50 PM »
Looking good Mark. I'm raking notes. Really like the wood work and that cussion is fantastic. Love the engine. I'll try the van dyke brown instead of my usual burnt umber. Very very nice. Of course looking at the riggin I am wondering what in the world I was thinking to have started this.
James