Author Topic: Scratch build partial stripdown Vickers FB 5 Gunbus 1/32 scale: a tribute to Des  (Read 28035 times)

Offline pepperman42

  • Hero Member
  • *****
  • Posts: 4431
  • Sergeant, my brown pants.......
Re: Scratch build partial stripdown Vickers FB 5 Gunbus 1/32 scale
« Reply #15 on: July 05, 2018, 10:08:38 PM »
Nice progress.

Steve

Offline RAGIII

  • Hero Member
  • *****
  • Posts: 18793
Re: Scratch build partial stripdown Vickers FB 5 Gunbus 1/32 scale
« Reply #16 on: July 06, 2018, 12:45:58 AM »
Your work on the smash mold worked well! Looking excellent.
RAGIII
"A man has to know his limitations": Harry Callahan

"Don't slop it on" Lynda Geisler

Offline GAJouette

  • Hero Member
  • *****
  • Posts: 3579
  • " Beware of the Spanish Inquisition"
Re: Scratch build partial stripdown Vickers FB 5 Gunbus 1/32 scale
« Reply #17 on: July 06, 2018, 01:19:49 AM »
 Stephen,
 Wow how did I miss this one? I'm looking forward to seeing more and following your latest project. Good luck and all the best my old friend.
Highest Regards,
Gregory Jouette
" What Me Worry"

Offline lone modeller

  • Hero Member
  • *****
  • Posts: 5300
Re: Scratch build partial stripdown Vickers FB 5 Gunbus 1/32 scale
« Reply #18 on: July 12, 2018, 03:35:18 AM »
Evening All,

A big thank you to all of you whop have dropped by and left encouraging remarks - I really appreciate them especially as I am feeling well outside my comfort zone with this larger scale. I know that unless I have a challenge with my modelling I do not have too much enthusiasm, but this time I have taken on a major challenge and positive comments are extremely helpful.

This project is, I think, getting under way at last, but that does not mean that I will have all of the answers in future, so any suggestions would be welcomed.


I have completed the main parts of the fuselage frame at last: it took three attempts to get it right, but here it is as of now:


It is made from 3/64 in brass rod and plastic rod bracing which has been superglued into position: I originally tried brass tube and intended to use connectors, but found that there were so many pieces on some joints that I could not get the correct angles to the frame, so I gave up and used rod instead. For the benefit of those who do not have experience of building structures like this here is how I tackled mine. NB. I also use this method when constructing frames with plastic rod and cement.


I started by bending the nose of the floor around a piece of copper pipe - it just happened to be the right diameter (22mm). I then soldered the cross pieces to the sides of the frame. I placed the floor section on to a piece of balsa which I use to pin the brass pieces while I am soldering, and laid the pieces of one of the fuselage sides so that they aligned exactly with the floor, and then held the side pieces in place with pins. This means that the side will fit exactly later.


Remove the floor section and solder the joints of the side: the pins hold everything in place:


The image above shows that the side piece and floor section to align as required. Unfortunately these images are of my first attempt which I had to abandon later.... however the pinciple worked as shown by the results above of the third attempt show.


Having made the frame at last I then had to make a second fuselage shell in plastic as the first attempt was slightly too small. The marking on the outside are for later reference as they delineate the metal and fabric parts. I have also used Mr Surfacer to fill the marks from the wood mould on the underside of the shell.


I feel now that I can start to make the internal parts of the nacelle while I continue to make ribs for the wings.


Thanks for looking.

Stephen.

Offline coyotemagic

  • Hero Member
  • *****
  • Posts: 7710
  • "Here's to not buggering it up." -Winston Chuchill
    • My Models
Re: Scratch build partial stripdown Vickers FB 5 Gunbus 1/32 scale
« Reply #19 on: July 12, 2018, 04:09:18 AM »
Spectacular work all around, Stephen!  From the vac molding, to the welded frame, this bears all marks of a masterpiece!
Cheers,
Bud
"All men dream: but not equally. Those who dream in the dark recesses of the night awake in the day to find all was vanity. But the dreamers of day are dangerous men, for they may act their dreams with open eyes, and make it possible." -T. E. Lawrence

Offline lcarroll

  • Administrator
  • Hero Member
  • ******
  • Posts: 8547
Re: Scratch build partial stripdown Vickers FB 5 Gunbus 1/32 scale
« Reply #20 on: July 12, 2018, 12:31:09 PM »
Stephen,
    You've certainly eased into the soldering operation with ease, that's really impressive work! This project is looking like another very impressive model will result, and in my chosen scale!
Cheers,
Lance

Offline NigelR

  • Hero Member
  • *****
  • Posts: 592
Re: Scratch build partial stripdown Vickers FB 5 Gunbus 1/32 scale
« Reply #21 on: July 12, 2018, 09:30:16 PM »
Very impressive model engineering skills. This should be a superb model if you can keep up the momentum - it looks like a lot of work!

Offline RAGIII

  • Hero Member
  • *****
  • Posts: 18793
Re: Scratch build partial stripdown Vickers FB 5 Gunbus 1/32 scale
« Reply #22 on: July 13, 2018, 01:35:56 AM »
Wow Stephen, that is impressive work! This one has the potential to be my Favorite of all of your Gorgeous scratch builds!
RAGIII
"A man has to know his limitations": Harry Callahan

"Don't slop it on" Lynda Geisler

Offline IanB

  • Hero Member
  • *****
  • Posts: 2435
Re: Scratch build partial stripdown Vickers FB 5 Gunbus 1/32 scale
« Reply #23 on: July 15, 2018, 03:46:43 AM »
Hi Stephen,
I've been away from this site for a long time it seems, mainly due to a) my last 2 projects were WWII, and b) I have relocated to Abu Dhabi for a new job and consequently haven't done any modeling at all for a few months!
 Have you thought about casting the wing ribs in resin? It really isn't that difficult, and you can guarantee they'll all be the same. If you can manage soldering, casting should be a piece of cake!
 I'm looking forward to seeing how this one progresses, even though it's on the wrong scale! 😉

Ian

Offline gbrivio

  • Hero Member
  • *****
  • Posts: 1681
Re: Scratch build partial stripdown Vickers FB 5 Gunbus 1/32 scale
« Reply #24 on: July 15, 2018, 02:36:46 PM »
Very nice progress on this. I like these soldered frames.
Ciao
Giuseppe

Offline lone modeller

  • Hero Member
  • *****
  • Posts: 5300
Re: Scratch build partial stripdown Vickers FB 5 Gunbus 1/32 scale
« Reply #25 on: August 15, 2018, 12:51:30 AM »
Evening All,

My apologies for the slow response to all of your very positive comments. I have been dropping by recently but have lost some momentum on this project and have not been as responsive as I should.

Bud, Lance Rick and Guiseppe: thank you for the encouraging comments - I really appreciate them, the more so when as recently I seem to have struggled with one or two of the construction problems.

Nigel - yes it will be a lot of work but no more I think than the Dornier and as I am not bothered about speed of output of models that does not matter too much!

Ian: I like your idea of mass producing ribs by using resin but at the moment i am trying out so many other techniques which are new to me that I do not wish to try another! I am keeping it in mind for future projects though.

Stephen. 

Offline lone modeller

  • Hero Member
  • *****
  • Posts: 5300
Re: Scratch build partial stripdown Vickers FB 5 Gunbus 1/32 scale
« Reply #26 on: August 15, 2018, 12:52:39 AM »
Evening All,

Progress has been rather slow for a combination of reasons, some of which concern how I am going to make the wings and tail unit: while I think that I may have solved the tail unit problem I am still not quite sure about the wings but I will give that more thought later.

In the meantime I have made a little progress with the ribs and some internal fuselage details. I made the cockpit control panels and floors with 20thou card and painted them with Revell acrylic brown 381 as a base coat, and then raw sienna oil paint as the top coat.


The main instrument panel was deliberately made too large so that it could be cut down after I had added the instrument dials and bezels: the former were from the Airdecal sheet and the latter from HGW models WW1 instrument bezel set. The map holder was cut from 10 x 20 thou Evergreen strip. The barograph on the port (left) side panel was added in the same way:


I also finished the oil tank:


and then made a fuel tank from 30 thou card rolled around a piece of dowel and immersed in very hot water. The sides were cut from 20 thou card and the embossing was achieved by holding the pointed end of a round file against the plastic and striking the other end with a pair of pliers. One or two taps were enough to get the desired effect. Filler and drain pipes were made from 30 thou rod:


I have also been working away on the ribs for the wings. These come in two types, those with lightening slots and those without.


I have made up enough for both the top and lower wing halves, but to ensure that the holes for the spars were in the correct locations I threaded them on to a pair of brass bars. The lower wing will look a little like this when they are in place:


The solid part of the horizontal tail unit was easy to construct as it was simply two pieces of 30 thou card with Evergreen strip ribs. The strip was sanded to a rounded profile - an easy procedure:


The frame of the stripped down half of the horizontal tail unit has been made from 20 x 30 thou strip and 20thou rod. The strip makes up the spars and the rod a strut which joins them and the boom to the wing. The boom to the wing in the photo is the long piece extending to the left: the vertical pieces are the spars. The ends of the spars will be inserted into slots which I will cut into the solid half of the horizontal tail. The ribs have been cut from 20 x 30 strip and are not shown: the elevator will also consist of ribs and a single spar - again not shown here. The boom in the photo is currently plastic rod but I am hoping to be able to replace it with brass - the only problem being that the brass is slightly larger diameter than the plastic so the holes have to be bigger and the brass may be just too large. More experimentation needed here - it is one of the reasons why this build is proving to be so slow.


Thanks for looking.

Stephen.

Offline lone modeller

  • Hero Member
  • *****
  • Posts: 5300
Re: Scratch build partial stripdown Vickers FB 5 Gunbus 1/32 scale
« Reply #27 on: September 06, 2018, 07:15:38 AM »
Evening All,

I am not used to working in this gargantuan scale and have made some mistakes as a result, which I am not going to share as I am too ashamed to do so!! I have also been a bit frustrated at not being able to get things to work, so I have decided instead to try out an idea and make a proof of concept. If this does not work as I want it to I will have to think again. "This" being the other half of the wings - ie the solid bits.

I am using brass bar for the spars - they will be soldered to the cockpit frame in due course, but before I get too far I want to make sure that I can make the covered wing halves first. I am going to mould these using my well tried push moulding system, but I am not sure whether they are going to be too large, especially given the problems I had with the nacelle half. What follows is what I have learned so far.

I started by making the moulds for the upper and lower wing sections. As on most WW1 types these were concave sections, so I have to make two separate pieces and glue them together. I used basswood for the moulds as it is easy to work but provides a really strong former. To get the curvature right I used card formers:
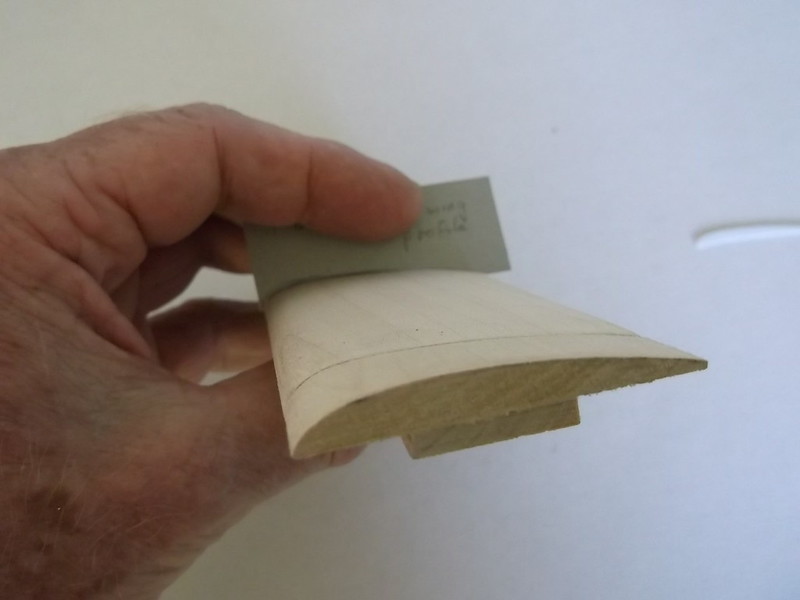
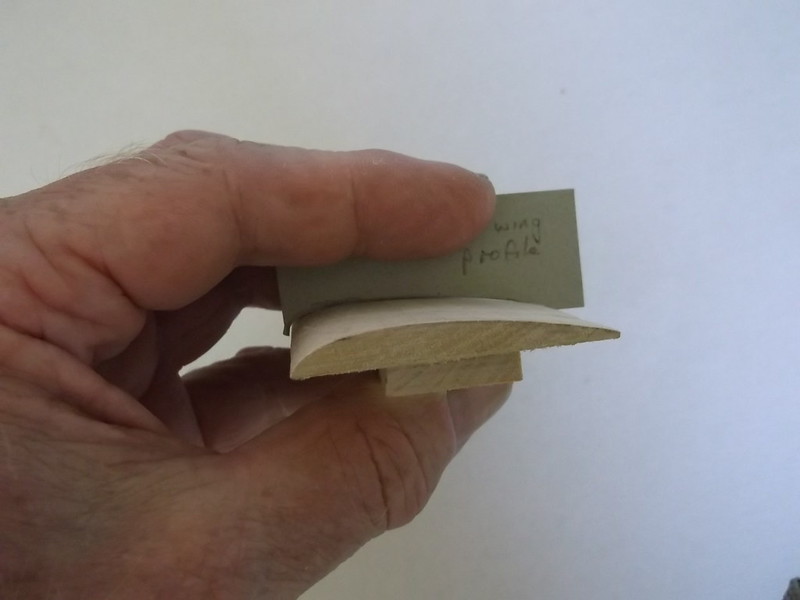


This is the upper surface of the wing and the former is at each end - the shape is close enough for me because it will vary a little during the moulding process, but at this scale nobody will see if its only 98% accurate, especially after the ribs and other details have been added.

So on to the moulding - a piece of plywood with a suitable hole cut in it, 30 thou card pinned to the plywood and the formers put ready:
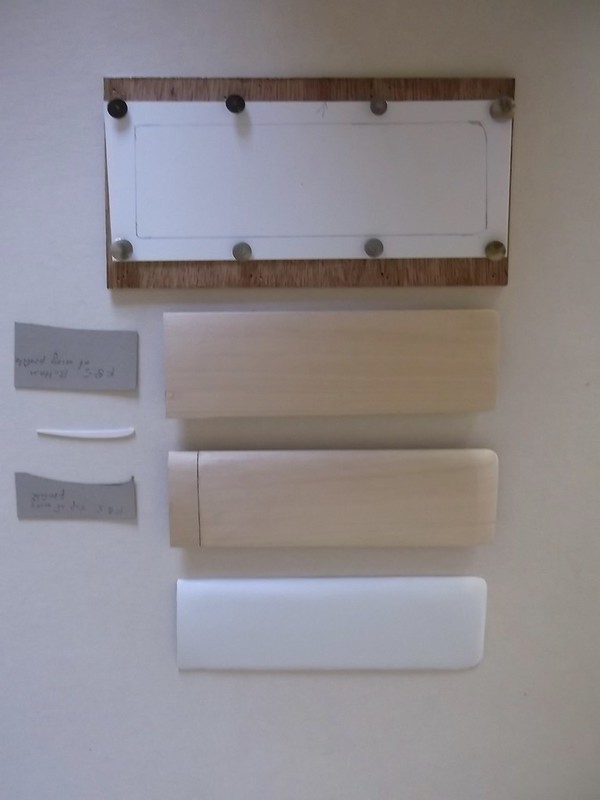


Also shown are the card formers, a rib which was used as a guide for the upper and lower surface card formers, and at the bottom - success a moulded wing surface. I found that because this moulding is so large that I had to heat the male moulds under the grill at the same time as I heated the plastic, otherwise I could not get the plastic to bend as required. After 4 aborted attempts I managed to get an acceptable upper and lower wing surface:
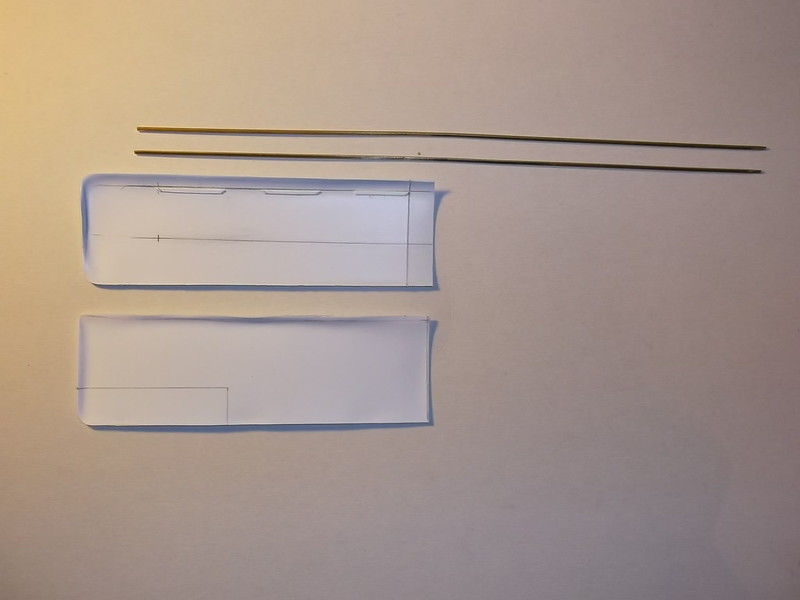


This will be a top wing half: the lower wing half is slightly shorter. The spars are shown ready to glue into place. I used epoxy glue to hold the spars which were attached to the upper half of the wing:
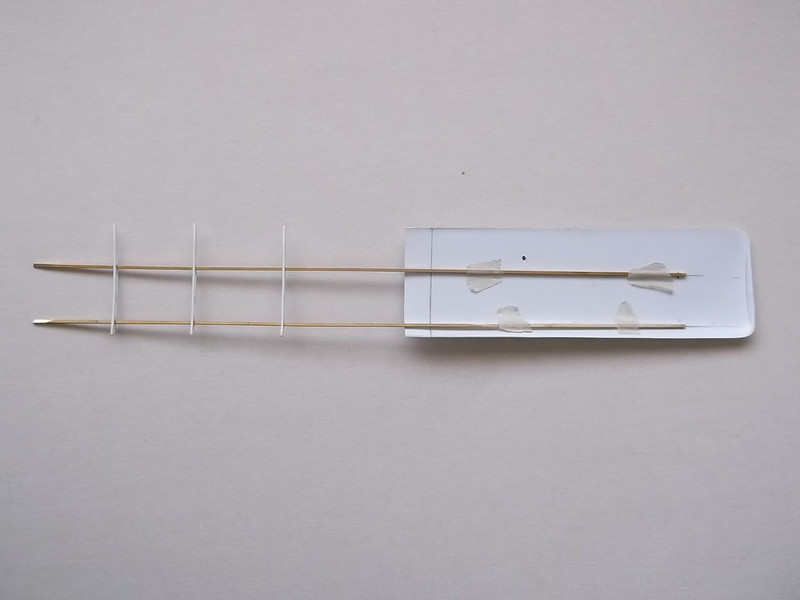


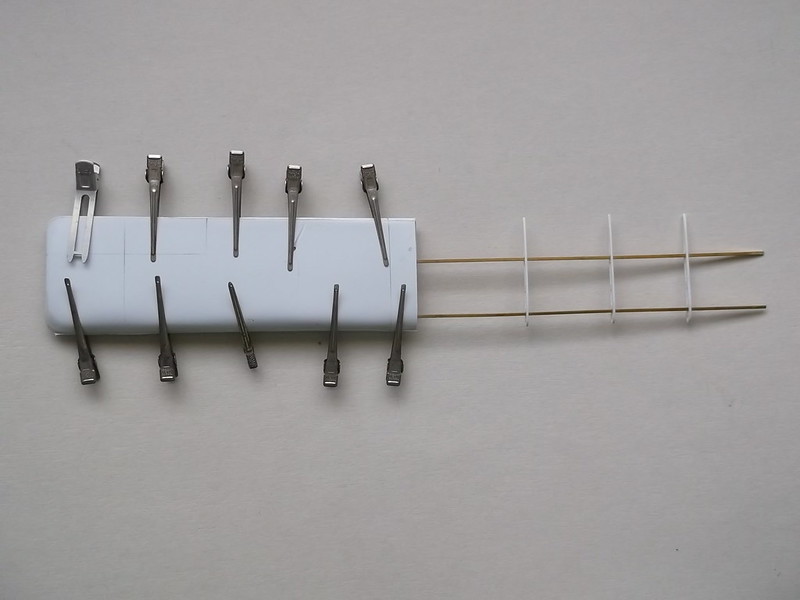
Getting the alignment right was a bit of a problem so to help things I used some ribs to hold the spars parallel and tape to hold it down while I applied the epoxy and allowed it to cure. After leaving this overnight I could glue the lower half of the wing into place and held it there while the glue set with my usual clamps - some of my late mother's hair grips:


Now the problems began to show - the moulds were not the best that I have made and trying to get the lower half of the wing to sit into the upper half was tricky and left some rather crude joints as these photos show: This is the leading edge of the wing:
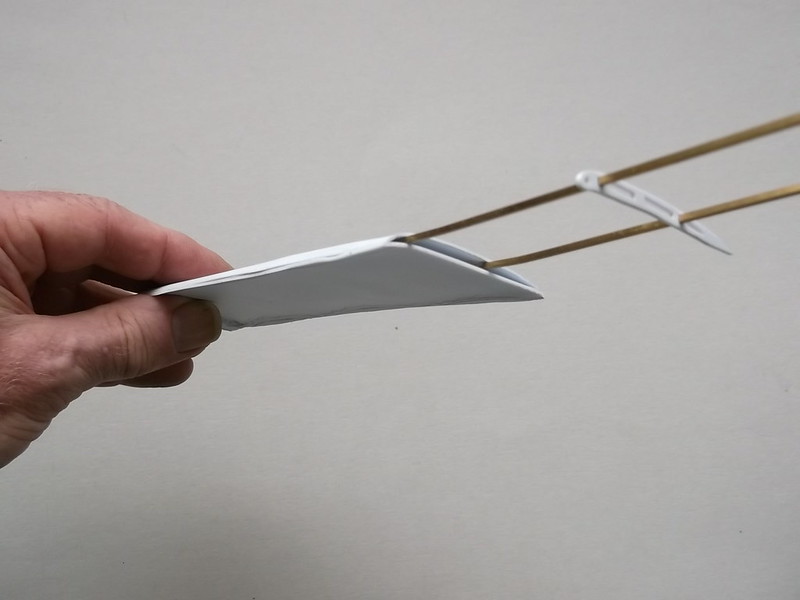


and this is the trailing edge and tip:


Not WNW standard. However after a few hours of filing, filling and sanding I managed to get acceptable joints all the way along the edges and tips. I also drilled a hole in the upper surface where the boom will have to be fixed and found that when I inserted a piece of brass rod to represent the boom the end made direct contact with the rear spar, which means that I can use epoxy to make a firm joint there:


The pencil marks show the aileron position and where the struts will be fixed later. Just as I thought that this was going really well and that I might be able to use this prototype on the model I discovered that the spar spacing where the spars enter the wing is wrong!!! Somehow the *@#^* things had moved when I was adding the epoxy and I had not checked them against the plans! Lesson learned (I hope). However I have proved that my idea works, but I also think that I can make some better moulds if I use a vacuform machine. As I do not possess one of these high-tech instruments of torture I will have to see if I can use one at my former place of employment..... so a trip down the road to my former school will be taking place shortly and I will be begging a favour from an old colleague.

Thanks for looking.

Stephen.

Offline Borsos

  • Hero Member
  • *****
  • Posts: 3315
Re: Scratch build partial stripdown Vickers FB 5 Gunbus 1/32 scale
« Reply #28 on: September 06, 2018, 07:35:45 AM »
Your posts are as fascinating as entertaining to read, Stephen. I am glad you are back on this great project and I really like what I see.
Andreas
"Deux armées aux prises, c'est une grande armée qui se suicide."
Barbusse.
"Ein Berg in Deutschland kann doch einen Berg in Frankreich nicht beleidigen. Oder ein Fluß oder ein Wald oder ein Weizenfeld."
Remarque.

Offline lcarroll

  • Administrator
  • Hero Member
  • ******
  • Posts: 8547
Re: Scratch build partial stripdown Vickers FB 5 Gunbus 1/32 scale
« Reply #29 on: September 06, 2018, 08:39:31 AM »
Your posts are as fascinating as entertaining to read, Stephen. I am glad you are back on this great project and I really like what I see.
Andreas

Stephen,
    I second Borsos' comment, it's a pleasure following your improvisation and progress. I believe you are on track to the solution here and it's looking good! This is going to be a fine model, stay the course as the saying goes!
Cheers,
Lance