Author Topic: Finished: 1/48 Albatros C. III  (Read 22167 times)

Offline GazzaS

  • Hero Member
  • *****
  • Posts: 1193
Re: 1/48 Albatros C. III
« Reply #30 on: June 13, 2018, 06:07:30 PM »
Amazing vents!  Love the idea of plastic chips in the glue...  gonna have to remember to try it one day.

Gaz
There are only two states to be in:  Queensland and blotto.

Offline huberlu

  • Full Member
  • ***
  • Posts: 201
Re: 1/48 Albatros C. III
« Reply #31 on: June 30, 2018, 10:51:30 PM »
Hello!

Thank you!

The bumps on the hood are added, pity they are not molded original.
Their shapes are difficult to apprehend on the photos of time.


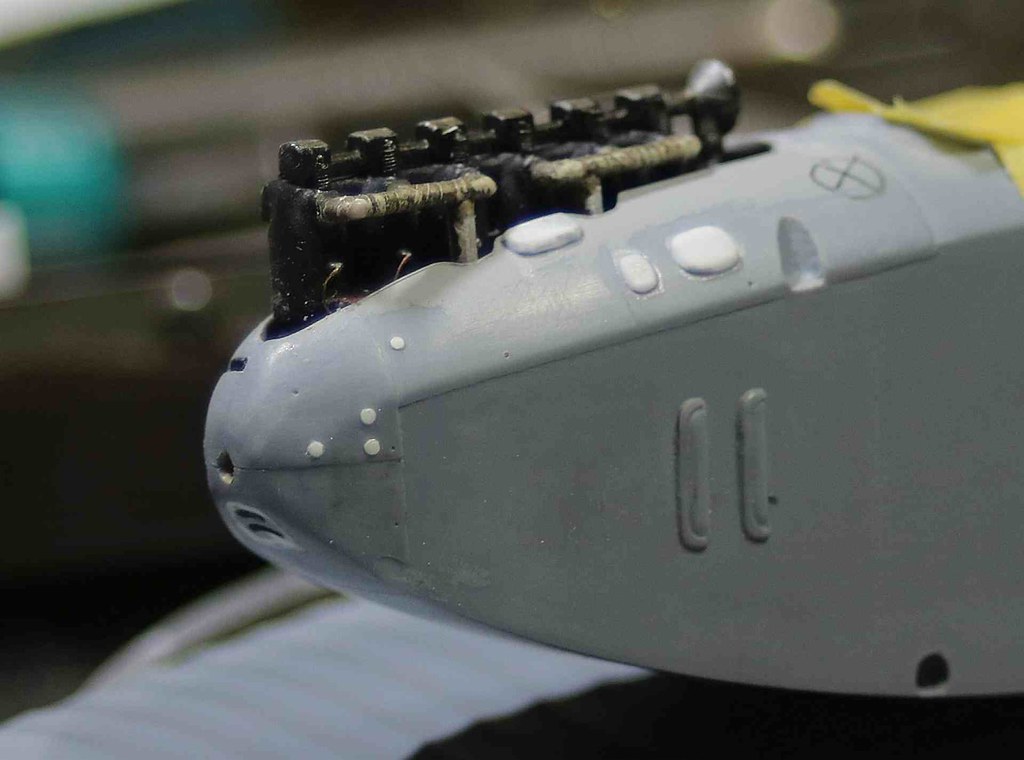
At the bottom of the hood (on both sides) I engraved and dug the notch in which a tensioner (cable) will be fixed.
A dymo band pierced with a hole and cut out serves as a model to engrave the outline, then one digs with the scalpel.


The foot market is dug, a photo-cut will surround it. A tip, do it before closing the fuselage ...
The red engraving is deleted. The one in green added.

I found only a photo of the back of the fuselage where we could distinguish panels of different colors or possible brands of "rivets". Same for the flanks. There are really not many exploitable images.


A lot of putty and sanding but nothing insurmountable.

The shape of the fuselage nose is too sharp in my opinion. I sanded a little to make it more "square".

Regards

Offline RAGIII

  • Hero Member
  • *****
  • Posts: 18793
Re: 1/48 Albatros C. III
« Reply #32 on: July 01, 2018, 05:24:31 AM »
Your detailing continues to make this a great build! Well Done on the nose section.
RAGIII
"A man has to know his limitations": Harry Callahan

"Don't slop it on" Lynda Geisler

Offline andonio64

  • Hero Member
  • *****
  • Posts: 1685
  • There's no hurry
Re: 1/48 Albatros C. III
« Reply #33 on: July 02, 2018, 02:56:05 AM »
Fantastic update Hunerlu, I love it also because it's in 48th...
Antonio

Offline pepperman42

  • Hero Member
  • *****
  • Posts: 4431
  • Sergeant, my brown pants.......
Re: 1/48 Albatros C. III
« Reply #34 on: July 09, 2018, 10:11:47 PM »
Not sure how I missed this. Excellent work!!

Steve

Offline huberlu

  • Full Member
  • ***
  • Posts: 201
Re: 1/48 Albatros C. III
« Reply #35 on: July 10, 2018, 09:14:31 AM »
Thank you !

I redid fasteners for stretchers. Two on each side.


A shot of surfacing with the airbrush and a layer of paint that will serve as a background for the oil painting.


The panels are painted separately but without drying between each panel (too long). I use a piece of tape to limit the start of the panel. The paint is burnt sienna.

Regards

Offline GazzaS

  • Hero Member
  • *****
  • Posts: 1193
Re: 1/48 Albatros C. III
« Reply #36 on: July 10, 2018, 11:00:51 AM »
That is excellent!  Amazed at the fasteners you redid.

Gaz
There are only two states to be in:  Queensland and blotto.

Offline RAGIII

  • Hero Member
  • *****
  • Posts: 18793
Re: 1/48 Albatros C. III
« Reply #37 on: July 10, 2018, 10:55:20 PM »
The fasteners look great and the wood finish is gorgeous!
RAGIII
"A man has to know his limitations": Harry Callahan

"Don't slop it on" Lynda Geisler

Offline huberlu

  • Full Member
  • ***
  • Posts: 201
Re: 1/48 Albatros C. III
« Reply #38 on: July 11, 2018, 08:00:10 PM »
Thank you!

Hello,


Small "circles" with oil paint (always Sepia):


and spread with a fine brush 3/0, draw the paint in the direction of the wood, here in only one direction.

If we paint in the other direction, it is a trail where the beige paint of the background appears (why?).
These beige trails allow to have grooves in the wood:


All this to approach this:


It looks like the old "linoleum" of my room when I was a kid ...

Regards
« Last Edit: July 12, 2018, 08:22:45 AM by huberlu »

Offline Manni

  • Hero Member
  • *****
  • Posts: 1768
    • Der Militärmodellbauer
Re: 1/48 Albatros C. III
« Reply #39 on: July 11, 2018, 09:49:00 PM »
Great replication of the woodgrain. The technique with oil paints is still the most convincing of all.
Bye,
Manni
"Ich hab' da mal was vorbereitet.": Jean Pütz
"Warum noch mehr Bausätze?!?": meine Frau

Offline RAGIII

  • Hero Member
  • *****
  • Posts: 18793
Re: 1/48 Albatros C. III
« Reply #40 on: July 13, 2018, 09:17:17 PM »
Great replication of the woodgrain. The technique with oil paints is still the most convincing of all.
Bye,
Manni

I agree with Manni on all counts!
RAGIII
"A man has to know his limitations": Harry Callahan

"Don't slop it on" Lynda Geisler

Offline GazzaS

  • Hero Member
  • *****
  • Posts: 1193
Re: 1/48 Albatros C. III
« Reply #41 on: July 15, 2018, 06:21:17 PM »
Fantastic wood technique!

Gaz
There are only two states to be in:  Queensland and blotto.

Bughunter

  • Guest
Re: 1/48 Albatros C. III
« Reply #42 on: July 16, 2018, 07:37:10 AM »
What a great build!
I really like the wood painting, details, dragon and the overall work.
Will watch, since I have the Eduard kit in stash.

Cheers,
Frank

Offline huberlu

  • Full Member
  • ***
  • Posts: 201
Re: 1/48 Albatros C. III
« Reply #43 on: July 20, 2018, 07:11:18 PM »
Thank you!

Well, the fuselage has been dry for 5 days and will stay safe for another week or two or three.

I started painting the wings and its many ribs.


The upper wing is two hours min. of 0.5mm strips cut into the tamiya scotch tape.
Next time I trace them to the brown marker and the ruler. It must work.

And there some will say to me: "No transparency on the wings seen from above !!!
It is not transparency that is the canvas glued and stretched on the wood of ribs.

I  cut a niche in the turret:


Regards.


Offline RAGIII

  • Hero Member
  • *****
  • Posts: 18793
Re: 1/48 Albatros C. III
« Reply #44 on: July 20, 2018, 08:33:07 PM »
As always your work is inspiring!
RAGIII
"A man has to know his limitations": Harry Callahan

"Don't slop it on" Lynda Geisler