Author Topic: 1/72 Breuget Br M 4  (Read 9723 times)

Offline lone modeller

  • Hero Member
  • *****
  • Posts: 5317
1/72 Breuget Br M 4
« on: June 30, 2017, 08:40:14 AM »
Evening All,

Most of you know by now that I have a bit of a penchant for, (some might say obsession with), early pusher types. There are a number of reasons for this. One of them is that I really like the complex tail arrangements with all of the attendant rigging and control cables which offer a challenge to the modeller. I also enjoy building the often exposed engines found on many of them, but most of all because they tend to look ungainly, fragile and not very airworthy. In reality many of them were very strongly built, could take a lot of punishment and still stay in the air, could hold their own in dogfights, and in the early stages of WW1 were among some of the better Allied fighting machines which were valued by their aircrews. Sadly very few of these positive attributes could be assigned to the Breuget BR 5 or its immediate predecessor the Br 4, both of which were products of the Michellin (of tyre fame) brothers attempt to foist on to the French armed forces an aircraft which was unsuited to its role, under-powered, poorly designed and generally loathed by those forced to fly in it. That did not stop the RNAS from purchasing some of these aircraft: Britain was so desperate to bring aeroplanes into service that it bought some of this type so that more squadrons could be made operational. Despite the exigencies of war, a better policy might have been more haste less speed in this case, but unfortunately for the aircrews involved, the higher powers only recognised their mistake when it was too late. The result was that Breuget Br 5's were only used for daylight raids for a short time, and then for night raids for as short a time as possible after that, when they were replaced as better types became available.

Given the above it is not perhaps surprising that this type is not well represented by kits: there was a resin kit produced in this scale, (one of which was sold for over $120 on Evil Bay a couple of years ago), but apart form that I do not know of any other. It could also be of course that pushers are also not popular even among modellers of WW1 aircraft because they are thought to be very difficult to build and rig. Such thoughts seem to extend to one of our regular contributors who is justifiably renowned for the skill and attention to the minute detail that he invariably puts into his models, turning what are sometimes very poor and inaccurate kits into potential award winning model aircraft. So pour encourager les autres here is another pusher scratch build. Hopefully it might just cause the modeller above to pull a pusher kit out of his stash when he finishes his current projects and demonstrate how to make a silk pusher out of a sow's ear.

I am unable to provide a picture of the aircraft in question because of copyright reasons but if you type the name into Google images you will find plenty of photos and drawings.

I have started by cutting out wing blanks from 30 thou card bent in hot water in a piece of drain pipe which has been sealed at one end. (I have to thank Stevehed for this idea). The top wing is considerably bigger than the lower wings and at the moment I have only drawn on the lines where the ribs will be glued. These will be made from 10 x 20 thou Evergreen strip which I will then sand down until they are just protruding above the wing surface.


I have also started to carve a male mould from balsa wood to plunge mould the fuselage nacelle, but this is not finished yet so no photos at the moment. More later.

Thanks for looking.

Stephen.

« Last Edit: August 30, 2017, 06:56:07 AM by lone modeller »

Offline Des

  • Administrator
  • Hero Member
  • ******
  • Posts: 9325
    • ww1aircraftmodels.com
Re: 1/72 Breuget Br 5
« Reply #1 on: June 30, 2017, 09:09:24 AM »
Great to see you starting another pusher Stephen and what a good subject you have chosen this time, I will be following along closely with your build as you do such wonderful work.

Des.
Late Founder of ww1aircraftmodels.com and forum.ww1aircraftmodels.com

Offline IanB

  • Hero Member
  • *****
  • Posts: 2439
Re: 1/72 Breuget Br 5
« Reply #2 on: June 30, 2017, 09:41:06 AM »
I'm definitely in on this one, as I have said resin kit in my stash - bought "under the table" and unadvertised for $50 from a lucky connection!

Ian

Offline lcarroll

  • Administrator
  • Hero Member
  • ******
  • Posts: 8551
Re: 1/72 Breuget Br 5
« Reply #3 on: June 30, 2017, 11:21:50 AM »
Stephen,
     I just Googled the beast, looks like a fair challenge alright! Another of your "magical mystery tours" as you turn raw plastic and wood into a masterpiece, I look forward to following along as always.
Cheers,
Lance

Offline Borsos

  • Hero Member
  • *****
  • Posts: 3321
Re: 1/72 Breuget Br 5
« Reply #4 on: June 30, 2017, 02:18:48 PM »
Stephen, this is a fantastic project! I will follow as closely as I always do with your scratch build magic.
The BM. 5 is a great choice. Did you make a decision regarding the markings? a bomber from the famous Oberndorf raid?
Borsos
"Deux armées aux prises, c'est une grande armée qui se suicide."
Barbusse.
"Ein Berg in Deutschland kann doch einen Berg in Frankreich nicht beleidigen. Oder ein Fluß oder ein Wald oder ein Weizenfeld."
Remarque.

Offline lone modeller

  • Hero Member
  • *****
  • Posts: 5317
Re: 1/72 Breuget Br 5
« Reply #5 on: July 10, 2017, 08:48:21 AM »
Evening All,

Thanks to Des, Ian, Lance and Andreas for your support which I greatly appreciate. Andreas I intend to build a standard RNAS machine: I am not sure whether it will be one that participated in the Oldendorf raid. I have also had confirmed that these machines sat on their tails when unloaded and on the nosewheel when loaded and the crew were in place. As I do not intend to put a crew in and as the bombs were stored in enclosed fairings nobody will be able to see whether the model represents an empty or loaded machine, so I will save myself the trouble of adding weights and leave it to sit on its tail.

I am sorry that there is not a great deal to report at the moment - I am sure that you will know why as there has been more than enough comment about the issue. In addition to which my camera has done some silly things, (or I have - not sure which/who is to blame).

Anyway I have plunge moulded the fuselage halves, cut them out and sanded them, cut out the window apertures and added some framework on the insides, not that much will be visible when the halves are joined. I have not been able to find any interior detail so I have made up a generic pair of seats and IP etc - as they too will hardly be visible I am not too bothered. If anybody wants to look closely when it is finished they are welcome to try, but I somehow doubt that they will. I also added two pieces of 60 thou card to the rear of the nacelles where the exhaust pipes will have to be drilled later: the moulded plastic is just too thin on its own to be able to support the exhausts. I have also added some card at the rear to support the prop shaft and a piece on the top of the rear to help strengthen the joint later - some filler may be needed there as the moulds are not quite as I would like them to be. Before I close the fuselage halves I will cut out two transparencies from clear acetate and glue into place with superglue.


Thanks for looking.

Stephen.

Offline IanB

  • Hero Member
  • *****
  • Posts: 2439
Re: 1/72 Breuget Br 5
« Reply #6 on: July 10, 2017, 09:42:41 AM »
Nice start, Stephen. I'm not at home at the moment, but I will check the kit when I get home (tomorrow) and see if there is any useful info in the instructions that may help you.

Ian

Offline RLWP

  • Hero Member
  • *****
  • Posts: 1494
  • Bodger
Re: 1/72 Breuget Br 5
« Reply #7 on: July 10, 2017, 05:55:24 PM »
You should be OK with this:


Breuget BR 5 on Wikipedia: https://commons.wikimedia.org/wiki/File:Breguet_5_drawing.jpg

Richard
Hendon for flying - the fastest way to the ground!

Offline RAGIII

  • Hero Member
  • *****
  • Posts: 18842
Re: 1/72 Breuget Br 5
« Reply #8 on: July 12, 2017, 12:17:45 AM »
Sorry I missed this until now! You are off to your usual fantastic start. The wings look great as does your work on the tub! As always I will follow with great interest!!
RAGIII
"A man has to know his limitations": Harry Callahan

"Don't slop it on" Lynda Geisler

Offline Old Man

  • Hero Member
  • *****
  • Posts: 600
Re: 1/72 Breuget Br 5
« Reply #9 on: July 13, 2017, 02:04:40 AM »
Great project, Sir.

Bruce's "Warplanes of the First World War V.4' has a good deal of information on the R.N.A.S. Breguet pushers. Let me know if you have any questions.


Offline ALBATROS1234

  • Hero Member
  • *****
  • Posts: 2657
Re: 1/72 Breuget Br 5
« Reply #10 on: July 14, 2017, 03:28:46 AM »
That's a cool one. I like the breguet u.2 and g.4 types from 1910 to 12 period

Offline Juan

  • Hero Member
  • *****
  • Posts: 2456
  • All gave some, some gave all.
Re: 1/72 Breuget Br 5
« Reply #11 on: July 14, 2017, 03:46:35 AM »
Awesome start Stephen, looking forward to your treatment on this one.

Offline lone modeller

  • Hero Member
  • *****
  • Posts: 5317
Re: 1/72 Breuget Br 5
« Reply #12 on: July 27, 2017, 07:09:56 AM »
Evening All,

Thanks Ian, Richard, Rick, OM, Scott and Juan for dropping by and leaving such kind remarks. Thanks especially to Richard for the plans: those were actually of the Br 4 (or at least I think that is the correct designation: it was the fighter version of this machine, and the designations are a bit complicated but I believe that I am correct with the numbering).

There has been a bit of a delay with this project as I have struggled to restore pictures to my posts.... I am sure that you will know what I am referring to. Anyway I have managed to make some real progress over the weekend and did some last touches the other night so that I can post something that is, I hope, worth seeing.

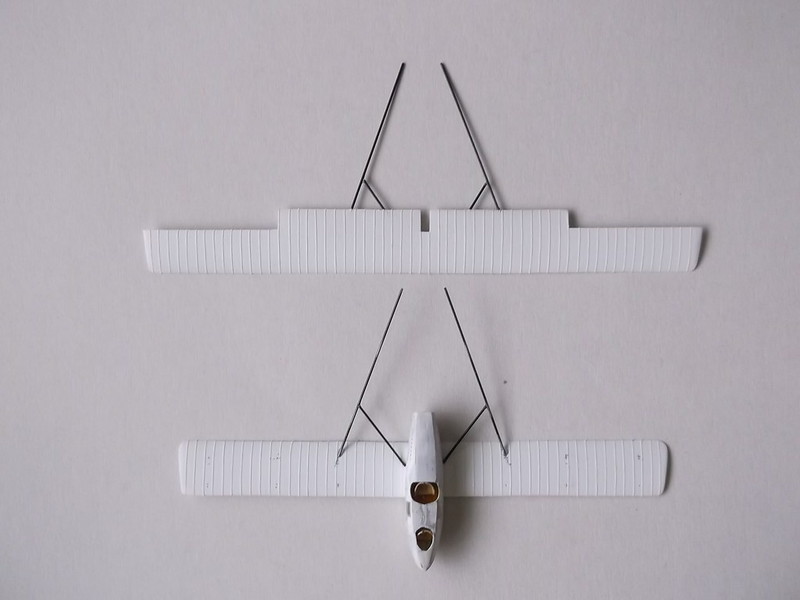
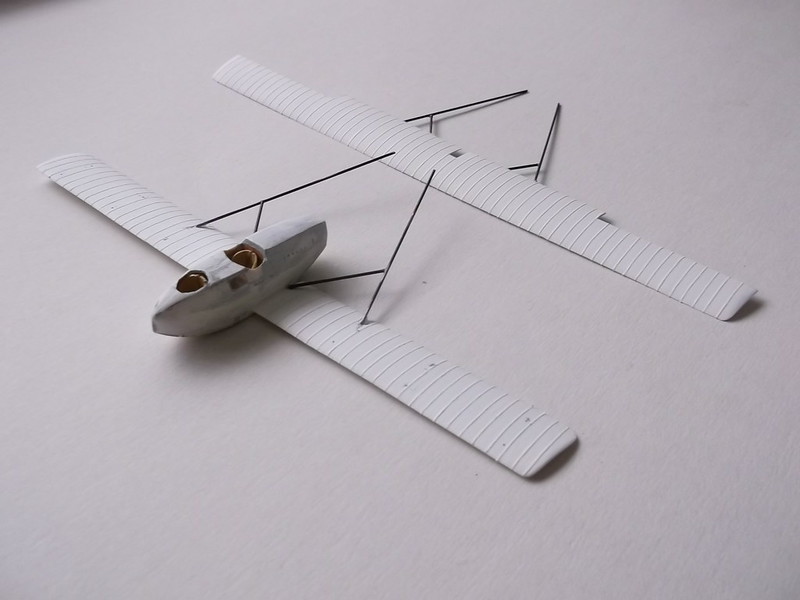
I joined the fuselage halves having inserted the windows in the sides first. These were made from thin acetate from an old Airfix bubble wrap. The windows were secured with super glue: I did not add much extra detail inside the fuselage as most of it cannot be seen anyway. The lower wings were glued to the fuselage nacelle and all of the the joints cleaned up with filler and a little sanding - not much was needed as the sides of the fuselage moulded rather well this time. I drilled holes for the exhaust pipes in the rear sides of the nacelle and for struts in the wings. The next step was to put on the booms which I make at this stage as it ensures that they fit exactly and do not have to be adjusted at a later and more delicate stage. My method is as follows for those who have not seen it before:

I start by cutting pieces of florists wire to length. I use this as it is malleable and easy to straighten if it gets bent but it is also rigid enough not to sag or bend under any weight from tail units etc. I then file two shallow grooves into the wings where the wires will be attached at a later stage.

I calculate the angle that the booms need to be in relation to the trailing edges of the wing and make up a simple jig to support the tail end of the booms.

I lay the wing on to a plan and align the wire booms with the plan., putting the ends of the wires over the wing trailing edges in the position that they will eventually be fixed, and on to the jig at the rear end.

When I am satisfied that all is ready I mix some expoxy rapid glue and attach the front ends of the booms to the trailing edges of the wings, lay the wings and booms on the plans to get the alignment correct, and support the rear ends of the booms on the jig. I leave everything for at least 12 hours to harden.

Here is the bottom wing boom assembly with its jig. Note that I have not used the plan in this case as I marked on to the piece of plastic card the positions of the centre line of the aircraft and the booms:


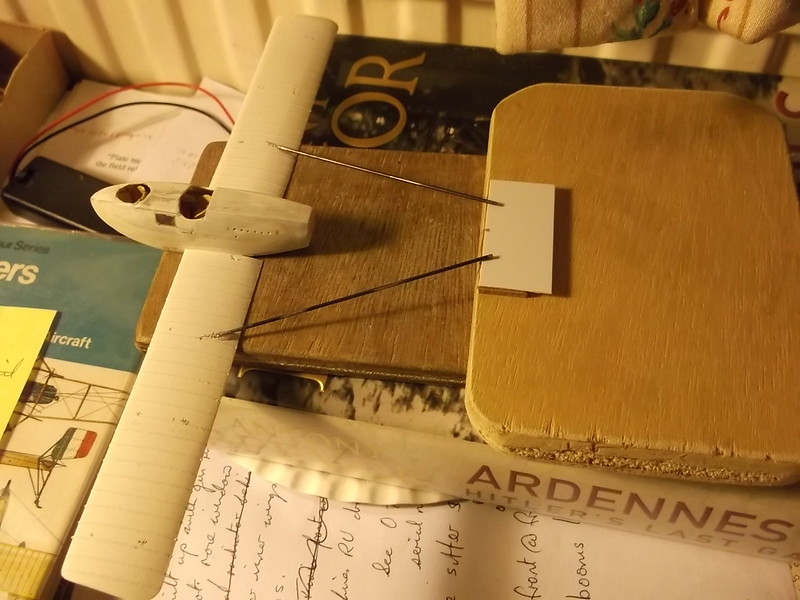
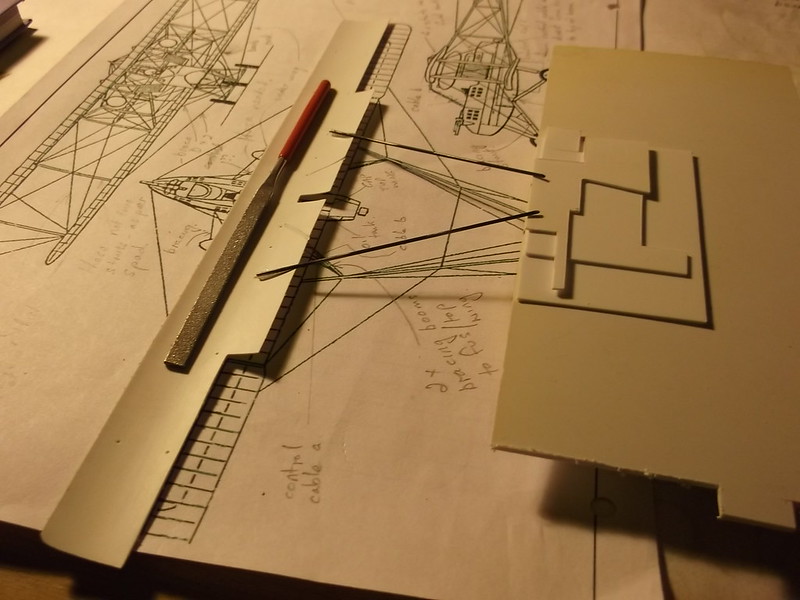
Next is the top wing boom and jig set up, this time over the plan. The file was put on to the wing to hold it down:


The Breuget booms were different to most pushers because they had short horizontal struts to help improve the strength of the structures: these were put in place with superglue once the main parts were thoroughly set:


Now the booms are in place I can proceed with the painting and markings, which will be hand painted.

Thanks for looking.

Stephen.

 
« Last Edit: July 27, 2017, 07:16:13 AM by lone modeller »

Offline IanB

  • Hero Member
  • *****
  • Posts: 2439
Re: 1/72 Breuget Br 5
« Reply #13 on: July 27, 2017, 07:45:21 AM »
Lovely work as usual Stephen! I'll check the plans of my kit when I get home to make sure it mentions those support braces....I notice they're not on the plans shown above!

Ian

Offline lcarroll

  • Administrator
  • Hero Member
  • ******
  • Posts: 8551
Re: 1/72 Breuget Br 5
« Reply #14 on: July 27, 2017, 07:51:17 AM »
Stephen,
    Your use of simple but incredibly effective "jigs" and jig like formers never ceases to impress, you make all this appear so simple! The last two photos are impressive, it's really starting to come together ....... lovely work! 8) 8)
Cheers,
Lance