Author Topic: Voisin III LAS 1/72  (Read 9502 times)

Offline lone modeller

  • Hero Member
  • *****
  • Posts: 5300
Voisin III LAS 1/72
« on: April 07, 2017, 08:18:39 AM »
Evening All,

I have had a severe attack of pusher withdrawal symptoms again: time to start another one! This will be a French design but I will finish it in RNAS markings. Voisin machines were very numerous during the first part of WW1 as they were employed by French, British and Italian air forces, some were sent to Russia and others were built there, so it was an important allied type. As it is a pusher it is seriously under-represented in the kit market: there is a vacuform kit by Flashback for which Stevehed gave a super demo build.: Now I will try to show how to make one from scratch using plastic card and florists wire. I am going to cheat a little because I have acquired from Epeeman a spare rotary engine from a Roden kit which I will modify to represent the Salmson of the Voisin. I suppose this is the scratch builder's version of an aftermarket part. I will be using genuine aftermarket parts in the form of a set of Eduard PE wire wheels: my first experience of this medium. The plans will come from the DataFile no 135.   


I started by bending some 30 thou plastic card in a piece of drain pipe which had been plugged at one end. (Again I have to thank Stevehed for this idea). I placed the card in the pipe and held it with a wooden spoon handle while I poured in boiling water. After 10 seconds I drained out the hot water and poured in cold water. The card was then suitably bent so that I could cut out the wing blanks. I also cut out some ailerons and horizontal tail stabilisers, and a rudder. I have marked these in pencil to show where the ribs will be added in the form of 10 x 20 thou Evergreen strip.


The engine looked like this:


so the first change was to get rid of those awful moulded push rods and replace them with some new ones from thin copper wire.


An exhaust pipe was made from plastic rod and glued to the rear of the engine'


and finally an extended drive shaft also made from thick rod which had been filed to shape and glued to the front.


Thanks for looking.

Stephen.


Offline Des

  • Administrator
  • Hero Member
  • ******
  • Posts: 9325
    • ww1aircraftmodels.com
Re: Voisin III LAS 1/72
« Reply #1 on: April 07, 2017, 08:31:09 AM »
Great to see you doing another pusher type Stephen and what a great choice of aircraft. I did the same model but in 1:32 scale and followed the same datafile, here is the link to my scratch build, it might give you a few ideas  http://forum.ww1aircraftmodels.com/index.php?topic=50.0

Des.
Late Founder of ww1aircraftmodels.com and forum.ww1aircraftmodels.com

Offline lone modeller

  • Hero Member
  • *****
  • Posts: 5300
Re: Voisin III LAS 1/72
« Reply #2 on: April 08, 2017, 04:41:05 AM »
Thanks for the link Des: I knew of it and I have already got this one bookmarked because as you had guessed, I am taking ideas from you!

Stephen.

Offline IanB

  • Hero Member
  • *****
  • Posts: 2435
Re: Voisin III LAS 1/72
« Reply #3 on: April 08, 2017, 08:46:37 AM »
Nice, I'm in!
I have a soft spot for this aircraft so it'll be interesting to see how you deal with it. Don't forget the rigging under the wings!

Ian

Offline lcarroll

  • Administrator
  • Hero Member
  • ******
  • Posts: 8547
Re: Voisin III LAS 1/72
« Reply #4 on: April 08, 2017, 10:30:13 AM »
    Great start Stephen, and another enjoyable Build Log to follow. Great subject, and I'm looking forward to watching the application of your magic to this one!
Cheers,
Lance

Offline steveb

  • Full Member
  • ***
  • Posts: 237
Re: Voisin III LAS 1/72
« Reply #5 on: April 08, 2017, 11:56:11 AM »
Wow! I admire you guys that do this sort of work from scratch. Maybe one day I'll get to something that ambitious.

Steve

Offline Juan

  • Hero Member
  • *****
  • Posts: 2455
  • All gave some, some gave all.
Re: Voisin III LAS 1/72
« Reply #6 on: April 16, 2017, 08:55:18 PM »
Great choice of a very interesting plane, will follow your progress.

Offline lone modeller

  • Hero Member
  • *****
  • Posts: 5300
Re: Voisin III LAS 1/72
« Reply #7 on: April 21, 2017, 08:59:00 AM »
Evening All,

Thanks Ian, Steve, Lance and Juan for dropping by and leaving positive comments. I always greatly appreciate any interest in my builds.

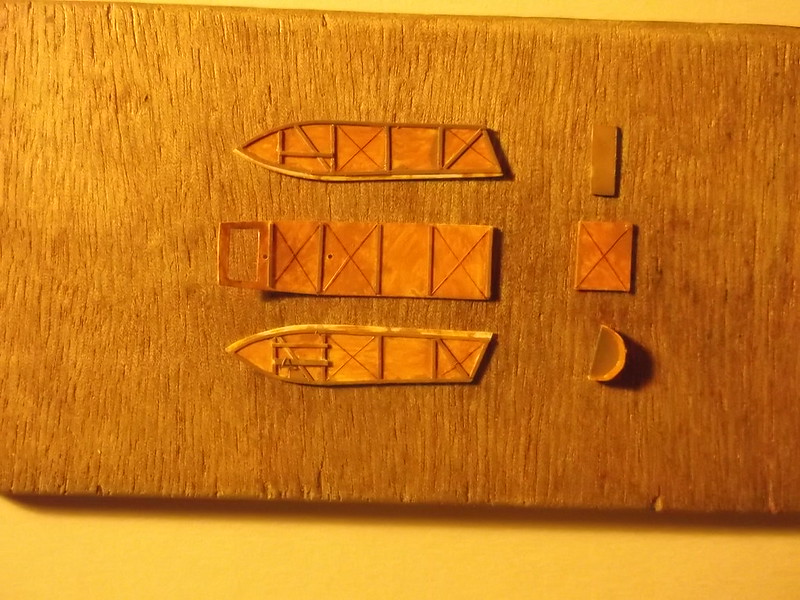
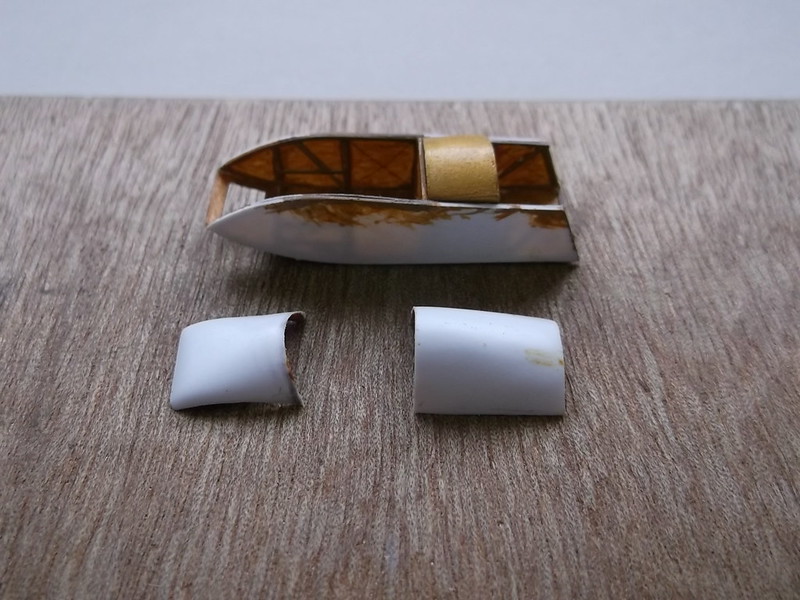
I made the fuselage sides and floor from 20thou plastic card and painted the interior with Revell semi-matt natural wood (SM 382) which is close enough for this model. Very little will be visible when the fuselage is closed so I am not too concerned about the colour. I added some framing from Evergreen strip and interior wire bracing - the latter is rolled copper wire.


I constructed a fuel tank from 20thou plastic card and filled it with some old lead fishing weights that I found stored in the roof from my earlier incarnation as a modeller: lead weights are no longer available in the UK. This aircraft had so much lead in its petrol that its exhaust fumes would have poisoned half of the troops that it flew over, never mind the ground crews!!


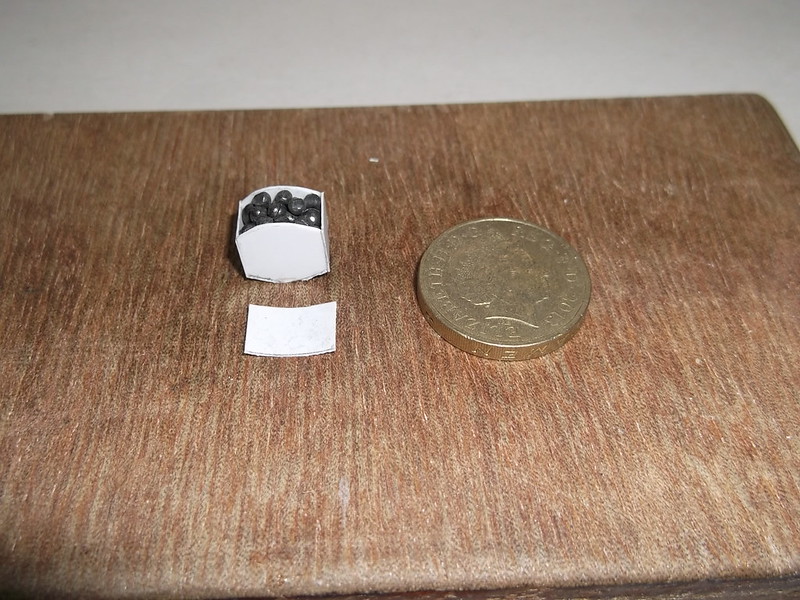
This model will be a nose sitter so I need to add a lot of weight - there are few places to put it without it being visible. Just to make sure I am going to put more under the observer's seat too. The fuel tank was painted brass but I am not sure that much will be visible when the top of the fuselage is in place. The shelf behind the fuel tank also has lead shot underneath it - extra weight which I hope will help to pull the nose down. (There was no such shelf on the real aircraft but this will not be visible on the completed model).


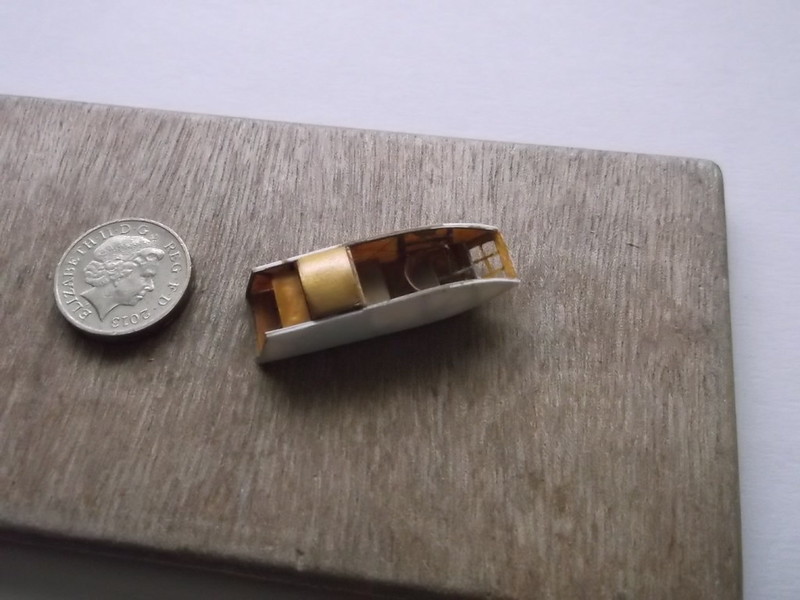
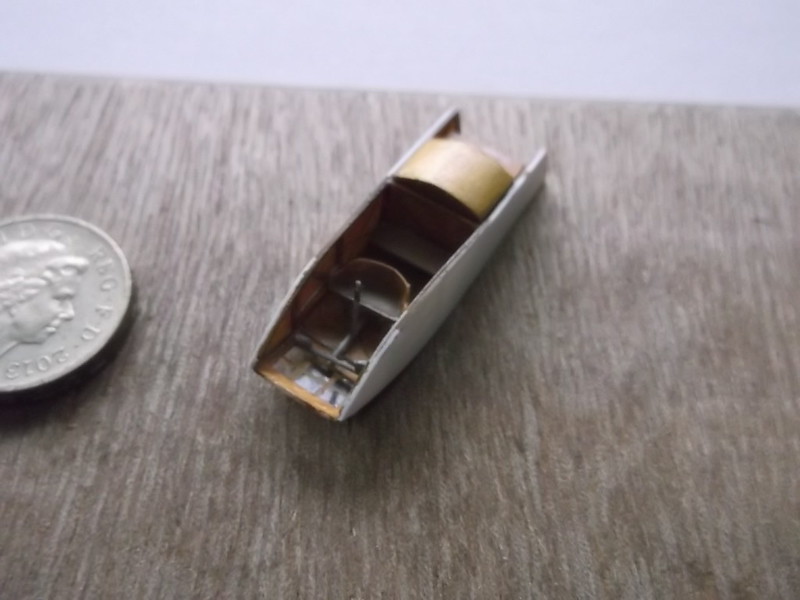
The pilots' seat was made from card together with a control column (rod) and rudder bar and pedals. The window in the floor at the front of the nacelle was added from a small piece of acetate cut from an old blister pack which I keep for this purpose.


I moulded the top sections of the fuselage (front and rear) from 30 thou card. These will be glued into place next - I have been away for the Easter break and have not done that yet.


Thanks for looking.

Stephen.

Offline IanB

  • Hero Member
  • *****
  • Posts: 2435
Re: Voisin III LAS 1/72
« Reply #8 on: April 21, 2017, 09:36:10 AM »
Coming on nicely, it looks as though you've captured the compound curves of the nose very well.

Ian

Offline Des

  • Administrator
  • Hero Member
  • ******
  • Posts: 9325
    • ww1aircraftmodels.com
Re: Voisin III LAS 1/72
« Reply #9 on: April 21, 2017, 10:22:21 AM »
Looking really good Stephen, looking forward to more updates. Even though I added weight to the nose of my Voisin I still needed to prop the tail to keep the model sitting on all fours.

Des.
Late Founder of ww1aircraftmodels.com and forum.ww1aircraftmodels.com

Offline dr 1 ace

  • Hero Member
  • *****
  • Posts: 2340
Re: Voisin III LAS 1/72
« Reply #10 on: April 21, 2017, 10:38:19 AM »
Nice work, await more !!!

Ed
Life is short, enjoy it, nobody gets out alive.

Offline Juan

  • Hero Member
  • *****
  • Posts: 2455
  • All gave some, some gave all.
Re: Voisin III LAS 1/72
« Reply #11 on: April 21, 2017, 11:01:27 AM »
Looking really good.  How much weight did you have to add?

Offline RAGIII

  • Hero Member
  • *****
  • Posts: 18793
Re: Voisin III LAS 1/72
« Reply #12 on: April 23, 2017, 09:46:12 PM »
Nice work, await more !!!

Ed

I agree with my Amigo! Your usual gorgeous work!
RAGIII
"A man has to know his limitations": Harry Callahan

"Don't slop it on" Lynda Geisler

Offline Alexis

  • Hero Member
  • *****
  • Posts: 7947
  • Love the self
Re: Voisin III LAS 1/72
« Reply #13 on: April 28, 2017, 09:36:56 AM »
Following along on this journey  :)


Terri
Hurra ! , Ich Leben Noch
Body and life is a vessel we use to travel the planet . Femininity is the gift , The miracle comes from what we do with it .

Offline lone modeller

  • Hero Member
  • *****
  • Posts: 5300
Re: Voisin III LAS 1/72
« Reply #14 on: April 29, 2017, 08:30:12 AM »
Evening All,

Thanks Ian, Des, Ed, Juan, Rick and Terry for your kind and encouraging remarks which I really appreciate. Juan: I added approximately 2oz (60 grams) to the nacelle: in the fuel tank, in a small box immediately behind the fuel tank (which is not visible because it is under the rear fuselage cover), and under the observer's seat. Then I ran out of space! If this is not enough I will hve to go for plan B.

I have attached the moulded upper parts of the fuselage nacelle to the main body and cleaned up the joints. I also drilled the holes in the top rear where the water pipe from the radiators will enter.


The radiators have been made from 2 x 60thou laminated card which was scribed to represent the vertical pipes with thin strip glued for the binding pieces. Holes have been drilled where the pipes will enter and leave.


The propellor has been carved from wood and I have added the ribs to the flying surfaces from 10 x 20 thou Evergreen strip.


The next stage will be to glue the lower wings to the nacelle and then the booms to the wings: more later.

Thanks for looking.

Stephen.