Author Topic: Ansaldo A.1 "Balilla" 1/32 Aviattic OOB  (Read 33853 times)

Offline uncletony

  • Hero Member
  • *****
  • Posts: 4349
    • Aircraft In Pixels
Re: Ansaldo A.1 "Balilla" 1/32 Aviattic OOB
« Reply #90 on: January 15, 2017, 05:54:49 PM »
Intake manifold/ carburettor

here are the parts:
\\

cleaned up:


assembled:


painted/ fixed to motor:


Two things to note:
1) In Ron's [DRAFT] build log, he goes to elaborate lengths drilling and pinning all of the above parts together for extra strength. An admirable exercise in craftsmanship, but of dubious utility imo -- simply epoxied together the intake assembly is quite strong.

2) I removed the wrong-facing crankcase breathers from the intake side. These parts seem to have been added to the model as a bit of an afterthought any way, and don't really fit well with the carburettor in place -- regardless of which way they face. I will be replacing them with simple round caps as sometimes seen in photos.
« Last Edit: January 17, 2017, 03:38:58 AM by Bo »

Offline RAGIII

  • Hero Member
  • *****
  • Posts: 18842
Re: Ansaldo A.1 "Balilla" 1/32 Aviattic OOB
« Reply #91 on: January 15, 2017, 06:20:28 PM »
Excellent step by step on the ignition wiring assembly. Thanks! Your engine is really taking shape and looks outstanding!
RAGIII
"A man has to know his limitations": Harry Callahan

"Don't slop it on" Lynda Geisler

Offline Alexis

  • Hero Member
  • *****
  • Posts: 7947
  • Love the self
Re: Ansaldo A.1 "Balilla" 1/32 Aviattic OOB
« Reply #92 on: January 16, 2017, 12:27:54 AM »
Great stuff Bo  :)


Terri
Hurra ! , Ich Leben Noch
Body and life is a vessel we use to travel the planet . Femininity is the gift , The miracle comes from what we do with it .

Offline lone modeller

  • Hero Member
  • *****
  • Posts: 5317
Re: Ansaldo A.1 "Balilla" 1/32 Aviattic OOB
« Reply #93 on: January 16, 2017, 03:41:56 AM »
What a superb tutorial. I cannot think why anyone can now say they do not know how  to do it…. I expect to see this level of achievement form all of the rest of you from now on….!

Stephen.

Offline steveb

  • Full Member
  • ***
  • Posts: 237
Re: Ansaldo A.1 "Balilla" 1/32 Aviattic OOB
« Reply #94 on: January 16, 2017, 04:32:26 AM »
As always, I love the step by step process & seeing all the pars come to life in color.

Steve

Offline Gisbod

  • Hero Member
  • *****
  • Posts: 2438
Re: Ansaldo A.1 "Balilla" 1/32 Aviattic OOB
« Reply #95 on: January 16, 2017, 05:14:59 AM »
Lovely!

Guy
“Oh! I have slipped the surly bonds of Earth -
Put out my hand, and touched the face of God.”

P.O. John Gillespie Magee 1941

Offline uncletony

  • Hero Member
  • *****
  • Posts: 4349
    • Aircraft In Pixels
Re: Ansaldo A.1 "Balilla" 1/32 Aviattic OOB
« Reply #96 on: January 16, 2017, 11:48:33 AM »

So on to the oil pipes that feed the camshaft & valve train. Ron has supplied a template to create a jig for bending the wires, but I have a slightly different approach. My jig is made of of 2mm styrene, drilled all the way through so you can flip it and use other side for a mirror image.


Annealed copper wire, ~.5mm is fed into the top hole...


... and bent over 90 degrees.


Next, a HSS .5mm drill bit is inserted into the next hole and used as mandrel, the wire being bent 90° perdendicular to the first bend:


Then a 2mm punch is inserted and likewise used as mandrel; the wire being bent back around it in the opposite direction. (A 2mm drill bit would also work, as would brass tube, etc.):


Finally another .5mm drill bit is inserted into the last hole and the wire bent back around it; the desired shape is a straight run with a half-circle chicane at the top:


result:


Installed in place:


Installation tip: The copper "pipes" are meant to fit between the holes in the front of the camshaft and the top of the valve dohickey which is part 14. Start by installing part 14 in the block, shove it down as far as it will go, but do not glue it yet. Now trim the copper "pipes" to length, so that they are just exactly flush with top of part 14. Now epoxy the wires to the respective holes in the camshaft only. Wait 5 minutes, allowing the epoxy to set up. Now gently jiggle part 14 upwards while simultaneously allowing the bottom ends of the copper "pipes" to settle into the holes in the top of part 14. Once everything is lined up nicely, lock part 14 and the pipes with a drop of CA.

« Last Edit: February 15, 2017, 11:52:38 PM by Bo »

Offline Mark

  • Sr. Member
  • ****
  • Posts: 258
Re: Ansaldo A.1 "Balilla" 1/32 Aviattic OOB
« Reply #97 on: January 16, 2017, 12:33:09 PM »
WOW, what a great tutorial on building WWI aircraft in general! Thank you so much for taking the time to do this, Bo!

Mark G

Offline bobs_buckles

  • Hero Member
  • *****
  • Posts: 3733
  • Freedom isn't free.
    • Bobs Buckles
Re: Ansaldo A.1 "Balilla" 1/32 Aviattic OOB
« Reply #98 on: January 16, 2017, 08:21:23 PM »
Mental!  :o

vB


https://www.bobsbuckles.co.uk/

Last Minute Man Of Faith

Offline RAGIII

  • Hero Member
  • *****
  • Posts: 18842
Re: Ansaldo A.1 "Balilla" 1/32 Aviattic OOB
« Reply #99 on: January 16, 2017, 11:59:05 PM »
I am loving this tutorial!
RAGIII
"A man has to know his limitations": Harry Callahan

"Don't slop it on" Lynda Geisler

Offline PrzemoL

  • Hero Member
  • *****
  • Posts: 4882
  • There was Eru... and he made first the Ainur...
    • Przemysław Litewka
Re: Ansaldo A.1 "Balilla" 1/32 Aviattic OOB
« Reply #100 on: January 17, 2017, 01:12:49 AM »
Yes, the more I look into this thread the less I miss the to-appear-on-the-website pdf with the assembly instruction. :-)
Thanks, Bo for your efforts to bring us the Balilla construction in a so detailed master-class way.
Ash nazg durbatuluk, ash nazg gimbatul,
Ash nazg thrakatuluk, agh burzum-ishi krimpatul.

Offline markleecarter

  • Full Member
  • ***
  • Posts: 114
Re: Ansaldo A.1 "Balilla" 1/32 Aviattic OOB
« Reply #101 on: January 17, 2017, 01:19:55 AM »
It's all just so beautifully done!

Offline uncletony

  • Hero Member
  • *****
  • Posts: 4349
    • Aircraft In Pixels
Re: Ansaldo A.1 "Balilla" 1/32 Aviattic OOB
« Reply #102 on: January 17, 2017, 08:55:52 AM »
Cheers Guys & Gal :)

Exhaust Pipes

This next step may seem a little intimidating. In fact I was planning a workaround myself, but figured I would at least attempt "the official" way to do this first before presenting an alternative.

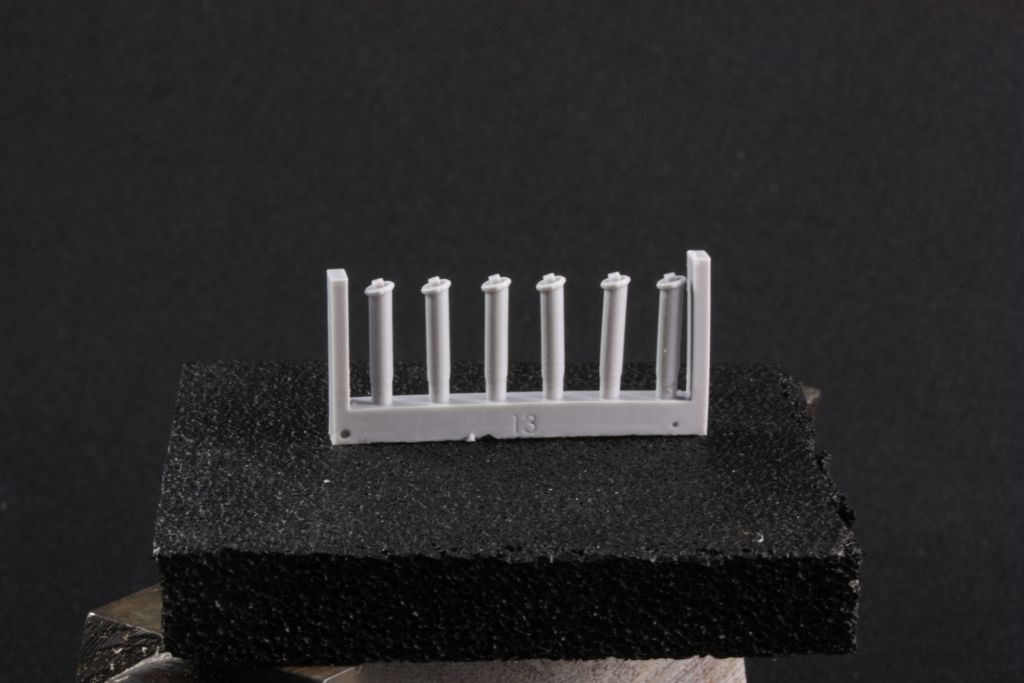
Ok, so the exhaust pipes are cast as solid rods. It's up to the modeler to cut the "baloney" ends and drill them out.  :o I asked Richard why they designed them this way, and he explained that it was necessary in order the successfully cast the base with its all-critical angle:


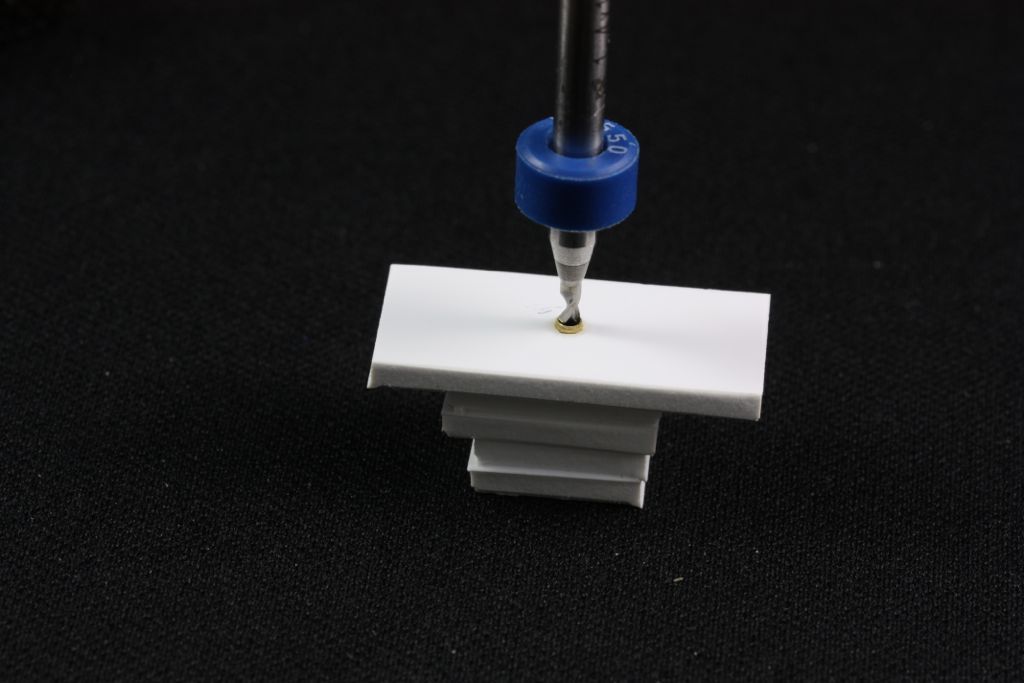
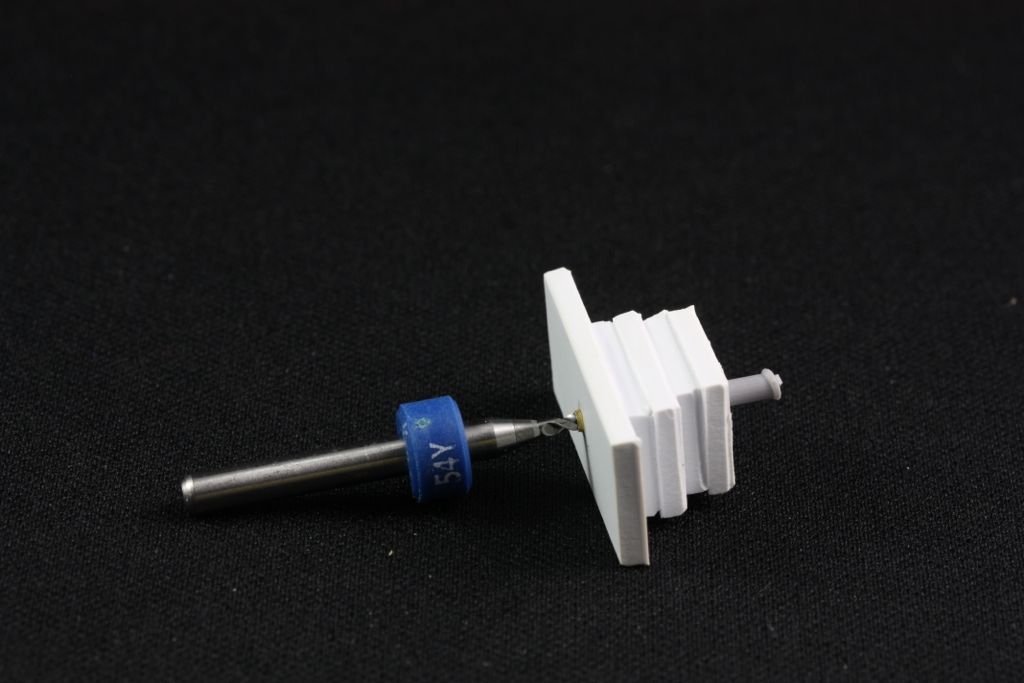
So we need to make a drilling jig in order to hollow these guys out. I started with a pile of 2mm styrene blocks, stacked and glued together, 5 in all, so it's 10mm tall:


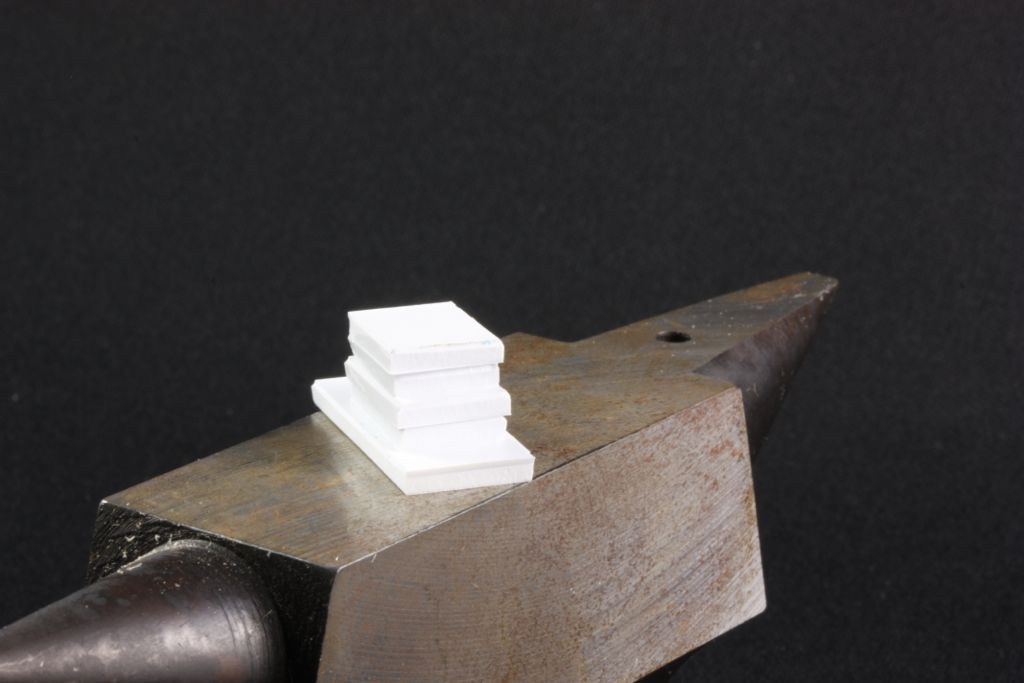
Next, I bored a 1.6mm hole all the way through. Then I followed that hole with a 2mm bit, this time only boring about halfway. So the result is like this in cross-section:


Now a bushing made from a short section of 1.6mm brass tubing is inserted into the narrow end, and CA'ed in place. This will serve as a snug guide for  a 1.4mm drill bit:


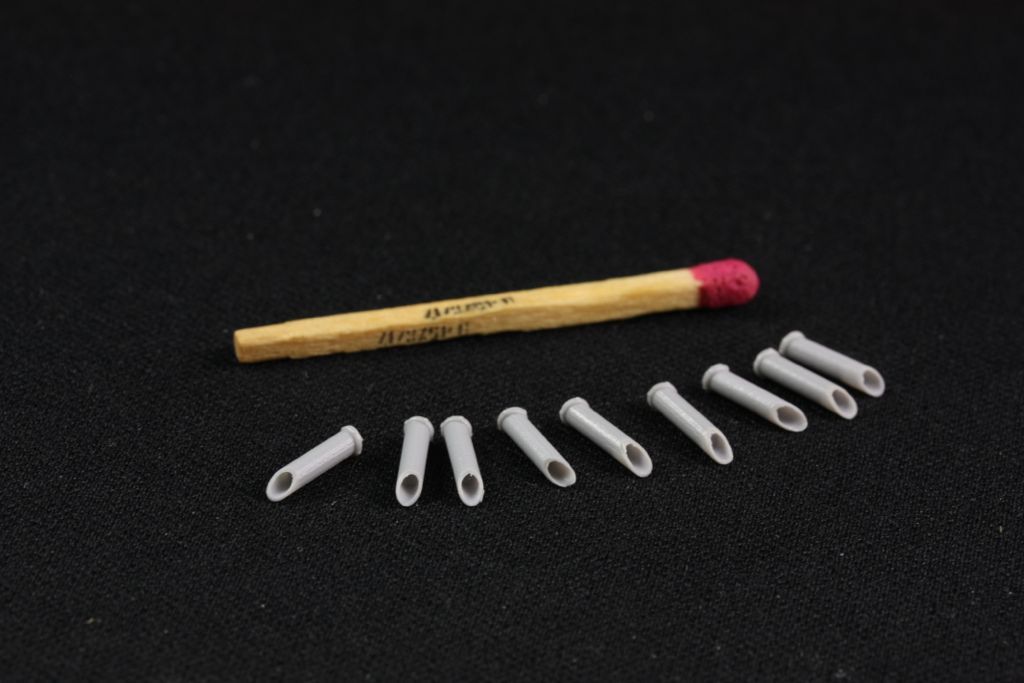
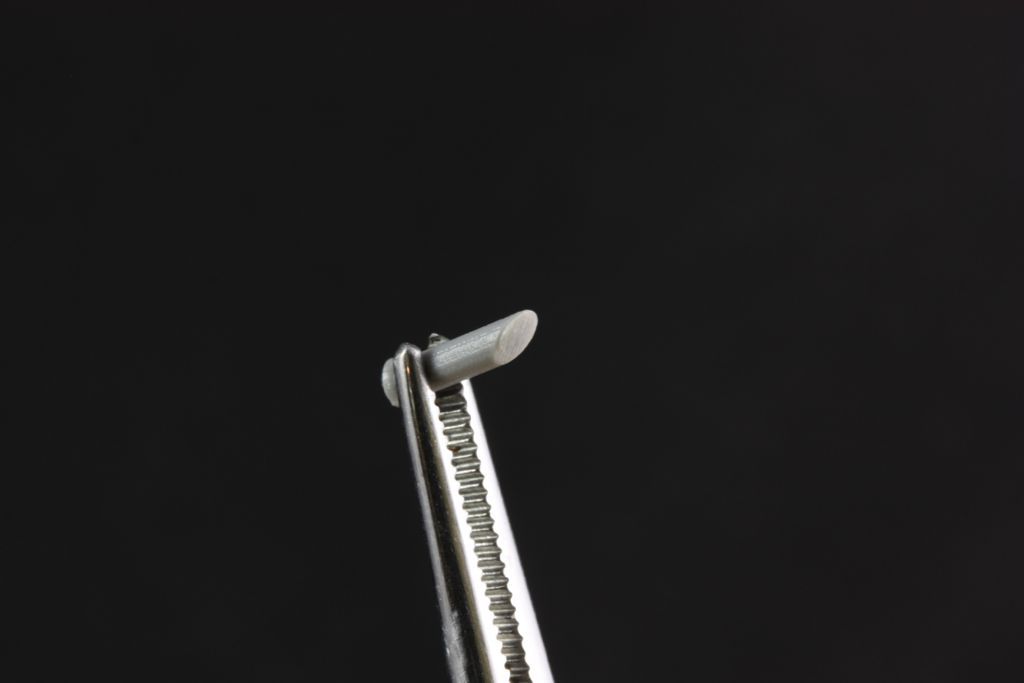
Next the exhaust pipes are cut from the casting block, and the ends carefully trimmed and sanded to the proper  "baloney-cut" profile:


Now, the exhaust pipe is inserted into the jig, and the bit given a few turns...


...viola! (oboe! french horn!) -- yeah, I know, same jokes, need new material:


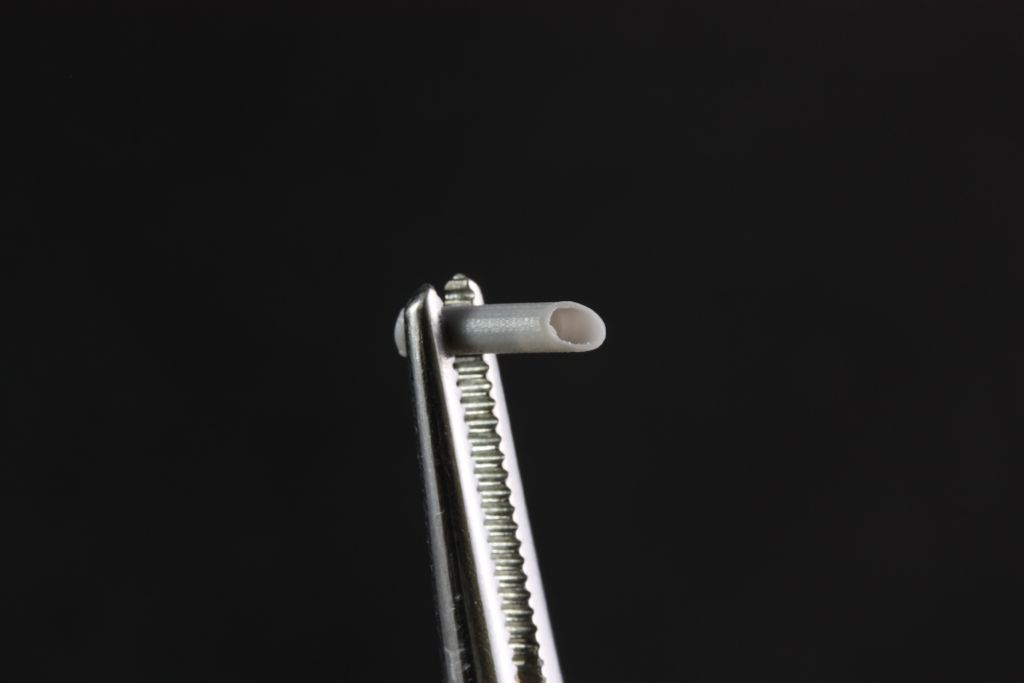
It's so easy I kept going -- you only need 6; I did 9 or 10 just to see if one would come out wrecked. They all passed...


Offline Borsos

  • Hero Member
  • *****
  • Posts: 3321
Re: Ansaldo A.1 "Balilla" 1/32 Aviattic OOB
« Reply #103 on: January 17, 2017, 09:20:00 AM »
What an engine! just awesome!
Borsos
"Deux armées aux prises, c'est une grande armée qui se suicide."
Barbusse.
"Ein Berg in Deutschland kann doch einen Berg in Frankreich nicht beleidigen. Oder ein Fluß oder ein Wald oder ein Weizenfeld."
Remarque.

Offline Juan

  • Hero Member
  • *****
  • Posts: 2456
  • All gave some, some gave all.
Re: Ansaldo A.1 "Balilla" 1/32 Aviattic OOB
« Reply #104 on: January 17, 2017, 09:30:31 AM »
Wow Bo, simple but very elegant way to bore out these exhaust stacks.  Going in the file for future use.
« Last Edit: January 19, 2017, 12:15:31 AM by Juan »