Author Topic: Krupp Morser 210 diorama  (Read 6133 times)

Offline Edo

  • Hero Member
  • *****
  • Posts: 702
Krupp Morser 210 diorama
« on: February 01, 2016, 07:31:05 PM »
Hi friends!
I am starting this new thread on my next build: the Takom 210 mm Krupp Morser.


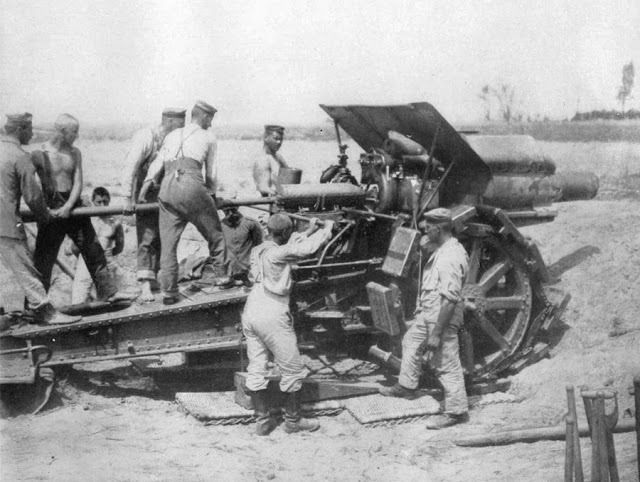
It is a very nice kit, not that big on the part number, but well done and well engineered. The gun was used form the first stages of WWI by german army and a lot of reference photos can be fond on the net. This is very helpful and a source of insipration. By studying those pics I found some areas of  improvemet, so I'll start by highlighting the short comings of the kit and the fixes I made.


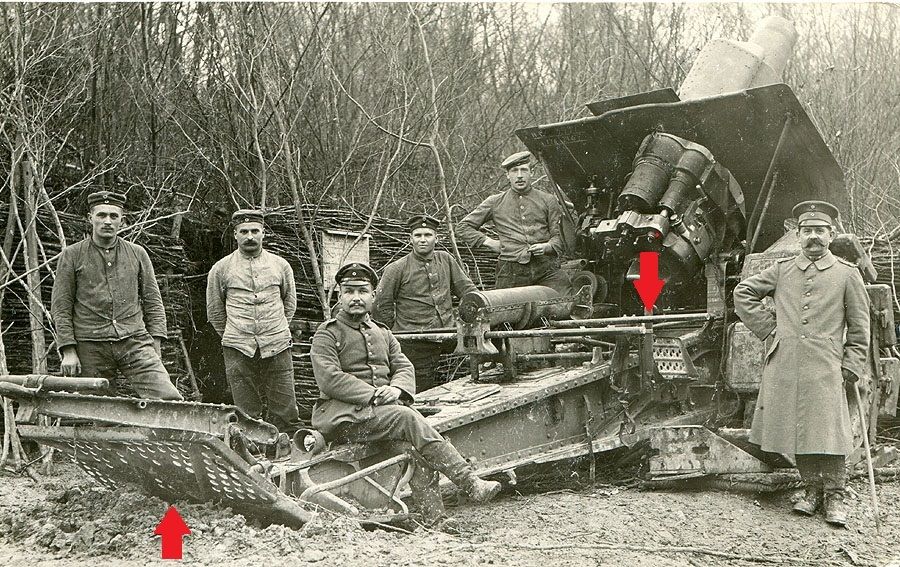
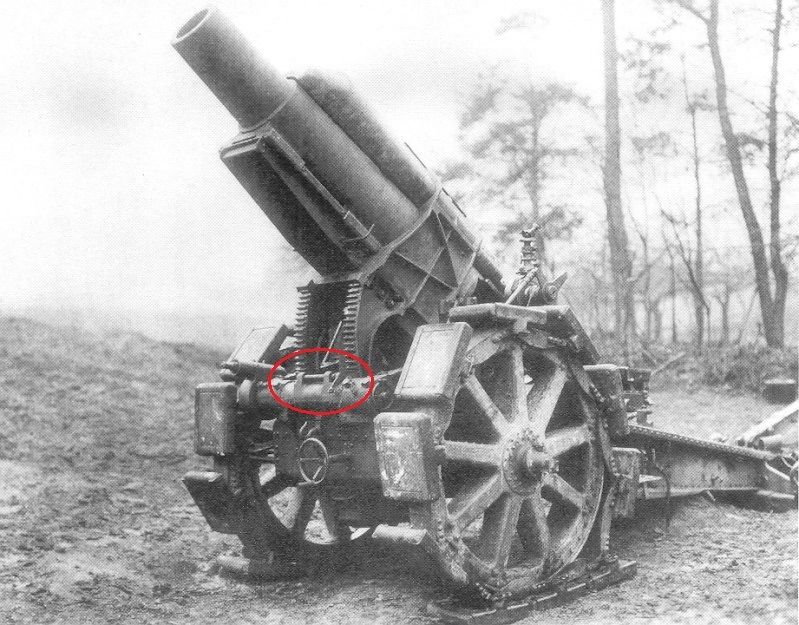
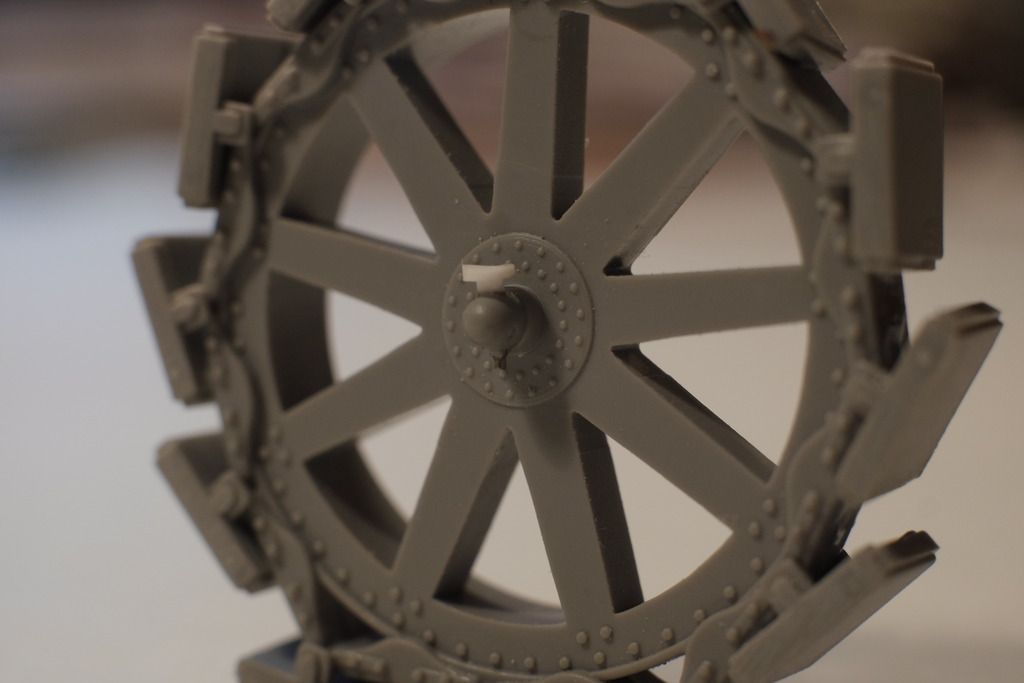
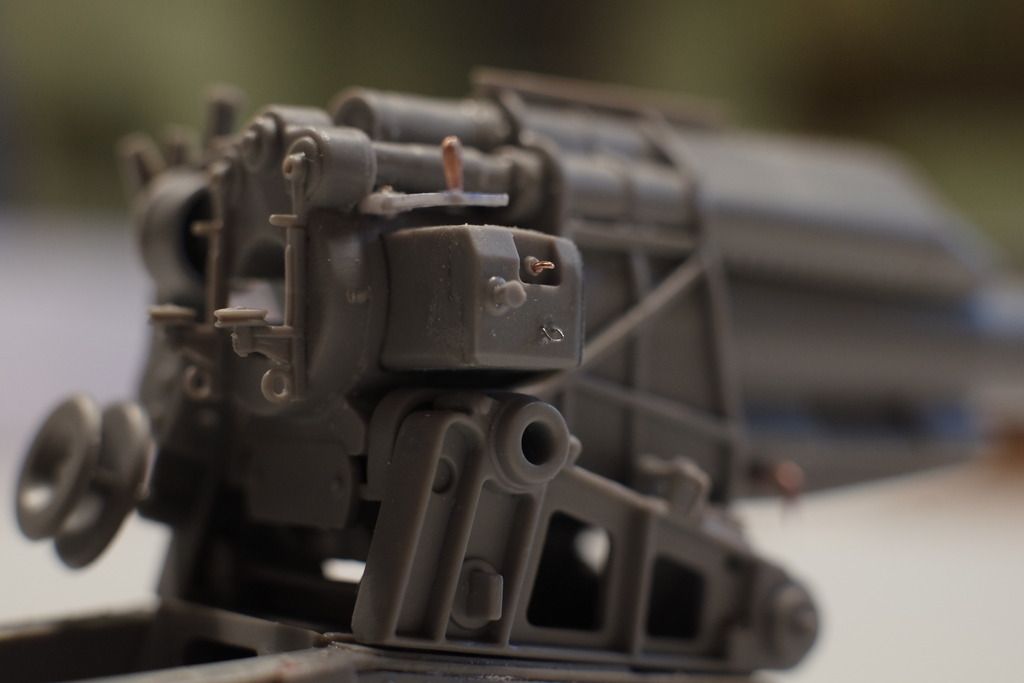
In this first picture you can see a kind of linchpin on the wheel (as the wheels could be changed for transportation or field use - by the way both could be found in the kitand)and the position of the breech lever in 'open' position.


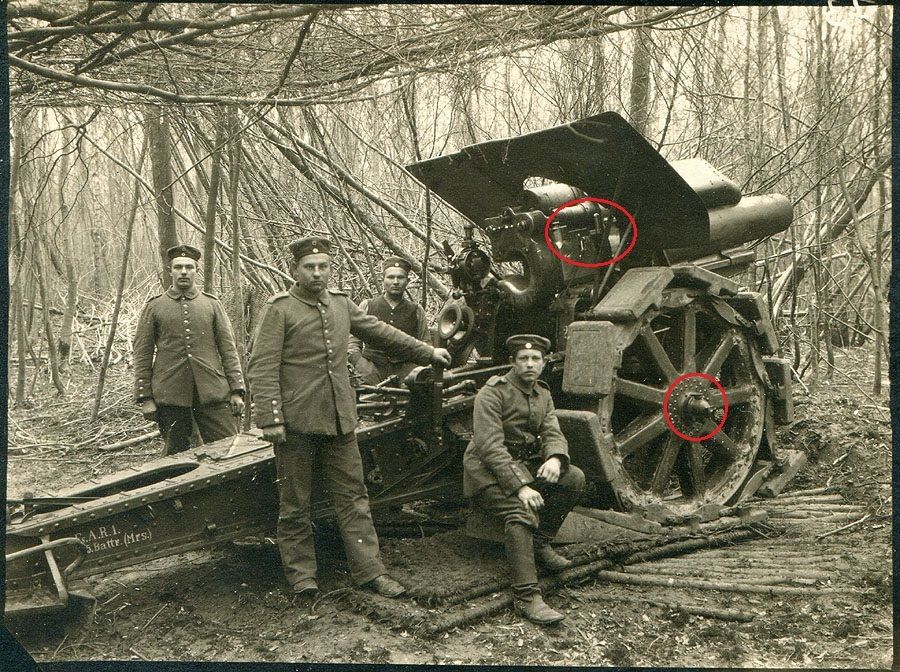
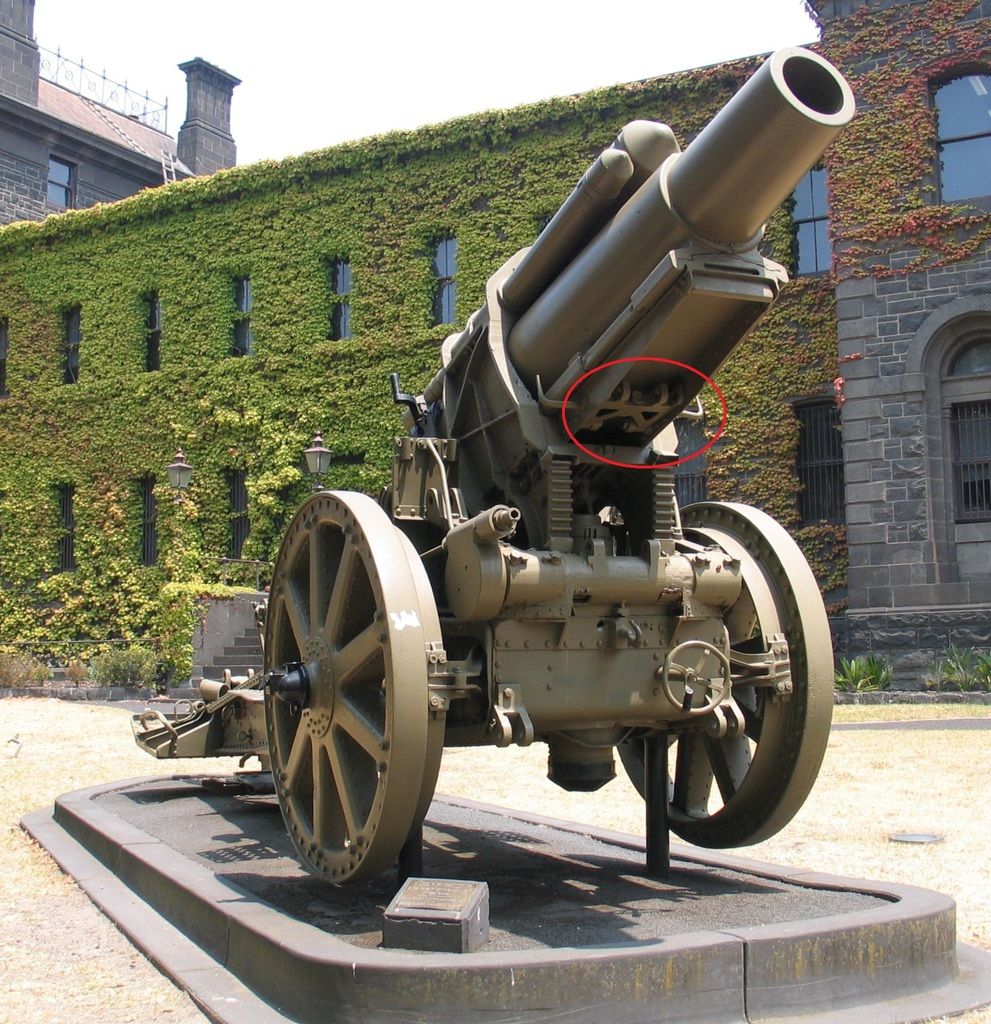
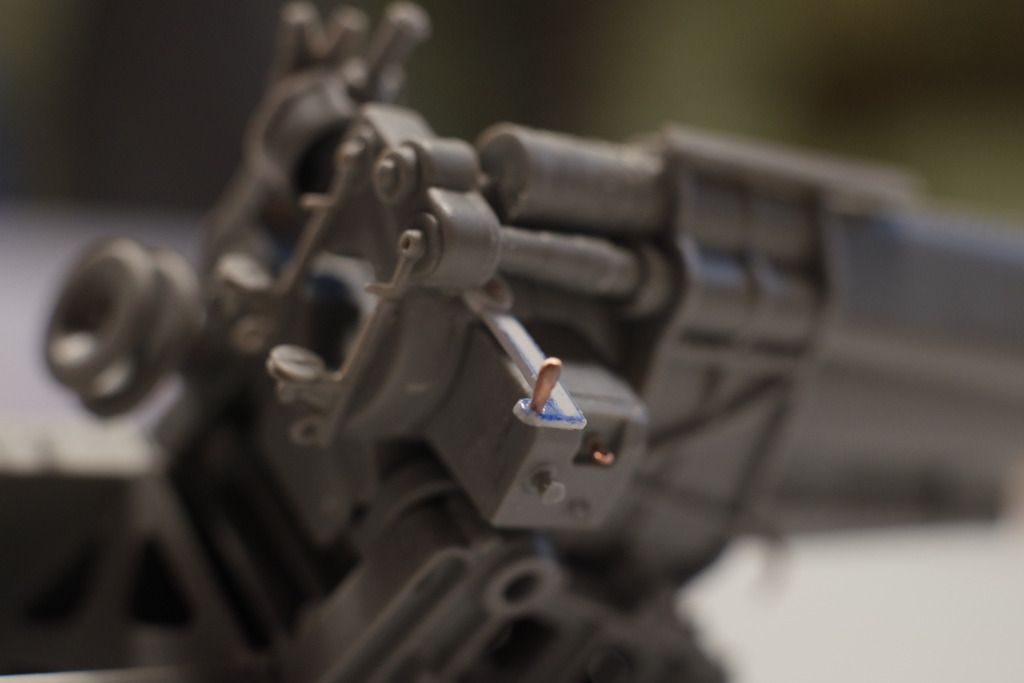
In the picture above, you can see a gunner holding the firing trigger and the breech lever in 'closed' position. You can also see the shape of the object on the tail (i don't know what is it for, but the kit part is wrong)


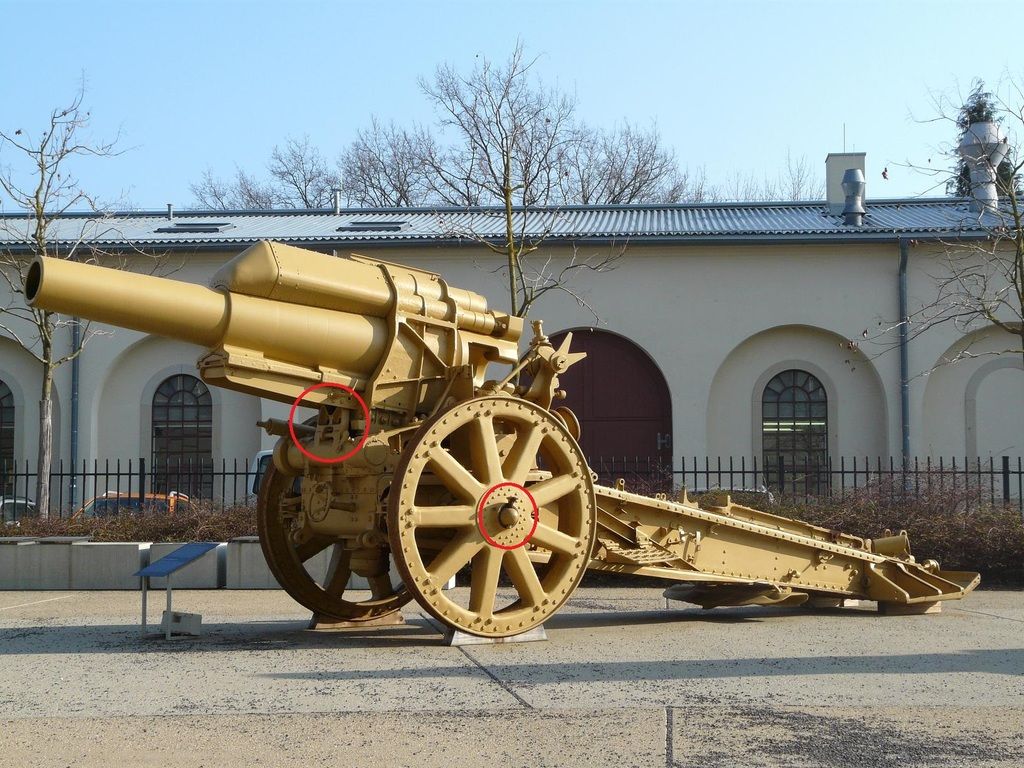
In the pic above I have highlighted the peg to block the gun in traveling position. Again, the peg is missing in the kit.


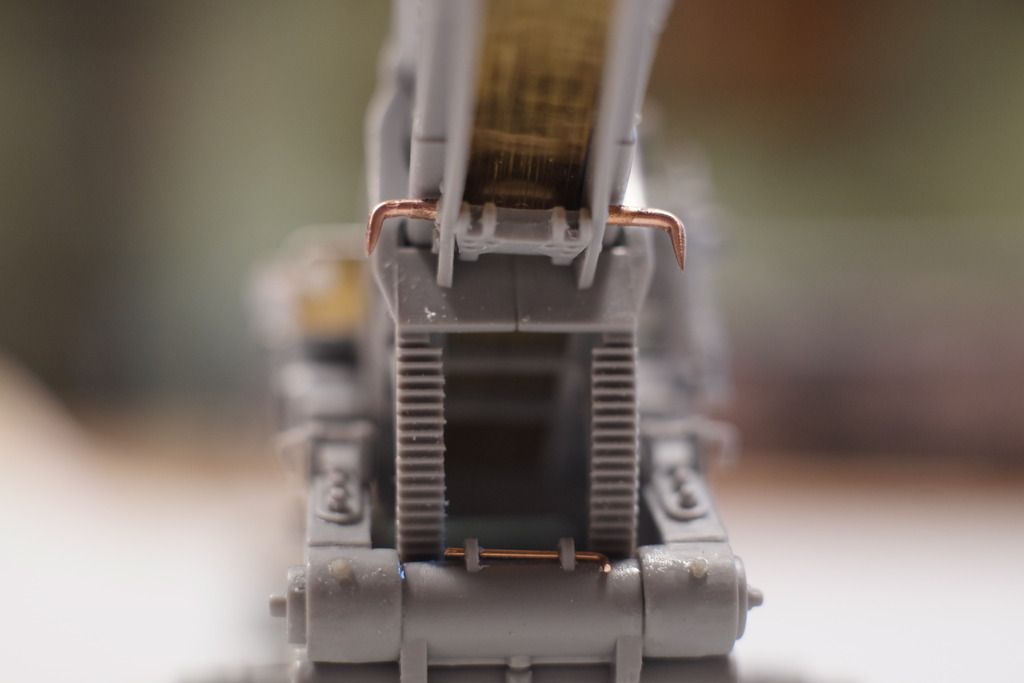
In the pic above, you can see the position for the blocking device in firing position, while in the next one is in travelling position (as well as the wheel's peg).


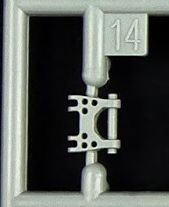
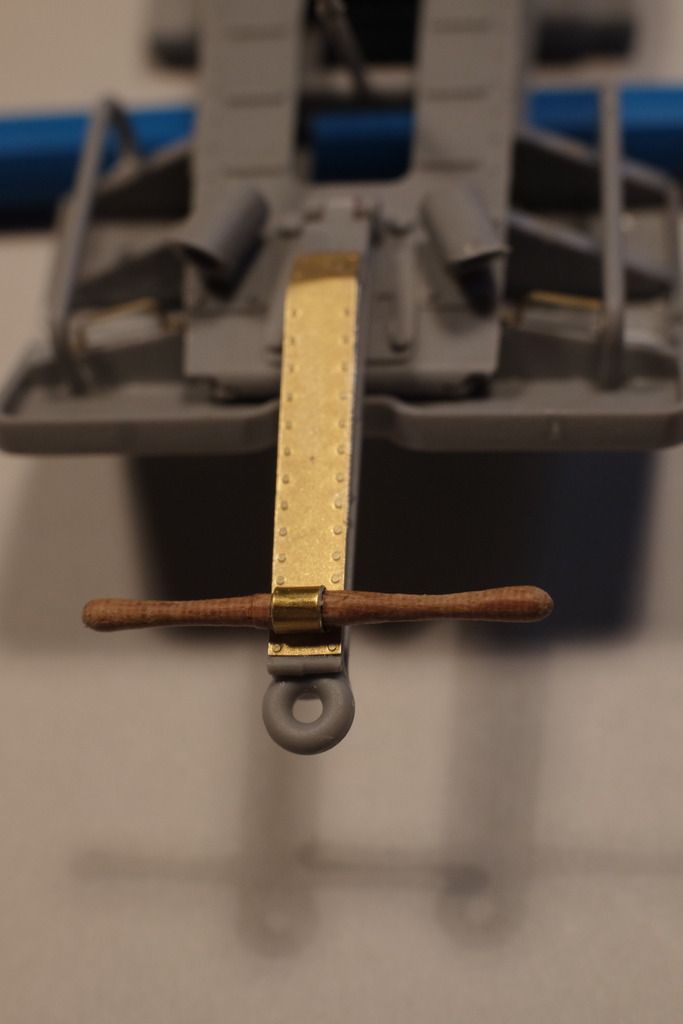
This blocking device is part C 14 of the kit and has not to be glued in place so it can move as the real one (not difficult as it can be just pushed in place).


It also have to be drilled where the peg should go in the transportation mode.

Here is what I did.


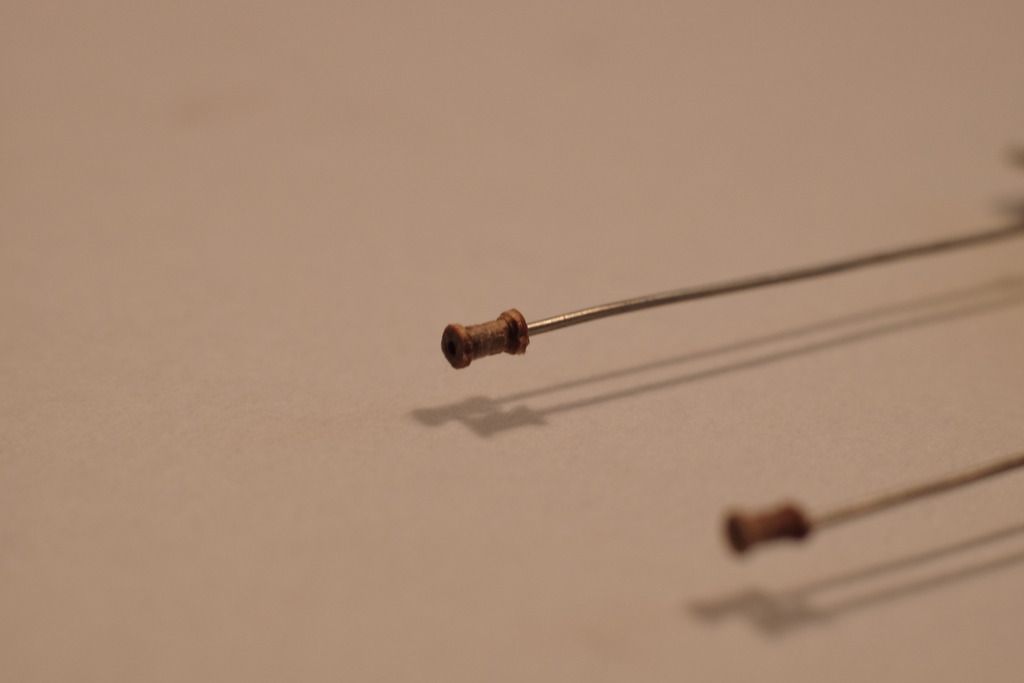
Here is the wheel's peg


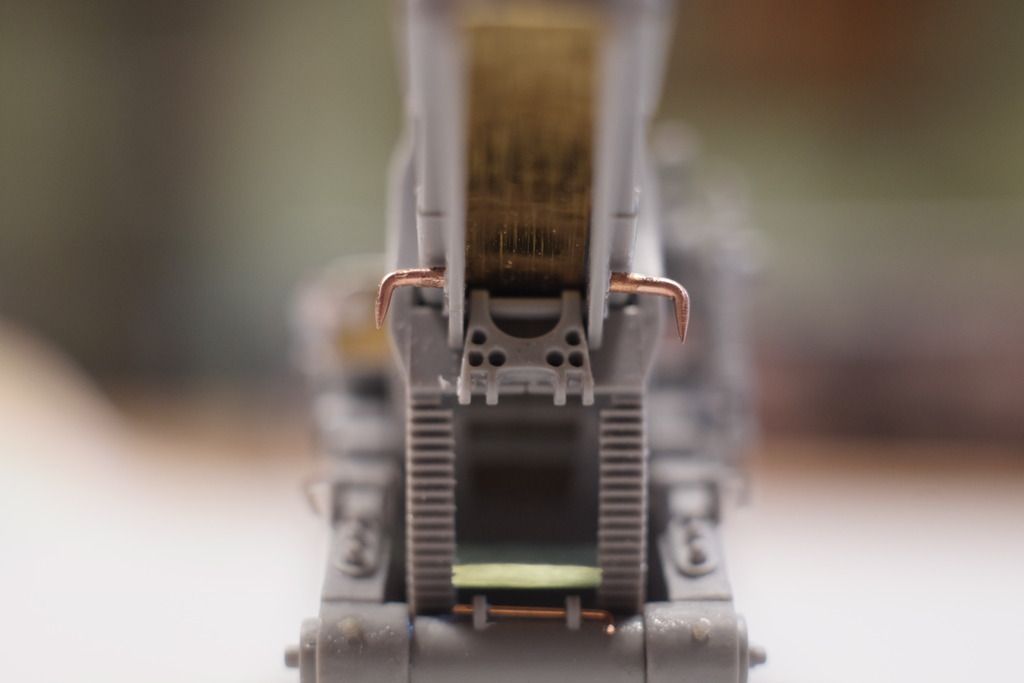
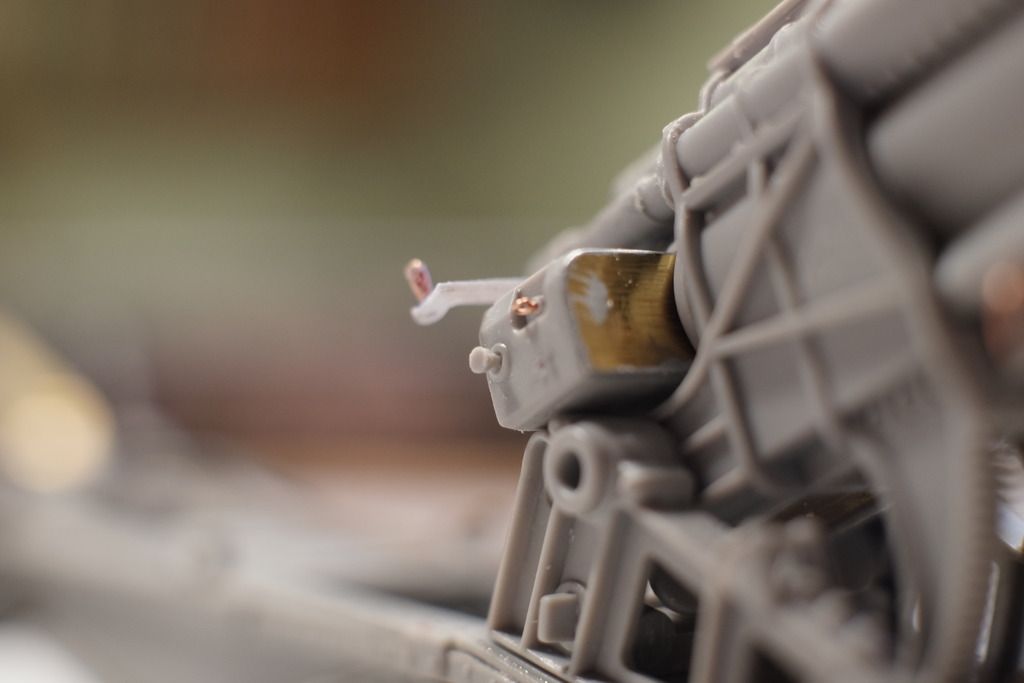
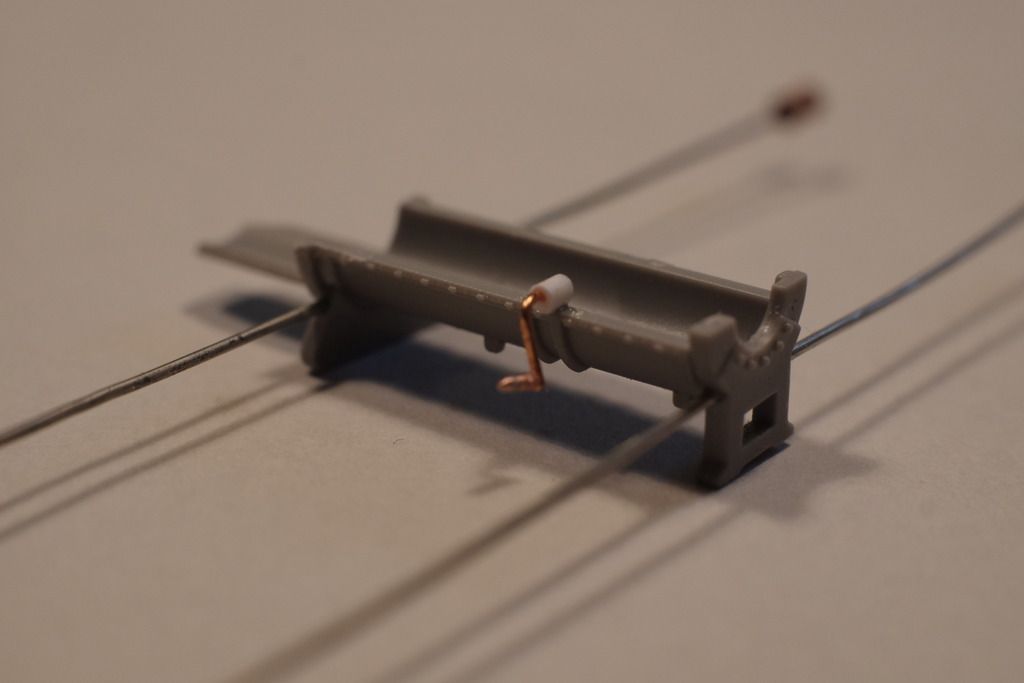
And here are the modification to the breech: I wanted to show it in the open position, so part D 2 can not be used


and I replaced it with a scratchbuited one. I also modified the trigger (part D 27)


The breech itself is hollow, so if you want to let it open you have to close it.   ;)


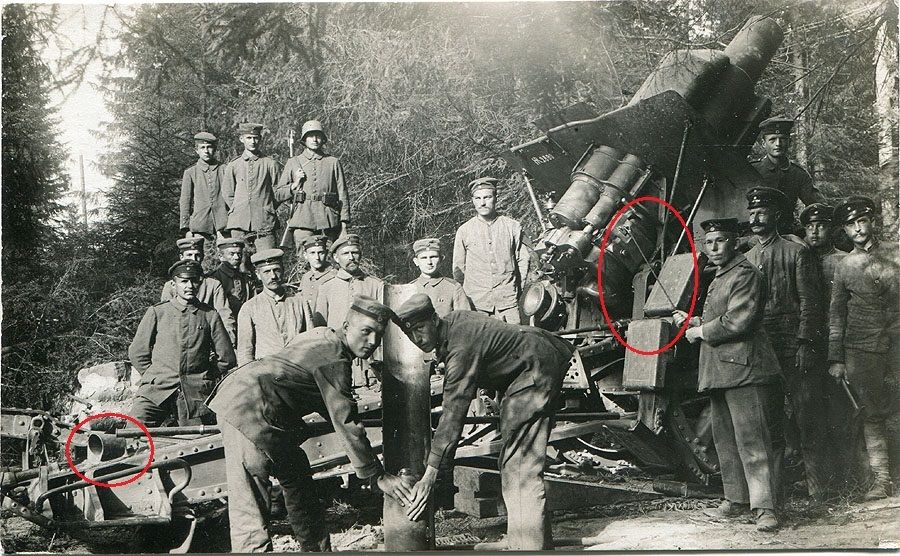
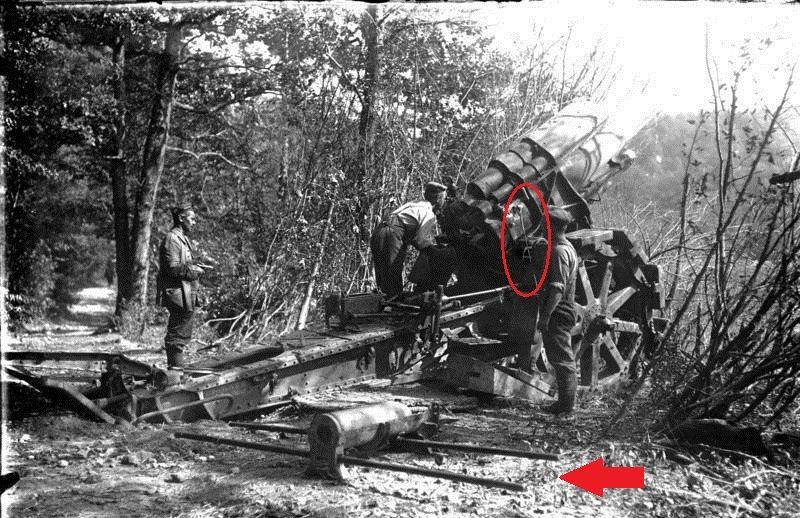
The shells where lift from ground and loaded into a creddle that was then brought to the gun as you can see from this pictures.


And this is my work:


In the picture below you can see the creddle in loading position and also some other interesting features. It was too late for me to add the holes in the recoil stop (but it is not a conclusive feature as in other pictures it is a solid block) but I could add what appears to be a lifting device for the gunners to move the gun mount into position.


This is all for now!
I hope you enjoy it!!
ciao
Edo


Offline Des

  • Administrator
  • Hero Member
  • ******
  • Posts: 9325
    • ww1aircraftmodels.com
Re: Krupp Morser 210 diorama
« Reply #1 on: February 01, 2016, 07:52:11 PM »
I thought this was a good kit straight from the box but you have shown that with some modeling and scratch building skills you can turn it into a much better kit. What you have done so far is amazing work and will add tremendously to the completed model, I have this kit as well so I will be following along closely and taking notes.

Des.
Late Founder of ww1aircraftmodels.com and forum.ww1aircraftmodels.com

Offline Steven Robson

  • Sr. Member
  • ****
  • Posts: 363
Re: Krupp Morser 210 diorama
« Reply #2 on: February 01, 2016, 07:55:34 PM »
That's great research Edo.

Love all the period photos.  I sort of like this gun without the shield on.  This will be an inspirational build log to follow.

Otto
Make Otto your motto for lovely spoked wheels.

Offline Ssasho0

  • Hero Member
  • *****
  • Posts: 581
    • Scale Models Club Bulgaria
Re: Krupp Morser 210 diorama
« Reply #3 on: February 01, 2016, 08:13:19 PM »
excellent start, I will be stealing many ideas from you once my kti arrives!
For now I will just watch with great interest.

best regards,
Sasho
Think globally, act locally!

Offline FokkerFodder

  • Sr. Member
  • ****
  • Posts: 325
Re: Krupp Morser 210 diorama
« Reply #4 on: February 01, 2016, 08:38:09 PM »
Excellent progress- I'm building one now. I've been following Andrew Moore 's build log on the Modelling News website but you've picked up a few other things as well.

One thing that is a shame is that there are no shells or implements with the kit.  I assume the AM guys might be coming through with stuff, including a crew.

I'll be watching your build with interest - what scheme are you going to use? I like the one on the cover, but its way beyond my airbrush skills, so I'm thinking I'll have to (try) hand painting it.

cheers
FF

Offline Edo

  • Hero Member
  • *****
  • Posts: 702
Re: Krupp Morser 210 diorama
« Reply #5 on: February 02, 2016, 01:20:06 AM »
Thank you guys!
I see that this new releases from Takom are very popular! Let's hope they continue down this road...  ::)

As far as the ammo are concerned I made a fiew on a home made lethe (just a drill kept horizontal, actually  :-X) by turning a 0,6 mm aluminium rod. Very noisy but, all in all, acceptable. I'll show some pic as soon as possible.

I'm going to use the box scheme, but I have not jet figured out how to draw the black lines... What I am thinking is to use a felt tip pen...

Offline GAJouette

  • Hero Member
  • *****
  • Posts: 3579
  • " Beware of the Spanish Inquisition"
Re: Krupp Morser 210 diorama
« Reply #6 on: February 02, 2016, 01:29:25 AM »
 Edo,
Wow another outstanding project begins my old friend. Excellent first progress. I'm looking forward to following along.
Highest Regards,
Gregory Jouette
" What Me Worry"

Offline Dave in Dubai

  • Hero Member
  • *****
  • Posts: 520
  • Beyond the blue horizon
Re: Krupp Morser 210 diorama
« Reply #7 on: February 02, 2016, 09:32:12 PM »
Nice work and attention to detail there Edo.

Thanks for providing the archive pictures also.

I came across this diorama resin base from Masterpiece Models in case anyone wants a setting to place their morser in.

http://masterpiecemodels.com/product/35th-scale-artillery-emplacement-pit-single-trail-artillery/

Will be interested to see how you get along with the box lid colour scheme?

Those thin black lines separating the colours are a painting challenge, but they are characteristic of the era and look eye catching.

Best wishes for the rest of your build.

Dave

PS- I am surprised that Takom did not include a couple of shells with the kit?
Maybe Aber will produce some aftermarket items?

Edit:typo
« Last Edit: February 03, 2016, 06:43:03 PM by Dave in Dubai »

Offline Edo

  • Hero Member
  • *****
  • Posts: 702
Re: Krupp Morser 210 diorama
« Reply #8 on: February 02, 2016, 11:17:25 PM »
Thak you Gregory, my old friend!
Stay tuned for more!!!  ;D

Dave, I am planning something similar, actually, and add some figures as well. Pictures to follow...

I bought a 0,7 mm felt tip Faber-Castell pen... I hope it will write on plastic...  ::)

Offline Edo

  • Hero Member
  • *****
  • Posts: 702
Re: Krupp Morser 210 diorama
« Reply #9 on: February 08, 2016, 11:40:51 PM »
Hey there!
I have some update.
First of all here is the gun emplacemnt I am planning to use for the diorama. It is still in the starting phases, so any change is still possible  ;)


There will be 3 men in the trench as well. I decide to get the Miniart offering, which is ok. Detail on the figures is nice, and there also is some facial expression. Poses are not convincing at all: to me they seems to have a walk in the park, not going over the top...
Also some features are missing (particularly the puttees are missing), but on the plus side you got 2 srues per counry (6 in total) of weapons and equipment that can be handy.


I started painting the gun: first I painted it green and then I masked for the yellow and brown. The masking process takes very long and it is not an easy one. I firstly tryed to trace the scheme on the instruction manual, but I find out that it is 2 d while the model is 3 d :o, so no good... At the end I found that the longer the mask the better as it better adhere to the rugged surface of the gun...Anyway: this is the result.


Also the felt tip pen for the black lines is not an optimal solution: the pen I've got has a rigid tip that does not follow the contour of the model, it is far better a pen with a more soft point


I'll tell you how it goes...
Ciao
edo

Offline Des

  • Administrator
  • Hero Member
  • ******
  • Posts: 9325
    • ww1aircraftmodels.com
Re: Krupp Morser 210 diorama
« Reply #10 on: February 09, 2016, 06:27:58 AM »
The gun emplacement is excellent Edo, the sand bags and the timber all look very realistic. The painting of your gun has turned out really well, the colours look brilliant, I will follow along with what you decide to do with the black felt pen, it will be interesting to see what you come up with but quite honestly, what you have achieved so far looks pretty good. Nice set of figures also, I'm sure that you will be able to make them suit your scene.

Des.
Late Founder of ww1aircraftmodels.com and forum.ww1aircraftmodels.com

Offline Steven Robson

  • Sr. Member
  • ****
  • Posts: 363
Re: Krupp Morser 210 diorama
« Reply #11 on: February 09, 2016, 08:35:00 PM »
I agree with Des, your emplacement is looking like the real deal, excellent work.

The figures are also great quality. 

Steven
Make Otto your motto for lovely spoked wheels.

Offline coyotemagic

  • Hero Member
  • *****
  • Posts: 7710
  • "Here's to not buggering it up." -Winston Chuchill
    • My Models
Re: Krupp Morser 210 diorama
« Reply #12 on: February 10, 2016, 02:42:12 AM »
I agree completely with Des and Steven, Edo!  Your emplacement is extraordinary and the morser is shaping up beautifully. 
Cheers,
Bud
"All men dream: but not equally. Those who dream in the dark recesses of the night awake in the day to find all was vanity. But the dreamers of day are dangerous men, for they may act their dreams with open eyes, and make it possible." -T. E. Lawrence

Offline malaula

  • Sr. Member
  • ****
  • Posts: 267
Re: Krupp Morser 210 diorama
« Reply #13 on: February 10, 2016, 03:30:08 AM »
Edo,could you please explain how you did the groundwork?That looks extremely realistic although I guess you haven't finished painting yet! Bravo!!

Offline Edo

  • Hero Member
  • *****
  • Posts: 702
Re: Krupp Morser 210 diorama
« Reply #14 on: February 11, 2016, 02:29:08 AM »
Hi Malaula!
I'll gladly explain my procedure, but I have to warn you: I am not a master and my groundwork is farely basic!!

Anyway, one of the mistake I made was to lay stones, rocks and so directly above an almost flat ground. This geve an unnatural effect, so now I try to press very well things into the ground building some dirt around them.


Usually I lay a thick layer (about 0,5 cm) of plaster of Paris previously mixed with some brown acrilic paint (raw umber usually). In this way an unfinished spot will not stand out. Then I sprinkle the area with real earth that is then pressed into the plaster.
I  have seen many modeller sculpting rocks and groundwork in general, but I think that the real thing is just better (besides I am not good at sculplting  ::)).

In the pictures above the plaster is clearly visible where I have not yet covered it with earth.

I have a mix of earth divided by pattern: from very fine (sand like) to rough (with small stones in it). I also use cat litter as stones: it is very cheap (1 euro for 5 kg !!) and just about the right shape and colour.
When you apply earth or plaster try not to be too smooth as irregolarities ar the norm in real life (not an easy task as I always end with even and symmetrical scene, while nature is just the opposite).

Also the palisade is from real wood (birch small branch actually).
The sandbags are made out of DAS clay. Roll a cylinder of about 1 cm in diameter, then cut it 2 cm long, then press it to make it almost rectangular, but I found that flat surfaces are not realistic, again try not to be even and symmetrical.

I hope this helps, I'll show more details as I'll do the next steps!
Ciao
edo