Author Topic: My first Wingnut Wings model  (Read 3818 times)

Offline Gerg

  • Newbie
  • *
  • Posts: 30
My first Wingnut Wings model
« on: January 23, 2016, 04:07:51 AM »
Hello group,

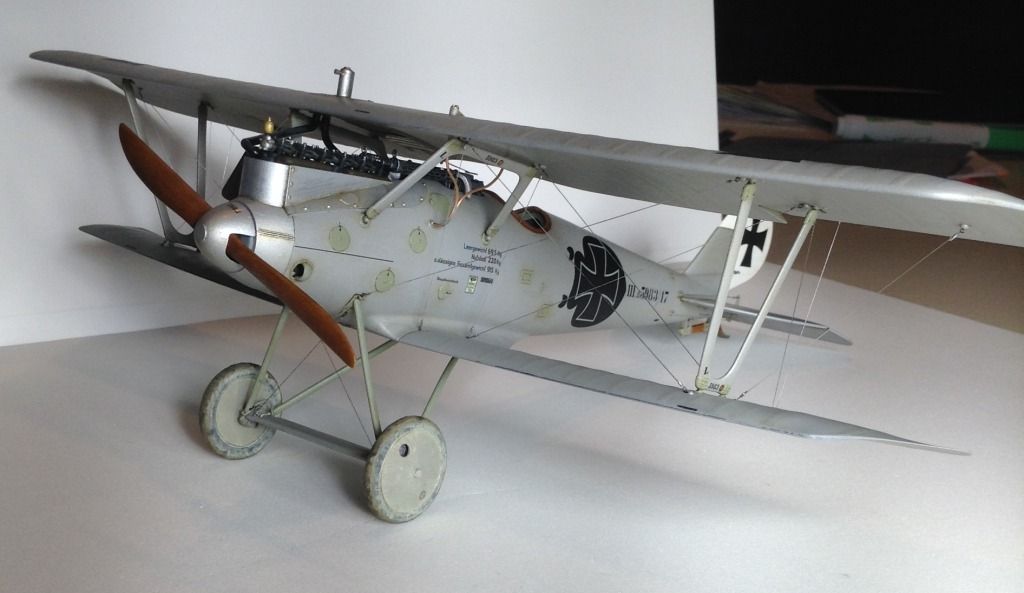
I have finished my Pfalz D III. No build log this time but I hope to do one in the future. This post will have a number of pictures though. I will likely post those over the next few weeks along with info. on materials and paints used along with technics tried.

I want to start off by listing the goals I had with this model.

1 I wanted to complete a model!  This is the first model I have built in 4 years and the first I have completed in over that. Come hell or high water, right, wrong or indifferent I needed to have a completion under my belt. I tried to do a good job but did not obsess. Mistakes were made and that was fine.

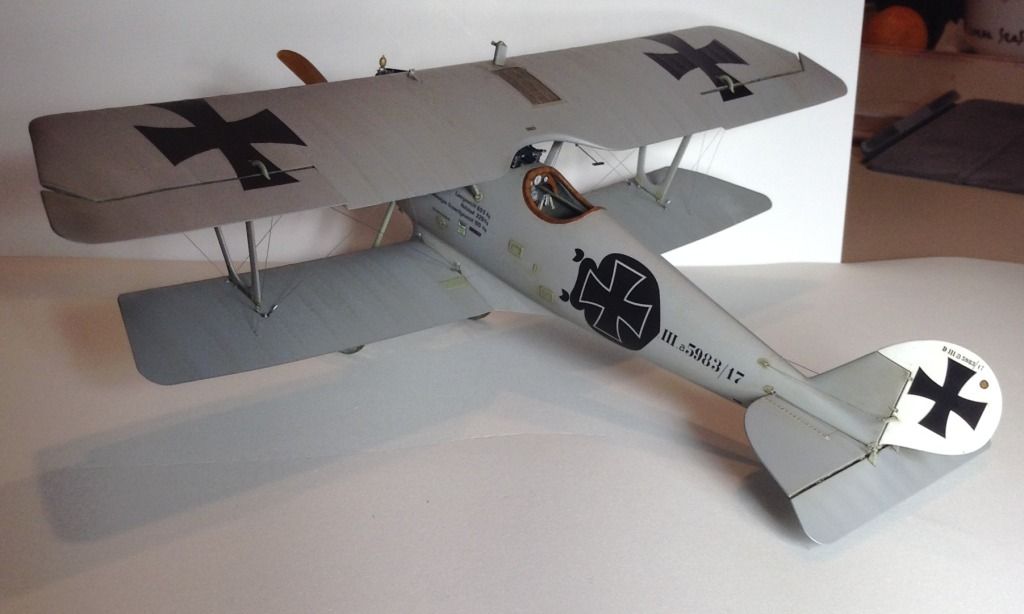
2 I wanted to rig a biplane. This is new territory for me and I had no idea if I could pull it off. It is a bit intimidating. Now that I am done I have to say it was not so difficult. Also, it is really enjoyable work. Success only came from much help though. The info Des provides on his website was invaluable. There were many others on this forum as well. Also, I found this very helpful.   http://www.austinsms.org/Rigging-Scale-Mode-Biplanes.pdf   Besides the help on rigging, two tools were indispensable: my Optivisor and Squadron Fine Point Tweezers. Using the Optivisor is like having Xray vision except that you see the invisible instead of the hidden. I have many pairs of tweezers, the Squadron fine point are incredibly better at handling the rigging line.

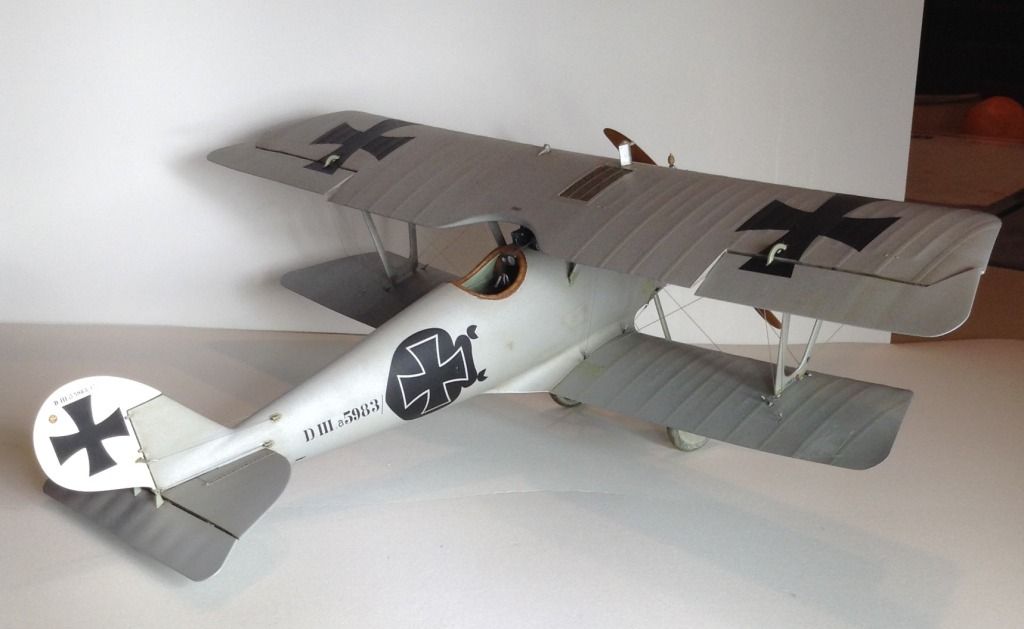
3 I wanted to just have fun with it. Knowing this model was more than anything, a learning step, took the pressure off. Although I started out with visions of this plane in a very sweet display case I have yet to build, it became apparent that it wasn't going to make the cut. It was then that the joy of building, much like when I was a kid, came back. At some point I will build something (I hope the FE 2b or the recently ordered Snipe) that will occupy a display case in the home. Until then my models will be staged around my shop where I can see them.

4 A secondary goal was to try new technics, mostly in the area of weathering. When I gave up modeling before, I was just starting to try some dry brushing and pin washes. I never became proficient. Now there are even more ways to weather or add realism. With this model I took some tentative steps but I didn't want to ruin an otherwise acceptable model trying something new. I came close with doing just that and will explain in a future post.

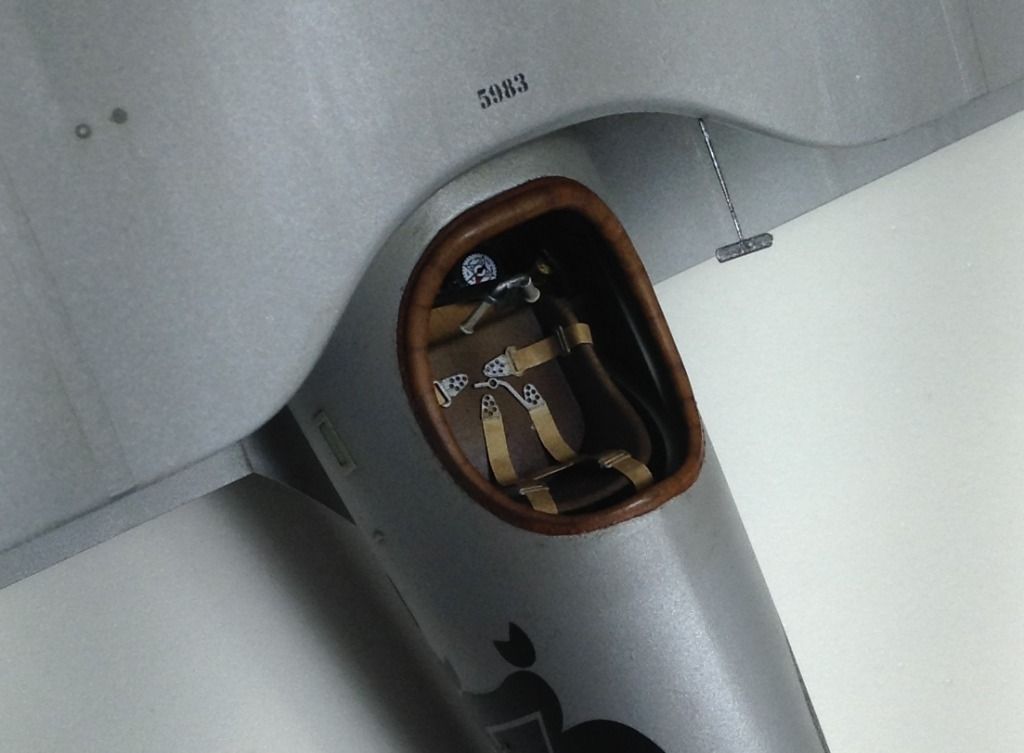
A note on the pictures. The camera has a way of changing the way something looks. Usually it makes it look worse. I have to say in my case it seems to have made the model look better. Maybe it is because I tried not to include any of the flaws in the pictures? There are plenty and lessons learned. Be very careful handling the model after spraying with Dullcote. I have a couple finger prints that testify to that advise!


“Never try to discourage thinking, for you are sure to succeed.”
― Bertrand Russell

Offline dtomko

  • Hero Member
  • *****
  • Posts: 527
Re: My first Wingnut Wings model
« Reply #1 on: January 23, 2016, 04:11:49 AM »
That looks great!  I especially like the staining under the wing.
What paint did you use for the silver-grey?

Drew

Offline Gerg

  • Newbie
  • *
  • Posts: 30
Re: My first Wingnut Wings model
« Reply #2 on: January 23, 2016, 04:25:19 AM »
I used equal parts Tamiya flat aluminum XF16, sky grey XF19 and titanium silver XF32 for my first coat. Someone else posted those ratios on here but I am afraid I don't remember who. Sorry to that person for not giving them credit. I thought it was a little dark so the second coat was a bit more XF16 and a bit less XF32.  I also did a filter of sorts to dirty it up. In a future post I am going to talk about that because it didn't really work out the way I wanted.
Greg
“Never try to discourage thinking, for you are sure to succeed.”
― Bertrand Russell

Offline lcarroll

  • Administrator
  • Hero Member
  • ******
  • Posts: 8559
Re: My first Wingnut Wings model
« Reply #3 on: January 23, 2016, 04:38:44 AM »
Greg,
   If one of your goals was to produce a beautiful model you met that one too! Very nicely done; very clean, nice subtle weathering, and a very "real" appearance. Your rigging is also very well done, hard to believe it's your first attempt.
   Looking forward to your next Build, great work!
Cheers,
Lance

Offline coyotemagic

  • Hero Member
  • *****
  • Posts: 7710
  • "Here's to not buggering it up." -Winston Chuchill
    • My Models
Re: My first Wingnut Wings model
« Reply #4 on: January 23, 2016, 04:46:38 AM »
Very beautiful Pfalz, Greg!  I would be very proud to show her off in my display case.  Seems all your goals have been met.  I look forward to your next project.
Cheers,
Bud
"All men dream: but not equally. Those who dream in the dark recesses of the night awake in the day to find all was vanity. But the dreamers of day are dangerous men, for they may act their dreams with open eyes, and make it possible." -T. E. Lawrence

Offline lone modeller

  • Hero Member
  • *****
  • Posts: 5322
Re: My first Wingnut Wings model
« Reply #5 on: January 23, 2016, 05:00:26 AM »
That is a stunner. If I could have produced a model of that quality (warts and all) as a first attempt I would be justifiably proud. Remember all models have mistakes - but usually it is only the modeller who knows where they are and therefore can spot them. I do not see any problems with this one - as the others have written it has a super finish and would grace any display case.

Stephen.

Offline Oeli

  • Full Member
  • ***
  • Posts: 203
Re: My first Wingnut Wings model
« Reply #6 on: January 23, 2016, 05:17:29 AM »
Hi Greg,

wonderful work, it´s looking great! Congratulation.

And thank you for the "rigging link", this could be helpful.

I´m looking forward to your next model!  :D

Regards
Jörg
Normality is a beautiful paved road, but it grow no flowers on her.

Offline Des

  • Administrator
  • Hero Member
  • ******
  • Posts: 9325
    • ww1aircraftmodels.com
Re: My first Wingnut Wings model
« Reply #7 on: January 23, 2016, 06:33:23 AM »
Congratulations on completing your first Wingnuts kit and you certainly did a beautiful job with it. The overall finish is superb and the rigging is very well done.

Des.
Late Founder of ww1aircraftmodels.com and forum.ww1aircraftmodels.com

Offline Gerg

  • Newbie
  • *
  • Posts: 30
Re: My first Wingnut Wings model
« Reply #8 on: January 23, 2016, 07:40:06 AM »
I would like to say thank you for all the kind words.  I am happy with the results but like any modeler I can see things that could have been better. Mostly that boils down to being a bit more careful in the final stretch. I got a little careless and had 2 big blobs of CA to clean off and 2 well define finger prints in the dullcote to fix. The fixes weren't as good as I would have like but acceptable.  In the case of the glue I sanded it away and brush painted them. They didn't match the rest of the finish, I knew they wouldn't, so it was my thought to make them look like a fabric patch, damage fixed from possibly enemy fire? I am sure that sort of thing happened but I didn't know how to model that. One question I had was what shape would a patch take? Random, to fit the damage or a nice neat round or square patch? In the end I made them angular and random. They are hard to notice so they don't bother me too much. With the finger prints I sanded them to the point they were less obvious and then smeared on some grim from a Tamiya weathering set.

Weathering.
I did learn a lesson on using Future/Kleer. I had read more than a few people say they brush only the areas to receive decals with Future. That seemed like a good idea. I decided to do that as well as some of the areas I knew I would be using a pin wash. After decals and more Future to seal them I started the pin washes. I used minerals spirits and artist oil. I forget which one, I would have to go look, but it was a dark brown black. In the areas I used it, I cleaned up with a cotton swab and kinda liked the dirty look left on the finish. I thought this may a good way to make the finish in scale, and a bit less new. I decided to cover the whole model with this mixture and wipe most of it back off. I guess this is considered a filter? Before doing this I coated the entire model with Future. 2 coats. Two things happened that I will learn from.  First, the areas that I initially coated with Future (areas where decals and pin washes were applied) had a greater density of Future. Enough so that even after a flat coat I can see the difference. The filter also was a bit blotchy in these areas. Next, the filter is a bit darker than I would like. The pictures don't really show that. I was under the impression that the flat coat would make the filter less prominent but I think it did the opposite.

On my next model I will apply Future evenly on the entire model. Not saying the other way is a bad idea but for me at this stage it is safer to do the entire model.

Maybe it is just me but are WW1 planes a bit harder to weather? By harder I mean there is less opportunity to weather. With WW2 to modern planes you have panel lines to darken. Not so with WW1 or very limited panel lines. Also, the life of an airplane from the WW2 area to the modern was/is much greater. Planes didn't get old in WW1. Therefore less wear and tear to model, less grim and soot also. I could be wrong about this but not enough pictures so show how they weathered. Certainly none in color.

While on the subject, is a silver fabric covered aircraft a bit harder to weather?  No painted aluminum to chip. Hard to fade a silver color as opposed to a painted color. Preshading of the ribs is out.  In the end I thought dirtying it up was about it. A bit of rust and mud too.
“Never try to discourage thinking, for you are sure to succeed.”
― Bertrand Russell

Offline Oeli

  • Full Member
  • ***
  • Posts: 203
Re: My first Wingnut Wings model
« Reply #9 on: January 23, 2016, 08:20:20 AM »
Hi,

Yes, the manufacturers always sees any errors. Because he did it. ;)  But you also learn from it. I have just finished my first WnW model (almost) ready and I have some mistakes, but the overall picture is very satisfying. And the next time I know what I must do better. if I have my Workbench again, I'll finish it and then I'll present it.
And your model, I really like it, chapeau!

Kindly regards

Jörg

PS. These are not directly answers to your questions, but I just wanted to have said. ;)
Normality is a beautiful paved road, but it grow no flowers on her.

Offline Epeeman

  • Hero Member
  • *****
  • Posts: 1419
Re: My first Wingnut Wings model
« Reply #10 on: January 23, 2016, 08:36:08 AM »
Gerg,

Hard to believe your first WNW model - looks really great!

What is going to be your next project?

Regards

Dave
As we say in fencing, what's the point?

Offline Gerg

  • Newbie
  • *
  • Posts: 30
Re: My first Wingnut Wings model
« Reply #11 on: January 23, 2016, 09:27:56 AM »
Dave,
Well I have already broken the agreement I made with myself (no stash).  I have ordered 3 more planes. They are on the way. The Sopwith Pup, SE.5a and Sopwith Snipe.  I think I will start with the SE.5a.  It won't be for awhile though. I have a furniture project I need to do first. I should now have a couple years of WNW models to build but I think it is very likely I will order something else before they are built. I am going to keep my purchases in check though and stick with WNW. No reason to look elsewhere at this point.

I look at the Pup and SE.5a as learning models (all models should be but more so for those 2) and save the Snipe for a later build. I really like the look of that one and want to get it right. 

“Never try to discourage thinking, for you are sure to succeed.”
― Bertrand Russell

Offline Alexis

  • Hero Member
  • *****
  • Posts: 7947
  • Love the self
Re: My first Wingnut Wings model
« Reply #12 on: January 23, 2016, 10:52:45 AM »
I for one , would love to see some pic's , wonderful build  8)


Terri
Hurra ! , Ich Leben Noch
Body and life is a vessel we use to travel the planet . Femininity is the gift , The miracle comes from what we do with it .

Offline GAJouette

  • Hero Member
  • *****
  • Posts: 3579
  • " Beware of the Spanish Inquisition"
Re: My first Wingnut Wings model
« Reply #13 on: January 23, 2016, 12:15:31 PM »
 Gerg,
I second Terri I'd love to see your in progress photographs as well my friend. Your very first WNW build is Outstanding! Well Done.
Highest Regards,
Gregory Jouette
" What Me Worry"

Offline Pete Nottingham

  • Hero Member
  • *****
  • Posts: 906
  • I chose the wrong week to stop sniffing glue
Re: My first Wingnut Wings model
« Reply #14 on: January 23, 2016, 09:57:32 PM »
Lovely looking Pfalz Greg.

Cheers

Pete.