Author Topic: Airfix 1/72 Handley Page 0/400  (Read 7292 times)

Offline lone modeller

  • Hero Member
  • *****
  • Posts: 5529
Re: Airfix 1/72 Handley Page 0/400
« Reply #15 on: January 25, 2016, 08:48:29 AM »
Evening All,

One of the reasons for the delay in posting more is that I got into a muddle with my photos - hence the temporary loss for which I apologise again.

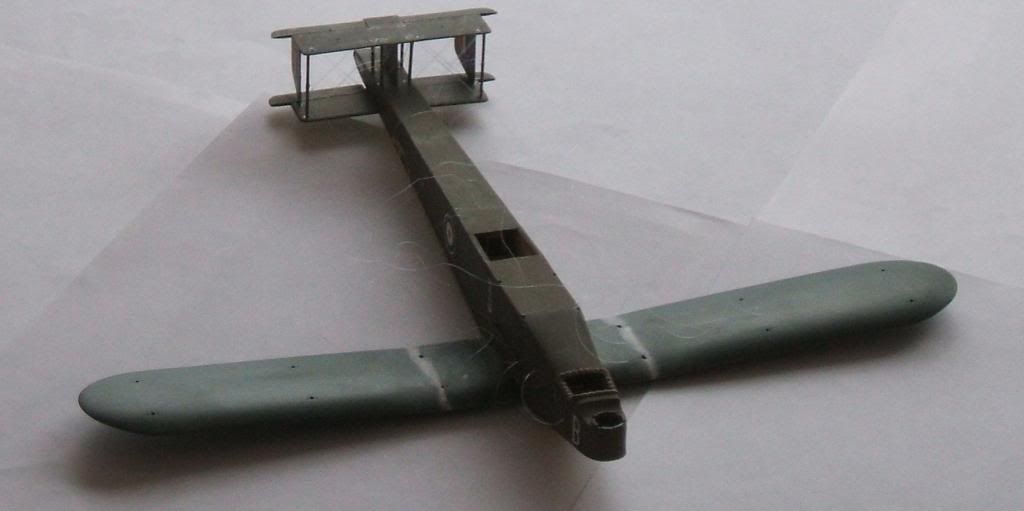
I assembled the front and rear cockpit parts, adding small items such as the wires on the rear gunner's seat, etc. and then glued the fuel tanks, cockpit floors, bomb rack on to the starboard (right) fuselage side and cemented the port (left) side and rear fuselage bottom plate (part 63). Here I hit problem number one. The port fuselage side had warped - probably during the long time that the kit was in the roof of my home so that when I tried to line up the sides with the bottom they did not do so. I decided to fix the top of the rear fuselage to make a box structure and cement the lot in one go and then use one of my lash-up "jigs", to hold the fuselage while it dried out. This jig consisted of some nice heavy books - and the fuselage side dutifully bent back into shape. The tail unit and wing stub were then glued into place and aligned: this was very important as it affects the alignment of the wings and tail unit later and if these were not square the whole model would look misshapen. There were some small gaps and holes to fill but these really were very small.


I added the protection around the pilot's cockpit but not the fuselage rails or generators at this stage because they could be easily knocked off. The holes for the struts of the tail unit in the rear fuselage were in the wrong place - they would not line up as required so I filled them and drilled new ones so that they did line up with the holes in the horizontal tail unit. The tab on the centre fin (part 72) was also too long and needed to have the front end cut off so that the fin leading edge was about 0.5mm ahead of the front struts. The lugs on the fin also needed shortening so that there was a tiny gap (about 1mm) between the fin and the upper horizontal tail surface. The kit rudders were too small so I cut new ones from 20 thou plastic card. I then glued the central fin and tail skid support (part 151) to the fuselage and filled the gaps. My model will represent an RNAS machine from early 1918 in day finish with PC10 upper surfaces and clear doped linen undersides, so I decided to paint the fuselage and tail surfaces at this stage. I also had to paint the rudder flashes, fuselage roundels and individual letter on the nose, and I also added the serial (from the spares box) and lift here signs (from the kit), as they were much easier to apply then rather than later.

I drilled the holes for the tail rigging next : on the original machines these were double wires throughout and ran across the tail unit between the forward struts, rear struts and rudders and the fuselage struts where they passed through the fin. They also ran fore-aft between the fuselage struts. The box art is of some help but I used drawings in the Datafile no 116 which has excellent sketches which are very clear. Single wires ran from left to right across the front struts, between the leading edges of the rudders through the fin and from the centres of the rudders via the rear of the fin. In all quite a birdcage. After I drilled the holes I assembled assemble the tail unit: the fuselage struts first, then the two on the lower tail surface and while those were still moveable I lowered the upper tail surface and glued it into place. When the tail was dry I rigged it. That was a time consuming process but was best done then as there was little else of the kit to get in the way or be damaged.


Thanks for looking.

Stephen.
« Last Edit: January 25, 2016, 09:02:13 AM by lone modeller »

Offline RAGIII

  • Hero Member
  • *****
  • Posts: 19702
Re: Airfix 1/72 Handley Page 0/400
« Reply #16 on: January 25, 2016, 11:58:03 PM »
Stephen,
Outstanding work and as always done at an amazing pace,! (At least for Me) Your added details are really making this old kit look awesome!
RAGIII
"A man has to know his limitations": Harry Callahan

"Don't slop it on" Lynda Geisler

Offline coyotemagic

  • Hero Member
  • *****
  • Posts: 7710
  • "Here's to not buggering it up." -Winston Chuchill
    • My Models
Re: Airfix 1/72 Handley Page 0/400
« Reply #17 on: January 26, 2016, 05:23:12 AM »
Stephen,
Outstanding work and as always done at an amazing pace,! (At least for Me) Your added details are really making this old kit look awesome!
RAGIII
Once again, I'm in total agreement with my amigo.  Awesome work, Stephen.
Cheers,
Bud
"All men dream: but not equally. Those who dream in the dark recesses of the night awake in the day to find all was vanity. But the dreamers of day are dangerous men, for they may act their dreams with open eyes, and make it possible." -T. E. Lawrence

Offline Des

  • Administrator
  • Hero Member
  • ******
  • Posts: 9325
    • ww1aircraftmodels.com
Re: Airfix 1/72 Handley Page 0/400
« Reply #18 on: January 26, 2016, 07:24:14 AM »
You are doing a brilliant job with this old kit Stephen.

Des.
Late Founder of ww1aircraftmodels.com and forum.ww1aircraftmodels.com

Offline radio

  • Hero Member
  • *****
  • Posts: 3952
Re: Airfix 1/72 Handley Page 0/400
« Reply #19 on: January 27, 2016, 05:51:31 AM »
Exellent work at all Stephen.
Cheers
Martin

Offline GAJouette

  • Hero Member
  • *****
  • Posts: 3579
  • " Beware of the Spanish Inquisition"
Re: Airfix 1/72 Handley Page 0/400
« Reply #20 on: January 27, 2016, 06:19:03 AM »
 Stephen,
Awesome work my old friend. It's absolutely fantastic to see an old classic being built,and oh so well too.
Highest Regards,
Gregory Jouette
" What Me Worry"

Offline KiwiZac

  • Global Moderator
  • Hero Member
  • *****
  • Posts: 2886
    • My Linktree
Re: Airfix 1/72 Handley Page 0/400
« Reply #21 on: January 29, 2016, 07:09:22 AM »
Fine work on the interior, it really looks the part! I quite like the overall fuselage too, it looks great.
Zac in NZ

Offline lone modeller

  • Hero Member
  • *****
  • Posts: 5529
Re: Airfix 1/72 Handley Page 0/400
« Reply #22 on: January 31, 2016, 03:54:17 AM »
Evening All,

Thanks to all who have dropped by and left positive comments - I do appreciate them. Rick: please note that I am not currently building this kit - as I wrote in the intro I actually made it about three years ago - it was my third model after taking up the hobby again after a long break. I am writing up notes and including the few photos that I took at the time without ever thinking that it would one day become part of a build log. How times change!

The wing ribs are too heavy and needed rubbing down. Airfix conveniently provide holes for rigging in the wings but there is a problem as they only provide holes for flying and lift wires between the struts: there are none fore and aft between the struts. Therefore I drilled the necessary holes in the upper and lower wing halves for both top and bottom wings. I wanted to put in the double rigging wires so I had to drill the extra holes in both top and bottom wings. The bracing wires which stabilised the upper wing overhang were also double. The holes for the aileron control wires which ran above and below the top wing were also drilled. The upper parts of the inner wing units were glued to the stubs and fuselage and the gaps filled and rubbed down.


 I found that the fit of the engine parts was very good but the joints needed rubbing down and cleaning up. I left off the propellors as these only get in the way and could easily be added later. The top and bottom engine struts (parts 110, 112, 116, 118,) were put into place but the joints were poor and needed filler. The engine assemblies were painted next as they would have been difficult to paint when the model was assembled. The nacelles were PC10, the radiator fronts black and the sides were dark grey on my model, and the exhausts were painted using a mixture of copper and rust. I added the exhausts but not the engine platforms at this stage.

Now I diverged again from the kit instructions because the fit of the wings is not good and problems can arise with alignment and filling of gaps if you follow the instructions. First I checked carefully the alignment of the upper sections of the bottom wings (parts 3 and 13) and filed down and adjusted them. I then glued the upper wing sections to the inner wing stubs making sure that  the dihedral was correct by supporting the wing tips while they dried out. I filled the gaps and sanded them down. Next came the fuselage cabane struts (123 and 124) to the fuselage. I had already drilled two small holes in the fuselage just in front of the cabane struts and under the centre-section of the top wing for fuel pipes: the pipes ran in front of the forward struts. I painted the upper surfaces of the bottom wing and the cabane struts and attached one engine assembly at a time to the lower wings. The forward bottom strut (109 on the port - left engine), and rear strut (111 on the same engine), was glued to the nacelle then the sub-assembly to the holes in the bottom wing. The control bar (part 114) and the inner engine strut (113) between the engine nacelle and the fuselage could then be put into place and properly aligned. This needed a little support while it dried out. The engine struts struts  gave the assembly more rigidity when I put the nacelles into place and made this assembly easier.  I only assembled the second engine when the first was complete and dry. Then the large wing struts (121 and 122) were put into the holes in the lower wing at the rear of the engine and finally the lower part of the upper wing centre section (125) was put into place, again making sure that everything was aligned.
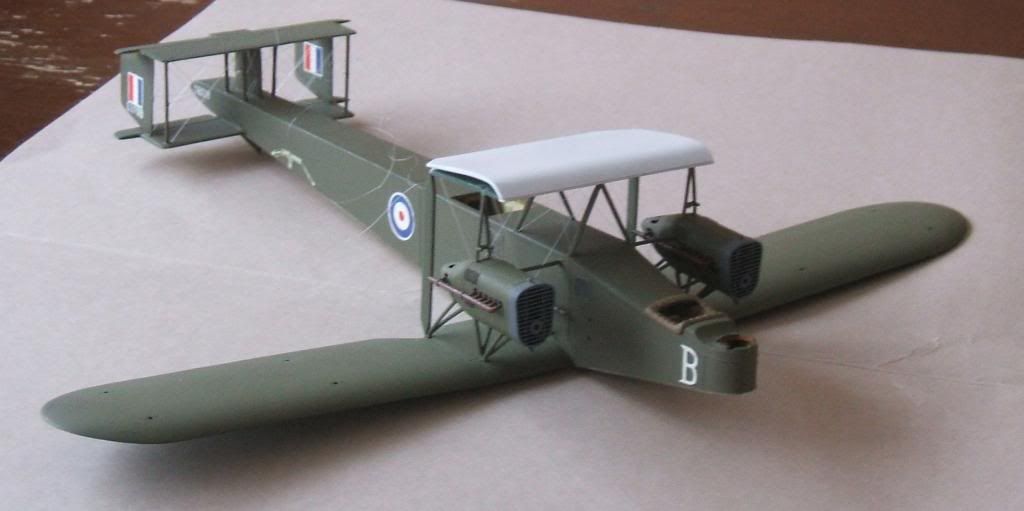


I now had a problem because the kit was supposed to have 167 parts but mine only had 166 - part number 126, the upper wing centre section, was missing! I moulded a new one from plastic card and added strips of card to the leading and trailing edges of part 125. So the strange white top to the upper wing centre section in the photo above was my first attempt at moulding a new part in about 30 years.

Thanks for looking.

Stephen.

Offline RAGIII

  • Hero Member
  • *****
  • Posts: 19702
Re: Airfix 1/72 Handley Page 0/400
« Reply #23 on: January 31, 2016, 05:31:37 AM »
Fantastic work Stephen! Your approach to mounting the wings and engines is brilliant! Outstanding work on replacing the center wing section!
RAGIII
"A man has to know his limitations": Harry Callahan

"Don't slop it on" Lynda Geisler

Offline Des

  • Administrator
  • Hero Member
  • ******
  • Posts: 9325
    • ww1aircraftmodels.com
Re: Airfix 1/72 Handley Page 0/400
« Reply #24 on: January 31, 2016, 06:16:39 AM »
Very nicely done replacing the missing centre wing section, it's very handy having scratch building skills to do things like this.

Des.
Late Founder of ww1aircraftmodels.com and forum.ww1aircraftmodels.com

Offline TobyCoulson

  • Hero Member
  • *****
  • Posts: 610
Re: Airfix 1/72 Handley Page 0/400
« Reply #25 on: January 31, 2016, 06:53:08 AM »
Great work. I think the kit is still available so would Airfix have sent you a replacement if you hadn't scratch built it.?
Ale should be drunk out of a glass. Lager should be drunk out of desperation

Offline radio

  • Hero Member
  • *****
  • Posts: 3952
Re: Airfix 1/72 Handley Page 0/400
« Reply #26 on: January 31, 2016, 09:17:31 AM »
What can I say it looks every time better and better, Stephen.
Cheers
Martin

Offline lone modeller

  • Hero Member
  • *****
  • Posts: 5529
Re: Airfix 1/72 Handley Page 0/400
« Reply #27 on: February 14, 2016, 09:20:15 AM »
Evening All,

Thanks to all for the kind remarks. Toby: I built this about 3 1/2 years ago when the kit was not available: I did contact Airfix at the time but they were unable to supply the missing part so I had a choice - not build the kit or make my own part. As I explained at the start of this thread I am unable to do much modelling just at the moment so I am posting this history for the benefit of anyone who is thinking of building one of these: it is just taking longer to sort out my notes and photos than I had originally intended - such is life at the moment! It is an old kit but it is still a good one (or at least I think so), but it does have some issues which I have tried to address and hope this may be of benefit to others in the future.

I held one of the upper wing bottom pieces (part 6 or 16) to the edge of the top wing centre-section and test the fit of the main wing struts. This is fiddly but by inserting the struts into the location holes it can be done and the alignment of the wing sections can be  checked. In my case the rear inner strut was too long and needed to be shortened by a couple of mm or 1/16 inch. The wings are different so I had to measure both wings and sets of struts. When the wing joints were flush and I had the correct dihedral, I glued the wing struts into the top of one of the lower wings. I placed a small drop of cement into the front holes on the upper wing and placed this on on the ends of the forward struts, then placed a small drop of cement on the tops of the rear struts and eased these forward into the holes on the rear of the wing. I ran some glue along the joint between the two wing sections and brought the sections together. This assembly was supported and allowed to dry overnight.


The photo shows one of my jigs that I construct as necessary from what is near to hand: however crude it looks I can assure you it worked and the wings are square and have the correct dihedral, although looking at photos of IanB's jig I almost feel ashamed to post this, but then I want to encourage others to have a go even if they do not have near state-of-the-art equipment. The moulded centre section shown in an earlier photo has been taken off and the white strips which I added to the front and rear of the underside of the centre section in order to increase the chord to the correct width can be clearly seen. The white pieces on top of the wing is where I had glued the ends of the rigging threads to make them completely secure when I came to tightening them.

I repeated the operation on the other wing. Then I filled and rubbed down the joints on the underside of the wings which could now be rigged before adding the top sections of the top wings and bottom sections of the lower wings. The king posts were glued to the top of the upper wing halves and rigged before the section was stuck into place. More filling was be needed on the undersides of both of the wings and on the top sides along the centre section, and the undersides of the lower wing. This was a tricky set of operations but they gave good joints and got around the alignment problem which seems to mar so many attempts with this model. I then painted the top and bottom of the upper wing and the cockades as the kit transfers were not suitable for the aircraft depicted in my model. Painting cockades is not difficult. First scribe on the outer circle of the cockades with a sharp pair of dividers and then painted the circle in with white paint. As the white appears in the cockades two coats may be needed to achieve the correct density. With care, thin paint and a fine brush the paint can be allowed to run into the groove made by the dividers and a neat outline will result. When the white paint is dry scribe on circles for the red and blue colours, again using dividers, and complete the painting as already described.


Thanks for looking.

Offline Des

  • Administrator
  • Hero Member
  • ******
  • Posts: 9325
    • ww1aircraftmodels.com
Re: Airfix 1/72 Handley Page 0/400
« Reply #28 on: February 14, 2016, 09:43:57 AM »
Looking really good Stephen, for an old kit it is shaping up beautifully.

Des.
Late Founder of ww1aircraftmodels.com and forum.ww1aircraftmodels.com

Offline RAGIII

  • Hero Member
  • *****
  • Posts: 19702
Re: Airfix 1/72 Handley Page 0/400
« Reply #29 on: February 14, 2016, 10:33:26 AM »
Outstanding work on the wings Stephen! Your process was involved but well worth the effort!
RAGIII
"A man has to know his limitations": Harry Callahan

"Don't slop it on" Lynda Geisler