Author Topic: 1/72 Avro Type D Biplane 1911  (Read 11270 times)

Offline Des

  • Administrator
  • Hero Member
  • ******
  • Posts: 9325
    • ww1aircraftmodels.com
Re: 1/72 Avro Type D Biplane 1911
« Reply #15 on: July 18, 2015, 08:24:57 AM »
This is looking superb Stephen, the fuselage is excellent and your flying surfaces look great.

Des.
Late Founder of ww1aircraftmodels.com and forum.ww1aircraftmodels.com

Offline RAGIII

  • Hero Member
  • *****
  • Posts: 18847
Re: 1/72 Avro Type D Biplane 1911
« Reply #16 on: July 18, 2015, 08:46:57 AM »
Awesome update, Stephen!  The moulded fuselage turned out brilliantly and the wings and tail surfaces look fantastic.  Truly inspiring work.
Cheers,
Bud

I can't say it any better than my Amigo!
RAGIII
"A man has to know his limitations": Harry Callahan

"Don't slop it on" Lynda Geisler

Offline IanB

  • Hero Member
  • *****
  • Posts: 2441
Re: 1/72 Avro Type D Biplane 1911
« Reply #17 on: July 18, 2015, 01:31:42 PM »
Looking good!

Ian

Offline ermeio

  • Hero Member
  • *****
  • Posts: 913
Re: 1/72 Avro Type D Biplane 1911
« Reply #18 on: July 18, 2015, 04:25:23 PM »
Almost complete...
Now the building process starts
Very nice work

Offline radio

  • Hero Member
  • *****
  • Posts: 3952
Re: 1/72 Avro Type D Biplane 1911
« Reply #19 on: July 18, 2015, 09:11:10 PM »
Exellent work Stephen.
Martin

Offline Alexis

  • Hero Member
  • *****
  • Posts: 7947
  • Love the self
Re: 1/72 Avro Type D Biplane 1911
« Reply #20 on: July 18, 2015, 11:03:15 PM »
Nice up-date , coming along very well so far  8)


Terri
Hurra ! , Ich Leben Noch
Body and life is a vessel we use to travel the planet . Femininity is the gift , The miracle comes from what we do with it .

Offline lone modeller

  • Hero Member
  • *****
  • Posts: 5322
Re: 1/72 Avro Type D Biplane 1911
« Reply #21 on: July 19, 2015, 02:47:26 AM »
Thanks Bud, Des, Rick, Ian, Ermio, Martin and Terri for the very kind comments. I really appreciate those.

Ermio:  there is more construction work to do before I can start assembly - I am working on the engine and hope to post pictures of that next, but I am away (again) tomorrow for a few days so there will be another pause before the next update.

Offline Ernie

  • Hero Member
  • *****
  • Posts: 3961
  • "Once more into the breach"
Re: 1/72 Avro Type D Biplane 1911
« Reply #22 on: July 19, 2015, 08:31:06 PM »
Great progress, Stephen!  How was the scalloped edges of
the wing and tail done, with a file?  Beautiful work, my friend. :D

Cheers,
Ernie :)
The new old guy, take two...

Offline ALBATROS1234

  • Hero Member
  • *****
  • Posts: 2657
Re: 1/72 Avro Type D Biplane 1911
« Reply #23 on: July 21, 2015, 06:06:17 PM »
nice job so far, it is an interesting subject as well

Offline Adam

  • Hero Member
  • *****
  • Posts: 647
Re: 1/72 Avro Type D Biplane 1911
« Reply #24 on: July 21, 2015, 08:44:42 PM »
Excellent!  :)

Adam.

Offline Bolman

  • Full Member
  • ***
  • Posts: 158
Re: 1/72 Avro Type D Biplane 1911
« Reply #25 on: July 24, 2015, 11:45:18 PM »
Nicely done so far Stephen, can't wait for the next update. Keep up the good work!

John

Offline GAJouette

  • Hero Member
  • *****
  • Posts: 3579
  • " Beware of the Spanish Inquisition"
Re: 1/72 Avro Type D Biplane 1911
« Reply #26 on: July 25, 2015, 02:38:23 AM »
 Stephen,
Awesome project my friend. Eagerly awaiting the next installment and seeing how you handle her rigging.
 Highest Regards,
Gregory Jouette
" What Me Worry"

Offline lone modeller

  • Hero Member
  • *****
  • Posts: 5322
Re: 1/72 Avro Type D Biplane 1911
« Reply #27 on: July 27, 2015, 04:43:17 AM »
Thank you Ernie, Albatros, Adam, John and Gregory for dropping by and leaving such kind remarks. I really appreciate them.

Ernie: my apologies for not explaining properly how I scallop the wings. I mark out the scallops by first measuring the depth from the plan and drawing a pencil line on the trailing edge of the wing to the correct depth. The I mark the trailing points of the scallops with a pencil mark by holding the wing against the plan. Finally I mark the shape of the scallop freehand - in this scale very small irregularities do not show! 

Next I file out the hollow back to the pencil line with a round file and then use the same file at a low angle to the wing to get the final thin trailing edge. I finish by giving a light polish with worn fine glass paper

Offline pietro

  • Full Member
  • ***
  • Posts: 204
  • What?! Are you kidding?!
Re: 1/72 Avro Type D Biplane 1911
« Reply #28 on: July 27, 2015, 04:56:56 AM »
Stephen, I had all those hanging from my bedroom ceiling, brush painted with Pactra in the little square bottles, plenty of Testors tube glue and rigged with fuzzy sew thread. You are creating works of art. Pietro

Offline lone modeller

  • Hero Member
  • *****
  • Posts: 5322
Re: 1/72 Avro Type D Biplane 1911
« Reply #29 on: July 31, 2015, 05:14:35 AM »
Evening All,

Pietro, many thanks for your kind remarks and reminiscences. I too had all 6 of the series and I too rigged them with thread, but I did not have them hanging from the ceiling. Mine were painted in Humbrol gloss (!) enamels and I still have the instruction sheets - hence the photos of the same in this thread. Rather like the Airfix Albatros that I made last year, this is a bit of a trip down memory lane for me. I do not know whether I will tackle any of the other types in the future (I have in part already done so I suppose with the Bleriot XI Penguin and the Farman Longhorn), but time will tell.

I have now finished the engine. Inpact kindly helped me with this by providing an excellent drawing of a Green engine which I was able to use in conjunction with photos, some of which are on this site.


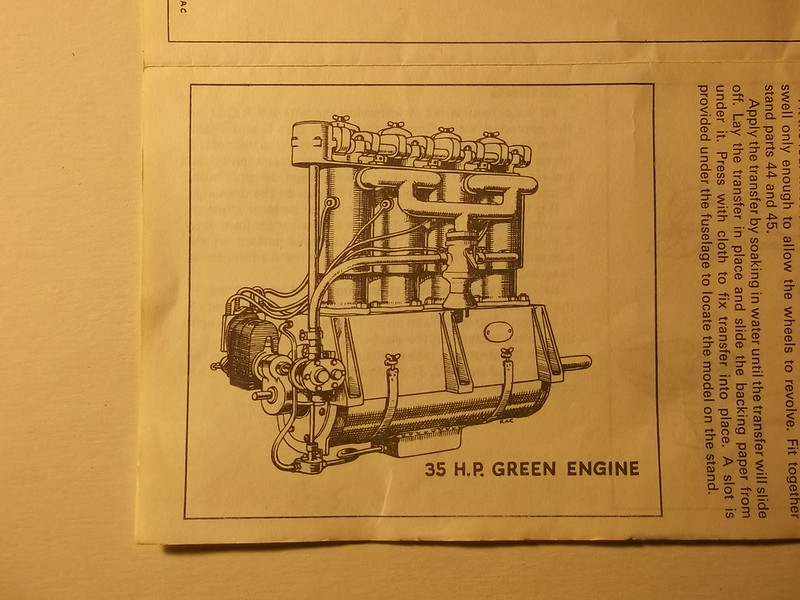
This is how I interpreted the above using laminated card for the engine block, Evergreen rod (20thou diameter) and cocktail stick thinned down for the cylinders, card for the carburettor and engine bearers and stretched sprue for the pipe work.


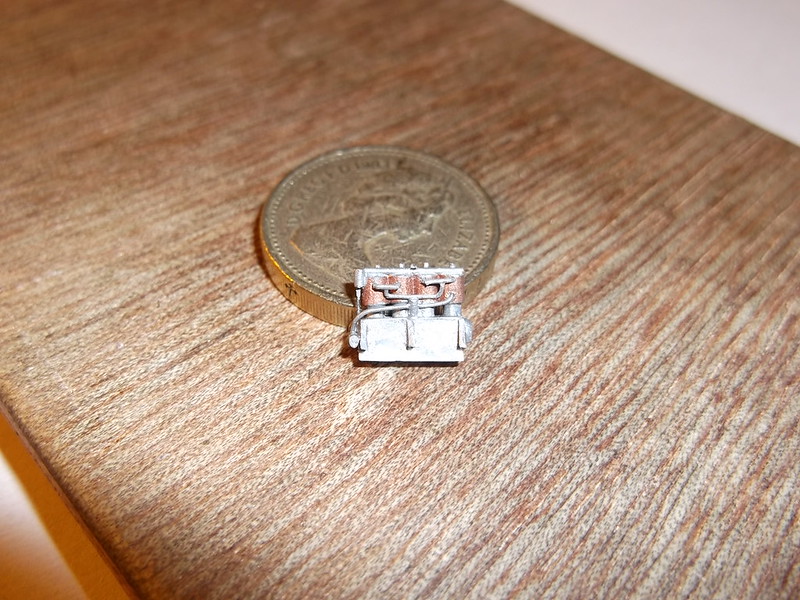
The lower part of the engine will be hidden beneath the top of the fuselage so I have not bothered to make the sump completely accurate as it will not be visible.

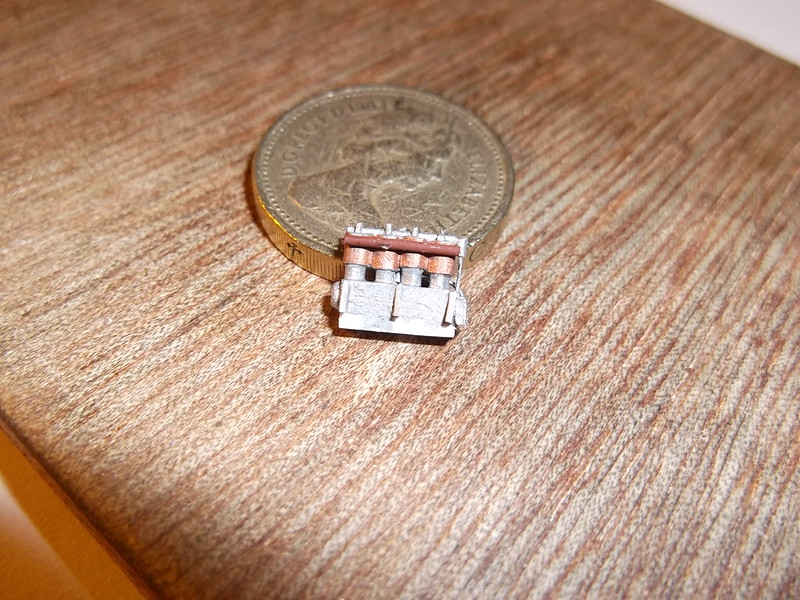
I have also added thin stretched sprue to the wings to make the ribs. In this image I had not trimmed or rubbed the sprue down - it just shows the task in progress for those who do not know how this is done. The ends ware later trimmed and the sprue sanded with worn fine glass paper and then several coats of paint were applied to get a smoother rib. The tail surfaces have also had ribs added (but are not in the image).


Thanks for looking.

Stephen.
« Last Edit: July 29, 2017, 03:39:09 AM by lone modeller »