Author Topic: Eduard Fokker EV ( DVIII ) 1/72 - FINISHED  (Read 17332 times)

WarrenD

  • Guest
Re: Eduard Fokker EV ( DR VIII ) 1/72
« Reply #15 on: March 19, 2015, 08:33:35 AM »
Andonio,
              Here is how I did it on my Fokker Triplane, and how I plan to do it on my other builds in this scale:

- Drill out the opening on the side of the fuselage with the appropriate sized drill bit, BUT do not drill all the way through.

- Take a smaller drill bit, just a little larger than your rigging material, and drill a hole in the forward side of the hole you just drilled. This is where you will insert your rigging material when you are done.

- Assemble, paint, decal, weather, etc. your model.

- When all is done, take your rigging material up with tweezers leaving a bit sticking out, dip it in CA, and insert it in the smaller, forward-facing hole that you drilled. I use medium CA. Let it cure for a bit.

- Now you can pull it tight and attach it to the control horns of the rudder or elevator. I also make sure that the I put a spot of flat black paint in the hole for obvious reasons.

Note, if you 1) accidentally drill all the way through the fuselage when you are drilling out the cable exit hole, OR 2) if your fuselage already has it drilled through, it's just an easy matter to glue on a "backing plate" of sorts, and you are back in business.

I hope my explanation makes sense.

Warren

Offline andonio64

  • Hero Member
  • *****
  • Posts: 1685
  • There's no hurry
Re: Eduard Fokker EV ( DR VIII ) 1/72
« Reply #16 on: March 19, 2015, 05:03:49 PM »
Thank you Warren, it is a good method, my only doubt, but I will make some experiment to check it, is that I use EZ line (elastic line) and if I dip it into the CA glue it usually wrinkles ... I'll report about it in this build log .

By the way I already pierced the holes all way through the fuselage, but as you said it's easy to close the holes from the back.

Thanks again

Antonio

WarrenD

  • Guest
Re: Eduard Fokker EV ( DR VIII ) 1/72
« Reply #17 on: March 19, 2015, 08:10:31 PM »
Ahhhh, I see, that could be a problem.  For this build, you may have to use something else.

Warren

Offline andonio64

  • Hero Member
  • *****
  • Posts: 1685
  • There's no hurry
Re: Eduard Fokker EV ( DR VIII ) 1/72
« Reply #18 on: March 19, 2015, 08:20:47 PM »
OK I'll test how to use some fishing line I have at home but have not ever tried it

Offline andonio64

  • Hero Member
  • *****
  • Posts: 1685
  • There's no hurry
Re: Eduard Fokker EV ( DR VIII ) 1/72
« Reply #19 on: April 08, 2015, 07:14:22 PM »
Hallo everybody...

here are some progresses:

Rudder

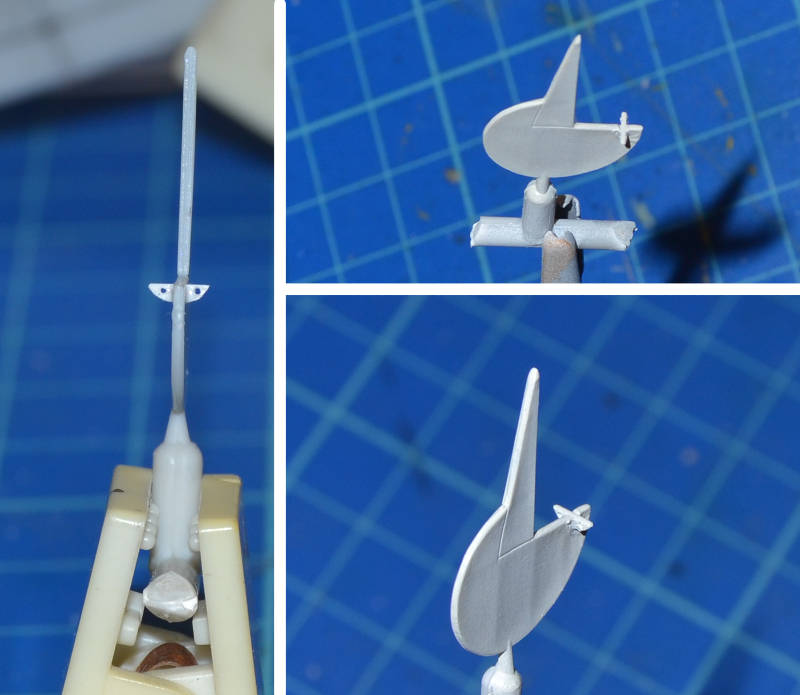
control horns made from 0.5 mm thin plasticard, the PE parts were not drilled and my attempt to make a hole through them resulted in spoiling the piece...
So I made them from scratch.


Here you see the rudder painted and my first attempt to use the lozenge decals, I was not too precise cutting away the excess part with the scalpel, I am worried when I'll have to make the more extensive trimming required by the fuselage livery...


Tail planes:

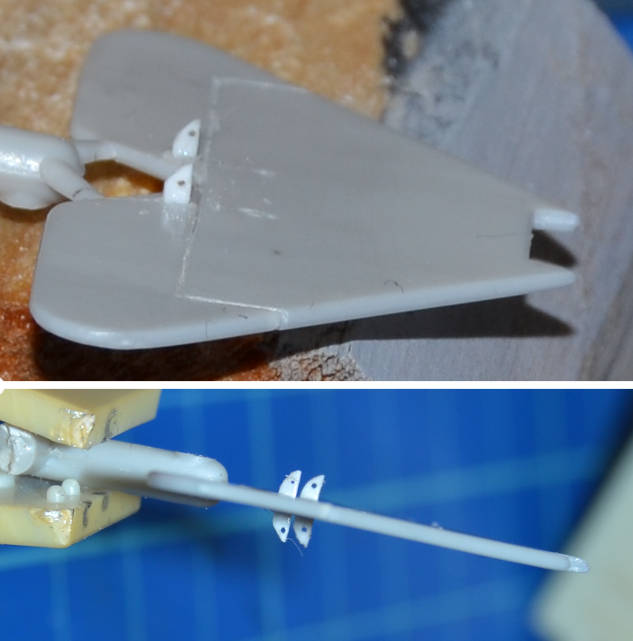
same home made control horns...


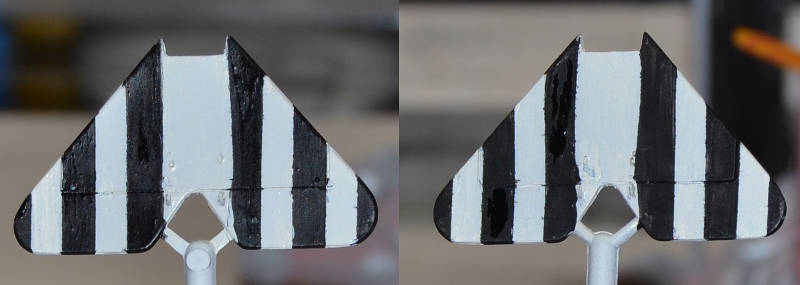
the stripes were painted using Tamiya Flat black and it was a nightmare, there are a few basic colours from Tamiya that are impossible to use with the brush, this is one!
In any case the result is OK to me and will spray an overall coating of Humbrol satin transparent varnish to get an even finish. The white is Mr.Kit Italian Navy Off white which is a really nice tone, it has a satin finish.

Wheel discs:

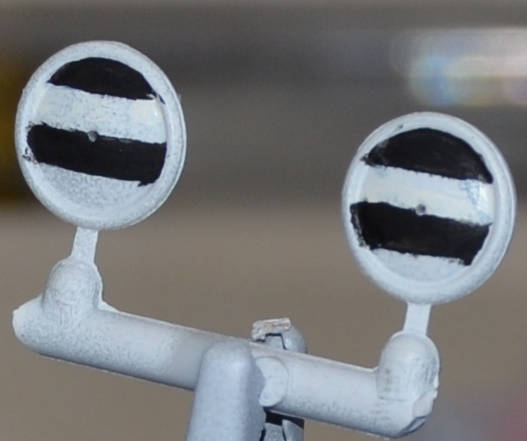
I will spray the wheels with satin transparent before painting the tyres and putting a lozenge decals disc on the inner side.

Propeller:

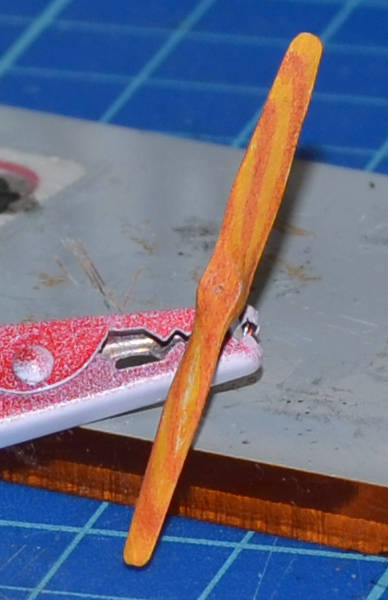
I should have used a lighter tone for the basis (I used yellow ochre but perhaps is too warm ...)

Cowling:
After painting it off white, I cut some triangles (4 mm basis - 6 mm height) to mask the white parts

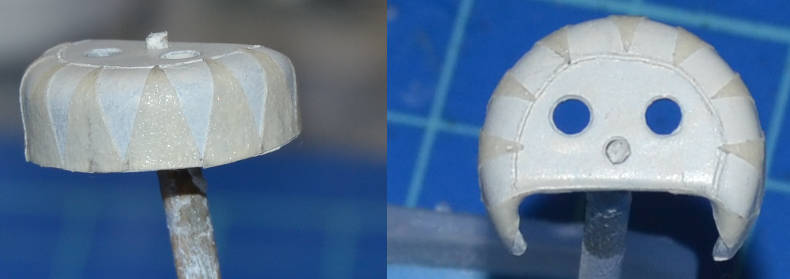
and painted with Tamiya Flat black with the same problems.

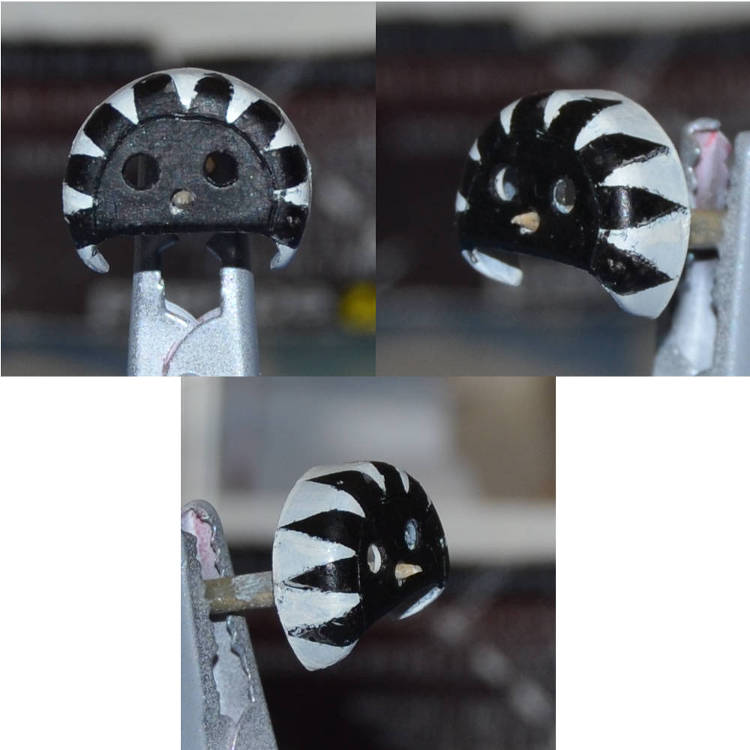
Here some touch up as well as the satin transparent coating will be needed
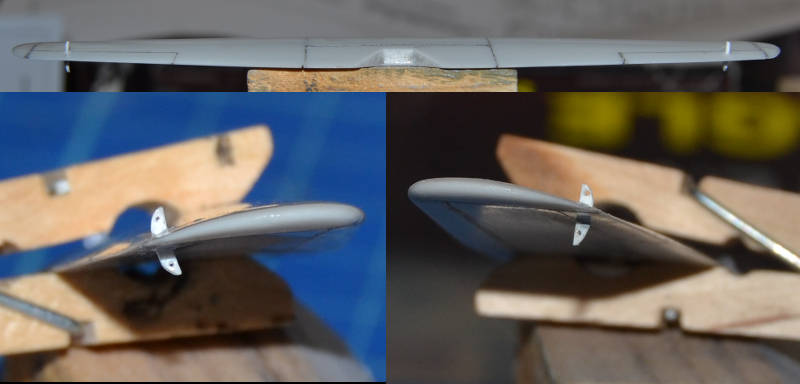
Wing:
Control horns applied


Then I made some colour essays:

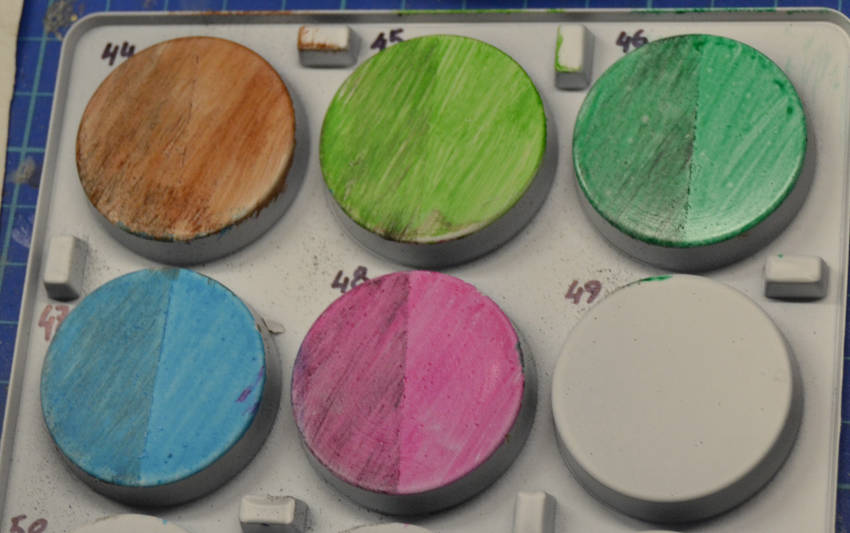
To make the streaking more evident, I tried to paint a drybrushed base of Tamiya XF54 Dark Sea Gray (left half of each circle). On each circle I then painted the chosen colour diluted with water (not too much) using a stiffened brush:

44) Tamiya XF64 Red Brown
45) Citadel Goblin Green 61-42
46) Mr.Kit 07 Flag Green
47) Citadel Ice Blue 61-36
48) Citadel Warlock purple 61-28

I didn't like 45 so I tried 46 which I liked most. The other colours appear good to my eyes.

Here is the final result on the upper surface of the wing...

XF64 Red Brown is flat, while Mr.Kit 07 Flag Green is satin, so I will spray all over the satin varnish once the wing is completed and the crosses are in place.

I also started detailing the cockpit:


OK that's all for now, stay tuned!

:-)

AnDonio
« Last Edit: April 09, 2015, 11:13:24 PM by andonio64 »

Offline uncletony

  • Hero Member
  • *****
  • Posts: 4349
    • Aircraft In Pixels
Re: Eduard Fokker EV ( DR VIII ) 1/72
« Reply #20 on: April 08, 2015, 10:54:43 PM »
Nice update Antonio.

What are you thinning the Tamiya paint with? I find that thinned with 91% Isopropyl Alchohol the stuff brushes out beautifully. I put a drop of paint in a palette well, followed by a drop of alcohol, mix with the brush by running the paint up the side of the well. I brush only in one direction and let it dry before the next coat -- which is very fast as the alcohol evaporates very quickly.
I keep adding alcohol to the well as I go to keep the paint at a nice milky consistency. You can even let the well dry out completely and reconstitute it later, even days later with alcohol.

Best wishes and good luck!

Offline andonio64

  • Hero Member
  • *****
  • Posts: 1685
  • There's no hurry
Re: Eduard Fokker EV ( DR VIII ) 1/72
« Reply #21 on: April 08, 2015, 11:44:26 PM »
Nice update Antonio.

What are you thinning the Tamiya paint with? I find that thinned with 91% Isopropyl Alchohol the stuff brushes out beautifully. I put a drop of paint in a palette well, followed by a drop of alcohol, mix with the brush by running the paint up the side of the well. I brush only in one direction and let it dry before the next coat -- which is very fast as the alcohol evaporates very quickly.
I keep adding alcohol to the well as I go to keep the paint at a nice milky consistency. You can even let the well dry out completely and reconstitute it later, even days later with alcohol.

Best wishes and good luck!

Thanks Bo,
I often use Isopropyl Alchohol, this time I did not, don't ask me why...

 >:(

Offline andonio64

  • Hero Member
  • *****
  • Posts: 1685
  • There's no hurry
Re: Eduard Fokker EV ( DR VIII ) 1/72
« Reply #22 on: April 20, 2015, 10:03:52 PM »
Hallo friends,
a few steps ahead:

the pieces that were painted black and white are now touched up (especially the cowling) and satin-finished.
The inner side of the wheel have been prepared with lozenges
On the tail planes the control horns have been threaded with 0.13 mm fishing line, so that it will be easier when fixing them to the fuselage to open one end and fix it to the fuselage without having to manipulate such a small creature with my thick fingers...


I also used a diluted medium gray to tone down a bit the shining black and to enhance the panel lines on the black crosses decals.

here goes the wing


and the control horns of the ailerones


here is where I applied the reverse lozenge decals to the cockpit walls.
(apologies for the starboard side pic)

I applied the decals over an off white coat, they are barely visible, is this an error of mine?
Which base would be better to make them a bit more visible?


Pilot seat and wall behind it lozenged and ready to be detailed.

Thanks for your attention!

Ciao

AnDonio

Offline andonio64

  • Hero Member
  • *****
  • Posts: 1685
  • There's no hurry
Re: Eduard Fokker EV ( DR VIII ) 1/72
« Reply #23 on: April 21, 2015, 12:58:49 AM »
Thanks Richard, the colour was off white and glossy with wax I brushed on it.
Yes the brush signs are there and the bg seems dirty.
For the fuselage I will spray a white primer and coat it with wax to have it glossy when applying decas to the fuselage.
the cooking tin foil idea is great, I'll use it!

Thanks again

Antonio

PS The seat and back wall lozenges were slided on a tamiya tan deck base made glossy with wax, I like the resulting effect.
« Last Edit: April 21, 2015, 02:54:41 PM by andonio64 »

Offline radio

  • Hero Member
  • *****
  • Posts: 3952
Re: Eduard Fokker EV ( DR VIII ) 1/72
« Reply #24 on: April 21, 2015, 08:21:19 AM »
Wounderful work and painting Antonio.
Martin

Offline andonio64

  • Hero Member
  • *****
  • Posts: 1685
  • There's no hurry
Re: Eduard Fokker EV ( DR VIII ) 1/72
« Reply #25 on: April 21, 2015, 02:56:11 PM »
Wounderful work and painting Antonio.
Martin
ù

thank you Martin!

I am now preparing a piece of plastic well painted and waxed to see how the fuselage lozenges appear on different base tones, more later...

Ciao

Offline andonio64

  • Hero Member
  • *****
  • Posts: 1685
  • There's no hurry
Re: Eduard Fokker EV ( DR VIII ) 1/72
« Reply #26 on: April 24, 2015, 06:49:21 AM »
Hallo,
here is the result of my experiment to test the aviattic lozenges over different base paint:

I took a plastic piece from an old kit, with plain surfaces


I painted it with 4 different colours (left to right)
- MrKit GC10 German Clear Doped Linen
- MrKit GC13 German Naval Clear Doped Linen
- MrKit IT04 Italian Clear Doped Linen (Light)
- Tamiya Flat White XF-2

They were brushed very carefully and I got an even coat.

Then I used my floor wax to make the whole surface glossy


And then I applied the decals:


As you can see the reverse lozenges that I used inside the fuselage now appears really good, and the polygons are clearly readable.
So the problem has been the one highlighted by Richard: uneven paint and surface.

As per the two fuselage lozenges they have a fantastic surface, they adhered perfectly to the glossy surface and all in all they do not show a meaningful difference covering the different colours I used on the piece of plastic.
So probably I will keep using off white (glossy coated) in order to leave uncovered the vertical band on the fuselage without having to re paint it.

I am very happy with this result.

Let's go ahead now!

Ciao

Antonio

Offline andonio64

  • Hero Member
  • *****
  • Posts: 1685
  • There's no hurry
Re: Eduard Fokker EV ( DR VIII ) 1/72
« Reply #27 on: May 04, 2015, 01:40:27 AM »
Hallo everybody,
A tiny step ahead, small in dimensions and not in chronological terms... 

I rebuilt from scratch the cockpit, nothing was in the kit but tiny, flat PE simulations of the inner tubing.


Port side: tubings are 0.8 mm diam. plasticard rods the seat structure is 0.5 mm diam.
THe length of the whole structure is less than 2 cm.
As always the super detail shows more imperfections than if it iseen from a natural distance.
In Italy we have a proverb saying "Even the cockroach is beautiful to the eyes of his mother".


Starboard side: on the opposite "wall" you can see the magneto, the plate on which it is fixed was taken from the PE fret, the round piece and the lever were made from plasticard, and the "throttle" was taken from the PS as it was.

The front piece is the ammunition reservoir with the 2 tubes for the Synchronization gear cables.
(see them here http://en.wikipedia.org/wiki/Synchronization_gear#/media/File:Zentralsteuerung01.jpg)


Here you can see better the magneto and the throttle, moreover you can see the compass on the floor on the right of the pilot.


Here you can see the control column, I took the terminal from the "flat" PE and glued it on top of a 0.4 mm diam. iron rod.
I painted a thich drop of brown on eac of the handles to simulate some thickness...


Her you can see the airspeed indicator, it was below the ammo container but I wasn't able to glue it there properly becaust it collided with the rudder pedals (yea, there are also the pedals... believe me...


Here are the 2 Spandau, from Mini World, very nice, the giant cent coin is just for cheating ...


Larger detail


Here you can see the 2 MGs provisionally mounted on the fuselage, provisionally closed.
I glued 2 fuel tank corks and traced the profile of the top cowling that has to be painted green and not "lozenged".
I also made a couple of holes to let the ammunition belts come out of...

Ouff...

I pity my eyes...

Thanks as usual for your attention my friends...

AnDonio

Offline coyotemagic

  • Hero Member
  • *****
  • Posts: 7710
  • "Here's to not buggering it up." -Winston Chuchill
    • My Models
Re: Eduard Fokker EV ( DR VIII ) 1/72
« Reply #28 on: May 04, 2015, 02:51:12 AM »
Great looking interior and guns, AnDonio!  Truly remarkable for 1/72 scale.
Cheers,
Bud
"All men dream: but not equally. Those who dream in the dark recesses of the night awake in the day to find all was vanity. But the dreamers of day are dangerous men, for they may act their dreams with open eyes, and make it possible." -T. E. Lawrence

Offline radio

  • Hero Member
  • *****
  • Posts: 3952
Re: Eduard Fokker EV ( DR VIII ) 1/72
« Reply #29 on: May 04, 2015, 03:15:40 AM »
Very beautiful interior and weapons, Antonio.
Martin