Author Topic: Wingnut Wings Fokker E.II/E.III Early  (Read 31485 times)

Offline BigBlue

  • Hero Member
  • *****
  • Posts: 640
Re: Wingnut Wings Fokker E.II/E.III Early
« Reply #75 on: September 10, 2014, 11:51:39 PM »
Martin, Mark, Terri And Rick, thank you all for checking in.  I really appreciate your supportive comments.

Stefan, I dealt with the decal seams in two different ways.  One one side, I cut a sliver of extra decal material and applied it over the corner.  This worked fine, except for the fact that I had thoughtlessly hit the already applied decals with a bit of Tamiya Smoke to tone down the white, so the clean new patch was readily apparent.  I have tried to blend it in as well as I can, and will post pictures when I get the chance.  On the other seam, I just dabbed some thinned white paint into the seam and it worked fine.  The seams were pretty small, so the paint really just obscures the dark under surface that had been peaking out in the gap.

Regarding your question about the green tones, the color I used for the exterior surfaces, Tamiya XF-22 (RLM Grey) definitely has a greenish tint.  I think there are a number of factors that caused it to become more prominent in the later pictures, the first being that the gloss clear coat made the colors appear darker, which intensified the green.  Further, I think having that large white (and black) square in the middle of the wing, makes it look more green by comparison.  Finally, I think the light source  at my work table (a delightful mix of incandescent and "warm" LED bulbs) and the color added to it.   The last set of fuselage pictures (against the black construction paper) were shot with a daylight balanced flash and are more representative, although I have since given everything a light matte coat which has muted the colors a bit more.   By the way, anyone reading this that knows more than I do about color theory and how gloss and matte surfaces reflect light, etc. can point me in the right direction if my theories are erroneous.

Thanks again for the nice comments all,

Chris

Offline BigBlue

  • Hero Member
  • *****
  • Posts: 640
Re: Wingnut Wings Fokker E.II/E.III Early
« Reply #76 on: September 11, 2014, 02:01:17 AM »
Here is a group shot of (nearly) everything I have worked on since the last pictures:


The stains and streaks were done with oil paints.  For overall discoloration, I used dilute washes of a mixture of Lamp Black and Burnt Umber, and for the vertical streaking, I placed very small dots of Lamp Black, Payne's Grey, Burnt Umber, and Transparent White along the upper edges, and pulled them down using a flat brush dampened with odorless turpentine.  The majority of reference photos I have seen are of fairly grubby Eindeckers in the field, so I tried to replicate the effect without overdoing it.  I still plan on adding a couple of specific castor oil seepages, as well as streaks of fresh oil from the rotary, and am still working out how I want to tackle those. 

All of the exterior (fabric) surfaces received a light coat of Alclad Matte to take the intense shine of the Aqua Gloss off, and tie the stains into the rest of the finish.  I read the thread on Alcad's lacquer based clear coats (http://forum.ww1aircraftmodels.com/index.php?topic=2915.0) with great interest, and would have weighed in on the discussion had it not been dormant for so long.  I use Alcad's Matte and Light Sheen clear coats (as well as the acrylic Aqua gloss, but that is a totally separate product), and have mixed feelings.  On the one hand, I have not found any matte or semi-matte coat that looks as good to me as the Alclad version; it is the only one I know of that presents a matte finish without adding the tell tale white haze.  Other than the matte vs gloss effect, it appears completely transparent.  On the other hand, I have had the same issues as a number of others where the lacquer just does not ever seem to fully cure, and will take fingerprints days or longer after spraying.  It is very frustrating.  It doesn't happen every time, and I think I have better luck if I thin it prior to spraying (I use Mr. Color Leveling Thinner), perhaps because it takes less of a coating for my eye/brain to register that I have covered the area.  In this case, I wanted more of a satin finish, so the thinned Matte worked well.  I sprayed the coat last night, and it seems to have cured, but we will see what happens when I need to handle the surfaces while rigging.

As an aside, I am a big fan of the Aqua Gloss product.  Water based, dries fast and hard, and highly glossy.  The only issue I've had with it is that it can occasionally be fussy when it encounters residue from the Micro Set/Sol.  Given that I have yet to build something where the gloss finish is final, it has not been an issue since the matter/satin coats have no problems.  I wish they would make Aqua equivalents of their non-gloss lacquer based clears.

The prop now has the proper decals, and I hit the fuel tank caps and ammo feed with Mr. Metal Color Brass.  Not shown in the picture are the various undercarriage components that I have been painted.  So, coming soon: final oil effects, undercarriage assembly (and probably one or two drillings that I've missed), paint and touch up the leather as well as the metal walkways, and work on the engine.  Then assembly.  I feel like there is something else I've forgotten.... oh yeah... rigging.  Perhaps its time to work on my D.VII for the group build!

Thanks for reading through all this; comments, questions, tips are always appreciated.

Chris

Online lcarroll

  • Administrator
  • Hero Member
  • ******
  • Posts: 8660
Re: Wingnut Wings Fokker E.II/E.III Early
« Reply #77 on: September 11, 2014, 02:36:11 AM »
     The vertical striping on the fuselage is excellent Chris, it really gives it a "realistic' appearance. I also read your comments on the occasional poor performance of the Alclad Klear Cote product with great interest. I think you may have actually provided the most logical cause for that problem (if I'm not mistaken I think I raised the issue originally). Perhaps (likely) the amount or thickness of the coat is a "player" in all this. I do tend to over do it and lately have forced myself to use thinner coats, with much better results. I think I'll try a few experiments with it when I get some time.
    Back to the theme.............your Eindecker is still looking something well to the right of spectacular!
Cheers,
Lance

Offline Chris Johnson

  • Hero Member
  • *****
  • Posts: 1959
Re: Wingnut Wings Fokker E.II/E.III Early
« Reply #78 on: September 11, 2014, 05:16:29 AM »
Streaking has been a fixture in AFV modelling for quite some time now and it's good to see it making its way into WWI aviation modelling too. You've done a superb job with the effect Chris. Very subtle and realistic looking.

Cheers,

Chris
You can have it good; You can have it fast; you can have it cheap. Pick any two, but all three are impossible.

Offline BigBlue

  • Hero Member
  • *****
  • Posts: 640
Re: Wingnut Wings Fokker E.II/E.III Early
« Reply #79 on: September 11, 2014, 06:39:00 AM »
Lance, Your comments are very generous, so I thank you.  Regarding the Alclad, I was nodding in agreement as I read through that thread because I felt like I could have written some of those posts myself.  I hope the thinned coats help fix the problem, because it does give a really nice finish.  That said, for this build I don't want a dead flat appearance, but if I did, it would take more than one coat with the thinned Matte.  Hopefully the problem wouldn't reappear once the layers start to build up. 

Chris, thank you for the kind words as well; they are much appreciated.  You are right on the money about the streaking, as I lifted the technique from a AFV build article that Google suggested!  Simple but effective, and easy to remove if the first attempt is unsatisfactory.

Thanks again to you both,

Chris

Offline stefanbuss

  • Hero Member
  • *****
  • Posts: 976
Re: Wingnut Wings Fokker E.II/E.III Early
« Reply #80 on: September 11, 2014, 06:09:22 PM »
Chris,

the streaking you applied looks very convincing; nevertheless I have one concern. I always had the impression (which might be perfectly incorrect, hence my concern), that tis kind of streaking is meant to show rain marks, oil drippings etc. The majority of those streaks would appear (in real life, that is) on a parked aircraft. My concern: As the fuselage is not aligned parralel with the horizon, but standing at an angle, shouldn't those streaks be applied at such an angle as well?

Please do not understand that as any kind of criticism. It is not meant to be. I only see that you think a lot about what you are doing. This is why I dared to raise my concern. I hope you can understand it (English is, most obviously, not my primary language) - if not, feel free to ask what I mean.

Stefan

Offline BigBlue

  • Hero Member
  • *****
  • Posts: 640
Re: Wingnut Wings Fokker E.II/E.III Early
« Reply #81 on: September 11, 2014, 11:00:51 PM »
Stefan,

No offense taken at all; it is a perfectly legitimate question, and I appreciate your asking.  I wondered the same thing myself prior to painting, but after looking through reference photos, decided that most of the pictures I saw seem to depict streaks which ran perpendicular to the upper framing rather than perpendicular to the ground:


I could certainly be mistaken in my interpretation of the pictures, but most of streaks seem to run parallel to the edges of the Iron Cross' white box.  Perhaps this is because the tail was kept elevated while on the ground, or because the the leaks occur when the engine is running, at which time the fuselage is generally parallel to the ground.  Or, perhaps for some other reason that I have not properly guessed.   

Either way, I hope that I made the right call.  Thanks again for checking in on my build and helping to keep me in the right direction,

Chris

p.s. The first photo is obviously from the Wingnuts website, and the second is from the San Diego Air & Space Archives.  I know the latter is without any known copyright issues, and hope that the former is being used in an acceptable fashion (and helps to promote their products).

Offline jknaus

  • Hero Member
  • *****
  • Posts: 1121
Re: Wingnut Wings Fokker E.II/E.III Early
« Reply #82 on: September 12, 2014, 01:28:14 AM »
Looks great. I really like the subtle streaking. Interesting observation and deductive reasoning. Something to give me some thought for when I get back to my bird.
James

Offline drdave

  • Hero Member
  • *****
  • Posts: 1036
Re: Wingnut Wings Fokker E.II/E.III Early
« Reply #83 on: September 12, 2014, 06:19:35 AM »
I had gained the impression that the streaking is where muck catches on the fabric in flight as the airflow crosses stringers and formers. It's not just that though, you are trying to create a scale realism, which you've done very well.

Online Alexis

  • Hero Member
  • *****
  • Posts: 8092
  • Love the self
Re: Wingnut Wings Fokker E.II/E.III Early
« Reply #84 on: September 12, 2014, 09:14:45 AM »
Agree with Drdave  . Has anyone thought that the rain water , oils, and such will follow the fabric weave ? Which is parrella ...

or am I way off ...


Terri
Hurra ! , Ich Leben Noch
Body and life is a vessel we use to travel the planet . Femininity is the gift , The miracle comes from what we do with it .

Offline BigBlue

  • Hero Member
  • *****
  • Posts: 640
Re: Wingnut Wings Fokker E.II/E.III Early
« Reply #85 on: September 12, 2014, 12:56:49 PM »
Drdave & Terri, you may both be right, I am just guessing as to the cause.  Thanks to you both and to James for your kind comments.

Chris

Offline BigBlue

  • Hero Member
  • *****
  • Posts: 640
Re: Wingnut Wings Fokker E.II/E.III Early
« Reply #86 on: September 15, 2014, 02:05:53 PM »
Update:


I painted the leather bits using Tamiya Red-Brown (XF-64).  The tires were first painted with Tamiya Neutral Gray (XF-53), but I didn't like the color.  The picture of 105/15 in the Wingnuts instruction book shows what appears to be darker rubber, so I took a page from Des' book, and colored the tires with graphite pencil shavings.  Hat tip to Des.  (As an aside, I finally noticed that the pictures show a fellow left hander at work...)

After some deliberation, I added the oil stains along the bottom of the fuselage using a combination of MIG Black & Russian Earth pigments and AK Interactive Fuel Stains.  The Fuel Stains paint has a nice greasy look, but is a bit too brown for what I wanted, so I first laid out the basic shape of the stain with the pigments, and then brushed a thinned coat of the AK enamel over them.  The side views are representative, but the underside view understates the stains.  You can make out the shine where they are, but the flash knocked much of the color out of them.  The top view is also a bit washed out looking due to the flash, and both are a bit too green.  Need to do a better job with my color balance.

Next, I removed the masking tape from the turned metal areas, and assembled the front end of the aircraft.  I was a bit nervous that I'd lose some of the finish with the masking tape, but fortunately had no issues there.  I added the Spandau trigger cable using EZ Line and a small piece of nickel tube:


I have also made a small start on the rigging by preparing the landing gear with mount points, and taking care of the small control lines coming out of the underside of the cockpit:


I had drilled a hole through the bottom end of the control stick prior to assembly.  After gluing the ends of two pieces of fine mono into the fuselage opening (to represent the elevator control lines running aft), I looped them through the hole and closed them off using small sleeves of polyimide tubing.  The first one went without a hitch, but the second broke through the control stick leaving me in a bit of trouble.  With Bertl's original solution in mind, I took a piece of wire and ran it through the remnants of the original drilled hole making a small cross bar.  I was then able to loop the control lines around the protruding wire, glue them, and trim the wire.  The wing warping control lines from the cockpit now run to 1/48 Gaspatch turnbuckles (held there using the polyimide tubing.)  The turnbuckles will eventually run to the multi-armed device that connects to the various underside wing attachment points (A45).

The undercarriage awaits assembly, as does the tail skid, then rigging will begin in earnest.  I am still undecided if I want to try to do it with EZ Line, mono, or a combination of both.  I feel reasonably certain I want to use mono for at least the upper wing support, but not sure about the rest.

I did run into a bit of trouble that has me a bit down.  At some point over the weekend, I noticed that the seam along the upper fuselage join mysteriously re-appeared.  It started out as a small line, but has now extended from the fuel tank cap into the Iron Cross:
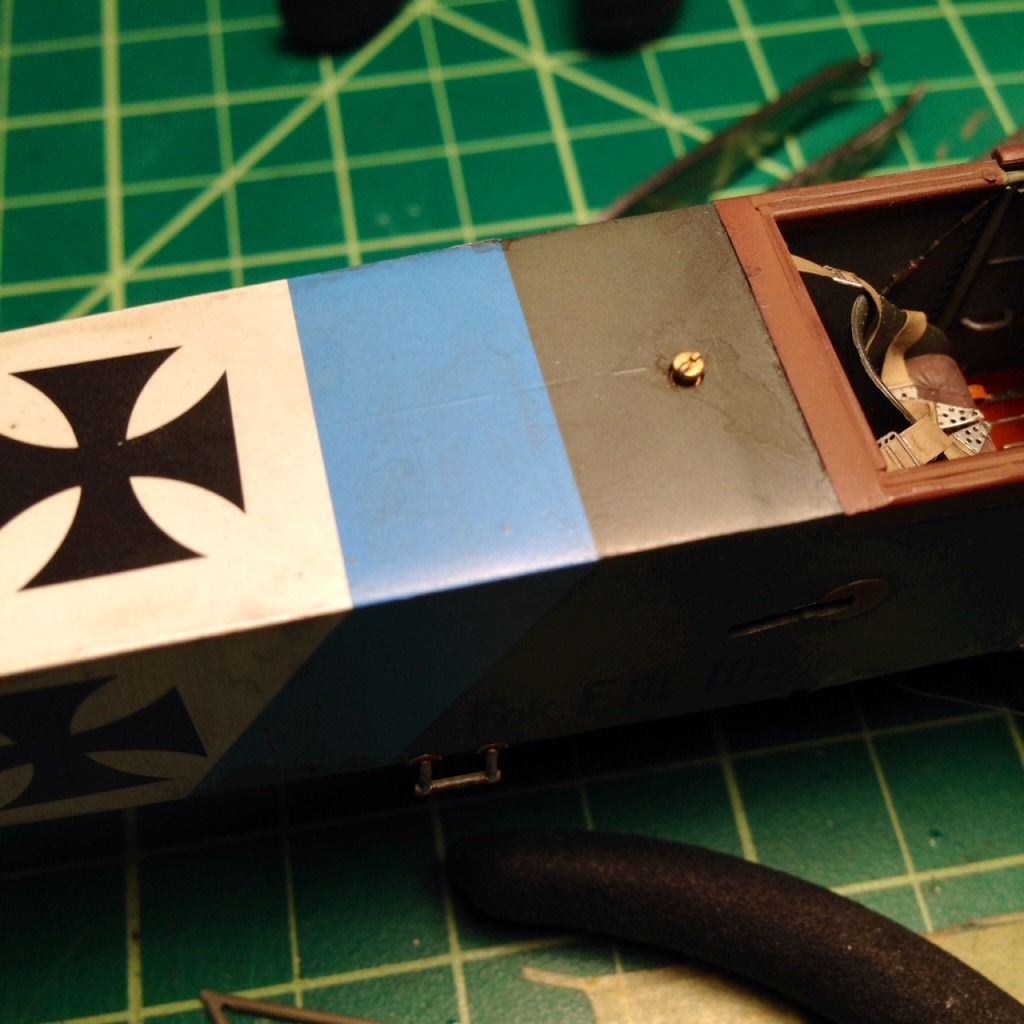


After all that filling and sanding, to have the seam re-appear at this point in the build knocked a bit of the wind out of my sails.  The only explanation that I have is that I noticed it after I had been dry fitting the wings in the fuselage.  It is a very tight fight, and perhaps in my pulling and pushing to get them in, I upset the join somehow.  Either way, it is a bummer.    :(

That's all for now.  Comments, questions and advice are all welcome.

Thanks for checking in and reading all this,

Chris

p.s. The Alclad Matte coat, which I had thought had dried without issue, is in fact up to its old tricks.  I really need to find a substitute.  Another small :(
« Last Edit: September 16, 2014, 01:35:00 PM by BigBlue »

Offline RAGIII

  • Hero Member
  • *****
  • Posts: 19694
Re: Wingnut Wings Fokker E.II/E.III Early
« Reply #87 on: September 15, 2014, 07:32:37 PM »
Looking great! Your staining is subtle yet gives a very good representation! Turning into a beauty!
RAGIII
"A man has to know his limitations": Harry Callahan

"Don't slop it on" Lynda Geisler

Offline radio

  • Hero Member
  • *****
  • Posts: 3952
Re: Wingnut Wings Fokker E.II/E.III Early
« Reply #88 on: September 15, 2014, 09:22:49 PM »
Great work and painting so far.
Martin

Offline KitRookie37

  • Sr. Member
  • ****
  • Posts: 489
Re: Wingnut Wings Fokker E.II/E.III Early
« Reply #89 on: September 19, 2014, 05:37:09 AM »
Good evening to all,
I like it too !!
A gorgeous work.
Best regards.
Alain.
Use the force, Luke.