Author Topic: Wingnut Wings Fokker E.II/E.III Early  (Read 31467 times)

Online uncletony

  • Hero Member
  • *****
  • Posts: 4393
    • Aircraft In Pixels
Re: Wingnut Wings Fokker E.II/E.III Early
« Reply #60 on: September 06, 2014, 07:37:53 AM »
Do you actually chamfer the edges of the fuselage halves prior to joining[?]

Yup :)

Offline Jamo

  • Hero Member
  • *****
  • Posts: 1123
  • Wellington, NZ
    • My Smugmug album
Re: Wingnut Wings Fokker E.II/E.III Early
« Reply #61 on: September 06, 2014, 08:31:50 AM »
Your detailed step by step guide is perfect Chris. Thanks for taking the time to photograph and explain each stage in the process.

I managed to find for you a monoplane image that features Ernst Udet on it:


(Lessing were a cigarette manufacturer that used Udet's name)

A truly excellent build  :)

Cheers
James
Happy Modelling
James Fahey

Check out my massive photo collection here: https://jamesfahey.smugmug.com/

Offline BigBlue

  • Hero Member
  • *****
  • Posts: 640
Re: Wingnut Wings Fokker E.II/E.III Early
« Reply #62 on: September 06, 2014, 01:03:24 PM »
Thanks again, Bo.

James, thanks for the comments, and thank you very much for the poster!  I love it!  I have been admiring the D.VII posters you've been sharing, so it gave me a big smile when I saw this one.  Much appreciated.

Offline BigBlue

  • Hero Member
  • *****
  • Posts: 640
Re: Wingnut Wings Fokker E.II/E.III Early
« Reply #63 on: September 07, 2014, 04:27:55 AM »
Need a quick sanity check, please:

I think there is an error in the Wingnut instructions (gasp).  If I am not mistaken, scheme E (105/15) is equipped with the Garuda propellor, and is finished with decal 40:


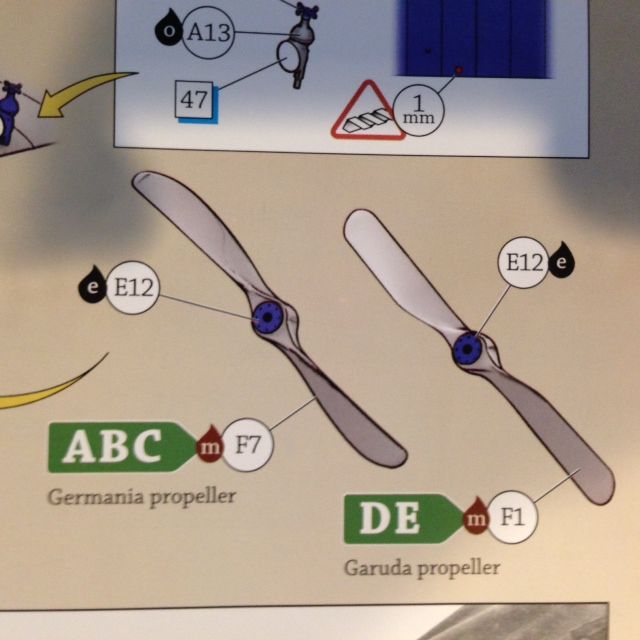
However, it appears to me that decal 40 is meant for the Germania prop, and that 41 is in fact the Garuda marking:


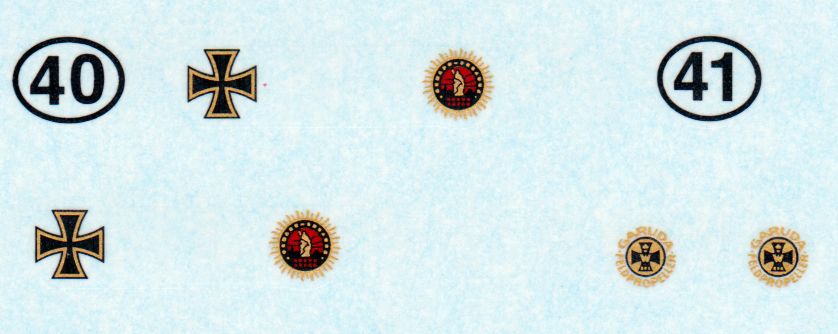
The accompanying photo of 105/15 does appear to show the Garuda propeller, and the other Garuda scheme, "D", does call for decal number 41. 

Assuming I'm not crazy (based only on this limited data point....), this is a heads up to anyone planning to build this scheme.  Unfortunately, I blindly applied the called for decal before my realization, so will need to remove it if I am correct.  I don't want to make a mess of things if for some reason I am mistaken.

Thanks,

Chris

Online uncletony

  • Hero Member
  • *****
  • Posts: 4393
    • Aircraft In Pixels
Re: Wingnut Wings Fokker E.II/E.III Early
« Reply #64 on: September 07, 2014, 05:52:45 AM »
You are not crazy-- but remember to check the WNW site for corrections to the instructions ;)

Offline BigBlue

  • Hero Member
  • *****
  • Posts: 640
Re: Wingnut Wings Fokker E.II/E.III Early
« Reply #65 on: September 07, 2014, 06:29:02 AM »
Once again, thanks Bo.  Did you mean the place on the WnW site where they specifically mention this correction?

Nothing to see here... move along.

Offline Alexis

  • Hero Member
  • *****
  • Posts: 8092
  • Love the self
Re: Wingnut Wings Fokker E.II/E.III Early
« Reply #66 on: September 07, 2014, 10:45:32 AM »
Very nice job on the effect with the wings !


Terri
Hurra ! , Ich Leben Noch
Body and life is a vessel we use to travel the planet . Femininity is the gift , The miracle comes from what we do with it .

Offline hiddeous1973

  • Sr. Member
  • ****
  • Posts: 359
  • Don't worry, Baldrick has a cunning plan !!
Re: Wingnut Wings Fokker E.II/E.III Early
« Reply #67 on: September 07, 2014, 04:15:17 PM »
The corrections for this one are on the wingnut site. Check the the page for the EII/EIII early and click on the hints and tips link. Most planes have some corrections... WNW at least admit when they make a (small) mistake in the instructions

Offline BigBlue

  • Hero Member
  • *****
  • Posts: 640
Re: Wingnut Wings Fokker E.II/E.III Early
« Reply #68 on: September 08, 2014, 12:31:33 AM »
Thanks, H. 

I did see the update (after a gentle pointing in that direction) and was able to remove the incorrect decal without too much difficulty.  Lesson learned: check the tips page on the website prior to construction.

Chris

Offline BigBlue

  • Hero Member
  • *****
  • Posts: 640
Re: Wingnut Wings Fokker E.II/E.III Early
« Reply #69 on: September 08, 2014, 01:33:26 PM »
Terri, thank you for your nice comments.

Quick update:

I have applied all the decals to the fuselage and wings.


As the pictures show, there is a small seam on the upper corners where the side and top decals meet with which I need to deal.  After that, I plan to add some additional weathering using oils before knocking the gloss coat back.  Rigging approaches.

Chris

Offline radio

  • Hero Member
  • *****
  • Posts: 3952
Re: Wingnut Wings Fokker E.II/E.III Early
« Reply #70 on: September 09, 2014, 12:38:03 AM »
Lovely and great work and paint Chris.
Martin

Offline mgunns

  • Hero Member
  • *****
  • Posts: 2255
Re: Wingnut Wings Fokker E.II/E.III Early
« Reply #71 on: September 09, 2014, 08:18:16 AM »
Hello Chris:

You are making progress on it.  Looks good from here.  Can't wait to see you put the finishing touches on it.  You are now on to the fun stuff.  The rigging. ;)

Best

Mark
Mark

We few, we happy few.....

Offline Alexis

  • Hero Member
  • *****
  • Posts: 8092
  • Love the self
Re: Wingnut Wings Fokker E.II/E.III Early
« Reply #72 on: September 10, 2014, 12:09:36 AM »
Two big thumbs up !


Terri
Hurra ! , Ich Leben Noch
Body and life is a vessel we use to travel the planet . Femininity is the gift , The miracle comes from what we do with it .

Offline RAGIII

  • Hero Member
  • *****
  • Posts: 19694
Re: Wingnut Wings Fokker E.II/E.III Early
« Reply #73 on: September 10, 2014, 08:05:26 AM »
In a word, BEAUTIFUL!
RAGIII
"A man has to know his limitations": Harry Callahan

"Don't slop it on" Lynda Geisler

Offline stefanbuss

  • Hero Member
  • *****
  • Posts: 976
Re: Wingnut Wings Fokker E.II/E.III Early
« Reply #74 on: September 10, 2014, 06:50:25 PM »
Chris,

how are you going to deal with that decal related seam? Cutting away happily? Applying copious amounts of Mr. whatever?
Tell me, please!

Stefan

One question, though: The photos of the wings (the ones with the Eisernen Kreuze allready applied) show some kind of green colour, instead of the grey tones you had applied? How does that come?