Author Topic: WnW Fokker D.VII F (501/18 "Red W")  (Read 14698 times)

Offline BigBlue

  • Hero Member
  • *****
  • Posts: 640
Re: WnW Fokker D.VII F (501/18 "Red W")
« Reply #15 on: November 18, 2014, 11:58:31 PM »
Thanks guys!

Bo: I also think yours looked pretty good (i.e great), but was less happy with mine.  It was an execution issue rather than a conceptual one.  While your clamps are nicely formed and consistent, mine were less so.  I used .4 mm brass as well, and while I wouldn't want to go much larger than that, I had trouble placing a hole large enough to get over the head on the spark plug, so the clamps just sort of sat on top.  I also had a bit of trouble with the plugs that angle back towards the cylinders during a test fit.  There just wasn't much room for a natural placement between the pipes that carry the ignition wires and the side of the adjoining cylinder.

Ernie: I am very glad to hear you find the explanations helpful.  As I've said before, I have learned a tremendous amount from this community, and am happy to contribute in some small way.

Justin: I may not have been clear in my haste to post before bed last night.  The tubing is just Albion Nickel Silver Micro Tube (.6 OD- .4 ID).  I'm glad you think it looks ok.  It is not quite as easy to tighten the loops with wire as it is mono, but not too bad all in all.

I added the manifold and water pipe.  Hopefully more to show this evening.


Chris

Offline radio

  • Hero Member
  • *****
  • Posts: 3952
Re: WnW Fokker D.VII F (501/18 "Red W")
« Reply #16 on: November 19, 2014, 12:06:24 AM »
Chris a very beautiful engine.
Martin

Online RAGIII

  • Hero Member
  • *****
  • Posts: 18859
Re: WnW Fokker D.VII F (501/18 "Red W")
« Reply #17 on: November 19, 2014, 02:36:01 AM »
Beautiful to say the least! Outstanding work on those plug leads!
RAGIII
"A man has to know his limitations": Harry Callahan

"Don't slop it on" Lynda Geisler

Offline BigBlue

  • Hero Member
  • *****
  • Posts: 640
Re: WnW Fokker D.VII F (501/18 "Red W")
« Reply #18 on: November 25, 2014, 01:56:23 PM »
Here is a brief update:


Boy, the digitally magnified phone picture is brutal.  Be that as it may, I am close to finishing the engine, with just a bit of plumbing I want to add once I see what will be visible.   I wired the magnetos using the same brass wire as the plug leads (since they're theoretically continuous).  The connectors are small bits of polyimide tube (when you have a hammer, everything looks like a nail.... when I have tubing....)  I fashioned the little do-hickey off of the rear end of the crankcase using styrene rod and, yep, more tubing (all seen above in my earlier post), since the kit piece arrived broken and detached piece was lost before I noticed.  Thanks to Justin for the reference photo of his engine.

I haven't had as much time at the bench as I expected, so progress has been slow.  I doubt I will get much more time before Sunday with the impending holiday here in the States.

Thanks for checking in; sorry there's not more to share.   Happy Thanksgiving to those in the US, and my best wishes to those of us who are not.

Chris
« Last Edit: November 26, 2014, 12:37:28 AM by BigBlue »

Offline Ernie

  • Hero Member
  • *****
  • Posts: 3961
  • "Once more into the breach"
Re: WnW Fokker D.VII F (501/18 "Red W")
« Reply #19 on: November 25, 2014, 09:49:40 PM »
Chris, don't worry about macro photography...with what
you have done here, you should be reveling in it!  Superb
engine, my friend. :D

Cheers,
Ernie :)
The new old guy, take two...

Offline Chris Johnson

  • Hero Member
  • *****
  • Posts: 1959
Re: WnW Fokker D.VII F (501/18 "Red W")
« Reply #20 on: November 25, 2014, 11:45:20 PM »
It looks like a well used engine to me. I can't think of a better compliment. Well done!

Cheers,

Chris
You can have it good; You can have it fast; you can have it cheap. Pick any two, but all three are impossible.

Offline coyotemagic

  • Hero Member
  • *****
  • Posts: 7710
  • "Here's to not buggering it up." -Winston Chuchill
    • My Models
Re: WnW Fokker D.VII F (501/18 "Red W")
« Reply #21 on: November 26, 2014, 02:39:35 AM »
I agree with Chris and Ernie, Chris!  Brilliant looking engine.
Cheers,
Bud
"All men dream: but not equally. Those who dream in the dark recesses of the night awake in the day to find all was vanity. But the dreamers of day are dangerous men, for they may act their dreams with open eyes, and make it possible." -T. E. Lawrence

Offline BigBlue

  • Hero Member
  • *****
  • Posts: 640
Re: WnW Fokker D.VII F (501/18 "Red W")
« Reply #22 on: November 26, 2014, 02:55:13 AM »
Many thanks, Ernie, Chris and Bud.  Your comments are appreciated!

Chris

Online RAGIII

  • Hero Member
  • *****
  • Posts: 18859
Re: WnW Fokker D.VII F (501/18 "Red W")
« Reply #23 on: November 26, 2014, 09:14:45 AM »
Agree with all of the others. Beautiful Engine!!
RAGIII
"A man has to know his limitations": Harry Callahan

"Don't slop it on" Lynda Geisler

Offline BigBlue

  • Hero Member
  • *****
  • Posts: 640
Re: WnW Fokker D.VII F (501/18 "Red W")
« Reply #24 on: November 27, 2014, 04:52:01 AM »
Thanks Rick!

Offline radio

  • Hero Member
  • *****
  • Posts: 3952
Re: WnW Fokker D.VII F (501/18 "Red W")
« Reply #25 on: November 27, 2014, 07:30:00 AM »
An exellent engine.
Martin

Offline jeanluc maumejean

  • Full Member
  • ***
  • Posts: 106
Re: WnW Fokker D.VII F (501/18 "Red W")
« Reply #26 on: November 28, 2014, 07:33:25 AM »
I realize the same.

I take a seat ;)

Offline BigBlue

  • Hero Member
  • *****
  • Posts: 640
Re: WnW Fokker D.VII F (501/18 "Red W")
« Reply #27 on: January 01, 2015, 06:03:25 AM »
Season's greetings to all.

I have a small and much overdue update to post.  The holiday's have made it a bit hard to find bench time, but I have managed to make some progress.  Since last I posted:


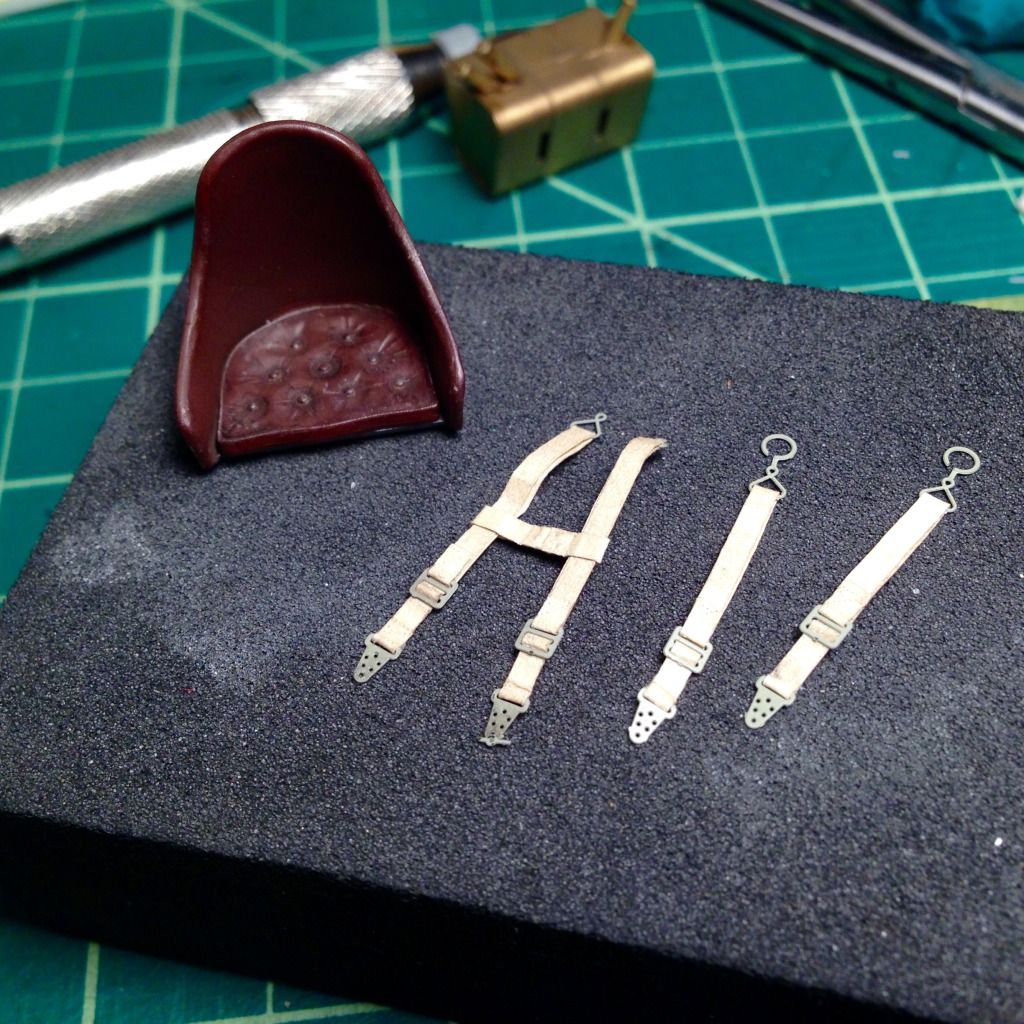
These are the RB Productions WW1 Seat Belts, and the first time I have used anything other than photo etch.  The belts are made from a reasonably durable paper, which comes pre-cut into strips of the appropriate size, and p/e hardware.  You assemble the belts much like you would the real deal (with glue rather than stitching!) and the end result looks very nice.  I found them to be a bit stiffer than I had hoped, which I guess is the tradeoff for the durability.  In order to get them to conform to the seat in a semi-realistic fashion, I wound up wetting the paper which certainly softened them up, but also degraded the glue and some to the details (like the 'stitches' I applied with the serrated edge of the p/e fret.)  All in all, I was happy with the product, but will probably try the HGW belts on my next build (in my quest for realistic draping).  That said, I am sure a more talented modeler could get excellent results with these.

Next up is the instrument panel:


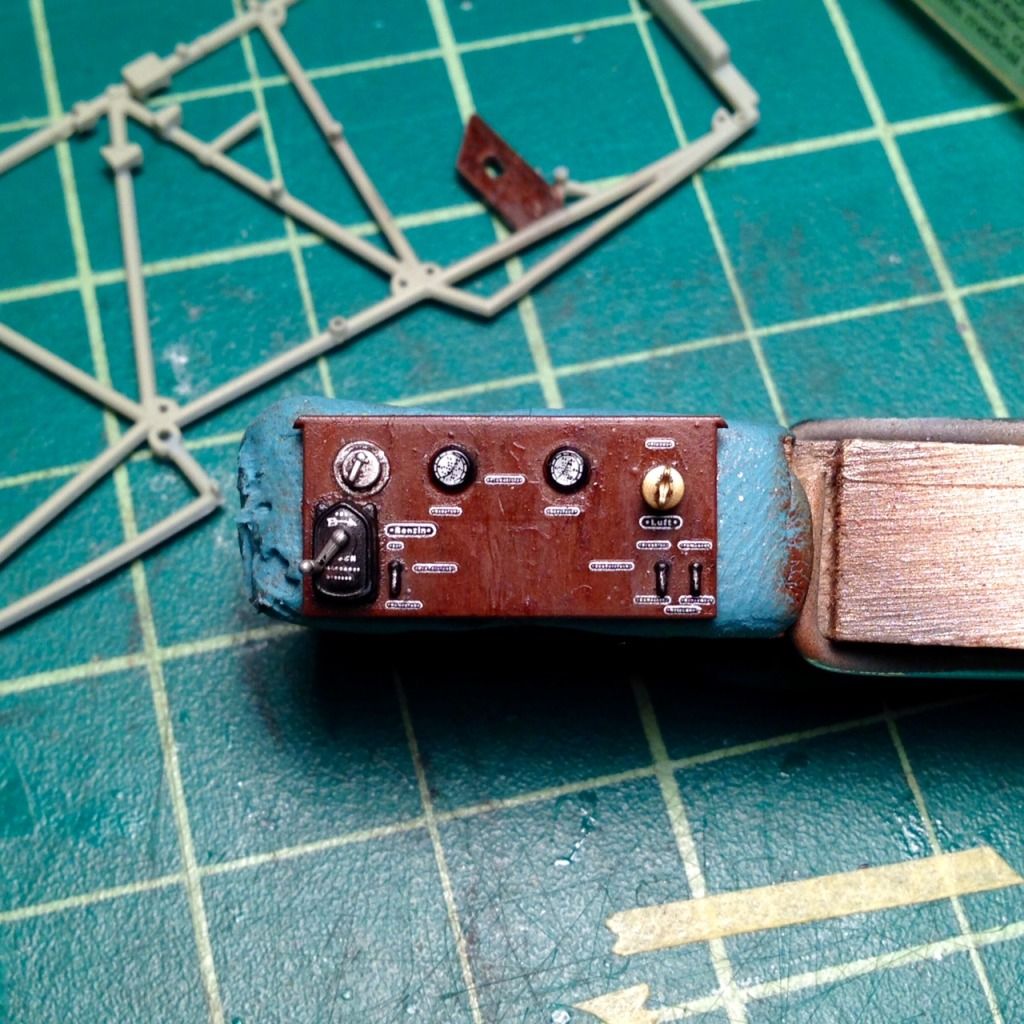
Nothing too out of the ordinary here.  The digitally zoomed camera picture is cruel.  I added copper tubing to the back of the panel using wire, which is visible in the next picture below:


Since the back of the panel will only be visible from directly above, I didn't spend too much time masking and painting, so please excuse the slapdash job.  I tried something different with the cockpit floor boards, which can be seen in photo as well.  After the base acrylic and oil paint grain, I gave it a coat of Tamiya Flat Clear.  I followed this with a layer of hair spray, and this with Alclad Aqua Gloss.  I used a damp cotton swap to remove the 'varnish' in areas that I wanted to appear worn, and used muddy colored pigments (which obviously bite into the flat coat more than the gloss) to dirty the wood up a bit.  It isn't very obvious in the picture, but the different finishes are apparent in the way they reflect light.


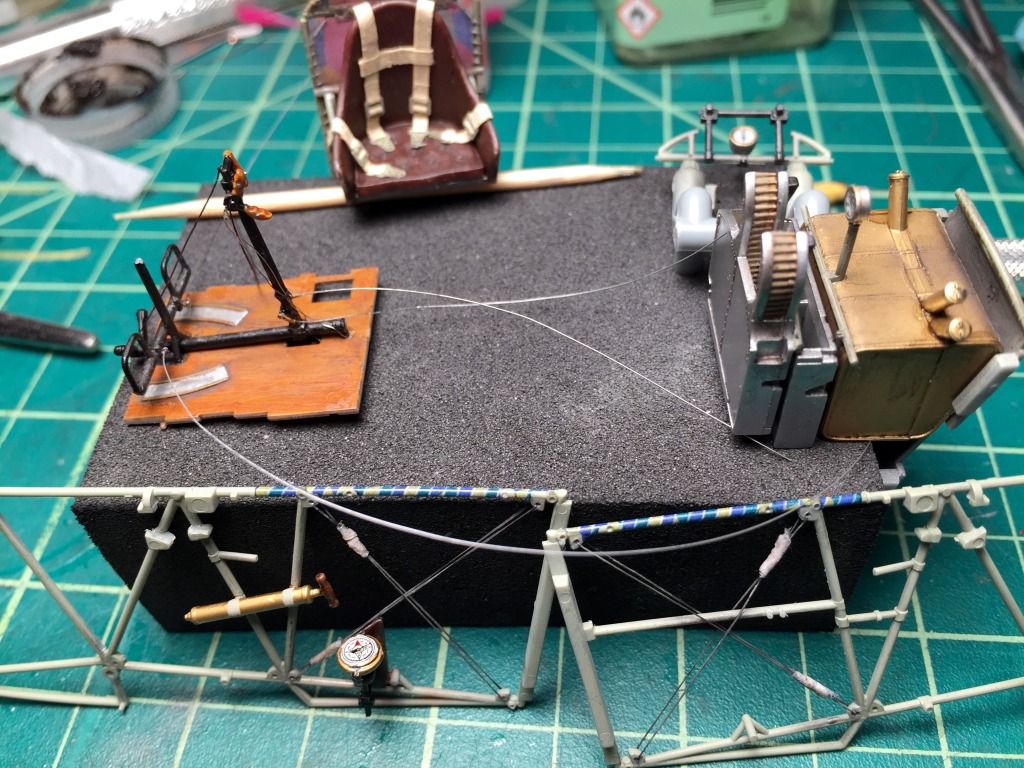
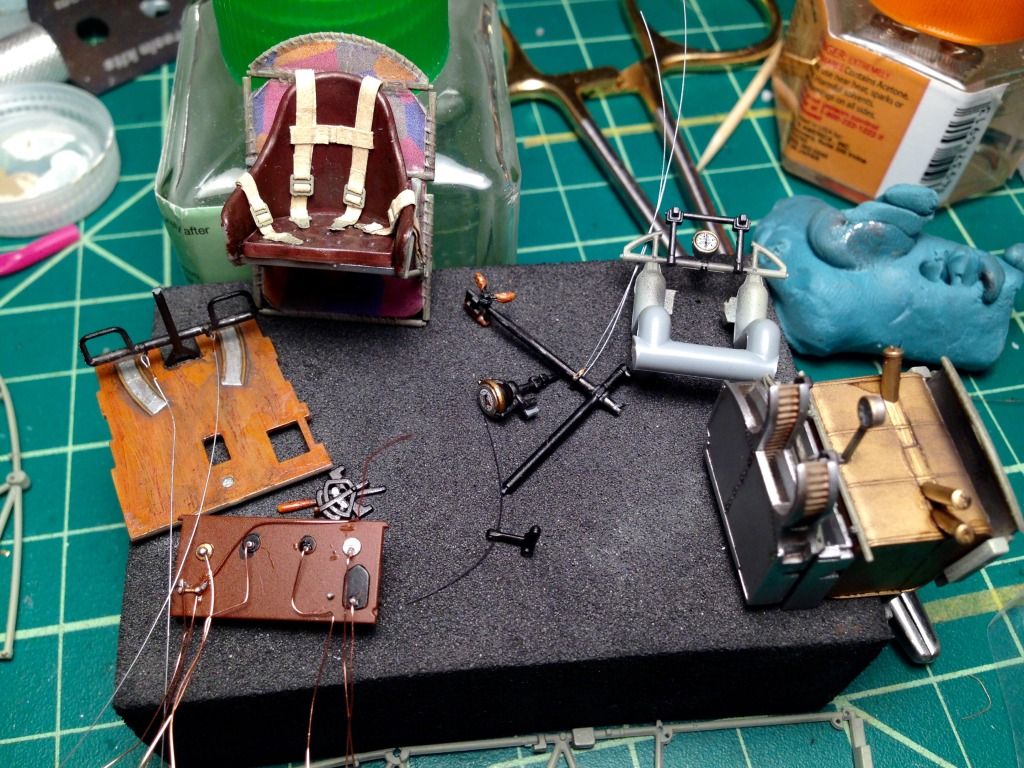
I have rigged the cockpit framing using EZ Line, which I don't love, but I wanted a bit of elasticity in case the framing shape flexes a bit after assembly.  I made the turnbuckles using a small piece of aluminum tube, and suggested the wrapping using small pieces of white gift tissue paper from the Christmas presents.  I thinned Gator's Grip glue with water and dragged the tissue through the slurry prior to "wrapping" them on (more of a mush than a true wrap.)  Once dried, I gave them a brushing with some pigments.  The framing still needs a coat of flat coat on the lozenge decals, and a light oil wash.  The stick is rigged with a mix of monofilament, wire and EZ line (for the machine gun trigger cables).  I used a pair of my rejected ignition wire connectors to mount the elevator cables to the control stick.

I am close to closing up the cockpit, but am still working my way through the proper appearance of the wiring and control rods that attach to the throttle and spark advance levers.  The best picture I've found of the BMW throttle is from the Memorial Flight Association's website:


Their DVII F restoration photos are terrific, but unfortunately are very small so while useful, details can be a bit tricky to pick out.

Like I said above, it really doesn't look like much progress, but between the holiday schedule and my propensity to slow down during detail work, it has taken me longer to get here than it probably seems like it should have.  I hope everyone had a happy and healthy [insert holiday of choice], and wish the same for you all for 2015.

Thanks for looking in,

Chris

Online RAGIII

  • Hero Member
  • *****
  • Posts: 18859
Re: WnW Fokker D.VII F (501/18 "Red W")
« Reply #28 on: January 01, 2015, 09:42:08 AM »
The interior bits are looking terrific! Well Done!
RAGIII
"A man has to know his limitations": Harry Callahan

"Don't slop it on" Lynda Geisler

Offline lcarroll

  • Administrator
  • Hero Member
  • ******
  • Posts: 8558
Re: WnW Fokker D.VII F (501/18 "Red W")
« Reply #29 on: January 01, 2015, 01:34:26 PM »
    Some really nice work going on here, Chris. This will be even more impressive once all of the sub components/assemblies start to come together. This is going to be a beauty! 8)
Cheers,
Lance