Author Topic: 1:72 Maquette Ilya Muromets  (Read 48842 times)

Offline RAGIII

  • Hero Member
  • *****
  • Posts: 18793
Re: 1:72 Maquette Ilya Muromets
« Reply #30 on: August 06, 2013, 07:45:55 PM »
Your engines look terrific. Very impressive work to date!
RAGIII
"A man has to know his limitations": Harry Callahan

"Don't slop it on" Lynda Geisler

Offline Zabu

  • Hero Member
  • *****
  • Posts: 681
Re: 1:72 Maquette Ilya Muromets
« Reply #31 on: August 06, 2013, 09:47:51 PM »
Hi IanB.

Great job in those tiny engines .

Your doing wonders in that model.

Cheers

Offline Rob Hart

  • Hero Member
  • *****
  • Posts: 694
Re: 1:72 Maquette Ilya Muromets
« Reply #32 on: August 06, 2013, 10:27:19 PM »
Great subject! A pity the kit is so rough, but it looks like you are gaining the upper hand.

Offline IanB

  • Hero Member
  • *****
  • Posts: 2435
Re: 1:72 Maquette Ilya Muromets
« Reply #33 on: August 12, 2013, 12:44:10 PM »
I've put the engines away until later as there's no point adding all that detail and then putting them in a bag until needed.
 So today was spent preparing the fuselage interior and building some of the interior fittings. The fuselage side bracing is just drawn on with a pencil as it really can't be seen, thin strip was added as the formers. The upper fuselage bracing will be done with mono as it doesn't follow the roof contours, the cross bracing likewise, but the floor will also be drawn in.
  I found a set of 4 bombs, I don't recall which kit they came from, but the size was almost perfect. The tails were removed and replaced with a small piece of plastic rod. They'll be separated later and fitted into the bomb rack when it is built. The Deperdussin frame was made from .016" brass wire with plastic rod for the switch console and pulleys, and .005" sheet for the main pulley cover. I'll drill the lightening holes in it later. Steering wheel is from .016" aluminium tube bent around plastic rod, with .005" plastic strip for the braces.
 I've also started to prepare the cockpit floor and wing spars. Since I'm mounting the wings on brass rod for strength, the spars are plastic rod hollowed out to fit over the brass rod.


Slowly but surely....
Thanks for looking in!

Ian
« Last Edit: July 02, 2017, 04:23:05 AM by IanB »

Offline Des

  • Administrator
  • Hero Member
  • ******
  • Posts: 9325
    • ww1aircraftmodels.com
Re: 1:72 Maquette Ilya Muromets
« Reply #34 on: August 12, 2013, 12:56:12 PM »
Coming along very nicely Ian, the fuselage interior looks great, it will be nice to see the cockpit details start to go into place.

Des.
Late Founder of ww1aircraftmodels.com and forum.ww1aircraftmodels.com

Offline Adam

  • Hero Member
  • *****
  • Posts: 647
Re: 1:72 Maquette Ilya Muromets
« Reply #35 on: August 12, 2013, 10:58:36 PM »
As soon as I finished my model Gotha IV, I had in my hand model Ilya Muromets, but I was very hesitant, and I did not buy it. Frightened me rigging. Maybe it was a mistake, who knows?

Now I can only watch how your beautiful model is created.

Adam.
« Last Edit: August 13, 2013, 04:21:02 AM by Adam »

Offline GAJouette

  • Hero Member
  • *****
  • Posts: 3579
  • " Beware of the Spanish Inquisition"
Re: 1:72 Maquette Ilya Muromets
« Reply #36 on: August 13, 2013, 01:37:05 AM »
  Ian,
Man the ol'big stick never looked better my old friend. Your additional scratch built details First Class all the way as is the entire project to date. Honestly it almost makes me want to drag my Ilya out of mothballs and give her a go. Especially after having been following your Ilya build. Now I can see with extra work the kit is indeed worth building. Keep up the excellent and impressive work.
Highest Regards,
Gregory Jouette
" What Me Worry"

mike in calif

  • Guest
Re: 1:72 Maquette Ilya Muromets
« Reply #37 on: August 13, 2013, 04:41:17 AM »
Nice start on a beast of a kit Ian.

Offline IanB

  • Hero Member
  • *****
  • Posts: 2435
Re: 1:72 Maquette Ilya Muromets
« Reply #38 on: September 22, 2013, 12:05:06 PM »
I've finally got around to doing some more on this project. Delays due to trying to reclaim the garden/yard from nature, and remodelling a bathroom - both of which are still ongoing!

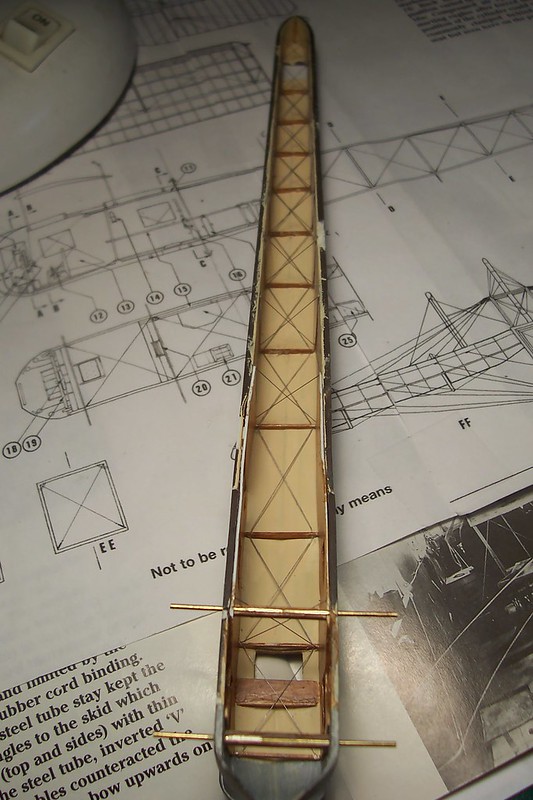
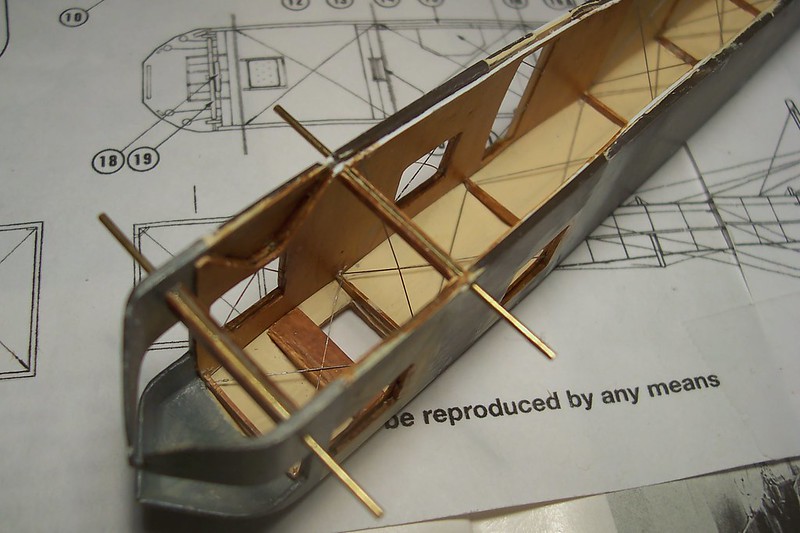
 The fuselage halves have been joined and I've added the gunner's platform and lower wing wountings, which are brass rod. I used evergreen channel to cover the rear one, and rectangular section rod for the front, hollowed out with a fine saw to fit over the brass rod.

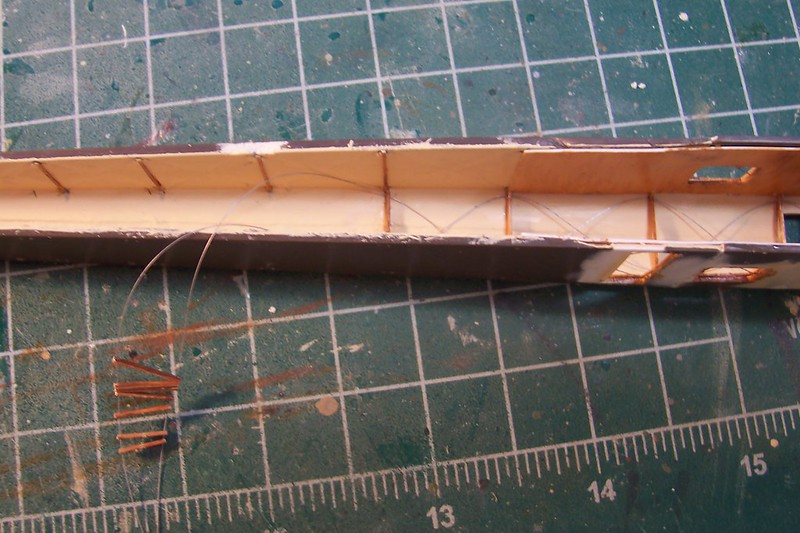
 I decided the pencil lines for the interior weren't going to work, so I drilled all the holes (54 in the fuselage, 2 each for each roof cross-member!) and have spent spare time this week adding the interior rigging. Most of it will never be seen, but with such large windows up front I had to add it just in case anyone ever decides to shine a torch inside... :-"

All done now apart from the lower cross bracing which will be done in the same way as the upper - by threading the cross members, then gluing them in place. I've also made a little more progress on the interior fittings. I'll post pics of those when I start to install them.

This is the same method I used for the Bleriot upper and lower cross bracing, seems to work well!


Thanks for looking in!

Ian
« Last Edit: July 02, 2017, 04:26:22 AM by IanB »

Offline uncletony

  • Hero Member
  • *****
  • Posts: 4349
    • Aircraft In Pixels
Re: 1:72 Maquette Ilya Muromets
« Reply #39 on: September 22, 2013, 12:06:35 PM »
Nifty!

Offline Zabu

  • Hero Member
  • *****
  • Posts: 681
Re: 1:72 Maquette Ilya Muromets
« Reply #40 on: September 22, 2013, 12:24:15 PM »
Great looking interior Ian.

Nicely done.

Cheers

Offline GAJouette

  • Hero Member
  • *****
  • Posts: 3579
  • " Beware of the Spanish Inquisition"
Re: 1:72 Maquette Ilya Muromets
« Reply #41 on: September 22, 2013, 12:51:09 PM »
 Ian,
Outstanding craftsmanship my old friend. I believe you made an excellent call deciding to
rig hsr interior. Best luck in your remodeling project too. I've a complete remodeling and update.
for our home before moving back toTexas. Want a job?

Highest Regards,
Gregory Jouette
" What Me Worry"

Offline Ernie

  • Hero Member
  • *****
  • Posts: 3961
  • "Once more into the breach"
Re: 1:72 Maquette Ilya Muromets
« Reply #42 on: September 22, 2013, 09:43:45 PM »
Even with the outside "distractions", you are making good progress, Ian.
The interior bracing is spot-on...worth the extra effort.  If I haven't mentioned
the interior wood effects, they are great!  Looking forward to more updates.

Cheers,
Ernie :)
The new old guy, take two...

Offline IanB

  • Hero Member
  • *****
  • Posts: 2435
Re: 1:72 Maquette Ilya Muromets
« Reply #43 on: October 02, 2013, 01:16:56 AM »
A little more progress has been made on the interior detail. A lot of time and not much to show, but it needs doing. The last problem is the gunner's ladder. I'm using .016 brass rod and superglue but every time I get it put together it breaks when I try to touch up the paint. Anyone know of any 1:72 scale ladders that are available, maybe from a train accessories supplier or similar?

Fuel strainers/sumps and fire extinguisher:


Bomb racks


General interior view:


Pilot's seat and deperdussin frame/steering wheel:


Once I get the ladder sorted out I can fit the rest of the interior rigging and the floors, the rudder pedals and framework, then get some paint on it!

Ian
« Last Edit: July 02, 2017, 04:31:29 AM by IanB »

Offline Ernie

  • Hero Member
  • *****
  • Posts: 3961
  • "Once more into the breach"
Re: 1:72 Maquette Ilya Muromets
« Reply #44 on: October 02, 2013, 03:23:10 AM »
Ian you are doing marveolus work on the beastie!  I have been snooping around
and am wondering if a 1/72 boarding ladder from a modern jet would work?
  Here's a couple of linky ideas...

http://www.eduard.com/store/Eduard/Photo-etched-parts/Photo-etched-set/Aircraft/1-72/F-4-ladder-1-72.html

http://www.ebay.com/itm/Dreammodel-1-72-0545-Su-27UB-30-30MKK-Ladder-PE-/360754313445

Cheers,
Ernie :)
The new old guy, take two...