Author Topic: 1:32nd scale OEFFAG Albatros D.III  (Read 1013 times)

Offline NigelR

  • Hero Member
  • *****
  • Posts: 2778
Re: 1:32nd scale OEFFAG Albatros D.III
« Reply #15 on: July 14, 2026, 07:29:03 PM »
I'm going to get me one of those riveter tools seeing how well it's worked on this build and on Bertl's Albatros builds.

Offline Mike Norris (UK)

  • Hero Member
  • *****
  • Posts: 2735
  • RAF Old and Bold
    • Mikes WW1 Aircraft Models
Re: 1:32nd scale OEFFAG Albatros D.III
« Reply #16 on: July 15, 2026, 06:25:00 AM »
Hi all,
The basic fuselage is more or less completed.
The photo-etch parts have been painted and added.
Weathered with Flory Models dark dirt wash and dry brushing with Mr. Color Super Metallic 2 (203).

Now it's onto the engine,

Mike


« Last Edit: July 17, 2026, 07:12:49 AM by Mike Norris (UK) »


Retired - 27 years RAF service then 20 years Military Aerospace Technical Author/editor.

Offline NigelR

  • Hero Member
  • *****
  • Posts: 2778
Re: 1:32nd scale OEFFAG Albatros D.III
« Reply #17 on: July 15, 2026, 06:17:03 PM »
That looks superb Mike, the overall finish is fantastic. The wood and the nail runs look particularly impressive.

Offline Mike Norris (UK)

  • Hero Member
  • *****
  • Posts: 2735
  • RAF Old and Bold
    • Mikes WW1 Aircraft Models
Re: 1:32nd scale OEFFAG Albatros D.III
« Reply #18 on: July 16, 2026, 12:33:12 AM »
Hi all,
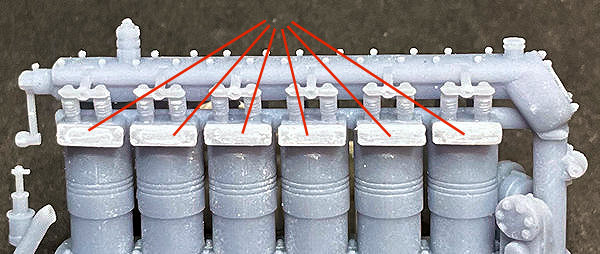
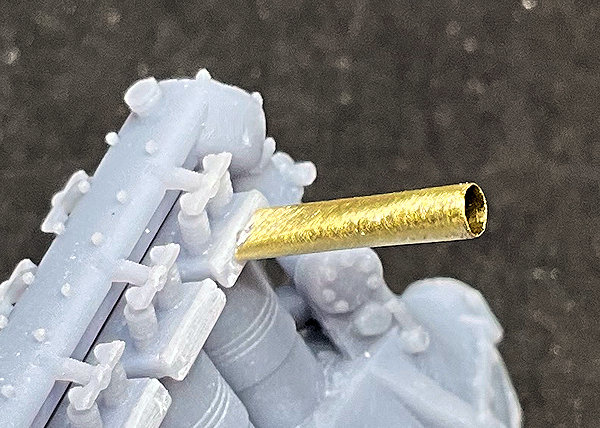
The kit supplied engine exhaust pipes are flattened along their entire length.
However, most photographs of the aircraft show the exhaust pipes at the engine end being flattened, but then changing to tubular shape at their outer ends.
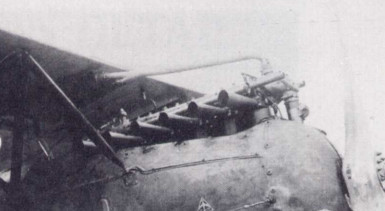
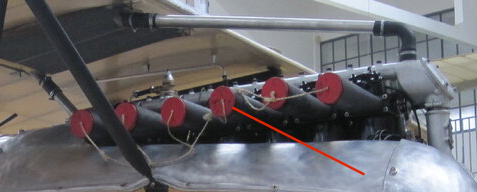
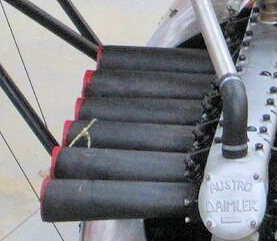


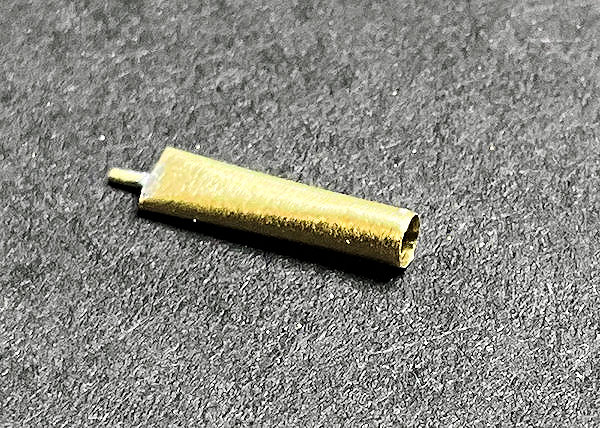
The replacement exhaust pipes were made as follows:

File or sand away the locating stub on the engine side of the exhaust pipe flanges.
Carefully cut away the exhaust pipes close to the flange.
Using thin CA adhesive, secure each flange centrally onto the exhaust outlets of the engine cylinders.
Cut a 10 mm length of 2.0 mm diameter Brass tube, such as ?Albion Alloy?s? (MBT20) or similar.
Using flat pliers, carefully flatten one end of the tube and reduce the flattening outboard to approximately half way along.
The bore of the flattened end should be approximately 0.5 mm wide.
Cut a length of 0.5 mm diameter Brass rod, such as that from ?Albion Alloy?s? or similar.
Insert the rod centrally into the flattened end of the tube, leaving approximately 4 mm protruding.
Secure the rod in the tube using either thicker, slow setting CA adhesive or soft solder the rod in the tube.
Drill a hole of 0.5 mm diameter centrally into an exhaust flange.
Test fit the exhaust pipe into the engine, making sure it?s 90 degrees to the engine when viewed from above and from the front.
Repeat the procedure to create the remaining five exhaust pipes.



Retired - 27 years RAF service then 20 years Military Aerospace Technical Author/editor.

Offline bobs_buckles

  • Hero Member
  • *****
  • Posts: 3874
  • Freedom isn't free.
    • Bobs Buckles
Re: 1:32nd scale OEFFAG Albatros D.III
« Reply #19 on: July 16, 2026, 02:01:39 AM »
Super duper work, Mike!

Carry on, Sir!

BB


https://www.bobsbuckles.co.uk/

Last Minute Man Of Faith

Offline NigelR

  • Hero Member
  • *****
  • Posts: 2778
Re: 1:32nd scale OEFFAG Albatros D.III
« Reply #20 on: July 16, 2026, 06:14:01 PM »
The kit supplied engine exhaust pipes are flattened along their entire length.
However, most photographs of the aircraft show the exhaust pipes at the engine end being flattened, but then changing to tubular shape at their outer ends.
No photograph I've ever seen shows these flattened exhaust pipes, I've no idea where LukGraph got the idea for these from. It was pointed out to them during the development of the kit but for some reason they ignored the input (like several other suggestions to make this model more accurate). Oh well, you've done a great job correcting this and explained how to do it.

I'm so glad you built this kit before I did..... :)

Offline Umlaufmotor

  • Hero Member
  • *****
  • Posts: 1265
Re: 1:32nd scale OEFFAG Albatros D.III
« Reply #21 on: July 16, 2026, 11:00:18 PM »
The nail heads - how well does that work with this resin material using the riveter, Mike?

Servus
Bertl

Hi Bertl,
OK really.
Just have to be careful you don't apply too much pressure as the cast resin is quiet soft compared to plastic.
Other than that, no problem,

Mike

Thanks, Mike, for the explanation. I was actually worried that the material would be too hard to attach the rows of nails neatly. But I can see how beautifully and precisely they're engraved on your model.
By the way, cool idea with the exhaust pipes.

Servus
Bertl

Offline Umlaufmotor

  • Hero Member
  • *****
  • Posts: 1265
Re: 1:32nd scale OEFFAG Albatros D.III
« Reply #22 on: July 16, 2026, 11:13:16 PM »
................ I'm so glad you built this kit before I did..... :)

Me too  8)

Offline Mike Norris (UK)

  • Hero Member
  • *****
  • Posts: 2735
  • RAF Old and Bold
    • Mikes WW1 Aircraft Models
Re: 1:32nd scale OEFFAG Albatros D.III
« Reply #23 on: July 17, 2026, 07:03:41 AM »
The kit supplied engine exhaust pipes are flattened along their entire length.
However, most photographs of the aircraft show the exhaust pipes at the engine end being flattened, but then changing to tubular shape at their outer ends.
No photograph I've ever seen shows these flattened exhaust pipes, I've no idea where LukGraph got the idea for these from. It was pointed out to them during the development of the kit but for some reason they ignored the input (like several other suggestions to make this model more accurate). Oh well, you've done a great job correcting this and explained how to do it.

I'm so glad you built this kit before I did..... :)

Hi Nigel,
Probably this render.


Not known for taking suggestions.
I pointed out the resin cast BE2c front end looked more like the RE8.

Ignored, so I modified the kit,

Mike


Retired - 27 years RAF service then 20 years Military Aerospace Technical Author/editor.

Offline Mike Norris (UK)

  • Hero Member
  • *****
  • Posts: 2735
  • RAF Old and Bold
    • Mikes WW1 Aircraft Models
Re: 1:32nd scale OEFFAG Albatros D.III
« Reply #24 on: July 17, 2026, 07:10:51 AM »
Hi all,
Engine finished.
Always tricky painting a fully detailed 3D printed engine.
The paints used were Tamiya, Mr. Metal Color, MRP and Alclad.
The only mods to the engine were the twelve ignition leads and the pipe from the valve at the rear of the camshaft cover.
I also drilled out the propeller shaft locating hole to 2.0 mm and fitted a Brass tube.
The shaft of the kit supplied propeller was smaller in diameter, so a sloppy fit.
The propeller was drilled out to.

Next up is fitting the engine into the fuselage then the nose cowl,

Mike 


Retired - 27 years RAF service then 20 years Military Aerospace Technical Author/editor.

Offline NigelR

  • Hero Member
  • *****
  • Posts: 2778
Re: 1:32nd scale OEFFAG Albatros D.III
« Reply #25 on: July 17, 2026, 06:18:11 PM »
Nice work on the engine. Quite a lot of build lines evident (although they won't really be seen). I think the quality of the 3D printing seems to have improved further since this kit....

Offline Mike Norris (UK)

  • Hero Member
  • *****
  • Posts: 2735
  • RAF Old and Bold
    • Mikes WW1 Aircraft Models
Re: 1:32nd scale OEFFAG Albatros D.III
« Reply #26 on: July 17, 2026, 11:43:18 PM »
Hi all,
Engine fitted including the replacement exhaust pipes and nose cowl.
Machine gun blast tubes replaced with blackened 0.8 mm diameter Brass tube.

Mike


Retired - 27 years RAF service then 20 years Military Aerospace Technical Author/editor.