Author Topic: 1:32nd scale Lloyd C.V  (Read 5304 times)

Offline Mike Norris

  • Hero Member
  • *****
  • Posts: 2214
  • RAF Old and Bold
    • Mikes WW1 Aircraft Models
1:32nd scale Lloyd C.V
« on: August 03, 2022, 07:55:01 AM »
Hi all,
The build of the Junkers J.1 is coming to a close.
So next up is the 1:32nd scale resin/3D printed Lloyd C.V from 'Lukgraph'.

On October the 4th, 1917, Feldpilot (Zugsfuhrer) Adolph Wiltsch and his Observer Roman Schmidt were flying Lloyd C.V Serial No: 46.01 from Flik 13 on the Russian Front.
They were attacked by three Russian ‘Sopwith’ type aircraft.
They managed to evade these attackers and Schmidt managed to shoot down one in flames.
This was Schmidt’s third aerial victory.

Mike


Retired - 27 years RAF service then 20 years Military Aerospace Technical Author/editor.

Offline Alexis

  • Hero Member
  • *****
  • Posts: 7947
  • Love the self
Re: 1:32nd scale Lloyd C.V
« Reply #1 on: August 03, 2022, 10:55:36 AM »
Reallllly looking forward to this one Mike


Chair , check , coffee , check , yup I'm set !


Alexis
Hurra ! , Ich Leben Noch
Body and life is a vessel we use to travel the planet . Femininity is the gift , The miracle comes from what we do with it .

Offline Mike Norris

  • Hero Member
  • *****
  • Posts: 2214
  • RAF Old and Bold
    • Mikes WW1 Aircraft Models
Re: 1:32nd scale Lloyd C.V
« Reply #2 on: August 09, 2022, 06:17:57 AM »
Hi all,
Having completed the basic chapters for the Lloyd C.V build log, I've found a few bits that will need adding.

Addition lower wing support rods.
Increased depth of support rods in upper wings.
Cockpit cross bracing wires.
Pilot cockpit control rods and wires etc.
Pilot cockpit flight control cables.

Plus the following.


Mike


Retired - 27 years RAF service then 20 years Military Aerospace Technical Author/editor.

Offline Dirigible-Al

  • Hero Member
  • *****
  • Posts: 530
Re: 1:32nd scale Lloyd C.V
« Reply #3 on: August 09, 2022, 06:51:54 AM »
Hello Mike
I love it that you say "a few bits that need doing" when most people wouldn't know they are there. Really looking forward to seeing this and I admire your attention to detail.
Alan.
I heard that it all started when a bloke called Archie Duke shot an ostrich 'cause he was hungry!

Offline Mike Norris

  • Hero Member
  • *****
  • Posts: 2214
  • RAF Old and Bold
    • Mikes WW1 Aircraft Models
Re: 1:32nd scale Lloyd C.V
« Reply #4 on: August 11, 2022, 05:43:18 AM »
Hi all,
The six kit supplied 3D printed exhaust pipes are not chamfered at the ends and not bored out internally.
Also, when fitted, the exhaust pipes should be angled slightly rearwards, which the kits pipes are not.
Therefore, I discarded the kit pipes and replaced them with rod and rubber tube.

The two supplied 3D printed halves of the cooling pipe are intended to be butt joined to the engine and to each other. This is a weak method of joining parts.
Therefore I cut out and replaced the larger diameter portion of the front pipe and replaced it with Brass 1.4 mm diameter tube.
The ends of the pipe were drilled and pinned into the engine, using 0.3 mm diameter Brass rod,

Mike

« Last Edit: August 15, 2022, 04:10:08 AM by Mike 'Sandbagger' Norris »


Retired - 27 years RAF service then 20 years Military Aerospace Technical Author/editor.

Online RAGIII

  • Hero Member
  • *****
  • Posts: 18850
Re: 1:32nd scale Lloyd C.V
« Reply #5 on: August 11, 2022, 07:21:11 AM »
Excellent start and looking forward to your build!
RAGIII
"A man has to know his limitations": Harry Callahan

"Don't slop it on" Lynda Geisler

Offline FAf

  • Hero Member
  • *****
  • Posts: 1077
Re: 1:32nd scale Lloyd C.V
« Reply #6 on: August 12, 2022, 04:14:57 AM »
Clever upgrades! Looks very promising!
/Fredrik

Offline Mike Norris

  • Hero Member
  • *****
  • Posts: 2214
  • RAF Old and Bold
    • Mikes WW1 Aircraft Models
Re: 1:32nd scale Lloyd C.V
« Reply #7 on: August 12, 2022, 11:14:15 PM »
Hi all,
My assumptions for how the engine cooling system worked are:

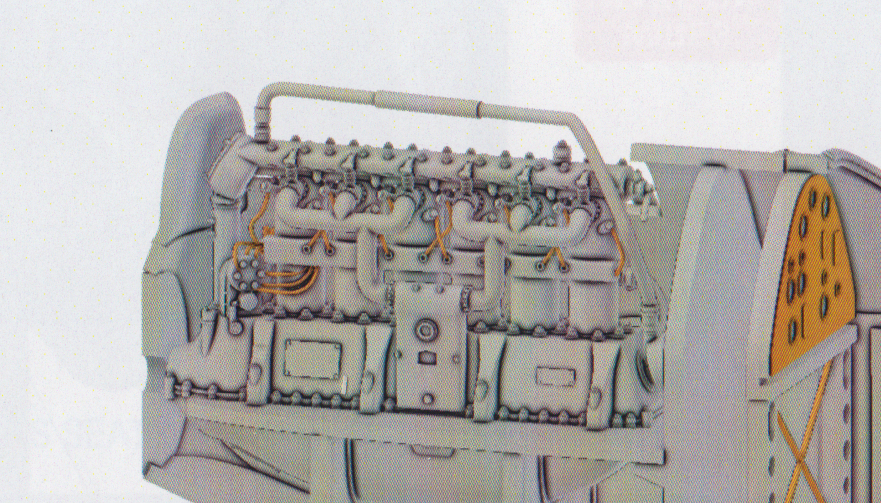
The engine driven water pump on the lower, rear of the engine, supplied water to the six engine cylinders.
This supply was pumped through a pipe interconnected to the lower right of the cylinders.
The water flowed up inside the cooling jacket of each cylinder and flowed out into the the return in the camshaft housing.
From there it flowed through the external forward pipe over the camshaft housing and into the base of the radiator.
It was then drawn around the inside of the radiator housing then down through the radiator to be drawn back to the water pump through the external rear pipe.

The external overhead cooling pipe supplied in the kit is in two parts and joined together.
The radiator just sits on the top of this pipe.
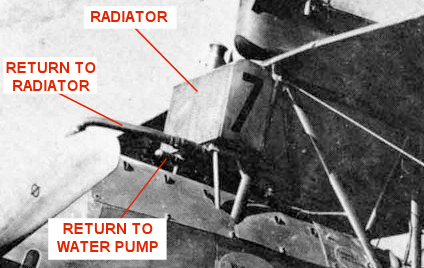
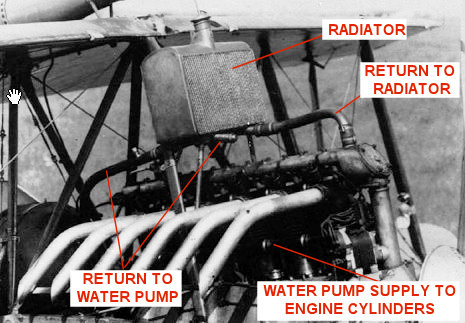
However, it seems this is not correct as can be seen from the following photographs taken at the time.
The supply to and the return from the radiator are separate pipes, which given the above would make sense.

Mike


Retired - 27 years RAF service then 20 years Military Aerospace Technical Author/editor.

Offline Mike Norris

  • Hero Member
  • *****
  • Posts: 2214
  • RAF Old and Bold
    • Mikes WW1 Aircraft Models
Re: 1:32nd scale Lloyd C.V
« Reply #8 on: August 16, 2022, 06:34:47 AM »
Hi all,
I decided to modify the radiator pipes to better represent those fitted to the actual aircraft.
The 3D printed rear pipe in the kit was discarded and a replacement made from 1.0 mm diameter rod with a 90 degree bend in the radiator end.
A hole was drilled into the water pump on the rear of the engine and also into the underside of the radiator.
The forward facing extension to the pipe was added with 1.0 mm diameter rod and 1.2 mm diameter tube.
The forward 3D printed pipe in the kit was modified with a 1.2 mm diameter end tube and 1.0 mm diameter 90 degree bent rod.
A 1.4 mm diameter tube was cut and fitted to the pipe stub on the top, front of the camshaft housing.
A hole was drilled for this pipe in the underside of the radiator.
Although dry fitted for now, it can all be added after the fuselage, with engine, has been closed up,

Mike


Retired - 27 years RAF service then 20 years Military Aerospace Technical Author/editor.

Online RAGIII

  • Hero Member
  • *****
  • Posts: 18850
Re: 1:32nd scale Lloyd C.V
« Reply #9 on: August 16, 2022, 08:48:12 AM »
Nice progress Mike!
RAGIII
"A man has to know his limitations": Harry Callahan

"Don't slop it on" Lynda Geisler

Offline Mike Norris

  • Hero Member
  • *****
  • Posts: 2214
  • RAF Old and Bold
    • Mikes WW1 Aircraft Models
Re: 1:32nd scale Lloyd C.V
« Reply #10 on: August 19, 2022, 08:59:32 PM »
Hi all,
The basic engine is nearly finished.
Just the ignition leads to add.
The control rods, pipes and exhaust pipes will be added later in the build.
As usual, painting a complete 3D printed engine is not that easy.
Personally I'd prefer to paint parts then assemble the engine, but that's the way 3D printing is taking us,

Mike


Retired - 27 years RAF service then 20 years Military Aerospace Technical Author/editor.

Offline Mike Norris

  • Hero Member
  • *****
  • Posts: 2214
  • RAF Old and Bold
    • Mikes WW1 Aircraft Models
Re: 1:32nd scale Lloyd C.V
« Reply #11 on: August 23, 2022, 07:30:15 AM »
Hi all,
The basic engine is now complete.
I've added the ignition leads, spark advance and throttle control rods and other pipes.

Mike


Retired - 27 years RAF service then 20 years Military Aerospace Technical Author/editor.

Offline FAf

  • Hero Member
  • *****
  • Posts: 1077
Re: 1:32nd scale Lloyd C.V
« Reply #12 on: August 23, 2022, 03:24:55 PM »
Great work and nice colours!
/Fredrik

Offline Mike Norris

  • Hero Member
  • *****
  • Posts: 2214
  • RAF Old and Bold
    • Mikes WW1 Aircraft Models
Re: 1:32nd scale Lloyd C.V
« Reply #13 on: August 30, 2022, 05:06:34 AM »
Hi all,
The fuselage components have been prepared for assembly.
The wood finish is 'Tamiya' Dark Yellow (XF60) over painted with Windsor & Newton’ Griffin (Alkyd) Burnt Umber oil paint.
The ammunition drum is a spare from a 'Gaspatch' Parabellum set, as its more in-scale than the kit supplied 3D printed part.
Now it's onto the control rods and cables before the fuselage is assembled and closed up with the engine,

Mike


Retired - 27 years RAF service then 20 years Military Aerospace Technical Author/editor.

Offline Mike Norris

  • Hero Member
  • *****
  • Posts: 2214
  • RAF Old and Bold
    • Mikes WW1 Aircraft Models
Re: 1:32nd scale Lloyd C.V
« Reply #14 on: September 01, 2022, 10:24:56 PM »
Hi all,
The internal fuselage detail is now complete.
I've added Control cables and cross bracing using 0.08 mm diameter mono-filament.
The spark advance control rod is 0.4 mm diameter Nickel-Silver tube, as will be the throttle control rod.
The throttle control rod will be added after the fuselage is closed up, so it can be passed through the left side of the instrument panel frame.

I may add a map to the gunners table,

Mike


Retired - 27 years RAF service then 20 years Military Aerospace Technical Author/editor.