Author Topic: LVA Fokker D.VII from Wingnut Wings  (Read 27948 times)

Offline michael

  • Sr. Member
  • ****
  • Posts: 464
Re: LVA Fokker D.VII from Wingnut Wings
« Reply #120 on: February 14, 2013, 04:29:25 AM »
Hi, Ivo the work you have done on the wings looks fantastic to me.

i like models to have a used and lived in appearence, and thats just what your achieving. it all boils down to personal taste.

and i like your taste. :)

michael
“An ounce of action is worth a ton of theory.”

Offline uncletony

  • Hero Member
  • *****
  • Posts: 4350
    • Aircraft In Pixels
Re: LVA Fokker D.VII from Wingnut Wings
« Reply #121 on: February 14, 2013, 11:54:20 AM »
Thanks Bo and Mark,

Sure I have to do something with the fuselage. I don't know where to start though. On the wings it is relatively easy as the ribs give you some direction. But the fuselage behind the engine is almost flat, so there is not much to go on.

And light changes everything. My normal lamps, halogen lamps and daylight give an enormous changing effect.

regards,
Ivo

Use the principles of zenithal lighting. Pick an imaginary light source. Surfaces that are perpendicular and facing get the lightest highlights. Surfaces that are perpendicular and facing away, the darkest. Parallel surfaces are intermediate. And so on. Easy does it.


Offline IvotB

  • Sr. Member
  • ****
  • Posts: 426
Re: LVA Fokker D.VII from Wingnut Wings
« Reply #122 on: February 15, 2013, 09:30:26 AM »
I tried to put the light in front and let it shine along the fuselage. But there isn't much to go on. Just the top and bottom sides of the louvers might be the beginning of some weathered striping to the back. Further you see some gradual vertical bends along the fuselage where the vertical beams of the inside frame are. You see one just behind the cockpit, at the second half of the orange circle and under the tail. Perhaps just some weathering around the top and bottom corners will do the trick. I'll try to find some inspiration at other builds shown on this forum.


Beautiful detail of the forward covers by the way. It will keep the engine out of sight  ;)


Forgot to put the custom made Hier optillen decals on the wing tips before weathering. But they still went on ok. Just add some more Micro Set and they will be just fine. Now I wonder if I got the dutch text right, because at the LVA Sopwith Pup it says Hier oplichten.


regards,
Ivo

Offline mgunns

  • Hero Member
  • *****
  • Posts: 2255
Re: LVA Fokker D.VII from Wingnut Wings
« Reply #123 on: February 16, 2013, 03:26:25 AM »
Hello Ivo:

It is coming along nicely.  I was thinking, maybe just dry brush some "CDL" along the sharp edges of the fuselage, just to give it a big of a worn look.  Maybe dry brush some silver on the louvre area.  As to the Hier Optillen or Optlichten, who would notice? 

This will certainly be a strking model when completed with the big orange cockades.

Best

Mark
Mark

We few, we happy few.....

Offline IvotB

  • Sr. Member
  • ****
  • Posts: 426
Re: LVA Fokker D.VII from Wingnut Wings
« Reply #124 on: February 16, 2013, 05:57:03 AM »
As to the Hier Optillen or Optlichten, who would notice? 
I do. And that's what detailling does to you. You will be the only one that will know, but you notice it every time  ;). But I can let this one slip.

By the way "CDL", what does it mean?

regards,
Ivo

Offline Todd Holaday

  • Jr. Member
  • **
  • Posts: 87
Re: LVA Fokker D.VII from Wingnut Wings
« Reply #125 on: February 16, 2013, 06:20:49 AM »
"clear dope linen" I'm guessing.

Offline IvotB

  • Sr. Member
  • ****
  • Posts: 426
Re: LVA Fokker D.VII from Wingnut Wings
« Reply #126 on: February 16, 2013, 06:39:28 AM »
That makes sense.

Now I have to look for pictures for some proof.

Ivo

Offline kornbeef

  • Hero Member
  • *****
  • Posts: 961
  • U.K. Carpet monster genocide squad leader.
Re: LVA Fokker D.VII from Wingnut Wings
« Reply #127 on: February 16, 2013, 07:43:28 AM »
CDL??? I'd be pretty sure under that Dutch camo thered be loz fabric lurking. So don't over work it.  ;)  Nice work on the flying surfaces Ivo.


K
Never too old to learn sumfink noo

Offline IvotB

  • Sr. Member
  • ****
  • Posts: 426
Re: LVA Fokker D.VII from Wingnut Wings
« Reply #128 on: February 18, 2013, 10:24:09 AM »
I gave the fuselage some general weathering to match it more with the wings and let the cuff match with the collar. It is now drying under clear cote, so no pictures yet.

I couldn't resist building at the side of the WNW D.VII another D.VII in a different LVA scheme. The scheme with the oramge cockades was used in the LVA D.VII from 1919-1920, so it is a real postwar scheme and perhaps it doesn't belong here on this ww1 forum. The next scheme was with almost the cockades still in use in the Netherlands, although the orientation of the cockades is different on the wings. This scheme was used between 1920 and 1936 when the last D.VII went out of service. In the beginning the numbers were round like shown here and later on the lost this roundness and were painted more with square lettering. Also there were variations with propellors and engine cowlings, which were painted and sometimes were bare metal.

This kit had been waiting a long time in my stash and there must be better ones, but it is for my collection and still some work te be done (painting of cockpit edge and landing strut, rigging between landing gear and between fin and stabiliser):


regards,
Ivo

Offline IvotB

  • Sr. Member
  • ****
  • Posts: 426
Re: LVA Fokker D.VII from Wingnut Wings
« Reply #129 on: February 19, 2013, 09:44:49 AM »
Small update:

fitted the bottom wing including cover, fitted the undercarriage and added the rigging following to Des' method (its a first, but it's ok. It just needs some paint) with only turnbuckles below and mounted the Spandau MG's with the empty belt shutes.

The undercarriage may have to come off again as the glue doesn't seem to set. The undercarriage doesn't fall off and stays into place, but is very wobbly and let's the left wing drop a little. It can dry overnight after putting it with some supports in the correct position.


regards,
Ivo

Offline IvotB

  • Sr. Member
  • ****
  • Posts: 426
Re: LVA Fokker D.VII from Wingnut Wings
« Reply #130 on: February 20, 2013, 08:54:01 AM »
Put the landing gear straight today, but it is still not very steady on its feet.

Then I wanted to fit the upper wing. I first added the cabane struts and wing struts to the model and tried to align everything as much as possible. I used the parts B8 and B12 as the main guidance for the positioning of the upper wing as those parts are connected with at least 2 cabane struts to the fuselage and leave little room for false positiong. The third strut of those pieces were left unglued to be able to place and remove the forward side cowls. With a vernier caliper (?) I measured the exact positions in the upper wing and tried to apply the correct spacing between the upper connections of the cabane struts. Then I placed parts B4 and B5, carefully measuring and positioning. After that the wing struts were placed in line with the cabane struts as they all support the wing below the two girders of the wing.


Then I put some glue in the openings in the upper wing, placed it upside down and let all the struts fit into the upper wing. I found that there was too much glue in the openings for the 4 cabane strut connections, so I'll have to do some correction work there as it messed up the paint there.

But the wing fitted and it is an excellent and strong connection. Nothing wobbly here:


Earlier I tried some dry-brushing on the tires, but that wasn't a big success:


You can read Gothania and flugreifen 960 x 100, but there is too much paint around it, where it shouldn'belong.

Size difference in 1:72 and 1:32:


Another shot:


And yes, the forward side cowling can be placed and removed again. Just bend the forward cabane strut a little bit, slide the cowling with the appropriate hole over the strut and put it in the rigth place. It is more or less clamped. Here the upper cowling is still loose and needs some more room on top for the airpump.


regards,
Ivo

Offline Epeeman

  • Hero Member
  • *****
  • Posts: 1419
Re: LVA Fokker D.VII from Wingnut Wings
« Reply #131 on: February 21, 2013, 08:56:56 AM »
Getting ever closer now, Ivo ...............

I also ended up with a bit too much glue squeezing out of the wing struts and I did no better dry brushing on tyres either!

Regards

Dave
As we say in fencing, what's the point?

Offline uncletony

  • Hero Member
  • *****
  • Posts: 4350
    • Aircraft In Pixels
Re: LVA Fokker D.VII from Wingnut Wings
« Reply #132 on: February 21, 2013, 11:27:54 AM »
Looks great Ivo. I think the tire lettering can be easily enhanced with a little backfilling/retouch with the grey, and then a veeeery light pin wash, (like just 1 shade or 2 darker than the tires)

Cheers

Offline IvotB

  • Sr. Member
  • ****
  • Posts: 426
Re: LVA Fokker D.VII from Wingnut Wings
« Reply #133 on: February 21, 2013, 09:02:38 PM »
Bo,

I'd like to understand what you explained, here perhaps my understanding of english just isn't sufficient.

The first part is that you suggest to carefully paint with a small brush the items around the letters in the original tire color, without touching the letters. The second the pin wash isn't completely clear to me. You suggest I guess to put a wash (in small tiny quantities with a small brush) in such a way that the wash stays in between the letters, but doesn't shadow the whites on top? I could give that a try. The only problem I organised for myself is that I have almost completed the aircraft, so I'll have to find a way to support it on the side, while the pin wash dries on the tires. But I want to try, because with my unsuccesfull attempts of dry brushing I did discover what was written and I just liked how it looked on the model. On pictures if the real thing I have never seen anything written on the tires though.

I was also thinking of another technique which bears some resemblance to what you have been doing on your Albatros D.V. Meaning applying different coats of paint and carefully rubbing the top layer off again at some areas with steel wool.

What I am considering is painting the area with the texts white, give it ample time for drying and cover it with the tire color. Then carefully scraping of the paint on the letters, just removing the top coat of paint. It will be tricky because the letters aren't flat but curved around the tire.

I apply a similar technique on PE number plates for railway engines:


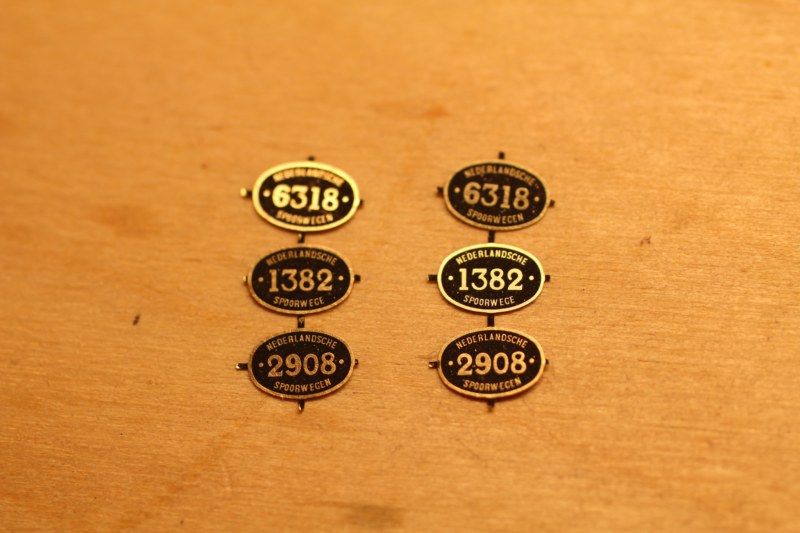
These are number plates for NS steam engines. They are about 4mm wide and 2mm high. Still you can read Nederlandsche above and Spoorwegen below the number. Here the producer forgot the "n" under Spoorwegen in the 1382 number plate, so he promised me a new set.

But these arrive as PE like this:


You then spray the number plates black and after it has dried there are at least 3 techniques to remove the paint from the numbers and letters. The most used is to sand it with waterproof sanding paper grade 1000, but that leaves tiny scrape marks. Another is to carefully scratch the plate with an Exacto knife perpendicular to the plate, but then sometimes you remove too much paint. What I like most is to moisten a small piece of paper with white spirit, put the plates face down on this paper and move them carefully with only the pressure of your finger over the wet paper. Then my first picture is the result.

regards,
Ivo
« Last Edit: February 21, 2013, 11:12:09 PM by IvotB »

Offline uncletony

  • Hero Member
  • *****
  • Posts: 4350
    • Aircraft In Pixels
Re: LVA Fokker D.VII from Wingnut Wings
« Reply #134 on: February 21, 2013, 10:38:52 PM »
That might work too :)

(I think you interpreted what I wrote correctly.)

Cheers