Author Topic: 1/32 BE2c  (Read 29454 times)

Offline RichieW

  • Hero Member
  • *****
  • Posts: 1966
Re: 1/32 BE2c
« Reply #105 on: November 17, 2022, 04:17:58 AM »
Thanks Fredrik, much appreciated from one of my favourite modellers!

Thanks, but you must have a very long list with all the fantastic modellers that show their work here... You can be on my list! 😃

I can see some differences between your struts and the real ones, but I would never think of it if I saw the finished model. So is it worth the extra work?!

Great looking tank and firewall!
/Fredrik

Thanks Fredrik, haha, I guess my favourite modellers are usually those who's work I am viewing at the time! There are certainly some crazily impressive skills shown on this forum. Much appreciate your comments on the struts, I think you are right. I need to move on and avoid stagnating.

Thanks as always Willem, hopefully as we gain experience and see long term scratch builders work their magic we will do more making and less experimenting. It certainly isn't a quick process at the moment.

Well there has been a little progress this week. I made the rudder from styrene sheet, the lip round the outside is just Mr Surfacer applied with a paintbrush. It might be too subtle to even notice but it is there. The rib tapes are just strips of decal sheet. Paints are MRP,  Toyota Supra prominence red,basic white and Oxford blue. Nice to see a splash of colour.

2022-11-16_05-12-36 by Richard Williams, on Flickr

I spent an eternity making my own propeller boss from washers, miniature hex nuts and sheer bloody mindedness. I actually had to make it twice because the first one had only 6 rather than 8 retaining bolts. Very frustrating!

Propeller boss by Richard Williams, on Flickr
A bit rough in brutal close up but good enough to the naked eye.


I made part of the tailplane from styrene rods and strips for the structure and 0.25mm sheet for the skin. I had intended to use 0.13mm sheet but was concerned about drilling holes in such thin plastic for rigging and control horns. Rib tapes are again white decal strips. I didn't take any progress shots but I have the other side and elevators to make so hopefully will remember then.

2022-11-16_05-12-19 by Richard Williams, on Flickr

Time is a bit limited for a while but hopefully I can keep ticking away at my own slow rate and have more to show you next time.

Thanks for dropping by
Richie


Offline KiwiZac

  • Global Moderator
  • Hero Member
  • *****
  • Posts: 2589
    • My Linktree
Re: 1/32 BE2c
« Reply #106 on: November 17, 2022, 06:04:38 AM »
Magic work Richie!

Offline lone modeller

  • Hero Member
  • *****
  • Posts: 5300
Re: 1/32 BE2c
« Reply #107 on: November 18, 2022, 05:37:23 AM »
Those control surfaces look the dog's b....cks! Super idea to make them translucent by using thin plastic sheet. Are you going to try the same idea with the wings?

Scratch building is a much slower process than kit building so do not fret if it seems to take forever....it probably will for a model in the gargantuan scale!

Stephen.

Offline DaveB

  • Hero Member
  • *****
  • Posts: 988
Re: 1/32 BE2c
« Reply #108 on: November 18, 2022, 08:47:44 PM »
One word, Richie -

Wow!!

Regards

Dave
As we say in fencing, what's the point!

Offline macsporran

  • Hero Member
  • *****
  • Posts: 1657
Re: 1/32 BE2c
« Reply #109 on: November 18, 2022, 09:08:45 PM »
Superb work, Richie.

One question - is it going to fly?
Sandy

Offline KiwiZac

  • Global Moderator
  • Hero Member
  • *****
  • Posts: 2589
    • My Linktree
Re: 1/32 BE2c
« Reply #110 on: November 19, 2022, 07:01:53 AM »
One question - when is it going to fly?
Fixed that for you  ;D

Offline RichieW

  • Hero Member
  • *****
  • Posts: 1966
Re: 1/32 BE2c
« Reply #111 on: November 19, 2022, 07:18:33 AM »
Chaps, thanks so much for your kind words, after so long in the model making wilderness you have no idea how much your generous feedback means to me!

Yes Stephen, the gargantuan scale is rather challenging. I thought it would be easier than the one true scale but how very wrong I was! I don't mind spending forever, I'm viewing each little piece as a separate kit. It's the only way to preserve sanity!

Superb work, Richie.

One question - is it going to fly?
Sandy

It might well do if things go horribly wrong Sandy!

One question - when is it going to fly?
Fixed that for you  ;D

That will be at the trying to fit the top wing stage Zac, the only BE2c monoplane to take to the air shortly before crashing into the wall!

I hope to finish all of the tail plane components in the next few days and have a trial fitting to the fuselage frame. So hopefully will have another update in a few days provided it doesn't become airborne shortly after a massive cock up!

Richie

Offline KiwiZac

  • Global Moderator
  • Hero Member
  • *****
  • Posts: 2589
    • My Linktree
Re: 1/32 BE2c
« Reply #112 on: November 20, 2022, 08:33:36 AM »
That will be at the trying to fit the top wing stage Zac, the only BE2c monoplane to take to the air shortly before crashing into the wall!
;D I'm sure it will be an unmitigated success and no such impromptu testing will be required!

Offline FAf

  • Hero Member
  • *****
  • Posts: 1057
Re: 1/32 BE2c
« Reply #113 on: November 20, 2022, 05:46:25 PM »
Looking great! I'm in absolute awe of your work!
/Fredrik

Offline RichieW

  • Hero Member
  • *****
  • Posts: 1966
Re: 1/32 BE2c
« Reply #114 on: November 26, 2022, 02:52:46 AM »
Looking great! I'm in absolute awe of your work!
/Fredrik

Ah Fredrik, that's so kind. You've just moved even higher up my list of favourite modellers! :D
It's a bit of a war of attrition for me, there are so many casualties for every step forward I take as my work is often messy and approximate while I learn how to make things as I will illustrate shortly!

Although I have not updated for a couple of weeks I have spent many hours working at this in that time with,as usual, very little to show for my efforts .I was so pleased with the propeller boss I showed last time but unfortunately I made a big measurement error so had to make another. This went quite smoothly as I had spent hours making one before. Again I used washers and punched discs of aluminium sheet. for the retaining bolts I used my hex punch and die set which I had completely forgotten about. All the parts were just positioned by eye with no measuring and stuck with extra thin CA. The new one is on the left, it will do, I am pleased!

BE2c Prop boss by Richard Williams, on Flickr

Next up I had to make the rest of the tail feathers. The ribs were cut on my cricut cutting machine, lined up with the plan and glued with B7000 glue. I also use this glue for skinning as it gives me working time and clumsy smudges can be cleaned up with Mr levelling thinner.

Tailplane under construction. by Richard Williams, on Flickr

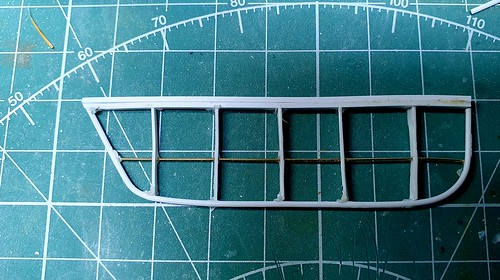
So far so good, now onto the elevators. I tried using the cricut again but it was not able to produce the accuracy I wanted so I had to try old school model making.  Using my beloved precision ruler (thanks for the recommendation Willem!) I marked out little rectangles with drilling points. Not so bad.

BE2c elevator by Richard Williams, on Flickr

The central hole is for a spar the other is simply to help line things up so I could thread the pieces ontp brass rod before block filing them into shape.

BE2c elevator by Richard Williams, on Flickr

A 1x1.5mm styrene strip was tacked onto an engineering square with CA gel and taped to the plan, the ribs were slid into place and glued.

20221124_205453 by Richard Williams, on Flickr

All going well so far. Styrene rod was bent into shape and glued making sure to keep everything square. The idea is file down the trailing edge later.

BE2c elevator by Richard Williams, on Flickr

Sadly whilst filing the trailing edge I managed to wrestle everything out of square, bend some of the ribs and the observant of you will have noticed that I missed out a rib. Arghhhhh!

elevator by Richard Williams, on Flickr

Another lot of styrene casualties for no forward movement. The upside is that I actually had great fun messing about with it and learned a lot about scratch building and the importance of patience. I will have another bash at it over the weekend, I have a cunning plan! ;)

Thanks for dropping by
Richie


Offline KiwiZac

  • Global Moderator
  • Hero Member
  • *****
  • Posts: 2589
    • My Linktree
Re: 1/32 BE2c
« Reply #115 on: November 26, 2022, 06:46:04 AM »
I actually had great fun messing about with it and learned a lot about scratch building and the importance of patience.
That sounds like a productive time to me!

Offline lone modeller

  • Hero Member
  • *****
  • Posts: 5300
Re: 1/32 BE2c
« Reply #116 on: November 26, 2022, 09:19:33 AM »
Good to see the current progress Richie. The new hub looks just as good as the old one - just a different size!

The tail surfaces are excellent - getting the translucent look is very difficult, (so difficult in fact I do not bother), and your method of making the ribs is a good one - at least they will all look the same. One problem with working with small pieces like them is that they are fragile - but you will soon learn how to get around that particular problem.

Stephen.

Offline RichieW

  • Hero Member
  • *****
  • Posts: 1966
Re: 1/32 BE2c
« Reply #117 on: November 27, 2022, 06:00:58 AM »
Many thanks Zac and Stephen. Yes Zac having fun and learning new things about the hobby is definitely productive, I like the spin you put on it. I shall make that my motto!

Well I have persevered today and had another bash at making an elevator. I followed the same process as last time but used 0.5mm styrene rod for the outer edges. I figured that the thicker rod I used last time was attempted to return to its original shape and being thicker pulled everything out of shape. I also bent the required shape well in advance this time. Again, not a huge amount to show for my time but there have many distractions. First the postman delivered this;


20221126_112441 by Richard Williams, on Flickr


I preordered whilst drunk on my birthday last January, all very exciting but not sure when I will ever have time to build it or space to display it. It really does look good though!


Despite this and cooking a batch of meals to deliver to my elderly folks tomorrow I think I finally won this particular round.


20221126_190454 by Richard Williams, on Flickr


Using such thin styrene rod for the trailing edge is a delicate business but once skinned the part sems robust enough to withstand the fettling and refining that will follow so I am chuffed with the outcome. It lines up pretty well with the plan and won't require a lot of work.


20221126_190325 by Richard Williams, on Flickr


Another bonus of making the internal structure is that I am spared the tedium of embossing the ribs on the skin and fiddling about to get the right alignment. Running a cotton bud over the surface produced the surface texture so quickly and easily. I think I would do things this way even if I was building a non translucent aircraft.


I'm off to drool over the newly arrived Airfix plastic and have a beer. Have a good weekend everybody.


Richie


Offline KiwiZac

  • Global Moderator
  • Hero Member
  • *****
  • Posts: 2589
    • My Linktree
Re: 1/32 BE2c
« Reply #118 on: November 27, 2022, 08:17:12 AM »
I like the spin you put on it. I shall make that my motto!
Always happy to help spin things for the better!
 
20221126_112441 by Richard Williams, on Flickr
Never mind, I hate you now!  ;) There aren't sufficient words to project my envy. I hope you share the build here!

Offline lone modeller

  • Hero Member
  • *****
  • Posts: 5300
Re: 1/32 BE2c
« Reply #119 on: November 28, 2022, 07:04:38 AM »
That is a serious distraction Richie: I note that you were drunk when you ordered it! Hopefully it will not get in the way of real modelling!!

The elevators look super, especially the way the ribs stick up through the plastic skin. If the rest of your model is as good as this it will be an outright winner.

Stephen.