Author Topic: 1/72 Morane Saulnier Type L Parasol  (Read 3983 times)

Offline RAGIII

  • Hero Member
  • *****
  • Posts: 18847
Re: 1/72 Morane Saulnier Type L Parasol
« Reply #15 on: June 07, 2021, 05:17:35 AM »
Your interior and fuselage look great all closed up. The wings also are looking Fantastic.
RAGIII
"A man has to know his limitations": Harry Callahan

"Don't slop it on" Lynda Geisler

Offline RichieW

  • Hero Member
  • *****
  • Posts: 1966
Re: 1/72 Morane Saulnier Type L Parasol
« Reply #16 on: June 07, 2021, 07:43:36 AM »
I am in awe of how quickly and smoothly this appears to be going Stephen. After nearly a year I still haven't got any external surfaces on my Scout, there's no substitute for years of experience and the knowledge it gives.

On another subject I joined IPMS, you may recognise a Sopwith Triplane in Cher Ami soon. 😀
Richie

Offline kensar

  • Hero Member
  • *****
  • Posts: 2505
  • Reshaping the world - one piece at a time.
Re: 1/72 Morane Saulnier Type L Parasol
« Reply #17 on: June 07, 2021, 09:51:53 AM »
Great progress, Stephen.  This is coming together quickly.  I like the interior details - sharp and crisp looking.

Offline Alexis

  • Hero Member
  • *****
  • Posts: 7947
  • Love the self
Re: 1/72 Morane Saulnier Type L Parasol
« Reply #18 on: June 11, 2021, 10:33:34 PM »
Fantastic work on getting the halves button up and the top wing , looking forward on seeing her in her livery  :)


Alexis
Hurra ! , Ich Leben Noch
Body and life is a vessel we use to travel the planet . Femininity is the gift , The miracle comes from what we do with it .

Offline Monty

  • Hero Member
  • *****
  • Posts: 1643
Re: 1/72 Morane Saulnier Type L Parasol
« Reply #19 on: June 12, 2021, 03:05:29 AM »
This is looking brilliant, Stephen! Such amazing work and everything so neatly done... Just lovely! To me, a really appealing subject, can't wait to see the progress... Regards, Marc.

Offline lone modeller

  • Hero Member
  • *****
  • Posts: 5322
Re: 1/72 Morane Saulnier Type L Parasol
« Reply #20 on: June 14, 2021, 06:53:33 AM »
Evening All,

Thank you Rick, Richie, Ken, Alexis and Marc for leaving your supportive comments - they are as always much appreciated.

I have painted the main parts of the model. I used Humbrol 103, (clear doped linen), mixed with white for the fuselage and flying surfaces, and Humbrol black for the cowling and stripes on the fuselage. I added some 10 x 20 thou strip with the corners rounded with a file to make the frame on the front of the fuselage behind the cowling. The wood was Revell 382, as was the propellor which I found in the spares box: I had made one for another model and reduced it in size to fit this one.

The national markings were Humbrol white, red (60) and blue (25) mixed with white. I scribe a circle the diameter of the roundel using a pair of dividers on to the surface I wish to paint. I apply two or three thin coats of white to the circle - the paint is taken to the edge of the circle but not allowed to run into the groove. I then scribe two more circles into the white paint and apply the red and blue - this time the paint is allowed to run into the groove and a nice clean edge results (provided that my hand does not move when I am painting). I rest my and on the desk when painting like this and I use an eye loupe (magnifying lens) on my glasses. The roundels are of the Royal Naval Air Service prior to mid -1916: I have not added a serial as I do not have suitable transfers so this will be a generic representative model.


Next I intend to complete the assembly and final details - undercarriage, wing plus struts, engine etc.

Thanks for looking.

Stephen.


Offline Early Bird Fan

  • Sr. Member
  • ****
  • Posts: 261
Re: 1/72 Morane Saulnier Type L Parasol
« Reply #21 on: June 14, 2021, 07:57:28 AM »
another incredible build, the paint job looks great and the roundels are superb

Offline Alexis

  • Hero Member
  • *****
  • Posts: 7947
  • Love the self
Re: 1/72 Morane Saulnier Type L Parasol
« Reply #22 on: June 14, 2021, 11:59:30 AM »
 :) :) :)


Alexis
Hurra ! , Ich Leben Noch
Body and life is a vessel we use to travel the planet . Femininity is the gift , The miracle comes from what we do with it .

Offline DaveB

  • Hero Member
  • *****
  • Posts: 1009
Re: 1/72 Morane Saulnier Type L Parasol
« Reply #23 on: June 14, 2021, 10:06:10 PM »
Excellent progress, Steve -

Looking great

Regards

Dave
As we say in fencing, what's the point!

Offline RichieW

  • Hero Member
  • *****
  • Posts: 1966
Re: 1/72 Morane Saulnier Type L Parasol
« Reply #24 on: June 14, 2021, 10:19:49 PM »
Lovely paintwork, all done with a hairy stick I believe! That CDL colour is really beautiful and I like your roundel painting method. Very old school and works perfectly.

Richie

Offline RAGIII

  • Hero Member
  • *****
  • Posts: 18847
Re: 1/72 Morane Saulnier Type L Parasol
« Reply #25 on: June 15, 2021, 12:32:02 AM »
Incredible paint work, especially the roundels! Looking Awesome!
RAGIII
"A man has to know his limitations": Harry Callahan

"Don't slop it on" Lynda Geisler

Bughunter

  • Guest
Re: 1/72 Morane Saulnier Type L Parasol
« Reply #26 on: June 15, 2021, 05:05:13 AM »
That is a very nice painting on this Parasol Stephen!
You have done an incredible paint job, also on the roundels in God's own scale, and that without machines like my electronic cutting plotter!
It looks so nice because your perfect job with some slight imperfections - as the real cockades are also hand painted in field at that time.

This will be again a nice model in your collection!

Cheers,
Frank

Offline kensar

  • Hero Member
  • *****
  • Posts: 2505
  • Reshaping the world - one piece at a time.
Re: 1/72 Morane Saulnier Type L Parasol
« Reply #27 on: June 15, 2021, 09:35:27 PM »
Coming along nicely, Stephen.  This will be an awesome little model.
One question, did the cowling not have fairings on the sides of the fuselage?


Offline Rookie

  • Hero Member
  • *****
  • Posts: 927
  • No guts, no glory...
Re: 1/72 Morane Saulnier Type L Parasol
« Reply #28 on: June 17, 2021, 06:01:42 PM »
Nice to see you're making so much progress Stephen!

It's really looking good!

Willem

Offline lone modeller

  • Hero Member
  • *****
  • Posts: 5322
Re: 1/72 Morane Saulnier Type L Parasol
« Reply #29 on: June 21, 2021, 09:32:32 PM »
Evening All,

Thank you EBF, Alexis, Dave, Richie, Rick, Frank, Ken and Willem for you kind remarks - they are all much appreciated.

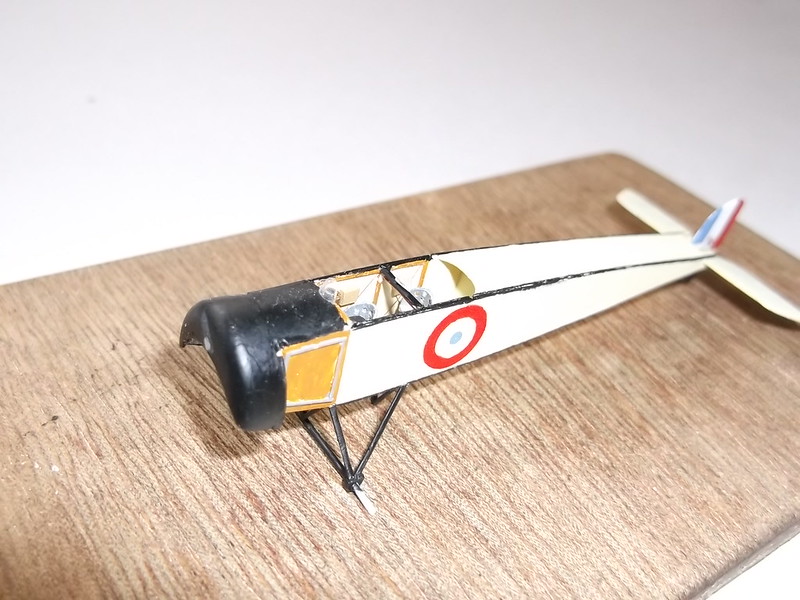
Ken: there were no fairings fitted to the rear of the cowlings on many of the L parasols according to the photographs that I have seen. It does seem to have been an omission from an aerodynamic point of view, but the wooden sides to the fuselage and the raised strip on it are quite clear both on the photos and the drawings that I am using.

The first step was to fit the undercarriage. The tail skid assembly looks complicated but in reality it is 4 outer support struts with a central post on which the skid was mounted. The purpose of the outer struts was to keep the skid rigid. Similarly the main undercarriage legs were simple to make and assemble - I used 30 thou rod, (which is probably a little over scale but needed for strength), with plastic rod for the axle. The V struts for the bracing wires were also made from plastic rod and the undercarriage assemblies were painted after fixing in place:


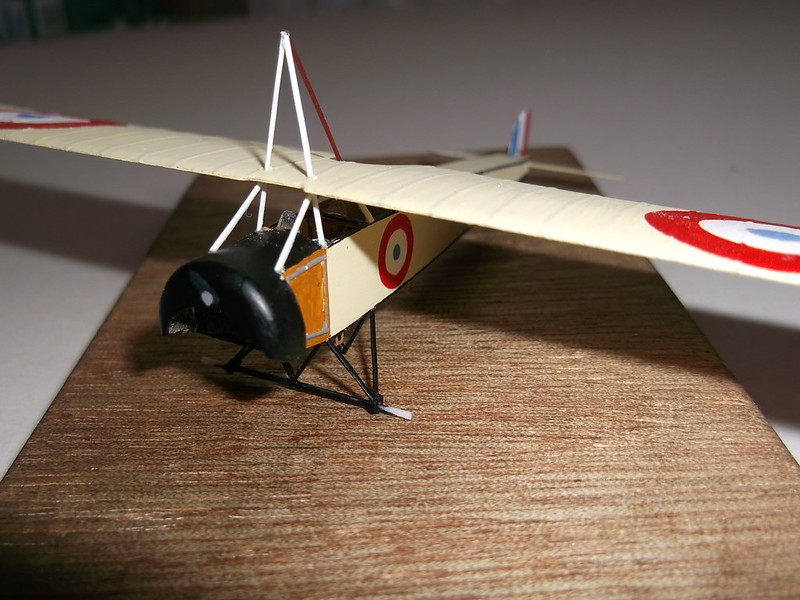
Once it was on its legs I could finish the details in the cockpit and add the windscreens for the pilot and observer. They were cut and shaped from clear acetate. To fix the wing I drilled two holes where the main struts passed through and then enlarged them a little with the end of a round file. The struts were shaped from 20 x 30 thou Evergreen strip which had been filed to remove the corners. After several attempts to get everything correctly aligned I cut the rear struts and cemented these to the sides of the cockpit. The main struts were threaded through the holes in the wing and cemented at the top and where they join the wing. While the cement was still wet I lowered the wing/strut assembly so the the main struts were on the fuselage sides and the rear struts fixed against the rear of the wing. This was set aside to harden properly.


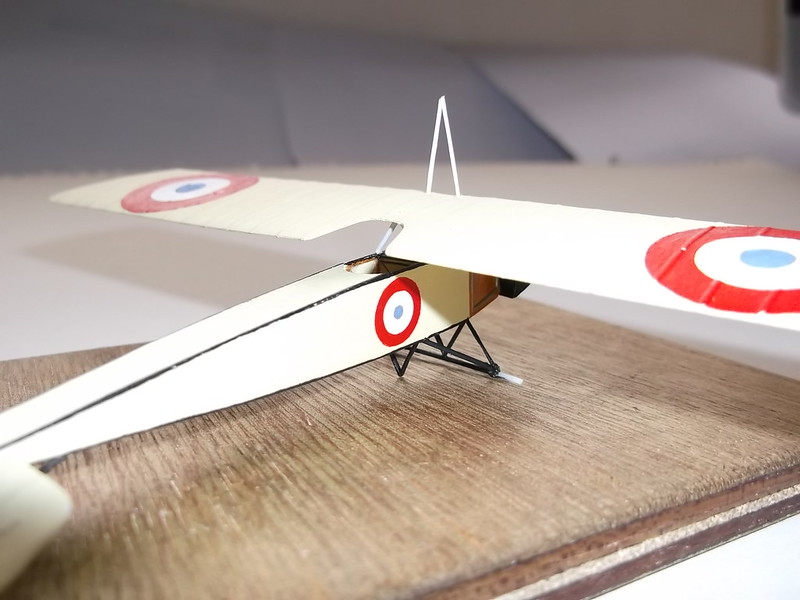
When the above had set properly it was a simple task to add the reinforcing front struts:

[

All that remains now is to paint the struts, rigging and add the wheels and propellor.

Thanks for looking.

Stephen.